| marp | title | theme | class | paginate | ||
|---|---|---|---|---|---|---|
true |
Your Hackathon Survival Kit |
gaia |
|
true |
womenplusplus.github.io/hackathon-survival-kit
Chris Gwilliams https://github.com/encima
-
Have you never been to a hackathon before? Afraid of what to expect, what is expected of you or that you do not have experience.
-
SHUT THAT VOICE UP. Anyone, and I mean anyone, should feel welcome at a hackathon.
- But, if you want to contribute and you do not have such a technical background, then this workshop can help you hit the ground running.

- What right do I have to
mansplainthe basics of a field that was originally dominated by women?
- Well...none
- But I taught these things to myself before, during and after university
- And I have been teaching since I was 21
I love: teaching, tech and professionalism I hate: memes, GIFs, awkward humour and pizza

And I am a huge hypocrite
- The right tool for the job is...
- The one(s) you know
- As much as you may love the project, you will likely stop after Sunday; leave it in a usable state
- Team work makes the dream work
- Production ready does not exist in a hackathon
- Never underestimate the pitch
- Never assume your audience
- i.e. They will know what an API is
- Check in with your team often
- Shut off when you need to
- Individually and as a team
- Not all time needs to be spent coding
- Code Editor - VS Code, Atom, Sublime Text
- Git
- Tasks:
- Github Projects
- Asana, Todoist, Trello
- Git GUI:
- SourceTree
- Github for Desktop
- Git-cola
- Ungit
- The Command Line
- Git
- Github/Gitlab/Bitbucket etc
- Web Development Introduction

There is none! Ask if you need help, pee when you want and scream when you are frustrated.
First, the command line, also known as:
- Terminal
- Bash
- Shell
- Cmd
- Command Prompt
- Console
- Barry (ok, not this one)
Before we had the magic of windows and Graphical User Interfaces, we had to do things the old way... with words on a pleasant black screen with green font.

You can! Git has some pretty sweet Desktop applications.
some things are just quicker in a terminal

Win+R Type cmd
Command Prompt
Terminal
Ctrl+Alt+T
Terminal
Microsoft recently launched WSL (Windows Subsystem for Linux). This is a huge step that allows Windows 10 users to run Linux inside their Windows OS.
This workshop supports both Linux and Windows but, to make things easy, WSL makes life so so so much easier.
If you are running Windows 10, click here to get set up.
(NOTE: If enough of the workshop wants to set this up, then we will take a 15 minute break to do it all together)
$__
The prompt is the part of the terminal that is just sitting and waiting for your input.
Before we give it some, we should know where we are!
$ pwd
/home/encima/
pwd - present working directory, this is where you are right now
Normall, this is your HOME directory:
- Linux: /home/USERNAME
- Mac: /Users/USERNAME
(NOTE: In Windows, it is cd)
Almost all of the world uses / to show a difference in path names
BUT
if you are a Windows User (using command prompt), then you must remember to use \
cd /Users/patty/Documents
ls
mkdir new_folder
The ~ symbol is a shortcut for your HOME and you can always use:
cd ~ to go back there.
Also: $HOME/Downloads means /home/you/Downloads

Commands like ls and cd are built-in commands, this means that we can use them in the shell without needing to install anything
We can give them arguments to change their default behaviour.
ls -ahl
a = all (show me hidden files and folders, please) h = human readable (I am not a machine!) l = long listing format (Give me all the details!)

1 Change the directory to your home directory 2 Create a new folder called 'newDir' 3 Change into that directory 4 List the contents 5 Now list all the contents (showing all hidden files)
What is in there? What do you think they mean?
touch myfile.txt
rm myfile.txt
rm -r myfolder
- Notice how these things run with no confirmation or anything?
- This little black screen has the power to make...or break your computer
- Always double check what you type
- NEVER run a script from the internet or from someone you do not know

- eat all the sweets
- paint your own room
- destroy your own furniture
- Let you open the medicine cupboard
- Let you paint the lounge
To do the things Grandma won't let you do, you must become Grandma
Everything outside of your home directory can contain important data.
Every folder at the root / level is protected and you cannot touch it.
To do these protected things:
- Modify system files
- Install programs
- Start and stop services
You must be an admin. Usually, in Linux, your account has admin rights but is stopped from doing these things by default.
In Linux, we call an Admin: superuser
The default superuser account is: root
Try running:
hostname barry
What happens? Why?
To run this command, you have 2 options:
- 1
su - 2
sudo
SU = SUPERUSER
Typing this command will log you in as the root user on your system and give you full rights to everything.
It is NOT recommended.
SUDO = SUPERUSER DO
sudo hostname barry
SUDO asks your machine to run the command you like as the root user and then switch back to your user once it is done.
USE THIS METHOD
- History - your shell knows what you ran before:
use the up and down keys to move through your history of commands - Completion - files and folders can be long
use the TAB key to autocomplete commands and file paths - this is CASE SENSITIVE - SEARCH - For things you ran a long time ago
press CTRL+r to start a search and type what you are looking for, you will be shown matching results as you type

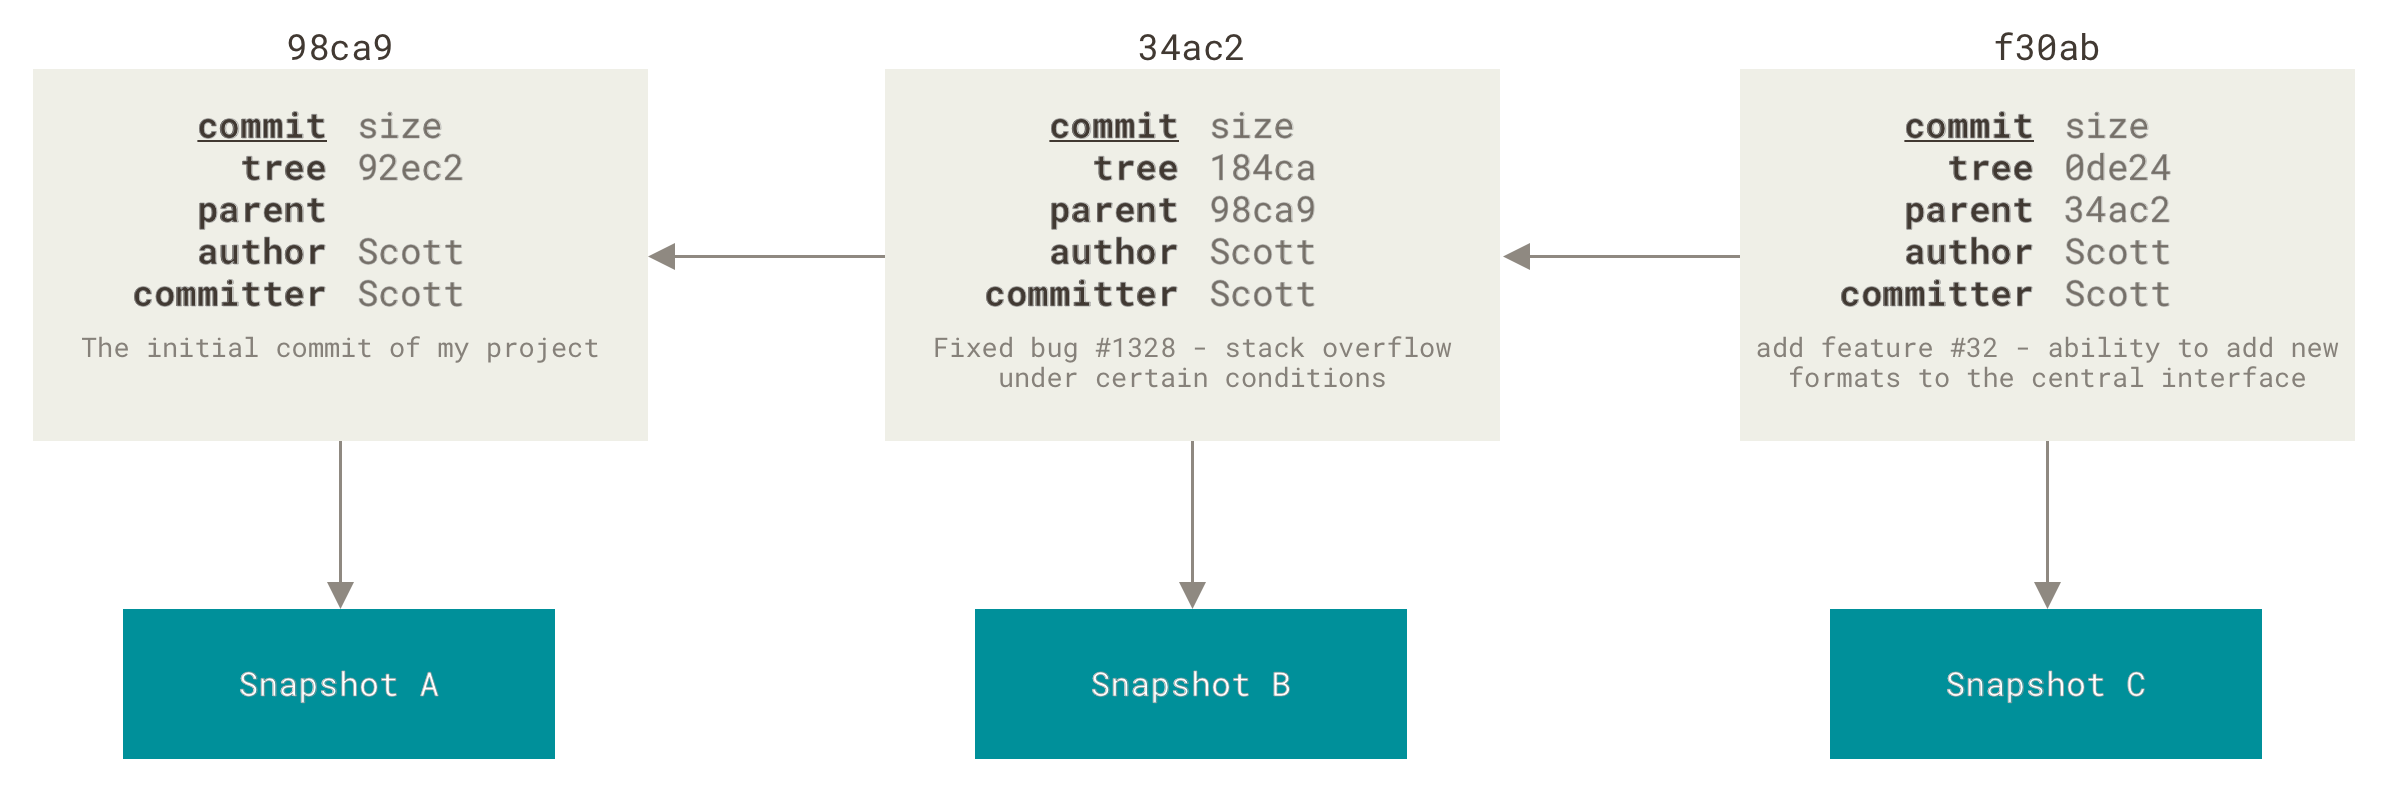
A Version Control System (VCS) that allows you to store files and access their history at different points in time
TL;DR: A manual Dropbox that stops you from making:
- doc1.docx
- doc1_final.docx
- doc1_final_FINAL_revised.docx
- doc1_final_I_will_kill_you_all.docx
- Linux:
apt/yum install git - OSX:
brew install git
- Git - A version control system that manages your files
- Repository - Git tracks changes down to the line, so it would not be fun to use it for your whole hard drive A repository is a folder that contains all of your code (it can contain subfolders). Think of a repository as a project. Each repo is a new project.
- Init - Init initialises a git repo inside the directory you are currently in. Basically, it creates a hidden
.gitfolder in that directory
- Add - Use this command to add files to your repository. By default, git will track nothing until you add some files.
- Commit - A commit is a specific point in time that you want to track. Git is a manual tool, so you tell it when you have done something important

- 1 Create a new directory called
git_some - 2 Cd into that directory
- 3 Run
git init - 4 Create a new file called
testing123.txt - 5 Run
git add testing123.txt - 6 Run
git commit -m 'Initial commit'
Not too hard, right? Git is like a snapshot tool on your machine. It can monitor repositories and store all the changes. When you want to go back, git will do it for you.
Commits - Notice that we used the -m argument here? ALWAYS do this! Every commit should have a message with it and that message should be:
- Clear
- Informative
- Short
Every time you create a commit, git will create a unique ID for it.
We can see that by running git log
- 1 Let's add a file
testing234.txt - 2 Now add it to git
- 3 And a new file called
dont_you.txt - 4 Now commit it with the message
add new test files - 5 Whoa now! Did we mess up?
- We can check if we messed up by seeing the status of our repo, with
git status - We see
dont_you.txtis an untracked file! But we don't want to make a whole new commit, do we? git commit --amendto the rescue!- Amend a commit removes all the files you added to git in the last commit and allow you to make a new commit'
git add dont_you.txtgit commit --amend
Git will open up a text editor showing some information about your commit in the terminal, you can change the message to forget about me and close the editor (with Ctrl-X usually)
Run git log and see that change!
So, you accidentally added a file to git, like passwords.txt and realised you don't want it? OK:
git rm passwords.txt
But wait, I wanted to keep a copy on my machine! I need it!
git rm --cached passwords.txt
Git keeps a history of everything you do, and it gives you some tools to change that history. The two we would use most often are revert and reset
We can summarise their differences simply:
revertmodifies the log to show you messed up (i.e. real history)resetremoves your mess ups from the log completely (i.e. propaganda)
Sometimes you may want to try something a bit...crazy (like at a hackathon). Maybe it does not work out, but you still want your efforts preserved. Here we use revert

- 1 Create a new repo called
reversion - 2 Add some files and create an initial commit
- 3 Now create some files with stupid names and create a second commit
- 4 Use git log to find your second commit ID
- 5 Run
git revert <ID>
What changed? What does git log say now?
Reset is a bit different and will not just undo the commit you specify but it will roll your whole repository back to that point in time.

- 1 Create a new repo called
reset - 2 Add some files as usual and commit.
- 3 Now create a few extra commits with files named 2,3,4,5
- 4 Find the ID of your second commit
- 5 Run
git reset --hard <ID>
What changed? What does git log show? Where are the other commits?

We used --hard when running git reset, what does it mean? And what are the differences between --hard, --soft and --mixed?
This is beyond the scope of this workshop but understanding the way git works makes all of these commands a lot easier to use!
Aside from having a questionable name, this is the default branch that git makes for you.
You can think of a branch as a list of commits, running git log will show you that list for the branch you are on...
Git is designed to be a tool for working with others. Working with others is hard. Git tries to solve this with branches. Each time you want to work on something, you can create a new branch:
git branch <new_branch_name>
git checkout <new_branch_name>
That command will split your repository from the latest commit and all of your new commits will be stored in a new list. Done with the new thing you wanted to do?
git checkout master
git merge <new_branch_name>

You will see this word a lot when using git.
HEAD is basically the tip of where you are right now, it is a pointer to a particular branch.
By default, the HEAD is always the latest commit of the master branch but, when you checkout a new branch, HEAD will now point to the latest commit of new_branch
Git is a great tool for backups, but it is not so useful when you are only backing up onto one machine. For this, we need an external place (or multiple) to store your repos.
We have quite a few options.
- 1 Github
- 2 Gitlab
- 3 Bitbucket
Now, we need to:
- 1 Create accounts
- 2 Create a repository
- 3 Copy the url of the repository and tell git/your machine about it
git remote add origin <URL>
NOTE Origin is the normal name chosen, but you can choose anything and even have more than one remote endpoint
Pushing is the act of pushing the code from your machine to the remote server. It is as easy as:
git push origin master
Maybe your dog is also using the repository and they added a cool new pic of them running in a field. But they pushed it to the server, how do you get it now?!?!!?!
git pull origin master
- ALWAYS commit your changes
- ALWAYS pull before you push
First, in order to push things to and from a remote repository, the remote needs to know that it is you.
Really, there is only one way of doing it, with SSH keys.
This is basically a secure key created for your device that allows you to connect to the remote server.
- 1
ssh-keygen - 2 Choose all the defaults (press ENTER)
- 3 Copy the contents of the created file:
cat ~/.ssh/id_rsa.pub - 4 Go to github.com and click on your profile->settings->SSH and GPG Keys
- 5 Copy the file contents into the big text box and save
- 6 Now you can
pushandpullwith no problems!
Merging and merge conflicts
It is unlikely that you will use branches at a hackathon (but not impossible), but merge conflicts can also occur on the same branch. Consider this:
- You write some code that prints something to the screen
- A team member does the same thing, in a different way
- They push their code first
- You commit and pull remote changes before you push your new work
- MERGE CONFLICT Your work and their work are in the same place and git has no idea what to do, so you must fix it...
<<<<<<< HEAD
console.log('HELP ME');

=======

function print(msg) {
    console.log(msg);
}
print('HELP ME');
>>>>>>> Team member's commit
- The file clearly shows where the issues are and you can choose to remove their code, your code or manually merge it.
- Once you do, add the file to git and commit, explaining your changes
- PROFIT
OK, now is the time for a big final exercise. Whatever time we have left, we will make a simple webpage using Git and then putting it online using Github.
If we run out of time, your homework will be to go through the code in the repository and modify it to suit your neds.
- CLI
- Git
- Github
- Web Things!
- Well, Frontend web things
- HTML
- Hyper Text Markup Language
- CSS
- Cascading Style Sheets
- JS
- JavaScript

- WTFYW
- Family Friendly: WWFY
<!doctype html>
<html lang="en">
<head>
  <meta charset="utf-8">
  <title>Hacker Profile</title>
  <meta name="description" content="Survival Kit">
  <meta name="author" content="encima">

  <link rel="stylesheet" href="css/styles.css?v=1.0">
</head>
<body>
  <script src="js/scripts.js"></script>
</body>
</html>

-
- Create a new directory for your website
-
- CD into it and create a new git repository
-
- Create a new file called
index.html
- Create a new file called
-
- Copy the code from the above slide into it
-
- Go to github and create a new repository (called
about-me)
- Go to github and create a new repository (called
-
- Go to the settings of the repository and scroll down to
Github Pages
- Go to the settings of the repository and scroll down to
-
- Enable it for the
masterbranch
- Enable it for the
-
- Copy the URL and perform the command to add it as a
remote
- Copy the URL and perform the command to add it as a
-
- Edit the file to show some information about you
-
- Create
imgandcssfolders
- Create
-
- Add a picture of you to the folder (if you are happy for it to be public)
body { //element
    background:blue;
    color:white;
    text-align:center;
    margin: 0 auto;
}

.centred { //class
    margin-left: auto;
    margin-right: auto;
    display:block;
}
- 12 Copy the
site/css/styles.cssfile into your repository. - 13 Play around!
- 14 Edit it and go wild.
- 15 Commit and push all changes
- 16 Open a browser and go to:
https://<USERNAME>.github.io/profile

- Help
- All Docs
- Web Docs
- [Community] (https://www.reddit.com/r/learnprogramming/)
- [Learning/Resources] (https://github.com/mike-north/awesome-learn-to-code)
Spread the word, bring your friends