First of all, I would like to give you a thumbs up 👍🏻 for choosing to contribute to the open source community. Also, thank you very much for choosing to participate in the VisActor community and contribute to this open source project.
The VisActor team usually develops and maintains issues on GitHub. Please open the GitHub website, click the Sign up button in the upper right corner, register your own account, and take the first step in your open source journey.
If you cannot open the Github site due to special circumstances, please inform us and proceed with project development through Gitee.
In the VChart repository, we have a guide for all open source contributors on versioning, branching, and more. Please take a few minutes to read about it .
Git is a version control system used to track and manage code changes in software development projects. It helps developers record and manage the history of code, facilitating team collaboration, code version control, merging code, and other operations. With Git, you can track each version of each file and easily switch and compare between different versions. Git also provides branch management functionality, allowing for multiple parallel development tasks to be performed simultaneously.
- Visit the official Git website: https://git-scm.com
- Download the latest version of the Git installer.
- Run the downloaded installation program and follow the prompts of the installation wizard to install.
- After the installation is complete, you can use the Command Line command
git versionto confirm the installation is successful.
- First, you need to fork this project, enter the VChart project page, and click the Fork button in the upper right corner

- The project Your_Github_Username/vchart will appear in your GitHub account
- Use the following command on your local computer: Get a VChart folder
// ssh
git clone [email protected]:Your_Github_Username/VChart.git
// https
git clone https://github.com/Your_Github_Username/VChart.git
- Go to the VChart folder and add the remote address of the VChart
git remote add upstream https://github.com/VisActor/VChart.git
- Get the latest source code of VChart
git pull upstream develop
- Okay, now we can start contributing our code. The default branch of VChart is the develop branch. Whether it's feature development, bug fixing, or documentation writing, please create a new branch and merge it into the develop branch. Use the following code to create a branch:
// Create a feature development branch
git checkout -b feat/xxxx

// Create a issue-fix development branch
git checkout -b fix/xxxx

// Create documentation and demo branches
git checkout -b docs/add-funnel-demo
Suppose we create a document modification branch docs/add-fund-demo
-
Now we can change the code on the branch
-
Assuming we have added some code and submitted it to the codebase
-
Git commit -a -m "docs: add custom funnel demo and related docs". The commit information of VisActor follows the Conventional Commitsspecification
<type>[optional scope]: <description>- The commonly used
typesinclude docs (document, log modification), feat (new feature), fix (problem repair), refactor (Code Refactoring), etc. Please choose according to the actual situation. - Please write a brief and accurate description in English.
- Before submitting the commit, we will perform a commit lint check, you can check the rules
- A common issue is that remote upstream (@visactor/vchart) has new updates, which can cause conflicts when we submit Pull Requests. Therefore, we can merge the commits of other remote developers with ours before submitting. Use the following code to switch to the develop branch.
git checkout develop
- Use the following code to pull out the latest remote code:
git pull upstream develop
- Switch back to your own development branch.
git checkout docs/add-funnel-demo
- Merge the develop commit into your own branch.
git rebase develop
- Submit the updated code to your own branch.
git push origin docs/add-funnel-demo
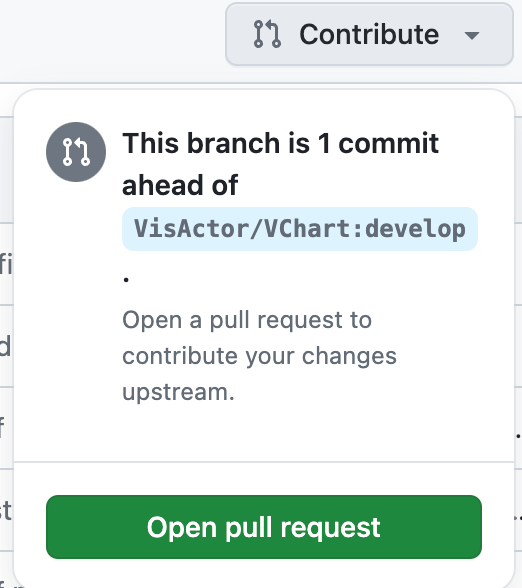
You can click the Compare & Pull Request button on your GitHub repository page.

Or create via the contribute button:
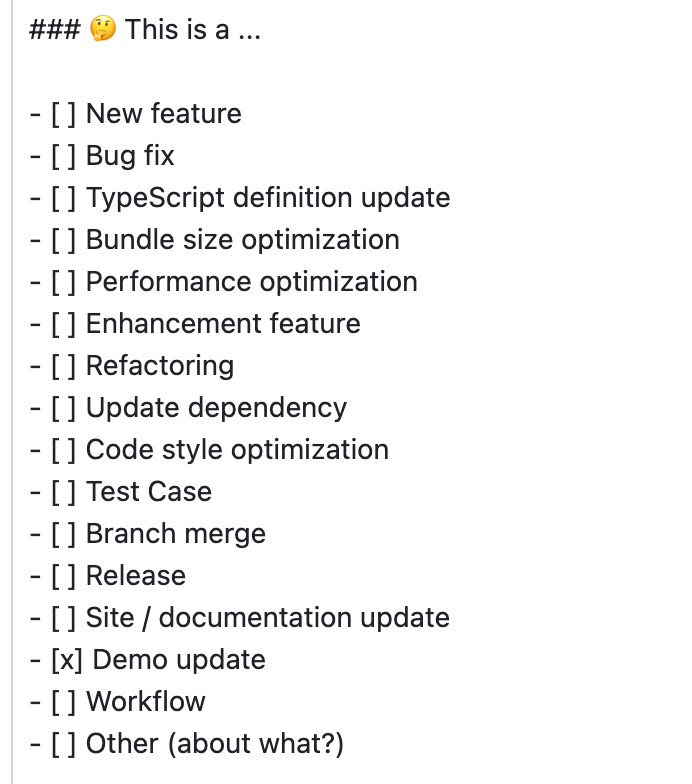
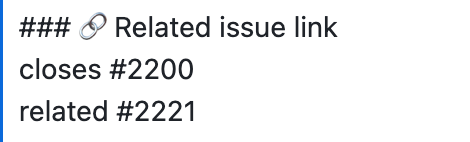
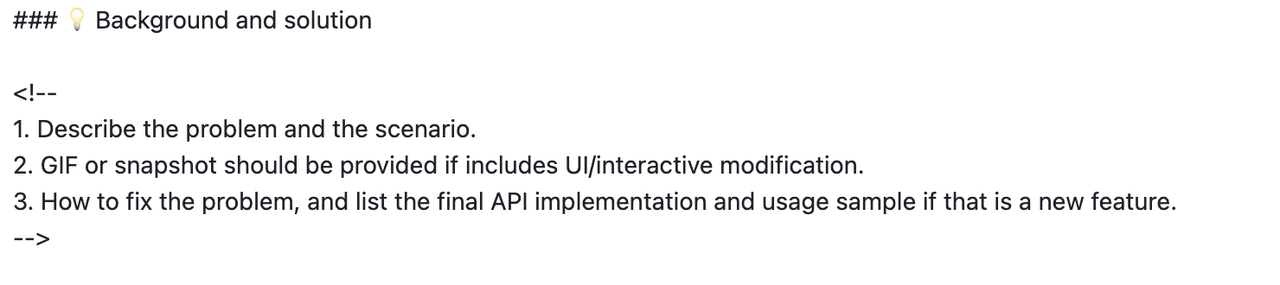
Fill in the submitted modification content according to the template.
- Check what type of modification this is
- Fill in the associated issue
- If there are complex changes, please explain the background and solution
After filling in the relevant information, click Create pull request to submit.
" Good first issue " is a common hashtag in the open source community, and the purpose of this hashtag is to help new contributors find problems that are suitable for beginners.
VChart beginner questions, you can view through the issues list, currently includes two categories:
- Demo case production
- Simple feature development
If you currently have time and willingness to participate in community contributions, you can take a look at the good first issue in the issue and choose a claim that is interested and suitable for yourself.
I believe you must be a colleague who has a beginning and an end. Therefore, when you understand and decide to claim an issue, please leave a message under the issue to inform everyone.
We have prepared some common cases in practical application scenarios and need to consider how to utilize the capabilities of VChart to achieve them.
You can get started with using VChart through this type of task. VChart provides rich capabilities, and everyone may have different implementation ideas. You can leave a message under the issue and discuss your own plan with everyone .
After completing the task, you can submit the self-made case to the official website demo for more people in need to learn and use.
All demos are stored in the docs/assets/examples directory
- Please create a new
docs/***ordemo/***branch based on the develop branch for development - (If you have already installed, skip this step) Global installation @microsoft/rush:
npm i --global @microsoft/rush - Run
rush update - Run
rush docsto preview the current demo content locally DocsdirectoryDocs/assets/examples/menu.jsonAdd your demo information to the directory file- Complete the Chinese and English demo documents in the
zh/endirectory respectively - Add the demo preview image in the
docs/public/vchart/previewdirectory and update the path in the demo document accordingly, for example,/vchart/preview/basic-map_1.9.1.png
- Submit all code and create a Pull Request on Github, inviting others to review
We have prepared some simple and easy-to-use feature development tasks. If you have a certain foundation in JavaScript/TypeScript, you can claim these tasks.
You can understand the VChart code architecture faster through requirement development. You can leave a message under the issue and discuss your own plan with everyone .
- Please create a new
feat/***branch based on the develop branch for development - (If you have already installed, skip this step) Global installation @microsoft/rush:
npm i --global @microsoft/rush - Run
rush update - Run
rush startto start demo page:- You can create a index.page page under
develop/packages/vchart/__tests__/runtime/browserto import your own created development use cases
- You can create a index.page page under
- Confirm that all tests pass the
rush test - After development is finished, run
rush changecommand, write changelog and submit - Submit all code and create a Pull Request on Github, inviting others to review
A promotion task refers to the action of publicly releasing materials related to VisActor, such as articles, demos, videos, etc., across various media channels.
You can create a new issue, select the type others and tag it with promotion. Then, post it along with relevant links, screenshots, summaries, etc.
For example, see #2858.
Every quarter, we will select some promotional works for VisActor and provide the authors with material rewards.
In addition to contributing code to VisActor, we encourage you to participate in other things that make the community more prosperous, such as:
- Provide suggestions for project development, functional planning, etc
- Create articles, videos, and hold lectures to promote VisActor.
- Write promotion plan and execute it together with the team
VisActor is also working hard to help colleagues who participate in community building grow together. We plan (but are not limited to, looking forward to more suggestions from everyone) to provide the following assistance:
- Data lake visualization development training based on VisActor helps participating colleagues grow rapidly in programming skills, visualization theory, architecture design and other aspects.
- Regularly select "Code Contribution Award" and "Community Promotion Award".
- Organize community members to participate in open source activities