Preparation for Linux Foundation Certified System Administrator
- Module 1: Essential Commands
- Module 2: User and Group Management and Permissions
- Module 3: Networking
- Module 4: Operating Running Systems
- Module 5: Storage Management
- Module 6: Service Configuration
- Module 7: Managing Virtualization
We will use several distributions:
- CentOs
- Ubuntu
- SUSE - OpenSUSE
logoutorexit- to log off from your current session.whoami- name of logged in userhostname- full hostnamedate- current date and timeuname- information about systempasswd- change your passwordtouch- creating an empty filelast- shows logged users to the system
- Working with
mancommand. By usingmanwe will work with following sections:
- User commands (1)
- Devices (4)
- Configuration files (5)
- Sysadmin commands (8)
Examples:
man 8 useradd- show information about command from section 8man -a passwd- show information about command from all sectionsman -k- using manual with keyword, when you don't know which command to useappropos user- same results as forman -kcommandman -k | grep 8- search for section 8sudo mandb- create or update the manual page index cachessu -- switch for root user
- stdin or '<' redirect standard input
- stdout - your console, or redirect output to a file use '>' or '>>' to append
- stderr or 2> - for redirect error
- piping
ls | lessinput oflsfiltered bylessps aux | grep httpd
find /proc -name "cpu*" 2> /dev/null- find cpu in /proc directory and send error output to the null devicehistory- command line history, to use command from history simple write commands number from history!28- history stored in .bash_history, you can find this file by typing
ls -a- where -a means to show hidden files.
- history stored in .bash_history, you can find this file by typing
echo who > myscript- create and add line to the fileecho ls >> myscript- append to the filechmod +x myscript- make your script executable./myscript- run your script
uname -r- get kernel versionhostnamectl set-hostname- change hostnamenmtui-hostname- change hostname from gui on CentOSlvcreate --help- all options in [] brackets are optional, all options in {} brackets are mandatory, must be used
Hierarchy:
-
/ - root directory
- /boot - files need to start your computer's OS
- /home - loc of user home directories
- /usr - operating system files
- /var - diverse information (log, cache)
-
mount - connection between directory and device
/dev/sdb1-- /dev is device directory,
- sd - scsi disk
- b - second scsi disk
- 1 - number of partition.
By using command mount we can mount different disks to the different directories.
Directories in linux defined by FHS - Filesystem Hierarchy Standards

ls -l- long list of itemsls -a- shows hidden itemsls -il- shows inode number tools -lrt- list items by last time modifiedls -l /etc- get content of /etc directoryls -R- list entire directory structure (recursive)ls -ld /etc- get information of /etc directory directly
Three types of globbing:
- '*' -
ls a*- will list all files starting with 'a' character. With any length - ? -
ls ca?- will list files which have 'ca' in the beginning and with last character, for instance 'cat' or 'car' - [a-b] -
ls ca[bt]orls ca[b-t]- first will list with 'ca' and 'b' or 't', second will list 'ca' and starting from 'b' to 't' Example:ls [a-d]??*- list word starting with 'a' to 'd', have '??' at least two characters and '*' any amount of characters in the end
cp /etc/hosts .- copy hosts files in home directorycp -R /tmp .- copy entire subdirectory structure in home directorycp /etc/hosts ~/data/- copy hosts file in home/data directory. Don't forget to put slash behind the directory
cd /tmp- change directorypwd- print working directorymkdir data- create subdirectory datamkdir -p files/pete- create directory files with pete directory entire using '-p' - path optionrmdir videos/- remove empty directoryrm -rf- remove directory forcely. Even if directory has a files in it.
Absolute path can be:
/tmp/data/files/peteRelative path can be:/files/photos/2017- no need to change directory from 'tmp'cd ..- go to previous directorycd- move to your home directorycd ../..- go to two levels down on directory
We can copy items by using relative path:

tree /tmp/data- get structure of the directorycp hosts /tmp/data/photos/2016/- copy hosts to '2016' directory using absolute pathcp hosts ../../photos/2017/newfiles- copy hosts to '2017' directory using relative path
mv /tmp/testfile ~ - move file 'testfile' to your home directory
mv testfile anotherfile - rename file
rm anotherfile - remove anotherfile
rm -r - recursive removal
rm -rf etc - remove directory without prompt
rm -rf / - remove everything on your system (dangerous command)
rm -- -myfile - remove files with dashes on the beginning
- Links
- hard
- symbolic
Hard Links:
- You can have several names to refer on one inode
- Must be stored on the same device
- Can't be linked to the directories
Symbolic Links:
- Refers to the name
- Become invalid if the name removed
- More flexible than hard link
- Can exist on different devices

ln /etc/hosts myhosts- create hard linkls -l /etc/hosts myhosts- directories will be in the same sizels -il /etc/hosts myhosts- list with inodes numberls -s myhosts symhosts- create symbolic link from hard link
symhosts symbolic link refers to the myhosts hard link:

ln -s etc /etc- create symbolic link to directory '/etc'
find /etc -name hosts- start searching in '/etc' directory and look for file with name 'hosts'find /etc -name "*hosts*"- look for file which contain 'hosts' name in it. But use double quotesfind / -user "student"- find files which belong to 'student' user
find /etc -name "*hosts*" -exec cp {} find/names \;- find all files in '/etc' with name hosts and cp all output from find to the directory 'find/names'. ';' - must be used to exit from exec interpretor. Where {} means output of find commandfind /etc -size +100k -exec cp {} find/size \;- look for files more than 100 kilobytes and copy them into the directory 'find/size'grep student /etc/* 2>/dev/null- grep will look for files, which contains 'student' word insidefind /etc -exec grep -l student {} \; 2>dev/null- find files through grep which contains 'student' word insidefind /etc -exec grep -l student {} \; -exec cp {} find/contents/ \; 2>/dev/null- cp all found files in 'find/contents/' directory and avoid any error messages.
vi works on two modes:
- command mode
- input mode
We can switch from command mode to input mode by using:
io- opening new lineO- opening new line above the current position[Ins]- same asia- append to the current cursor position
We can switch from input mode to command mode by using:
ESCZZ:wq
Copy and paste:
v :visuald :deletey :yankp :paste
Undo:
u :undoCtrl + R- redo
g- top of the documentG- bottom of the document/text- search for text:noh- disable highlight for current searchn, N- switch for next inside of search:300- go to line 300dd, x- delete line
:%s/one/ONE/g- substitute one with ONE, g - means global. For all occurences.
less /var/log/messages- less based on the vim/root- search for root word in less moden, N- for next itemg, G- for top and bottom of the document
cat myfile- content of the file from first line lasttac myfile- content of the file from last line first
head -n 10 /etc/passwd- get first 10 lines of the filestail -n 10 /etc/passwd- get last 10 lines of the fileshead -n 4 /etc/passwd | tail -n 1- get line 4 by using pipelinetail -f /var/log/messages- -f automatically shows information once it's written
grep -ilR student /etc 2>/dev/null- find files which contain student word, -i insensitive, -l means show file name, -R means recursive, 2>/dev/null - avoid any error messages.ps aux | grep cron- search inside of processes for process name cronps aux | grep cron | grep -v grep- inside of search don't show me grep output
- Regular expressions are text patterns that are used by tools like grep and others
- Don't confuse regular expressions with globbing
grep 'a*'- put your regular expressions in single quotes- grep, vim, awk, sed - tools which use regular expressions

grep '^abc' grepfile1- get words starting with 'abc'grep 'abc$' grepfile1- get words end with 'abc'grep 'a.c' grepfile1- matching 'abc', 'a2c', 'aac', 'abc123'man -k user | egrep '1|8'- get extended grep for user manual with pattern 1 or 8egrep 'ab{2}c' grepfile1- output will be 'abbc', 2 preceeding charactersgrep 'a[bB]c' grepfile1- we can get 'abc' or 'aBc' or '123abc'egrep '(123{3})' grepfile1- get group of items three times, output - '123123123'grep 'ab*c' grepfile1- no or more items between 'ab' and 'c', output can be - 'ac', 'abc', 'abbc', 'abbbbbc'egrep 'ab+c' grepfile1- more items between 'ab' and 'c', output can be - 'abc', 'abbc', 'abbbbbc'egrep 'ab?c' grepfile1- null or one preceeding character, can be - 'aac', 'ac', 'abc'
cut -d : -f 3 /etc/passwd | sort -n- filter out text from /etc/passwd by using delimeter :, -f 3 - is a third field. Sort by numbers use '-n'cut -d : -f 1 /etc/passwd | sort- filter out text from /etc/passwd by using delimeter :, -f 1 - is a first field. Sort by characters'cut -d : -f 1 /etc/passwd | sort | tr [:lower:] [:upper:]- translate output from lower to uppercaseecho hello | tr [a-z] [A-Z]- translate output from lower to uppercaseawk -F : '{print $1}' /etc/passwd- same as cut but more powerfulsed -i -e '10d' grepfile1- streamline editor, -i interactor, -e edit. We removed line 10 from grepfile1
head -n 5 /etc/passwd | tail -n 1sed -n '5p' /etc/passwdps aux | awk '{print $1}'grep '^root' /etc/* 2>/dev/nullgrep '^...$' /etc/* 2>/dev/nullgrep alex * | grep -v alexander
su -- log on as rootsudo su -orsudo -i- log on as root on ubuntu
su - username- perform log on as regular user 'username'
sudo -i- will get error that user is not in the sudoers fileid student- get id of the user. uid, gid and groupsusermod -aG wheel student- add 'student' user in 'wheel' group to perform sudo testsvisudo- open configuration of sudo file- Note: after adding your user in sudoers, you have to log off and log on, so your changes can be applied
Access for specific users managed by visudo command.
sudo passwd linda- set up password for usersu - linda- open linda shelllinda ALL=/sbin/useradd- provide access to linda user on ALL hosts to execute command useradd in visudo file
w- get information about active terminalschvt- switch to virtual terminalchvt 7- switch back to terminal number 7. Depends of distribution where graphical interface located.pts/0- information about user logged through ssh session
sshd- secure shell daemontelnetd- insecure and should not be used anymorePuTTy- remote ssh client for windows, nowadays powershell can be usedVNC- remote desktop client for Linuxssh [email protected]- connect to linux remote machine with student user
vim /etc/securetty- list of secure TTY's. Here you can include or exclude list of terminals.
Users as groups can have access to resources, files, directories e.t.c
id- get information about usersid linda- information about linda usergid=1000(student)- means that primary group for student user is student group
useradd -D- create user by using default optionsuseradd -s /bin/zsh -c "my user" -m anna- create user on CentOsadduser kate- you will be promted for all requrired information on Ubuntu
groupadd sales- create group salesusermod -aG sales anna- add user to the group sales, where -a means append to the group
usermod -L anna- lock the useruseromd -U annd- unlock the useruserdel -r- remove user, it's home directory and mail spoolgroupdel- remove groupgroupmod- modify properties of the existing group
We have /etc/default directory, where useradd file can be modified. That one refers to the useradd -D option. Default user properties.
/etc/login.defs- mail spool location, password expire days, length, age. UID and GID information./etc/skel/- items inside of skel directory will be copied to the home directory of newle created user
passwd --help- settings for passwd commandecho password | passwd --stdin brenda- update password for brenda user. Can be scripted.chage brenda- change age of the password for brenda user
/etc/passwdand/etc/shadow- information stored about users in these foldersvipw- vi for passwd, modify contents of /etc/passwd directly
/etc/group- group configuration files. Primary groups don't have members because they declared already in /etc/passwd as primary group. We can manage members here of secondary groups.
Setting up remote authentication can be difficult. Can be done on Active Directory or LDAP
First of all we need to install proper software
yum groups install "Directory Client"- software required for external authenticationauthconfigorauthconfig-gtk- gtk is graphic utility. To run gui verion authconfig-gtk

cd /etc/securitythenvim limits.conf- here we can configure limits of resources provided to the users.

As you can see from image here we can configure number of maximum processes, maxlogins, cores usage and so on.
-
Basic Permissions (file or directory):
- Read (4) - you can read file or list items in that directory
- Write (2) - modify contents of the file, create or delete files inside of directory
- Execute (1) - you can run the file. You need read permission to execute the script. To access directory to use cd we need execute permission.
-
Ownership:
- Users
- Group
- Others
-
chmod 760 file- where 7 - permission for user, 6 - permission for group, 0 - permission for others.
As we understand number 7 is a sum of 4(read) + 2(write)+ 1(execute). So 7 is a full permission. So user will have full access permission.
6 means that group will have 4(read) and 2(write) permissions
0 means that others will don't have any permissions for that file
chgrp sales mydirectory- make group sales as an owner of mydirectory directorychown anna mydirectory- make user anna as an owner of mydirectory directorychown linda:sales mydirectoryorchown linda.sales mydirectory- make linda user and sales group as an owner of mydirectory directory in one commandchmod g+w account- add write group permission to account directorychmod o-rx account- remove read and execute permissions from account directory for others
Advanced permissions:
- suid (4) - set user id. Run file as owner. Dangerous permission.
- sgid (2) - set group id. Run as group owner. Also dangerous permission. Inherit directory group owner.
- sticky (1) - sticky bit. Has no meaning on files. Delete if only owner for directory.
-
chmod u+s playme- set permissions as represantive to file. -
/bin/passwd- using same permissions set by suid -
chmod g+s *- set group id for directory to use shared directory. Group ownership will be set from parent directory. -
chmod +t *- add sticky bit to the files. File can't be removed by other users if sticky bit applied inside of shared directory.
Two types of ACL:
- normal - take care of files that already exists
- default - take care of files that will be created
setfacl -R -m g:sales:rx file- set -m modify access list -R recursively to file for group sales with rx read-execute permissionssetfacl -R -m d:g:sales:rx file- d column added for default ACL
To use ACL we need filesystem acl. Without this option we couldn't use ACL
setfacl -R -m g:sales:rx account- group sales need read and execute for account directorygetfacl account/- get information about access list
# file: mydirectory/
# owner: root
# group: sales
user::rwx
group::rwx
group:sales:r-x
mask::rwx
other::---
setfacl -m d:g:sales:rx account- default actions, which will be applied to any items created in mydirectory
# file: mydirectory/
# owner: root
# group: sales
user::rwx
group::rwx
group:sales:r-x
mask::rwx
other::---
default:user::rwx
default:group::rwx
default:group:sales:r-x
default:mask::rwx
default:other::---
Extended Attributes - properties of files only. Commands:
- chattr
- lsattr
chattr +i file1- add immutable attribute to the file1lsattr file1- get information about attribute.
[root@centos mydirectory]# lsattr file1
----i----------- file1
We can't do anything to the immutable file.
[root@centos mydirectory]# echo hello >> file1
-bash: file1: Permission denied
[root@centos mydirectory]# rm -f file1
rm: cannot remove ‘file1’: Operation not permitted
Except:
chattr -i file1- remove immutable attribute from the file1
Put limitation to the user for using disk space.
yum install -y quota- install required softwarevim /etc/fstab- mounting systems quota automaticallychmod -R 777 /quota- full access for /quota directorymount -o remount quota- to be sure that file system mounted with the right option.quotacheck -mavug- running quotacheck.quota -vu lisa- checking what is user lisa usingrepquota -aug- get information about quota limits for users
xfs_quota --helporman xfs_quota
man find- look for permfind . -perm 0600 -exec ls -l {} \;- find files in /etc with special permissions and list items.find . -perm /4000 -exec ls -l {} \;- items which have set user id permission mode.


-
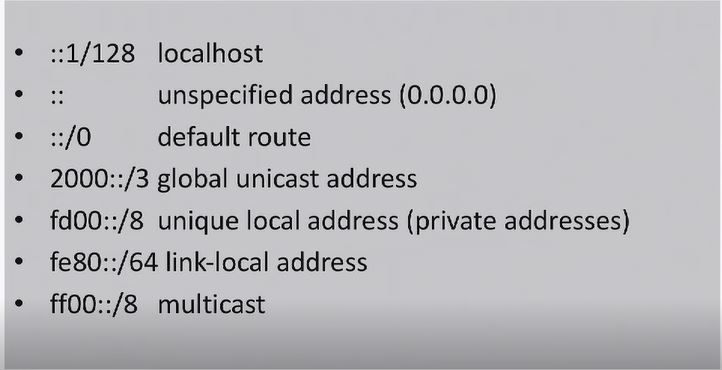
Predefined IPv6 Addresses
-
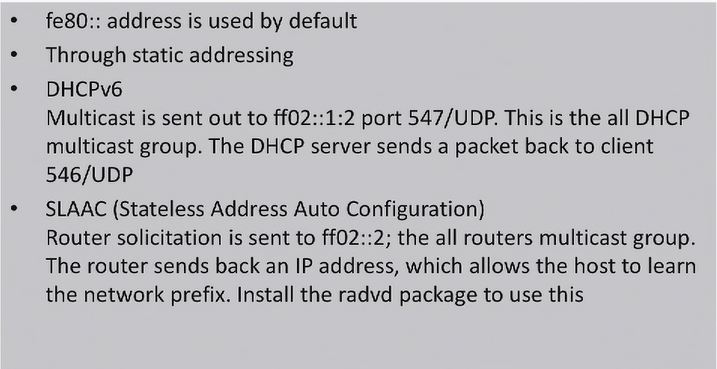
Obtaining an IPv6 Address


ip- monitor your network in run time.ip link show- information about network interfacesip address show- get all ip addressesip address add dev ens33 10.0.0.10/24- add secondary IP address for devices named ens33. After reboot this IP will gone. You need persistent IP address.ifconfig | help- shouldn't be used anymoreip route show- get information about routes
- biosdevname - uses device names that reveal information about physical location.


cat /etc/redhat-release- check your release versionnmtui- network manager user interfacenmcli- network manager command lineman nmcli-examples- you can look for different examplesrpm -qa | grep bash-completion- need for tabulation. To complete written commandsnmcli connection modify ens33 ipv4.addresses 192.168.4.240/24 ipv4.gateway 192.168.4.2 ipv4.dns 8.8.8.8- set static ip address, gateway and DNS.nmcli connection up ens33- enable network interfacecd /etc/sysconfig/network-scripts- network configuration stored in this directory.
yast- generic SUSE configuration tool. From this configuration tool we can manage system settings.
cd /etc/network/- network interfaces directory

ifdown ens33and thenifup ens33- reload network interface to apply changes to the network interface.
/etc/hostname- where hostname information storeduname -a- get information about machinecd /proc/sys/kernel- information about hostname also written here.vim /etc/hosts- configuration of hostname resolving
vim /etc/resolv.conf- configuration file of dns.
# Generated by NetworkManager
search mydns.example.com example.com
nameserver 100.253.0.10
nameserver 110.225.100.10
Note: if you can see that dns configured by NetworkManager better don't touch it directly.
vim /etc/nsswitch.conf- this file defines which file will be read first. hostname, resolv.conf or myhostname
#hosts:     db files nisplus nis dns
hosts:      files dns myhostname
As we can see hostname comes first, dns second and myhostname is last
ping- test response of other hosts
Let's ping google.com
64 bytes from bud02s27-in-f14.1e100.net (172.217.19.110): icmp_seq=1 ttl=52 time=21.7 ms
64 bytes from bud02s27-in-f14.1e100.net (172.217.19.110): icmp_seq=2 ttl=52 time=21.6 ms
64 bytes from bud02s27-in-f14.1e100.net (172.217.19.110): icmp_seq=3 ttl=52 time=21.4 ms
64 bytes from bud02s27-in-f14.1e100.net (172.217.19.110): icmp_seq=4 ttl=52 time=21.8 ms
dig- verify dns related issues. If command not found install bind-utilsdig google.com- let's check for google.com dns name
; <<>> DiG 9.9.4-RedHat-9.9.4-74.el7_6.2 <<>> google.com
;; global options: +cmd
;; Got answer:
;; ->>HEADER<<- opcode: QUERY, status: NOERROR, id: 481
;; flags: qr rd ra; QUERY: 1, ANSWER: 1, AUTHORITY: 0, ADDITIONAL: 1

;; OPT PSEUDOSECTION:
; EDNS: version: 0, flags:; udp: 4000
;; QUESTION SECTION:
;google.com.                    IN      A

;; ANSWER SECTION:
google.com.             135     IN      A       172.217.19.110

;; Query time: 19 msec
;; SERVER: 120.253.20.10#53(120.253.20.10)
;; WHEN: Mon Aug 05 14:30:24 CEST 2019
;; MSG SIZE  rcvd: 55
Where IN means an Internet, A means an Answer.
dig nosuchdomainindig.com- search for non-existing domain
; <<>> DiG 9.9.4-RedHat-9.9.4-74.el7_6.2 <<>> nosuchdomainindig.com
;; global options: +cmd
;; Got answer:
;; ->>HEADER<<- opcode: QUERY, status: NXDOMAIN, id: 47450
;; flags: qr rd ra; QUERY: 1, ANSWER: 0, AUTHORITY: 1, ADDITIONAL: 1

;; OPT PSEUDOSECTION:
; EDNS: version: 0, flags:; udp: 4000
;; QUESTION SECTION:
;nosuchdomainindig.com.         IN      A

;; AUTHORITY SECTION:
com.                    827     IN      SOA     a.gtld-servers.net. nstld.verisign-grs.com. 1565008545 1800 900 604800 86400

;; Query time: 19 msec
;; SERVER: 150.253.20.10#53(150.253.20.10)
;; WHEN: Mon Aug 05 14:37:01 CEST 2019
;; MSG SIZE  rcvd: 123
Note: from status: NXDOMAIN we can see that such domain does not exist
yum install nmap- install nmap - provides information about ports.nmap 10.0.2.15- get information about open ports.
Starting Nmap 6.40 ( http:https://nmap.org ) at 2019-08-05 14:41 CEST
Nmap scan report for centos.example.com (10.0.2.15)
Host is up (0.000010s latency).
Not shown: 999 closed ports
PORT   STATE SERVICE
22/tcp open  ssh
/etc/ssh/- directory where ssh configuration files stored./etc/ssh/sshd_config- server configuration config and sshd process configuration/etc/ssh/ssh_config- configuration for the ssh client
Important lines for sshd_config file:
# If you want to change the port on a SELinux system, you have to tell
# SELinux about this change.
# semanage port -a -t ssh_port_t -p tcp #PORTNUMBER
#
#Port 22

#PermitRootLogin yes
Note: here we can change default port for connection and permit root login. PermitRootLogin must be set to no
ssh_config - configuration for ssh client. If you want to modify settings for all users on your system.
# Host *
#   ForwardAgent no
#   ForwardX11 no
#   RhostsRSAAuthentication no
#   RSAAuthentication yes
#   PasswordAuthentication yes
#   HostbasedAuthentication no
#   GSSAPIAuthentication no
#   GSSAPIDelegateCredentials no
#   GSSAPIKeyExchange no
#   GSSAPITrustDNS no
systemctl status sshd- get information about sshd service
● sshd.service - OpenSSH server daemon
   Loaded: loaded (/usr/lib/systemd/system/sshd.service; enabled; vendor preset: enabled)
   Active: active (running) since Tue 2019-08-06 11:52:45 CEST; 36min ago
     Docs: man:sshd(8)
           man:sshd_config(5)
 Main PID: 4927 (sshd)
   CGroup: /system.slice/sshd.service
           └─4927 /usr/sbin/sshd -D

Aug 06 11:52:45 centos.example.com systemd[1]: Stopped OpenSSH server daemon.
Note: enabled means that this service will start on startup
systemctl stop|start|restart sshd- to stop, start and restart your service. If you make any change in configuration file you need to restart your service.systemctl disable|enable sshd- disable or enable sshd service for startup behaviour.
ssh [email protected]- log on as student on 192.168.4.240ssh -X [email protected]enable graphical interface while connect by ssh. You can run any graphical application by simply running name of the application. For instance:gedit &ssh-keygen- will generate public and private keys, which can be used to authenticate on the server by using these keys instead of password prompt. Private key can be secured by passphrasessh-copy-id [email protected]- transfer your public key to remote host, so you can log on using private key, without password prompt.
scp /etc/hosts 192.168.4.240:/tmp- copy /etc/hosts to the 192.168.4.240 host in /tmp directoryscp 192.168.4.240:/etc/passwd .- copy /etc/passwd from remote host 192.168.4.240 to your home directory.
rsync -avz /tmp [email protected]:/home/student/tmp- will syncronize local /tmp directory on remote host 192.168.4.240. Useful if you need to syncronize large amount of data.
- netfilter - linux kernel firewalling functionality.
- iptables - utility which takes care of firewalling
- firewalld - on RedHat
- ufw - on Ubuntu
- susefirewall - on SUSE

firewall-cmd --list-all- get current configuration of firewall on CentOs
public (active)
  target: default
  icmp-block-inversion: no
  interfaces: enp0s3 enp0s8
  sources:
  services: ssh dhcpv6-client
  ports:
  protocols:
  masquerade: no
  forward-ports:
  source-ports:
  icmp-blocks:
  rich rules:
-
Where:
- interfaces - is your current network interface to which role assigned
- services and ports - which service or port to configure.
-
firewall-cmd --get-services- list of services that's provided which exists by default -
cd /usr/lib/firewalld/services/- directory where services configuration files stored. Written by user firewalld. -
firewall-cmd --add-service samba- add samba services and allow required ports. But after firewall-cmd restart, added service will be disappear. It's because of different between runtime configuration and persistent one. -
firewall-cmd --add-service samba --permanent- add samba service to firewalld configuration, but now permanently. -
firewall-cmd --reload- reload firewalld configuration. -
firewall-cmd --help | grep add-port- get information what you need to add a port, or port range -
firewall-cmd --add-port 4000-4005/tcp- open TCP ports from 4000 to 4005 in runtime configuration. For pestistent you just need to add --permanent key.
sudo ufw enable- enable ubuntu firewall.sudo ufw allow ssh- enable SSH accesssudo ufw status- get status of your firewall and list of ports.sudo ufw reject out ssh- outgoing ssh traffic is now rejectedsudo ufw delete reject out ssh- delete created firewall rule.sudo ufw deny proto tcp from 192.168.4.245 to any port 22- denied traffic from 192.168.4.245 to port 22sudo ufw reset- reset firewall to default settingssudo ufw app list- get list of available applications on firewallsudo ufw app info OpenSSH- will show you info about OpenSSH application and port informationsudo ufw logging on- switch on logging
yast2- graphical version of yast Click on firewall and start from configuration of Interfaces. After selection of zone we have to configure services which is located in Allowed Services. Add required service to the list of allowed services. Or we can use advanced configuration. Define custom ports and so on.
In iptables we're working with chains
- Input
- Output
- Forward - for routing.
iptables {-A|I}- where A for append, I for insert.-j LOG|ACCEPT|DROP|REJECT- action for packet, LOG - write packet to the log file and do next actions, ACCEPT - accept this packet, DROP - silently drop packet (useful for external networks), REJECT - reject packet and inform about that to packet sender.
systemctl stop firewalld- disable firewalld on centosiptables -L- check status of iptablesiptables -P INPUT DROPandiptables -P OUTPUT DROP- configure iptables to reject any input/output behaviours.iptables -A INPUT -i lo -j ACCEPTandiptables -A OUTPUT -o lo -j ACCEPT- allow incoming and outgoing connection for internal loop back interface - loiptables -L -v- to get much more details about configured rules.iptables -A INPUT -p tcp --dport 22 -j ACCEPT- allow traffic with the destination port 22iptables -A OUTPUT -m state --state ESTABLISHED,RELATED -j ACCEPT- allow answers to get out from system. Load state kernel module.iptables -A OUTPUT -p tcp --dport 22 -j ACCEPT- allow all traffic going out to port 22iptables -A INPUT -m state --state ESTABLISHED,RELATED -j ACCEPT- allow answers to get out from system. Load state kernel moduleiptables -A OUTPUT -p tcp --dport 80 -j ACCEPT- allow outgoing web traffic.yum install elinks- when we will try to install package, we going to receive errors couldn't resolve name. That one related to the DNS
iptables -A OUTPUT -p udp --dport 53 -j ACCEPT- allow DNS.iptables-save- will be written to stdoutiptables-save > /etc/sysconfig/iptabes- write your config to iptables file. So this config will be found after reboot.- RedHat specific configuration:
systemctl disable firewalld- disable firewalldyum install iptables-services- install iptables-services, because that one is not installed by default.systemctl enable iptables- service will start automatically after that.
iptables -P INPUT DROP- set up default policy to DROP all INPUT trafficiptables -P OUTPUT DROP- set up default policy to DROP all OUTPUT trafficiptables -A INPUT -i lo -j ACCEPT- -A - append to the default policy. Accept any INPUT (-i) connections for lo interface.iptables -A OUTPUT -o lo -j ACCEPT- -A - append to the default policy. Accept any OUTPUT (-o) connections for lo interface.iptables -A INPUT -p icmp -j ACCEPT- enable icmp protocol for INPUT incoming connections.iptables -A OUTPUT -m state --state ESTABLISHED,RELATIVE -j ACCEPT- allow answers to get out from system. Load state kernel moduleiptables -A OUTPUT -p tcp --dport 80 -j ACCEPT- allow outgoinig HTTP for yum.iptables -A OUTPUT -p udp --dport 53 -j ACCEPT- allow DNS.
Time in linux:
-
hwclock- hardware closk, BIOS.hwclock- set hardware clock and synchronize with system clock.
-
system clock- system cloak appears after boot.date- to set system clock
-
NTP- Network Time Protocol, used to synchronize your time.ntpdorchronyd- used to sync with ntp server
Time set in UTC (Universal Time Coordinate)
Difference between system time and ntp time shouldn't be more that 10 mins. Otherwise your local host will refuse to syncrhonize with NTP

hwclock- output will be2019-08-13 16:06:10.200221+0200hwclock --systohc- sync system time to the hardware timehwclock --hctosys- sync hardware time to the system time
date- output will beÚt srp 13 17:00:23 CEST 2019date -s 17:15- set up system time to 17:15
timedatectl- time and date configuration on CentOS
- Concept of
stratum. And the most reliable NTP service has a valuestratum 0
Stratum reliability:
- Stratum 0 - is an atomic clock.
- Stratum 1 - server which sync with Stratum 0
- Stratum 2 - client which sync server and has Stratum 1
Better do not use NTP's with stratum 10 - which means local clock, or stratum 16 - which means clock hasn't set up yet.
ntpd- Time Synchronization Daemon.chronyorchronyd- new time synchronization daemon with nano secs ability.
Configuration of ntpd located in /etc/ntp.conf
Where:
- server 0.opensuse.pool.ntp.org iburst - means which server use to sync and iburst - will synchronize time forcely if local time has big difference with NTP server.
Internal hardware clock for synchronization, local clock has stratum 10, you can change it to stratum 5:
## Undisciplined Local Clock. This is a fake driver intended for backup
## and when no outside source of synchronized time is available.
##
# server 127.127.1.0            # local clock (LCL)
# fudge  127.127.1.0 stratum 10 # LCL is unsynchronized
When you uncomment server and fudge options, restart ntpd service:
systemctl restart ntpdntpq -p- display information about NTP. Where we can see that local clock is used and stratum is 5
     remote           refid      st t when poll reach   delay   offset  jitter
==============================================================================
 LOCAL(0)        .LOCL.           5 l   24   64    1    0.000    0.000   0.000
chrony- default ntp solution for RedHat and Fedora familyyum install chrony- to install it if you don't have.systemctl status chronyd- get status of chrony daemon/etc/chrony.conf- configuration file of chrony
# Use public servers from the pool.ntp.org project.
# Please consider joining the pool (http:https://www.pool.ntp.org/join.html).
server 0.centos.pool.ntp.org iburst
server 1.centos.pool.ntp.org iburst
server 2.centos.pool.ntp.org iburst
server 3.centos.pool.ntp.org iburst
chronyc sources- To verify what chrony is doing
210 Number of sources = 4
MS Name/IP address         Stratum Poll Reach LastRx Last sample
===============================================================================
^? mail.deployis.eu              0   6     0     -     +0ns[   +0ns] +/-    0ns
^? zearla.netinform.hu           0   6     0     -     +0ns[   +0ns] +/-    0ns
^? 185.82.232.254                0   6     0     -     +0ns[   +0ns] +/-    0ns
^? 84.2.44.19                    0   6     0     -     +0ns[   +0ns] +/-    0ns
chronyc tracking- to get more details
Reference ID    : 00000000 ()
Stratum         : 0
Ref time (UTC)  : Thu Jan 01 00:00:00 1970
System time     : 0.000000000 seconds fast of NTP time
Last offset     : +0.000000000 seconds
RMS offset      : 0.000000000 seconds
Frequency       : 0.000 ppm slow
Residual freq   : +0.000 ppm
Skew            : 0.000 ppm
Root delay      : 1.000000000 seconds
Root dispersion : 1.000000000 seconds
Update interval : 0.0 seconds
Leap status     : Not synchronised
From output you can see Leap status : Not synchronised, what means we didn't synchronised yet. This is because of the iptables. Let's add rule to the chain.
iptables -A INPUT -p udp --dport 123 -j ACCEPT- allow incoming time traffic.iptables -A OUTPUT -p udp --dport 123 -j ACCEPT- same for OUTPUT traffic
Let's run chronyc tracking again. Leap status is normal now:
Reference ID    : 51007CFD (mail.deployis.eu)
Stratum         : 4
Ref time (UTC)  : Wed Aug 14 10:08:45 2019
System time     : 0.000000461 seconds fast of NTP time
Last offset     : -0.000689063 seconds
RMS offset      : 0.000689063 seconds
Frequency       : 3.080 ppm fast
Residual freq   : +0.000 ppm
Skew            : 512.361 ppm
Root delay      : 0.042404659 seconds
Root dispersion : 0.036888056 seconds
Update interval : 1.7 seconds
Leap status     : Normal
hwclock --systohcandhwclock --hctosys- sync hardware and system clock and visa versa.- check iptables to allow ntp port 123
- run
chronyc sourcesandchronyc trackingto be sure that everything works properly. - modify your /etc/chrony.conf file and uncomment following lines (to allow local clients use your ntp server in network):
# Allow NTP client access from local network.
allow 10.0.10.0/24
Go to your client and configure /etc/ntp.conf. Where as a server you need to specify your NTP server and comment out pool or servers:
server 10.0.10.11 iburst
server 127.127.1.0              # local clock (LCL)
fudge  127.127.1.0 stratum 5    # LCL is unsynchronized
Reboot ntpd service and check ntpq status ntpq -p. Stratum 16 means that it's unreachable and .INIT - initializing status. Slowly it's going to synchronize:
     remote           refid      st t when poll reach   delay   offset  jitter
==============================================================================
 10.0.10.11      .INIT.          16 u    -   64    0    0.000    0.000   0.000
 LOCAL(0)        .LOCL.           5 l   24   64    1    0.000    0.000   0.000

- Kernel starts with PID number 1: systemd (was init before)
- Systemd starts a lot of kernel threads which indicated by [] brackets.
- processes can be monitored by ps command
- processes managed by user in bash shell also called as a jobs. Can be put in background and foreground.
- thread - task that can be started by an individual process. Or it a subtask of one single process. For instance apache can create spawn a lot of threads
sleep 600- run sleep commands for 600 secondsctrl + z- to stop jobbg- to run stopped job in the background.sleep 600 &- where & means run command in backgroundjobs- monitor currently running jobs.fg- run last job to the foreground.fg 1- move specific job to the foregroundctrl + c- cancel running job
top- provides all required information about processes.

Here we can see time, uptime, number of the logged on users and load average (5 10 15 minutes):
top - 15:36:03 up 3:45, 1 user, load average: 0.00, 0.01, 0.05
Third line shows us CPU load. By pressing 1 we can see load for one cpu. Where us means user space, sy means system space, ni - nice, priority modified, id - idle, wa - waiting for I/O (hard disk):
%Cpu0 : 0.0 us, 0.0 sy, 0.0 ni,100.0 id, 0.0 wa, 0.0 hi, 0.0 si, 0.0 st
Second line shows to us currently running tasks:
Tasks: 94 total, 1 running, 93 sleeping, 0 stopped, 0 zombie
Processes column:
PID USER PR NI VIRT RES SHR S %CPU %MEM TIME+ COMMAND
- S - means status (R - running, S - sleeping)
- VIRT RES SHR - memory usage, Virtual memory(claimed memory), Resident memory (real usage), SHR(Shared memory)
- PR - priority
- PID - unique Process ID
top -u student- processes started by specific user student
topand then typef- for fields. Information about fields you can see in top. You can manage which fields to show, remove, sort and so on.z- for changing color of topW- for saving configuration to '/root/.toprc'. this setting will available if you going to typetopcommand again.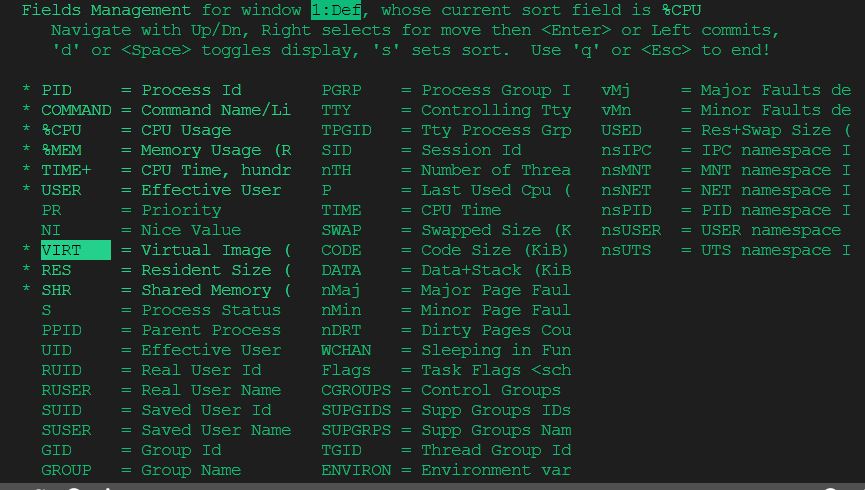

ps aux- list all processesps aux | grep sshd- find process sshdps -ef- PPID - parent process id, we can see which process is the parent one.[kthreadd]- process in square bracket means kernel thread. Can't be managed as a regular process.

ps -e -o pid,args --forest | less- use filtering option, to show output, only PID and arguments in a forest viewps aux --sort pmem- sort processes using pmemory
- while in TOP command press R to change priority of the process. Where we need to enter PID to renice.
- Nice range is starting from -20 to +90.
- -20 - is not going to be nice to other processes
- +90 - process will be nice to other processes Note: regular user can run only positive numbers for nice, root can use also negative values
nice [OPTION] [COMMAND [ARG]]nice -n 5 dd if/dev/zero =of/dev/null &- going to start process with nice value 5renice -n 5 14053- renice already running process and set nice value to 5
man 7 signals- read about signals.SIGTERM (15)- nice way to ask process stop it's activity. Gracefull stop.SIGKILL (9)- roughly end the process.
topand then pressK, enter PID to kill the process. We have to enter PID and select signal. In our case we need SIGKILLkill 14053- kill proces with PID number 14053killall dd- kill all processes in match ddkill -9 14231- SIGKILL for 14231 PIDpidof dd- PID of command ddkill $(pidof dd)- kill all PIDs of dd command
tar (Tar Balls)- tar archivertar xvf nmapgui-1.0.2.src.tar.gz- where x means extract, v verbose, f - file. If you're working with source file, most time we have Makefile in source code. Also we have README.txt which is important to read.
tar xvf nmapgui.src.tar.gz -C /tmpwhere -C means location where to extractfile nmapgui-1.0.2.src.tar.gz- if you don't know what type of data it's, runfilecommand.
nmapgui-1.0.2.src.tar.gz: gzip compressed data, was "nmapgui-1.0.2.src.tar", from Unix, last modified: Tue Sep 6 23:49:00 2005
gunzip nmapgui-1.0.2.src.tar.gz- we can unzip archive with gunzip. In the end we will have file nmapgui-1.0.2.src.tarfile nmapgui-1.0.2.src.tar- we will see as the result
nmapgui-1.0.2.src.tar: POSIX tar archive (GNU
tar tvf nmapgui-1.0.2.src.tar | less- to see content of the archive.
-
tar cvf etc.tar /etcwhere- c - create
- v - verbose
- f - file
- etc.tar - name of the archive
- /etc - what to archive Note: as you can see, there is no any compression and the .tar file is really big
-
gzip etc.tar- let's add compression by using gzip. -
gunzip etc.tar.gz- to get original file etc.tar back -
bzip2 etc.tar- another archiver named bzip2 -
tar xvf etc.tar.bz2 -C /- extract etc.tar.bz2 to the root directory.-u- this option only append files newer than copy in archive-p- extract information about file permissions (default for superuser). What means if you want to save permissions during extraction use this options. That one is default option for root user. But for regular user you need to use -p option.
rpm -ivh nmap-frontend-6.40.noarch.rpm- normal installation of the .rpm package.
Dependency issue fixed by META package handler:- apt - Ubuntu
- yum - RedHat
- dnf - Fedora
- zypper - SUSE
ldd /usr/bin/passwd- run to see which libraries required to run this command.ldd $(which ls)- to find out is the specific library present.
linux-vdso.so.1 =>  (0x00007ffdb91f6000)
        libuser.so.1 => /lib64/libuser.so.1 (0x00007fee9dc39000)
        libgobject-2.0.so.0 => /lib64/libgobject-2.0.so.0 (0x00007fee9d9e9000)
        libglib-2.0.so.0 => /lib64/libglib-2.0.so.0 (0x00007fee9d6d3000)
        libpopt.so.0 => /lib64/libpopt.so.0 (0x00007fee9d4c9000)
        libpam.so.0 => /lib64/libpam.so.0 (0x00007fee9d2ba000)
        libpam_misc.so.0 => /lib64/libpam_misc.so.0 (0x00007fee9d0b6000)
        libaudit.so.1 => /lib64/libaudit.so.1 (0x00007fee9ce8d000)
        libselinux.so.1 => /lib64/libselinux.so.1 (0x00007fee9cc66000)
        libpthread.so.0 => /lib64/libpthread.so.0 (0x00007fee9ca4a000)
        libc.so.6 => /lib64/libc.so.6 (0x00007fee9c67d000)
        libgmodule-2.0.so.0 => /lib64/libgmodule-2.0.so.0 (0x00007fee9c479000)
        libcrypt.so.1 => /lib64/libcrypt.so.1 (0x00007fee9c242000)
        libpcre.so.1 => /lib64/libpcre.so.1 (0x00007fee9bfe0000)
        libffi.so.6 => /lib64/libffi.so.6 (0x00007fee9bdd8000)
        libdl.so.2 => /lib64/libdl.so.2 (0x00007fee9bbd4000)
        libcap-ng.so.0 => /lib64/libcap-ng.so.0 (0x00007fee9b9ce000)
        /lib64/ld-linux-x86-64.so.2 (0x00007fee9e05f000)
        libfreebl3.so => /lib64/libfreebl3.so (0x00007fee9b7cb000)
ldconfig- to run update of the libraries.ld.so.cache- cache of the libraries.ld.so.conf.d- configuration with path to the cache ld.so.cache When you run packages install - ldconfig runs automatically and solve dependencies problems
rpm- Red Hat Package managerrpm -qa- query all.rpm -qa | grep http- find is http installedrpm -qi httpd- get information about installed packagerpm -ql httpd- list of files that installed from this packagerpm -qc httpd- list of configuration filesrpm -qd httpd- get documentationrpm -qpi nmap-fronted-6.noarch.rpm- get information about package that not installed yet.rpm -qp --script nmap-fronted-6.noarch.rpm- get information about scripts which will be executed during package installation.rpm -qf /etc/nanorc- will show where file comes fromrpm -qi nano- if you don't where file comes from.rpm -ql nano- files from the package.
dpkg- debian package managerdpkg --get-selections- list all installed packagesdpkg -L vim- show files in the packagedpkg -S /usr/bin/eject- from which package file comes from.dpkg -S eject- same as above commanddpkg -p vim- get information about content of the package
yum search nmap- look if package is availablecd /etc/yum.repos.d/- repository directory.
-rw-r--r--. 1 root root 1664 Nov 23  2018 CentOS-Base.repo
-rw-r--r--. 1 root root 1309 Nov 23  2018 CentOS-CR.repo
-rw-r--r--. 1 root root  649 Nov 23  2018 CentOS-Debuginfo.repo
-rw-r--r--. 1 root root  314 Nov 23  2018 CentOS-fasttrack.repo
-rw-r--r--. 1 root root  630 Nov 23  2018 CentOS-Media.repo
-rw-r--r--. 1 root root 1331 Nov 23  2018 CentOS-Sources.repo
-rw-r--r--. 1 root root 5701 Nov 23  2018 CentOS-Vault.repo
yum info nmap- get some information about package nmapyum install nmap-frontend- yum is going to resolve dependencies. During installation transaction check runs to see if the dependencies are available in repository for installing package.yum provides */sealert- to find out which package provides /sealert
setroubleshoot-server-3.2.30-3.el7.x86_64 : SELinux troubleshoot server
Repo        : base
Matched from:
Filename    : /usr/bin/sealert
yum remove kernel- couldn't be removed because kernel is running and protected package.yum remove bash- same for bash, dependencies will be processed and hit some protected packages like systemd and yum. So remove is not possible.yumdownloader vsftp- if you want only download package, without installation and then runrpm -qp --scripts vsftp- to see which scripts will be run. So you can analize there is nothing nasty inside.
apt-cache search ldap- search for packages that contain ldap name in it.apt-cache depends ldap-utils- get dependencies lists of the ldap-utilsapt-cache rdepends ldap-utils- get reverse dependencies of the packageapt-cache stats- get statistics about the packagesapt-get update- to synchronise your repository with online database.apt-get install nmap- install nmap. Which packages will be installed.apt-get check- check if there any broken installationapt-get clean- cleans package cache
zypper search nmap- search for nmap packagezypper install nmap- install nmap packageyast- packages can be installed from GUI.- software patterns can be used from yast.
Three different solutions for running tasks:
at- run task once at specific timecrond- task scheduler.timers- systemd timer is the same as crond
Most important is crond working with configurations file.
Main directory of crond:
/etc/crontab/etc/cron.d/- you will put your time specific files here, to run them.crontab -e -u- create user specific cron job./cron.hourly\/cron.daily- all managed by anacron. Helper of cron./cron.weekly//cron.monthly/
vim /etc/crontab- get information about crontab
SHELL=/bin/bash
PATH=/sbin:/bin:/usr/sbin:/usr/bin
MAILTO=root

# For details see man 4 crontabs

# Example of job definition:
# .---------------- minute (0 - 59)
# |  .------------- hour (0 - 23)
# |  |  .---------- day of month (1 - 31)
# |  |  |  .------- month (1 - 12) OR jan,feb,mar,apr ...
# |  |  |  |  .---- day of week (0 - 6) (Sunday=0 or 7) OR sun,mon,tue,wed,thu,fri,sat
# |  |  |  |  |
# *  *  *  *  * user-name  command to be executed
crontab -e- open crontab for current user*/10 * * * 1-5 logger its a weekday- create a job to run every 10 minutes, every hour, every day of month, every month, 5 days in a week.crontab -e -u define user- create crontab for defined usercrontab --help
Usage:
 crontab [options] file
 crontab [options]
 crontab -n [hostname]

Options:
 -u <user>  define user
 -e         edit user's crontab
 -l         list user's crontab
 -r         delete user's crontab
 -i         prompt before deleting
 -n <host>  set host in cluster to run users' crontabs
 -c         get host in cluster to run users' crontabs
 -s         selinux context
 -x <mask>  enable debugging
cd /etc/cron.d/- directory used by rpm packages. If installed package involves some tasks to start automatically. It will be dropped in cron.d directorycd ../cron.daily/- cron time directories. Here you can drop shell scripts. anacron helper used there, no need to enter time in your scripts.
[root@centos etc]# cd /etc/cron.
cron.d/       cron.daily/   cron.hourly/  cron.monthly/ cron.weekly/
cd /usr/lib/systemd/system/- directory where systemd creates it's unit files. Unit files contain services, but other things as well. For instance - timers

Timers consist of 2 files:
fstrim.service- what to run.fstrim.timer- when to run.
We need to use systemctl to activate this timer:
systemctl status fstrim.timer- currently this timer in disabled status.systemctl daemon-reload- reload daemon if you made some changes in systemd service or timers.systemctl start fstrim.timer- activate timer.systemctl enable fstrim.timer- enable timer, to run at least once in a week, as scheduled.
systemctl status atd- get status of the at daemon.
[root@centos system]# systemctl status atd
● atd.service - Job spooling tools
   Loaded: loaded (/usr/lib/systemd/system/atd.service; enabled; vendor preset: enabled)
   Active: active (running) since Wed 2019-08-21 15:09:09 CEST; 1s ago
 Main PID: 12369 (atd)
   CGroup: /system.slice/atd.service
           └─12369 /usr/sbin/atd -f

Aug 21 15:09:09 centos.example.com systemd[1]: Started Job spooling tools.
at 11:00- start scheduling task for 11:00at> mail -s hello root < .- you can schedule anything you want in this prompty.Ctrl + D- when you done, just press it to leave at promptat teatime- schedule job for 4:00 PMatq- see which jobs have been scheduled by atatrm 1- remove scheduled job with following number.
- syslog - original solution for linux logging.
/var/log- directory where logs stored as a different files.syslog-ng- first improvement of the syslogrsyslog- completely backward of the syslog and writing information to /var/logsystemd-journald- runtime log, by default it's not stored anywhere. Will be disappear after reboot.logrotate- helper service for /var/log, to control logs don't grow too big. You can rotate logs if they get too big or too old or whatever.

systemctl status sshd- get information about service. We can see there all relevant logs gathered by journald recently.
● sshd.service - OpenSSH server daemon
   Loaded: loaded (/usr/lib/systemd/system/sshd.service; enabled; vendor preset: enabled)
   Active: active (running) since Mon 2019-08-19 11:22:16 CEST; 2 days ago
     Docs: man:sshd(8)
           man:sshd_config(5)
 Main PID: 993 (sshd)
   CGroup: /system.slice/sshd.service
           └─993 /usr/sbin/sshd -D

Aug 19 11:22:16 centos.example.com systemd[1]: Starting OpenSSH server daemon...
Aug 19 11:22:16 centos.example.com sshd[993]: Server listening on 0.0.0.0 port 22.
Aug 19 11:22:16 centos.example.com sshd[993]: Server listening on :: port 22.
Aug 19 11:22:16 centos.example.com systemd[1]: Started OpenSSH server daemon.
Aug 19 11:23:32 centos.example.com sshd[1248]: Accepted password for student from...
journalctl- opens file system's journal. By default it kept in memory. It's going to be truncated when becomes too big.
[root@centos log]# journalctl
_AUDIT_LOGINUID=             __MONOTONIC_TIMESTAMP=
_AUDIT_SESSION=              _PID=
_BOOT_ID=                    PRIORITY=
_CMDLINE=                    __REALTIME_TIMESTAMP=
CODE_FILE=                   _SELINUX_CONTEXT=
CODE_FUNC=                   _SOURCE_REALTIME_TIMESTAMP=
CODE_LINE=                   SYSLOG_FACILITY=
_COMM=                       SYSLOG_IDENTIFIER=
COREDUMP_EXE=                SYSLOG_PID=
__CURSOR=                    _SYSTEMD_CGROUP=
ERRNO=                       _SYSTEMD_OWNER_UID=
_EXE=                        _SYSTEMD_SESSION=
_GID=                        _SYSTEMD_UNIT=
_HOSTNAME=                   _TRANSPORT=
_KERNEL_DEVICE=              _UDEV_DEVLINK=
_KERNEL_SUBSYSTEM=           _UDEV_DEVNODE=
_MACHINE_ID=                 _UDEV_SYSNAME=
MESSAGE=                     _UID=
MESSAGE_ID=
Note: If you want to search for specific item use tab and search for it
journalctl _PID=1- search for logs related to the PID number 1mkdir -p /var/log/journal- journalctl is not persistent. To make it persistent we need to create directory journal in /var/log dir.
After creation of this directory, we will have directory created in journal dir.
[student@centos journal]$ ls -l
total 0
drwxr-sr-x+ 2 root systemd-journal 53 Aug 21 16:33 2c6eb2cb883142de82ccc9f4448ded7d

[student@centos 2c6eb2cb883142de82ccc9f4448ded7d]$ ls -l
total 24584
-rw-r-----+ 1 root systemd-journal 16777216 Aug 21 16:39 system.journal
-rw-r-----+ 1 root root             8388608 Aug 21 16:35 user-1000.journal
There is also configuration file behind of this, which located in /etc/system/journald.conf. Here you can specify configuration for your journal. Size, what to store, storage behaviour and so on.
Essence of line in rsyslog consist of:
- facility - pre-defined set of services. For example: authpriv, kern, mail
- priority - how bad it is, what is happening. For example: emerg, crit, debug
- destination - write it to specific destination. For example: /var/log/.., :omusrmsg: (output module of rsyslog).
systemctl status rsyslog- get status of the rsyslog/etc/rsyslog.confand/etc/rsyslog.d/- confifguration items of rsyslogvim /etc/rsyslog.conf- has important settings.
#### MODULES ####

# The imjournal module bellow is now used as a message source instead of imuxsock.
$ModLoad imuxsock # provides support for local system logging (e.g. via logger command)
$ModLoad imjournal # provides access to the systemd journal
You can receive logs from other servers if you enable these options:
# Provides UDP syslog reception
#$ModLoad imudp
#$UDPServerRun 514

# Provides TCP syslog reception
#$ModLoad imtcp
#$InputTCPServerRun 514
Let's look for the rules:
#### RULES ####

# Log all kernel messages to the console.
# Logging much else clutters up the screen.
#kern.*                                                 /dev/console

# Log anything (except mail) of level info or higher.
# Don't log private authentication messages!
*.info;mail.none;authpriv.none;cron.none                /var/log/messages

# The authpriv file has restricted access.
authpriv.*                                              /var/log/secure

# Log all the mail messages in one place.
mail.*                                                  -/var/log/maillog


# Log cron stuff
cron.*                                                  /var/log/cron

# Everybody gets emergency messages
*.emerg                                                 :omusrmsg:*

# Save news errors of level crit and higher in a special file.
uucp,news.crit                                          /var/log/spooler

# Save boot messages also to boot.log
local7.*                                                /var/log/boot.log
crit.* /var/log/critical- create your own rule for critical events.logger -p crit CRITICAL SITUATION- write to the syslog with crit option.
/etc/cron.daily/logrotate- we have logrotate script in cron.daily directory
#!/bin/sh

/usr/sbin/logrotate -s /var/lib/logrotate/logrotate.status /etc/logrotate.conf
EXITVALUE=$?
if [ $EXITVALUE != 0 ]; then
    /usr/bin/logger -t logrotate "ALERT exited abnormally with [$EXITVALUE]"
fi
exit 0
/etc/logrotate.conf- configuration file of logrotate
 see "man logrotate" for details
# rotate log files weekly
weekly

# keep 4 weeks worth of backlogs
rotate 4

# create new (empty) log files after rotating old ones
create

# use date as a suffix of the rotated file
dateext

# uncomment this if you want your log files compressed
#compress

# RPM packages drop log rotation information into this directory
include /etc/logrotate.d

# no packages own wtmp and btmp -- we'll rotate them here
/var/log/wtmp {
    monthly
    create 0664 root utmp
        minsize 1M
    rotate 1
}

/var/log/btmp {
    missingok
    monthly
    create 0600 root utmp
    rotate 1
}

# system-specific logs may be also be configured here.
/etc/logrotate.d/- you can put your own configuration in that directory.
[root@centos logrotate.d]# ls -l
total 20
-rw-r--r--. 1 root root  91 Apr 10  2018 bootlog
-rw-r--r--. 1 root root 160 Sep 15  2017 chrony
-rw-r--r--. 1 root root 224 Oct 30  2018 syslog
-rw-r--r--. 1 root root 100 Oct 31  2018 wpa_supplicant
-rw-r--r--. 1 root root 103 Nov  5  2018 yum

Kernel => Drivers(modules) => Hardware
SYSCALLS- option to interact with kernel./proc- kernel interface.
lsmod- list kernel modules. Modules loaded automatically when they're needed.
Module                  Size  Used by
nf_conntrack_ipv4      15053  2
nf_defrag_ipv4         12729  1 nf_conntrack_ipv4
xt_conntrack           12760  2
nf_conntrack          137239  2 xt_conntrack,nf_conntrack_ipv4
iptable_filter         12810  1
intel_pmc_core         17748  0
intel_powerclamp       14451  0
iosf_mbi               15582  0
crc32_pclmul           13133  0
snd_intel8x0           38199  0
snd_ac97_codec        130556  1 snd_intel8x0
ghash_clmulni_intel    13273  0
ac97_bus               12730  1 snd_ac97_codec
snd_seq                62663  0
snd_seq_device         14356  1 snd_seq
ppdev                  17671  0
snd_pcm               105708  2 snd_ac97_codec,snd_intel8x0
aesni_intel           189415  0
lrw                    13286  1 aesni_intel
gf128mul               15139  1 lrw
glue_helper            13990  1 aesni_intel
ablk_helper            13597  1 aesni_intel
cryptd                 21190  3 ghash_clmulni_intel,aesni_intel,ablk_helper
sg                     40721  0
snd_timer              29912  2 snd_pcm,snd_seq
pcspkr                 12718  0
snd                    83815  6 snd_ac97_codec,snd_intel8x0,snd_timer,snd_pcm,snd_seq,snd_seq_device
parport_pc             28205  0
video                  24538  0
parport                46395  2 ppdev,parport_pc
i2c_piix4              22401  0
soundcore              15047  1 snd
ip_tables              27126  1 iptable_filter
xfs                   996949  2
libcrc32c              12644  2 xfs,nf_conntrack
sr_mod                 22416  0
cdrom                  42556  1 sr_mod
ata_generic            12923  0
sd_mod                 46281  3
crc_t10dif             12912  1 sd_mod
crct10dif_generic      12647  0
pata_acpi              13053  0
vmwgfx                276430  1
drm_kms_helper        179394  1 vmwgfx
syscopyarea            12529  1 drm_kms_helper
sysfillrect            12701  1 drm_kms_helper
sysimgblt              12640  1 drm_kms_helper
fb_sys_fops            12703  1 drm_kms_helper
ttm                   114635  1 vmwgfx
ahci                   34056  2
ata_piix               35052  0
drm                   429744  4 ttm,drm_kms_helper,vmwgfx
libahci                31992  1 ahci
libata                243133  5 ahci,pata_acpi,libahci,ata_generic,ata_piix
e1000                 137586  0
crct10dif_pclmul       14307  1
crct10dif_common       12595  3 crct10dif_pclmul,crct10dif_generic,crc_t10dif
crc32c_intel           22094  1
drm_panel_orientation_quirks    12957  1 drm
serio_raw              13434  0
dm_mirror              22289  0
dm_region_hash         20813  1 dm_mirror
dm_log                 18411  2 dm_region_hash,dm_mirror
dm_mod                124461  8 dm_log,dm_mirror
modprobe -r cdrom- unload module cdrom.
[root@centos log]# lsmod | grep cdrom
cdrom                  42556  1 sr_mod
modprobe -r sr_mod- we need to unload sr_mod before unloading cdrom module.modprobe cdrom- load cdrom module.
root@centos log]# lsmod | grep cdrom
cdrom                  42556  0
modinfo cdrom- get information about cdrom module
filename:       /lib/modules/3.10.0-957.27.2.el7.x86_64/kernel/drivers/cdrom/cdrom.ko.xz
license:        GPL
retpoline:      Y
rhelversion:    7.6
srcversion:     B63448BA9456F320F84B102
depends:
intree:         Y
vermagic:       3.10.0-957.27.2.el7.x86_64 SMP mod_unload modversions
signer:         CentOS Linux kernel signing key
sig_key:        52:0A:4E:2D:9D:55:3E:F8:42:01:C1:88:B8:7F:E5:1B:9D:E1:1A:5E
sig_hashalgo:   sha256
parm:           debug:bool
parm:           autoclose:bool
parm:           autoeject:bool
parm:           lockdoor:bool
parm:           check_media_type:bool
parm:           mrw_format_restart:bool
modprobe cdrom autoclose=1- parameters can be set while loading module. In this example we set autoclose=1.dmesg- get information about working modules/etc/modprobe.d/- configuration items of modprobe. Here we can set up options for modules, to make them loaded automaticallyecho options cdrom autoclose=1 > cdrom.conf- specific parameter will be automatically activated for cdrom module.
[root@centos modprobe.d]# ls -l
total 16
-rw-r--r--. 1 root root  26 Aug 22 11:49 cdrom.conf
-rw-r--r--. 1 root root 215 Jul 29 19:55 dccp-blacklist.conf
-rw-r--r--. 1 root root 166 Oct 30  2018 firewalld-sysctls.conf
-rw-r--r--. 1 root root 674 Jul  4  2018 tuned.conf
cd /proc- proc file system. Infterface of the linux kernelcat partitions- get information about disk devices that currently being used
[root@centos proc]# cat partitions
major minor  #blocks  name

   8        0    8388608 sda
   8        1    1048576 sda1
   8        2    7339008 sda2
 253        0    6496256 dm-0
 253        1     839680 dm-1
cat cpuinfo- get information CPU's on the system.
[root@centos proc]# cat cpuinfo
processor       : 0
vendor_id       : GenuineIntel
cpu family      : 6
model           : 78
model name      : Intel(R) Core(TM) i5-6200U CPU @ 2.30GHz
stepping        : 3
cpu MHz         : 2399.988
cache size      : 3072 KB
physical id     : 0
siblings        : 1
core id         : 0
cpu cores       : 1
apicid          : 0
initial apicid  : 0
fpu             : yes
fpu_exception   : yes
cpuid level     : 22
wp              : yes
flags           : fpu vme de pse tsc msr pae mce cx8 apic sep mtrr pge mca cmov pat pse36 clflush mmx fxsr sse sse2 ht syscall nx rdtscp lm constant_tsc rep_good nopl xtopology nonstop_tsc eagerfpu pni pclmulqdq monitor ssse3 cx16 pcid sse4_1 sse4_2 x2apic movbe popcnt aes xsave avx rdrand hypervisor lahf_lm abm 3dnowprefetch fsgsbase avx2 invpcid rdseed clflushopt flush_l1d
bogomips        : 4799.97
clflush size    : 64
cache_alignment : 64
address sizes   : 39 bits physical, 48 bits virtual
power management:
cat meminfo- get information about memory usage
[root@centos proc]# cat meminfo
MemTotal:        1014956 kB
MemFree:          769008 kB
MemAvailable:     760872 kB
Buffers:            2108 kB
Cached:           105036 kB
SwapCached:            0 kB
Active:            72776 kB
Inactive:          79720 kB
Active(anon):      45572 kB
Inactive(anon):      300 kB
Active(file):      27204 kB
Inactive(file):    79420 kB
Unevictable:           0 kB
Mlocked:               0 kB
SwapTotal:        839676 kB
SwapFree:         839676 kB
Dirty:               188 kB
Writeback:             0 kB
AnonPages:         45384 kB
Mapped:            33076 kB
Shmem:               520 kB
Slab:              43096 kB
SReclaimable:      20028 kB
SUnreclaim:        23068 kB
KernelStack:        1760 kB
PageTables:         4272 kB
NFS_Unstable:          0 kB
Bounce:                0 kB
WritebackTmp:          0 kB
CommitLimit:     1347152 kB
Committed_AS:     249468 kB
VmallocTotal:   34359738367 kB
VmallocUsed:       27108 kB
VmallocChunk:   34359706624 kB
HardwareCorrupted:     0 kB
AnonHugePages:     10240 kB
CmaTotal:              0 kB
CmaFree:               0 kB
HugePages_Total:       0
HugePages_Free:        0
HugePages_Rsvd:        0
HugePages_Surp:        0
Hugepagesize:       2048 kB
DirectMap4k:       53184 kB
DirectMap2M:      995328 kB
Note: if you type ps aux, system going to look in /proc directory
cd /proc/sys- this directory contains kernel's tunable. Which can be switchen on or off
[root@centos sys]# ls -l
total 0
dr-xr-xr-x. 1 root root 0 Aug 22 11:58 abi
dr-xr-xr-x. 1 root root 0 Aug 21 16:38 crypto
dr-xr-xr-x. 1 root root 0 Aug 22 11:58 debug
dr-xr-xr-x. 1 root root 0 Aug 22 11:58 dev
dr-xr-xr-x. 1 root root 0 Aug 21 16:35 fs
dr-xr-xr-x. 1 root root 0 Aug 21 16:35 kernel
dr-xr-xr-x. 1 root root 0 Aug 21 16:35 net
dr-xr-xr-x. 1 root root 0 Aug 22 11:58 user
dr-xr-xr-x. 1 root root 0 Aug 21 16:36 vm
cd /proc/sys/net/ipv6/conf/all- let's configure ipv6 protocol. Where all means that configuration will be applied for all network interfaces
[root@centos all]# ls
accept_dad                  force_mld_version                  optimistic_dad
accept_ra                   force_tllao                        proxy_ndp
accept_ra_defrtr            forwarding                         regen_max_retry
accept_ra_pinfo             hop_limit                          router_probe_interval
accept_ra_rt_info_max_plen  keep_addr_on_down                  router_solicitation_delay
accept_ra_rtr_pref          max_addresses                      router_solicitation_interval
accept_redirects            max_desync_factor                  router_solicitations
accept_source_route         mc_forwarding                      stable_secret
autoconf                    mldv1_unsolicited_report_interval  temp_prefered_lft
dad_transmits               mldv2_unsolicited_report_interval  temp_valid_lft
disable_ipv6                mtu                                use_optimistic
enhanced_dad                ndisc_notify                       use_tempaddr
-
echo 1 > disable_ipv6- disable ipv6 protocol. You can't use vim on that file. You can only use echo for changing configuration in kernel interface. But after reboot this settings will be reverted back. -
/etc/sysctl.conf- to find out where sysctl configuration stored. Subdirectory used to store configuration.
# sysctl settings are defined through files in
# /usr/lib/sysctl.d/, /run/sysctl.d/, and /etc/sysctl.d/.

# To override a whole file, create a new file with the same in
# /etc/sysctl.d/ and put new settings there. To override
only specific settings, add a file with a lexically later
# name in /etc/sysctl.d/ and put new settings there.
-
echo net.ipv6.conf.all.disable_ipv6 = 1 > ipv6.conf- now, next time after reboot, parameter will be applied. IPv6 protocol will be disabled. -
sysctl -a- list all tunable options for kernel
Boot procedure:
- POST - Power On Self Test
- DISK - disk found after test.
- BOOTLOADER - responsible for loading Kernel.
- KERNEL - Kernel going to load init.
- INIT/SYSTEMD - Init (systemd) will load services
- SERVICES - after services loaded, we will have shell presented
- SHELL
Bootloader:
- LILO - Linux Loader
- GRUB - Grand Unified Boot Loader
- GRUB2 - new version of the GRUB
Systemd takers care of:
- Services
- Devices
- Mounts
- and more...
Grub loader can be accessed from Grub menu in booting process:

- Linux 3.10 7 (Core) - your current installed Kernel
- Linux 0-rescue 7 (Core) - rescue kernel with minimal options to boot.
- If you want to change something in this menu, press e. We will be forwarded to the GRUB edit menu. Also we can access command prompt by pressing c, but there you should really know what you're doing.

From image above we can see several options:
- insmod - means that GRUB is loading modules. We don't need to modify it.
- Most important lines come after linux16 and initrd16. Here we can see which kernel is loading. This options used while your system is booting.

-
Let's remove options rhgb and quiet. What means you will not see what's happening while machine is booting.
-
Once we done with modifications press Ctrl + X to start.
-
To make persistent change inside of GRUB we have to go to the "/etc/default/grub" directory. Save your changes.
GRUB_TIMEOUT=5
GRUB_DISTRIBUTOR="$(sed 's, release .*$,,g' /etc/system-release)"
GRUB_DEFAULT=saved
GRUB_DISABLE_SUBMENU=true
GRUB_TERMINAL_OUTPUT="console"
GRUB_CMDLINE_LINUX="crashkernel=auto rd.lvm.lv=centos_centos/root rd.lvm.lv=centos_centos/swap rhgb quiet"
GRUB_DISABLE_RECOVERY="true"
-
To write changes to GRUB configuration file, which can be found in
/boot/grub2/grub.cfgyou have to run following command:grub2-mkconfig -o /boot/grub2/grub.cfgwhich will generate new script according to your changes done in/etc/default/grubfile. -
-rw-r--r--. 1 root root 6215 Aug 23 10:55 grub.cfg- from update date, we can see that file has been updated.
- Press e during boot to access GRUB menu.
- add line
systemd.unit=rescue.target- start operating sysmtem in rescue mode. rescue mode- minimal mode, with minimum amount of services loaded. If there is a problem during boot procedure, you can easily fix it.

-
once you done with fixing press Ctrl + D to continue booting.
-
systemd.unit=emergency.target- another option which boots a lot faster.

-
mount -o remount,rw /- puts your filesystem in read-write mode. Because in emergency state your file system by default in read-only mode -
rd.break- break into the boot procedure at the end of loading. Without entering root password. This is useful in case if you don't a root password.

chroot /sysroot- set root of file system to the contents of /sysroot directory. This directory mounted instead of /.mount -o remount,rw /- allowread-writepermission to therootdirectorypasswd- set new password of the root, in case you lost it.touch .autorelabel- for CentOS to avoid SElinux mess up with your system you have to run this command. Ubuntu and SUSE don't require this option.exit- to exit from chroot,reboot- you can safely reboot after that.
/usr/lib/systemd/- main configuration directory. You will find main components of systemd
[root@centos systemd]# ls
catalog                systemd-cryptsetup         systemd-shutdown
import-pubring.gpg     systemd-fsck               systemd-shutdownd
ntp-units.d            systemd-hibernate-resume   systemd-sleep
rhel-autorelabel       systemd-hostnamed          systemd-socket-proxyd
rhel-configure         systemd-importd            systemd-sysctl
rhel-dmesg             systemd-initctl            systemd-sysv-install
rhel-domainname        systemd-journald           systemd-timedated
rhel-import-state      systemd-localed            systemd-udevd
rhel-loadmodules       systemd-logind             systemd-update-done
rhel-readonly          systemd-machined           systemd-update-utmp
system                 systemd-machine-id-commit  systemd-user-sessions
systemd                systemd-modules-load       systemd-vconsole-setup
systemd-ac-power       systemd-pull               system-generators
systemd-activate       systemd-quotacheck         system-preset
systemd-backlight      systemd-random-seed        system-shutdown
systemd-binfmt         systemd-readahead          system-sleep
systemd-bootchart      systemd-remount-fs         user
systemd-cgroups-agent  systemd-reply-password     user-generators
systemd-coredump       systemd-rfkill             user-preset
-
/usr/lib/systemd/system- persistent part of configuration of your operating system. This directory contains unit filestmp.service- used to start servicestmp.mount- used to initialize file systemnss-lookup.target- target means groups of unit files- all files in system directory is static, what meant not be changed by system administrator.
-
Reminder: static part of configuration should be in /usr/lib
-
Reminder: dynamic part of configuration should be in /etc/systemd
-
/etc/systemd/system/- dynamic unit files, which system administrator can modify.
drwxr-xr-x. 2 root root   81 Aug 12 17:29 basic.target.wants
drwxr-xr-x. 2 root root   87 Jul 17 14:55 default.target.wants
drwxr-xr-x. 2 root root   32 Jul 17 14:55 getty.target.wants
drwxr-xr-x. 2 root root   35 Jul 17 14:55 local-fs.target.wants
drwxr-xr-x. 2 root root 4096 Aug 21 15:08 multi-user.target.wants
drwxr-xr-x. 2 root root   48 Jul 17 14:55 network-online.target.wants
drwxr-xr-x. 2 root root   29 Jul 17 14:55 sockets.target.wants
drwxr-xr-x. 2 root root  217 Jul 17 14:55 sysinit.target.wants
drwxr-xr-x. 2 root root   44 Jul 17 14:55 system-update.target.wants
/run/systemd/- what is generated dynamically stored in that directory. In case if you need an overview what systemd is doing check this directory /run/systemd/system.
systemctl -t help- overview of the different unit types, that are available.
Available unit types:
service
socket
busname
target
snapshot
device
mount
automount
swap
timer
path
slice
scope
cd /usr/lib/systemd/system- let's search for .socket units
[root@centos system]# ls *.socket
dbus.socket           rsyncd.socket           systemd-journald.socket
dm-event.socket       sshd.socket             systemd-shutdownd.socket
lvm2-lvmetad.socket   syslog.socket           systemd-udevd-control.socket
lvm2-lvmpolld.socket  systemd-initctl.socket  systemd-udevd-kernel.socket
cat /usr/lib/systemd/system/sshd.socket- let's take a look on content of that file. sshd.socket and sshd.service walks together.
[Unit]
Description=OpenSSH Server Socket
Documentation=man:sshd(8) man:sshd_config(5)
Conflicts=sshd.service

[Socket]
ListenStream=22
Accept=yes

[Install]
WantedBy=sockets.target
As we understand there is no need actual service working, even if we will disable sshd.service. Port 22 will be still available and connection through ssh can be established, because sshd.socket takes care of that.
/usr/lib/systemd/system/sshd.service- .service file goes for any unit file and consist of three parts- Unit - generic information about service, dependencies.
- Service - service definition itself
- Install - important for target
[Unit]
Description=OpenSSH server daemon
Documentation=man:sshd(8) man:sshd_config(5)
After=network.target sshd-keygen.service
Wants=sshd-keygen.service

[Service]
Type=notify
EnvironmentFile=/etc/sysconfig/sshd
ExecStart=/usr/sbin/sshd -D $OPTIONS
ExecReload=/bin/kill -HUP $MAINPID
KillMode=process
Restart=on-failure
RestartSec=42s

[Install]
WantedBy=multi-user.target
systemctl show sshd.service- list different parameters which can be included for sshd.serviceman systemd.directives- get information how to use parameters for servicesman systemd.unit- get information about directives which is related to unit files.systemctl set-property- nice way to modify unit filesystemctl set-property httpd.service MemoryLimit=500M- set memory limit to the httpd.service. Service must be active to apply some changes on it.- we can see that limit loaded to the service and stored in httpd.service.d directory

- another aproach is copy unit file from /usr/lib/systemd/system to /etc/systemd/system directory. Let's modify content of the unit file
[Unit]
Description=System Logging Service
;Requires=syslog.socket
Wants=network.target network-online.target
After=network.target network-online.target
Documentation=man:rsyslogd(8)
Documentation=http:https://www.rsyslog.com/doc/

[Service]
Type=notify
EnvironmentFile=-/etc/sysconfig/rsyslog
ExecStart=/usr/sbin/rsyslogd -n $SYSLOGD_OPTIONS
Restart=on-failure #Change to Restart=Always
#Add line here RestartSec=3
UMask=0066
StandardOutput=null
Restart=on-failure

[Install]
WantedBy=multi-user.target
- we have changed restart behaviour and added restart time to rsyslog.service. Let's reload daemon.
systemctl daemon-reload- daemon reload.- from
systemctl status rsyslog- we can see that service loaded with new settings.
● rsyslog.service - System Logging Service
   Loaded: loaded (/etc/systemd/system/rsyslog.service; enabled; vendor preset: enabled)
   Active: active (running) since Fri 2019-08-23 10:07:02 CEST; 6h ago
     Docs: man:rsyslogd(8)
           http:https://www.rsyslog.com/doc/
 Main PID: 995 (rsyslogd)
   CGroup: /system.slice/rsyslog.service
           └─995 /usr/sbin/rsyslogd -n
systemctl [TAB][TAB]- to get all available options.
targets- just a group of unit files which can be behave in specific way.ls *.target /usr/lib/systemd/system-get list of all available targets.vim /usr/lib/systemd/system/multi-user.target- let's see content of that file
#  This file is part of systemd.
#
#  systemd is free software; you can redistribute it and/or modify it
#  under the terms of the GNU Lesser General Public License as published by
#  the Free Software Foundation; either version 2.1 of the License, or
#  (at your option) any later version.

[Unit]
Description=Multi-User System
Documentation=man:systemd.special(7)
Requires=basic.target
Conflicts=rescue.service rescue.target
After=basic.target rescue.service rescue.target
AllowIsolate=yes
-
Here we can see dependency basic.target. Which required before multi-user.target starts.
-
We can see this target for instance in httpd.service unit inside of Install section.
-
/etc/systemd/system/multi-user.target.wants- we have this directory which contains of following sym links. If we include service in multi-user.target it will create symbolic links
lrwxrwxrwx. 1 root root 35 Aug 21 15:08 atd.service -> /usr/lib/systemd/system/atd.service
lrwxrwxrwx. 1 root root 38 Jul 17 14:56 auditd.service -> /usr/lib/systemd/system/auditd.service
lrwxrwxrwx. 1 root root 39 Aug 14 11:56 chronyd.service -> /usr/lib/systemd/system/chronyd.service
lrwxrwxrwx. 1 root root 37 Jul 17 14:55 crond.service -> /usr/lib/systemd/system/crond.service
lrwxrwxrwx. 1 root root 42 Jul 17 14:56 irqbalance.service -> /usr/lib/systemd/system/irqbalance.service
lrwxrwxrwx. 1 root root 37 Jul 17 14:56 kdump.service -> /usr/lib/systemd/system/kdump.service
lrwxrwxrwx. 1 root root 46 Jul 17 14:55 NetworkManager.service -> /usr/lib/systemd/system/NetworkManager.service
lrwxrwxrwx. 1 root root 39 Jul 17 14:56 postfix.service -> /usr/lib/systemd/system/postfix.service
lrwxrwxrwx. 1 root root 40 Jul 17 14:55 remote-fs.target -> /usr/lib/systemd/system/remote-fs.target
lrwxrwxrwx. 1 root root 46 Jul 17 14:55 rhel-configure.service -> /usr/lib/systemd/system/rhel-configure.service
lrwxrwxrwx. 1 root root 39 Jul 17 14:56 rsyslog.service -> /usr/lib/systemd/system/rsyslog.service
lrwxrwxrwx. 1 root root 36 Jul 17 14:56 sshd.service -> /usr/lib/systemd/system/sshd.service
lrwxrwxrwx. 1 root root 37 Jul 17 14:55 tuned.service -> /usr/lib/systemd/system/tuned.service
- When you enable some service in systemctl - symbolic link will be created.
[root@centos ~]# systemctl enable sshd
Created symlink from /etc/systemd/system/multi-user.target.wants/sshd.service to /usr/lib/systemd/system/sshd.service.
- Same when you disable service - symbolic link will be removed.
[root@centos ~]# systemctl disable sshd
Removed symlink /etc/systemd/system/multi-user.target.wants/sshd.service.
- Every linux operating systems that uses systemd are using default target
[root@centos ~]# systemctl get-default
graphical.target
- If you want to change default target:
[root@centos ~]# systemctl set-default multi-user.target
Removed symlink /etc/systemd/system/default.target.
Created symlink from /etc/systemd/system/default.target to /usr/lib/systemd/system/multi-user.target.
- Reboot to apply your changes. And get-default target to be sure, that your changes applied.
[root@centos ~]# systemctl get-default
multi-user.target
systemctl list-units- get information about units that currently loaded.systemctl list-units --all- list also inactive unitssystemctl list-dependencies sshd.service- get dependencies of the service
sshd.service
● ├─sshd-keygen.service
● ├─system.slice
● └─basic.target
●   ├─iptables.service
●   ├─microcode.service
●   ├─rhel-dmesg.service
●   ├─[email protected]
●   ├─paths.target
●   ├─slices.target
●   │ ├─-.slice
●   │ └─system.slice
●   ├─sockets.target
●   │ ├─dbus.socket
●   │ ├─dm-event.socket
●   │ ├─systemd-initctl.socket
●   │ ├─systemd-journald.socket
●   │ ├─systemd-shutdownd.socket
●   │ ├─systemd-udevd-control.socket
●   │ └─systemd-udevd-kernel.socket
systemctl isolate graphical.target- to start isolated graphical.target from multi-user.target
- If you run some service with regular user, like apache. You have to take measures, so this account couldn't harm your system. As we can see, there are a lot of processes run by apache user.
[root@centos ~]# ps aux | grep httpd
root      1914  2.5  0.4 224056  5004 ?        Ss   11:46   0:00 /usr/sbin/httpd -DFOREGROUND
apache    1915  0.0  0.2 224056  2960 ?        S    11:46   0:00 /usr/sbin/httpd -DFOREGROUND
apache    1916  0.0  0.2 224056  2960 ?        S    11:46   0:00 /usr/sbin/httpd -DFOREGROUND
apache    1917  0.0  0.2 224056  2960 ?        S    11:46   0:00 /usr/sbin/httpd -DFOREGROUND
apache    1918  0.0  0.2 224056  2960 ?        S    11:46   0:00 /usr/sbin/httpd -DFOREGROUND
apache    1919  0.0  0.2 224056  2960 ?        S    11:46   0:00 /usr/sbin/httpd -DFOREGROUND
- If we will try to log on as apache user, we will get the following error:
[root@centos ~]# su - apache
This account is currently not available.
- Because shell for that user set to /sbin/nologin:
[root@centos ~]# cat /etc/passwd | grep apache
apache:x:48:48:Apache:/usr/share/httpd:/sbin/nologin
There are two different systems of Mandatory Access Control:
- AppArmor - solution used on Ubuntu and SUSE families.
- SELinux - solution used by CentOs and related distributions.
- SELinux:
- Old, NSA, RHAT
- difficult
- complete: all denied
- policy used:
- rules - what is allowed, what is not
- also available on SUSE and Ubuntu
- AppArmor:
- Purchased by SUSE. SUSE and Ubuntu - default solution.
- easy to configure
- confined services
- profile files

- Let's make some demo with AppArmor on SUSE. AppArmor already enabled on SUSE by default
linux-aqsf:~ # aa-
aa-audit           aa-disable         aa-genprof         aa-status
aa-autodep         aa-easyprof        aa-logprof         aa-teardown
aa-cleanprof       aa-enabled         aa-mergeprof       aa-unconfined
aa-complain        aa-enforce         aa-notify
aa-decode          aa-exec            aa-remove-unknown
aa-status | less- get information about profiles.
linux-aqsf:~ # aa-status | less
apparmor module is loaded.
45 profiles are loaded.
45 profiles are in enforce mode.
   /usr/bin/lessopen.sh
   /usr/lib/apache2/mpm-prefork/apache2
   /usr/lib/apache2/mpm-prefork/apache2//DEFAULT_URI
   /usr/lib/apache2/mpm-prefork/apache2//HANDLING_UNTRUSTED_INPUT
   /usr/lib/apache2/mpm-prefork/apache2//phpsysinfo
   /usr/lib/dovecot/anvil
   /usr/lib/dovecot/auth
   /usr/lib/dovecot/config
   /usr/lib/dovecot/deliver
   /usr/lib/dovecot/dict
   /usr/lib/dovecot/dovecot-auth
   /usr/lib/dovecot/dovecot-lda
   /usr/lib/dovecot/dovecot-lda//sendmail
   /usr/lib/dovecot/imap
   /usr/lib/dovecot/imap-login
   /usr/lib/dovecot/lmtp
   /usr/lib/dovecot/log
   /usr/lib/dovecot/managesieve
   /usr/lib/dovecot/managesieve-login
   /usr/lib/dovecot/pop3
   /usr/lib/dovecot/pop3-login
   /usr/lib/dovecot/ssl-params
/etc/apparmor.d/- directory where profiles located itself.
linux-aqsf:/etc/apparmor.d # ls
abstractions                         usr.lib.dovecot.lmtp
apache2.d                            usr.lib.dovecot.log
bin.ping                             usr.lib.dovecot.managesieve
cache                                usr.lib.dovecot.managesieve-login
disable                              usr.lib.dovecot.pop3
local                                usr.lib.dovecot.pop3-login
sbin.klogd                           usr.lib.dovecot.ssl-params
sbin.syslog-ng                       usr.lib.dovecot.stats
sbin.syslogd                         usr.sbin.apache2
tunables                             usr.sbin.avahi-daemon
usr.bin.lessopen.sh                  usr.sbin.dnsmasq
usr.lib.apache2.mpm-prefork.apache2  usr.sbin.dovecot
usr.lib.dovecot.anvil                usr.sbin.identd
usr.lib.dovecot.auth                 usr.sbin.mdnsd
usr.lib.dovecot.config               usr.sbin.nmbd
usr.lib.dovecot.deliver              usr.sbin.nscd
usr.lib.dovecot.dict                 usr.sbin.ntpd
usr.lib.dovecot.dovecot-auth         usr.sbin.smbd
usr.lib.dovecot.dovecot-lda          usr.sbin.smbldap-useradd
usr.lib.dovecot.imap                 usr.sbin.traceroute
usr.lib.dovecot.imap-login           usr.sbin.winbindd
- let's investigate apache profile "usr.sbin.apache2". We can see there entire content of profile.
- We have couple of includes here for base and nameservice
- Also some read-write permissions indicated here.
- Include of apache2.d
# Author: Marc Deslauriers <[email protected]>

#include <tunables/global>
profile apache2 /usr/{bin,sbin}/apache2 flags=(attach_disconnected) {

  # This profile is completely permissive.
  # It is designed to target specific applications using mod_apparmor,
  # hats, and the apache2.d directory.
  #
  # In order to enable this profile, you must:
  #
  # 0- Stop apache:
  #    sudo service apache2 stop
  #
  # 1- Enable the profile:
  #    sudo aa-enforce /etc/apparmor.d/usr.sbin.apache2
  #
  # 2- Load the mpm_prefork and mod_apparmor modules:
  #    sudo a2dismod <other non-prefork mpm>
  #    sudo a2enmod mpm_prefork
  #    sudo a2enmod apparmor
  #    sudo service apache2 restart
  #
  # 3- Place an appropriate profile containing the desired hat in the
  #    /etc/apparmor.d/apache2.d directory.  Such profiles must include
  #    the "apache2-common" abstraction:
  #
  #    ^example.com {
  #        #include <abstractions/apache2-common>
  #        /var/www/html/             r,
  #        /var/www/html/**           r,
  #        /var/log/apache2/*.log     w,
  #    }
  #
  # 4- Use the "AADefaultHatName" apache configuration option to specify a
  #    hat to be used for a given apache virtualhost or "AAHatName" for
  #    a given apache directory or location directive:
  #
  #    <VirtualHost example.com:80>
  #        <IfModule mod_apparmor.c>
  #            AADefaultHatName example.com
  #        </IfModule>
  #        ...
  #    </VirtualHost>
  #
  #
  # There is an example profile for phpsysinfo included in the
  # apparmor-profiles package. To try it:
  #
  # 1- Install the phpsysinfo and the apparmor-profiles packages:
  #    sudo apt-get install phpsysinfo apparmor-profiles
  #
  # 2- Enable the main apache2 profile
  #    sudo aa-enforce /etc/apparmor.d/usr.sbin.apache2
  #
  # 3- Configure apache with the following (or similar):
  #    Alias /phpsysinfo /usr/share/phpsysinfo
  #    <Location /phpsysinfo>
  #        <IfModule mod_apparmor.c>
  #          AAHatName phpsysinfo
  #        </IfModule>
  #
  #        # adjust as necessary:
  #        Options None
  #        Require local
  #        Require ip 192.168.0.0/16
  #    </Location>
  #

  #include <abstractions/base>
  #include <abstractions/nameservice>

  # Send signals to all hats.
  signal (send) peer=@{profile_name}//*,

  capability dac_override,
  capability kill,
  capability net_bind_service,
  capability setgid,
  capability setuid,
  capability sys_tty_config,

  / rw,
  /** mrwlkix,


  ^DEFAULT_URI flags=(attach_disconnected) {
    #include <abstractions/base>
    #include <abstractions/apache2-common>

    / rw,
    /** mrwlkix,
  }

  ^HANDLING_UNTRUSTED_INPUT flags=(attach_disconnected) {
    #include <abstractions/apache2-common>

    / rw,
    /** mrwlkix,
  }

  # This directory contains web application
  # package-specific apparmor files.

  #include <apache2.d>

  # Site-specific additions and overrides. See local/README for details.
  #include <local/usr.sbin.apache2>
}
aa-genprof $(which vim)- let's generate profile for vim
ldd: warning: you do not have execution permission for `/lib64/libattr.so.1.1.0'
ldd: warning: you do not have execution permission for `/lib64/libattr.so.1.1.0'
Writing updated profile for /usr/bin/vim-nox11.
Setting /usr/bin/vim-nox11 to complain mode.
aa-genprof /bin/vim- let's run vim command in complain mode.- Open vim in another terminal window and add line to the /etc/hosts. (S)can from running AppArmor, we have options to allow or deny and so on.
After adddition of few lines in /etc/hosts we can (S)can system log for AppArmor events
[(S)can system log for AppArmor events] / (F)inish
Reading log entries from /var/log/audit/audit.log.
Updating AppArmor profiles in /etc/apparmor.d.
Complain-mode changes:

Profile:  /usr/bin/vim-nox11
Path:     /etc/apparmor.d/
New Mode: owner r
Severity: 6

 [1 - owner /etc/apparmor.d/ r,]
(A)llow / [(D)eny] / (I)gnore / (G)lob / Glob with (E)xtension / (N)ew / Audi(t) / (O)wner permissions off / Abo(r)t / (F)inish
-
Actions: (A)llow (D)eny (I)gnore (G)lob - if you want vi to be allowed to entire /etc directory Glob with (E)xtension - if you want vi to be allowed to entire /etc directory, but only if you have .swp directory.
-
Let's save our changes
= Changed Local Profiles =

The following local profiles were changed. Would you like to save them?

 [1 - /usr/bin/vim-nox11]
(S)ave Changes / Save Selec(t)ed Profile / [(V)iew Changes] / View Changes b/w (C)lean profiles / Abo(r)t
Writing updated profile for /usr/bin/vim-nox11.
- After profile creation we can only access /etc/hosts with vim because we created profile. If we'll try to access something else, we're going to receive permission error
linux-aqsf:/etc/apparmor.d # vim usr.bin.vim-nox11
"usr.bin.vim-nox11" [Permission Denied]
aa-autodep ping- create profile for ping command. From aa-status we can see that currently we have 1 profile in complain mode.aa-enforce /usr/bin/ping- enforce profile.- after that for running ping command we will receive error: permission denied even if you're root user
aa-logprof- to see what actions tried to be executed. And we can allow or deny access to it.aa-disable /usr/bin/ping- disable profile.
- States of SELinux can be:
- enabled
- enforcing mode - fully operational
- permissive mode - easy mode to do troubleshooting
- setenforce - to toggle between two of them.
- disabled
- /etc/sysconfig/selinux or /etc/selinux/config to toggle between state disabled or enabled
- enabled
Note: if you switch mode you will need to reboot

getenforce- to check if we're in Enforcing mode
[root@centos ~]# getenforce
Enforcing
setenforce Permissive- will switch to Permissive mode
[root@centos ~]# setenforce Permissive
[root@centos ~]# getenforce
Permissive
setenforce disabled- is not possible, only Enforcing or Permissive modes are available.
[root@centos ~]# setenforce disabled
usage:  setenforce [ Enforcing | Permissive | 1 | 0 ]
cd /etc/sysconfig/- place where symbolic link of selinux placed
[root@centos sysconfig]# ls -l selinux
lrwxrwxrwx. 1 root root 17 Jul 17 14:55 selinux -> ../selinux/config
/etc/selinux/config- SELinux configuration file. In case if you want to disable SELinux. ChangeSELINUX=enforcingtoSELINUX=disabledand reboot. But you don't want to do that, system need to be secured.
# This file controls the state of SELinux on the system.
# SELINUX= can take one of these three values:
#     enforcing - SELinux security policy is enforced.
#     permissive - SELinux prints warnings instead of enforcing.
#     disabled - No SELinux policy is loaded.
SELINUX=enforcing
# SELINUXTYPE= can take one of three values:
#     targeted - Targeted processes are protected,
#     minimum - Modification of targeted policy. Only selected processes are protected.
#     mls - Multi Level Security protection.
SELINUXTYPE=targeted
- Context label - essential part of SELinux. Consist of 3 parts:
- user
- role
- type or context type
ls -lZ- many commands, get information about context labels
[root@centos selinux]# ls -lZ
-rw-r--r--. root root system_u:object_r:selinux_config_t:s0 config
drwx------. root root system_u:object_r:selinux_config_t:s0 final
-rw-r--r--. root root system_u:object_r:selinux_config_t:s0 semanage.conf
drwxr-xr-x. root root system_u:object_r:selinux_config_t:s0 targeted
drwxr-xr-x. root root system_u:object_r:selinux_config_t:s0 tmp
ps Zaux- context type also exists in processes
system_u:system_r:httpd_t:s0    root      1914  0.0  0.4 224056  5004 ?        Ss   11:46   0:01 /usr/sbin/httpd -DFOREGROUND
system_u:system_r:httpd_t:s0    apache    1915  0.0  0.2 224056  2960 ?        S    11:46   0:00 /usr/sbin/httpd -DFOREGROUND
system_u:system_r:httpd_t:s0    apache    1916  0.0  0.2 224056  2960 ?        S    11:46   0:00 /usr/sbin/httpd -DFOREGROUND
system_u:system_r:httpd_t:s0    apache    1917  0.0  0.2 224056  2960 ?        S    11:46   0:00 /usr/sbin/httpd -DFOREGROUND
system_u:system_r:httpd_t:s0    apache    1918  0.0  0.2 224056  2960 ?        S    11:46   0:00 /usr/sbin/httpd -DFOREGROUND
system_u:system_r:httpd_t:s0    apache    1919  0.0  0.2 224056  2960 ?        S    11:46   0:00 /usr/sbin/httpd -DFOREGROUND
netstat -Ztulpen- context types also available on ports
[root@centos ~]# netstat -Ztulpen
Active Internet connections (only servers)
Proto Recv-Q Send-Q Local Address           Foreign Address         State       User       Inode      PID/Program name     Security Context
tcp        0      0 127.0.0.1:25            0.0.0.0:*               LISTEN      0          18256      1220/master          system_u:system_r:postfix_master_t:s0
tcp        0      0 0.0.0.0:22              0.0.0.0:*               LISTEN      0          20127      1691/sshd            system_u:system_r:sshd_t:s0-s0:c0.c1023
tcp6       0      0 ::1:25                  :::*                    LISTEN      0          18257      1220/master          system_u:system_r:postfix_master_t:s0
tcp6       0      0 :::80                   :::*                    LISTEN      0          21615      1914/httpd           system_u:system_r:httpd_t:s0
tcp6       0      0 :::22                   :::*                    LISTEN      0          20129      1691/sshd            system_u:system_r:sshd_t:s0-s0:c0.c1023
-
vim /etc/httpd/conf/httpd.conf- let's start from apache configuration file.DocumentRoot "/var/www/html"- comment it and set toDocumentRoot "/web"<Directory "/var/www">change to<Directory "/web">- Create directory
/weband file/web/index.htmlwith content inside. systemctl restart httpd- Restart apache.
-
If we have Permissive mode - we can see new content that we just created.

- But if we will change mode to Enforcing, content will not be available anymore.

- This caused because directory /web doesn't have right context. Processes that running by apache with context httpd_t don't allowed to access items with context default_t.
[root@centos web]# ls -lZd
drwxr-xr-x. root root unconfined_u:object_r:default_t:s0 .
semanage fcontext- SELinux Policy Management file context tool.
EXAMPLE
       remember to run restorecon after you set the file context
       Add file-context for everything under /web
       # semanage fcontext -a -t httpd_sys_content_t "/web(/.*)?"
       # restorecon -R -v /web

       Substitute /home1 with /home when setting file context
       # semanage fcontext -a -e /home /home1
       # restorecon -R -v /home1

       For home directories under top level directory, for example /disk6/home,
       execute the following commands.
       # semanage fcontext -a -t home_root_t "/disk6"
       # semanage fcontext -a -e /home /disk6/home
       # restorecon -R -v /disk6
-
semanage fcontext -a -t httpd_sys_content_t "/web(/.*)?"- will write new context type to SELinux policy, but it doesn't apply it to the file system yet. -a - add, -t - type, "/web(/.*)?" - web directory and everything what is below it. -
restorecon -R -v /web- to apply set SELinux policy to the file system -
ls -lZd /web- you can see now new policy was applied and context type has been changed.
[root@centos web]# ls -lZd
drwxr-xr-x. root root unconfined_u:object_r:httpd_sys_content_t:s0 .
- context apply to the others level as well - ports. Let's try to change ssh default port. From /etc/ssh/sshd_config we can see the following:
# If you want to change the port on a SELinux system, you have to tell
# SELinux about this change.
# semanage port -a -t ssh_port_t -p tcp #PORTNUMBER
#
#Port 22
#AddressFamily any
#ListenAddress 0.0.0.0
#ListenAddress ::
-
we can see line Port 22, but for SELinux system it's not enough.
-
semanage port -a -t ssh_port_t -p tcp #PORTNUMBER- that command required to make changes in SELinux policy. -
for changing default port, you need to do following steps:
- uncomment line Port 2022
semanage port -a -t ssh_port_t -p tcp 2022- run command to apply policy change in SELinuxsystemctl restart sshd- restart sshd service
-
getsebool -a- get list of currently existing booleans -
getsebool -a | grep ftp- let's get all booleans with ftp in name. [root@centos web]# getsebool -a | grep ftp ftpd_anon_write --> off ftpd_connect_all_unreserved --> off ftpd_connect_db --> off ftpd_full_access --> off ftpd_use_cifs --> off ftpd_use_fusefs --> off ftpd_use_nfs --> off ftpd_use_passive_mode --> off httpd_can_connect_ftp --> off httpd_enable_ftp_server --> off tftp_anon_write --> off tftp_home_dir --> off -
ftpd_anon_write --> off- means that anonimous write is set to off. No matter if you configure your FTP server to allow anonimous write, SELinux will stop it, no matter what. -
setsebool -P ftpd_anon_write on- set anonimous write to on (allow) state, with -P key - which means persistent.
yum provides *sealert- search which package provides sealert- go to /var/log/messages and search for sealert event.
sealert -l 949523-2342-fasf-124124 | less- from this event you can get information what happened, possible solutions and so on.
- Linux split all disk into partitions, if common disk name is /dev/sda, then:
/dev/sda1- /boot/dev/sda2- /root/dev/sda3- /home

- On current Linux there are 2 type or partitions:
- MBR
- Computers that are booting from BIOS (Basic Input Output System)
- Used by disk which is less than 2Tb
- Maximum is 4 partitions
- Extended partitions
- Logical partitions
- fdisk for MBR partitions
- GPT
- UEFI (Unified Extensible Firmware Interface) - new solution for booting, which using GPT paritioning.
- Used by disk which is more than 2Tb
- You can address max 128 partitions
- All partitions are primary
- gdisk to manage GPT partitions
- MBR
cat /proc/partitions- get information which storage devices are available.- where sd means - SCSI disk
- a - means order of the disk, it means first one.
- 1 and 2 - means numbers of partitions - sda1, sda2
[root@centos ~]# cat /proc/partitions
major minor  #blocks  name

   8        0    8388608 sda
   8        1    1048576 sda1
   8        2    7339008 sda2
   8       16    1258291 sdb
  11        0    1048575 sr0
 253        0    6496256 dm-0
 253        1     839680 dm-1
fdisk /dev/sdb:
[root@centos ~]# fdisk /dev/sdb
Welcome to fdisk (util-linux 2.23.2).

Changes will remain in memory only, until you decide to write them.
Be careful before using the write command.

Device does not contain a recognized partition table
Building a new DOS disklabel with disk identifier 0xd0482aa3.

Command (m for help):
Command (m for help): m:
Command action
   a   toggle a bootable flag
   b   edit bsd disklabel
   c   toggle the dos compatibility flag
   d   delete a partition
   g   create a new empty GPT partition table
   G   create an IRIX (SGI) partition table
   l   list known partition types
   m   print this menu
   n   add a new partition
   o   create a new empty DOS partition table
   p   print the partition table
   q   quit without saving changes
   s   create a new empty Sun disklabel
   t   change a partition's system id
   u   change display/entry units
   v   verify the partition table
   w   write table to disk and exit
   x   extra functionality (experts only)
Command (m for help): n #n means create new partition
Partition type:
   p   primary (0 primary, 0 extended, 4 free)
   e   extended
-
Select (default p): p #p means primary partition -
Partition number (1-4, default 1): 1 #1 - number indicated for partition -
First sector (2048-2516581, default 2048):
Using default value 2048 #2048 - start from megabyte number 1
Last sector, +sectors or +size{K,M,G} (2048-2516581, default 2516581): +1G #select size of the partition. Indicated 1 Gb partition size.
Partition 1 of type Linux and of size 1 GiB is set
Command (m for help): p- we used p to verify what is going to be created.
Disk /dev/sdb: 1288 MB, 1288489984 bytes, 2516582 sectors
Units = sectors of 1 * 512 = 512 bytes
Sector size (logical/physical): 512 bytes / 512 bytes
I/O size (minimum/optimal): 512 bytes / 512 bytes
Disk label type: dos
Disk identifier: 0xd0482aa3

   Device Boot      Start         End      Blocks   Id  System
/dev/sdb1            2048     2099199     1048576   83  Linux
Command (m for help): w- write configuration to disk
The partition table has been altered!

Calling ioctl() to re-read partition table.
Syncing disks.
cat /proc/partitionsorfdisk -l /dev/sdb- verify that we have created sdb1 partition.
[root@centos ~]# cat /proc/partitions
major minor  #blocks  name

   8        0    8388608 sda
   8        1    1048576 sda1
   8        2    7339008 sda2
   8       16    1258291 sdb
   8       17    1048576 sdb1
  11        0    1048575 sr0
 253        0    6496256 dm-0
 253        1     839680 dm-1
[root@centos ~]# fdisk -l /dev/sdb

Disk /dev/sdb: 1288 MB, 1288489984 bytes, 2516582 sectors
Units = sectors of 1 * 512 = 512 bytes
Sector size (logical/physical): 512 bytes / 512 bytes
I/O size (minimum/optimal): 512 bytes / 512 bytes
Disk label type: dos
Disk identifier: 0xd0482aa3

   Device Boot      Start         End      Blocks   Id  System
/dev/sdb1            2048     2099199     1048576   83  Linux
-
In MBR we only can have 4 primary partitions. If more required we have to go for extended and logical partitions.
-
fdisk /dev/sdb- again go to fdisk utilityn- for new partitione- for extended partitionFirst sector (1050624-2516581, default 1050624):- will search for first available sectorLast sector, +sectors or +size{K,M,G} (1050624-2516581, default 2516581):- will take last sector as default which is really suggested to avoid waste of disk space.
IMPORTANT: You create extended partition as your last partition. Everything that won't be available in the extended partition in that case won't be addressable anymore. That will be a waste of the disk space
Partition type:
   p   primary (1 primary, 0 extended, 3 free)
   e   extended
Select (default p): e
Partition number (2-4, default 2): 2
First sector (1050624-2516581, default 1050624):
Using default value 1050624
Last sector, +sectors or +size{K,M,G} (1050624-2516581, default 2516581):
Using default value 2516581
Partition 2 of type Extended and of size 715.8 MiB is set
-
Extended partition is like an empty box. You should create logical partition in it.
-
from fdisk we can see that logical partition is available now.
Command (m for help): n
Partition type:
   p   primary (1 primary, 1 extended, 2 free)
   l   logical (numbered from 5)
Select (default p): l
- we choose
lin our case for logical partition. - start block comes 1 Mb further of the extended partition.
- we define end block with size +250M.
pwill show to us information about extended and logical partitionswto write configuration to the disk
   Device Boot      Start         End      Blocks   Id  System
/dev/sdb1            2048     1050623      524288   83  Linux
/dev/sdb2         1050624     2516581      732979    5  Extended
/dev/sdb5         1052672     1564671      256000   83  Linux
partprobe- contents of the partition table on disk will be syncronized with kernel partition table. That command required if you will receive error kernel partition table couldn't syncronize.
gdisk /dev/sdc- gdisk is utility for creating GPT partitions. For applying it on MBR you need to convert your disk.
[root@centos ~]# gdisk /dev/sdb
GPT fdisk (gdisk) version 0.8.10

Partition table scan:
  MBR: MBR only
  BSD: not present
  APM: not present
  GPT: not present
- let's run ? for help
Command (? for help): ?
b       back up GPT data to a file
c       change a partition's name
d       delete a partition
i       show detailed information on a partition
l       list known partition types
n       add a new partition
o       create a new empty GUID partition table (GPT)
p       print the partition table
q       quit without saving changes
r       recovery and transformation options (experts only)
s       sort partitions
t       change a partition's type code
v       verify disk
w       write table to disk and exit
x       extra functionality (experts only)
?       print this menu
-
Command (? for help): n- create new partition -
Partition number (1-128, default 1): 1- select partition number -
First sector (34-2516548, default = 2048) or {+-}size{KMGTP}:- select first sector start. We used default value. -
Last sector (2048-2516548, default = 2516548) or {+-}size{KMGTP}: +1G- last sector, use default or size. In our case we used 1Gb. -
Hex code or GUID (L to show codes, Enter = 8300):- default value for Linux filesystem -
Command (? for help): p- get information about or changes. Pretty similar to fdisk
Disk /dev/sdb: 2516582 sectors, 1.2 GiB
Logical sector size: 512 bytes
Disk identifier (GUID): 6ECA454F-ED99-4D3A-81FA-C4D3141EE2C4
Partition table holds up to 128 entries
First usable sector is 34, last usable sector is 2516548
Partitions will be aligned on 2048-sector boundaries
Total free space is 419363 sectors (204.8 MiB)

Number  Start (sector)    End (sector)  Size       Code  Name
   1            2048         2099199   1024.0 MiB  8300  Linux filesystem

mkfs [TAB][TAB]- to get all available mkfs versions
[root@centos ~]# mkfs
mkfs         mkfs.cramfs  mkfs.ext3    mkfs.minix
mkfs.btrfs   mkfs.ext2    mkfs.ext4    mkfs.xfs
mkfs.ext4 --help- let's start from mkfs.ext4mkfs.ext4 -b 1024 -L myfs /dev/sdc1- create file system ext4 on partition sdc1mount /dev/sdc1 /media/sdc1/- mount created file system on directory/media/sdc1/mount- to double-check that we did everything properly.
/dev/sdc1 on /media/sdc1 type ext4 (rw,relatime,seclabel,data=ordered)
- We can create files now and so on. In a root directory of any ext file system, you will always have lost+found directory. That directory can be used by fsc (file system check) utility. It can be activated manually or on reboot to check for lost blocks and they will be copied in that directory.
[root@centos sdc1]# ls
lost+found  myfile.txt
-
umount /media/sdc1/- unmount your file system from that directory. -
mkfs.xfs --help- creating xfs file system.
mkfs.xfs: invalid option -- '-'
unknown option --
Usage: mkfs.xfs
/* blocksize */         [-b log=n|size=num]
/* metadata */          [-m crc=0|1,finobt=0|1,uuid=xxx]
/* data subvol */       [-d agcount=n,agsize=n,file,name=xxx,size=num,
                            (sunit=value,swidth=value|su=num,sw=num|noalign),
                            sectlog=n|sectsize=num
/* force overwrite */   [-f]
/* inode size */        [-i log=n|perblock=n|size=num,maxpct=n,attr=0|1|2,
                            projid32bit=0|1]
/* no discard */        [-K]
/* log subvol */        [-l agnum=n,internal,size=num,logdev=xxx,version=n
                            sunit=value|su=num,sectlog=n|sectsize=num,
                            lazy-count=0|1]
/* label */             [-L label (maximum 12 characters)]
/* naming */            [-n log=n|size=num,version=2|ci,ftype=0|1]
/* no-op info only */   [-N]
/* prototype file */    [-p fname]
/* quiet */             [-q]
/* realtime subvol */   [-r extsize=num,size=num,rtdev=xxx]
/* sectorsize */        [-s log=n|size=num]
/* version */           [-V]
                        devicename
<devicename> is required unless -d name=xxx is given.
<num> is xxx (bytes), xxxs (sectors), xxxb (fs blocks), xxxk (xxx KiB),
      xxxm (xxx MiB), xxxg (xxx GiB), xxxt (xxx TiB) or xxxp (xxx PiB).
<value> is xxx (512 byte blocks).
mkfs.xfs -L XFS /dev/sdc2- create xfs partition. But we received error, because it's not possible to create partition on Extended partition with 1 block size, we have to do it on logical partition.
[root@centos ~]# mkfs.xfs -L XFS /dev/sdc2
mkfs.xfs: /dev/sdc2 appears to contain a partition table (dos).
mkfs.xfs: Use the -f option to force overwrite.
[root@centos ~]# mkfs.xfs -L XFS /dev/sdc5- create xfs file system on logical partition /dev/sdc5
meta-data=/dev/sdc5              isize=512    agcount=4, agsize=32640 blks
         =                       sectsz=512   attr=2, projid32bit=1
         =                       crc=1        finobt=0, sparse=0
data     =                       bsize=4096   blocks=130560, imaxpct=25
         =                       sunit=0      swidth=0 blks
naming   =version 2              bsize=4096   ascii-ci=0 ftype=1
log      =internal log           bsize=4096   blocks=855, version=2
         =                       sectsz=512   sunit=0 blks, lazy-count=1
realtime =none                   extsz=4096   blocks=0, rtextents=0
mount LABEL=XFS /media/sdc5/- mount created XFS label.mount- to double-check that partition mounted.
/dev/sdc5 on /media/sdc5 type xfs (rw,relatime,seclabel,attr2,inode64,noquota)
mkfs.btrfs --help- get information about 'butterfs'
Usage: mkfs.btrfs [options] dev [ dev ... ]
Options:
  allocation profiles:
        -d|--data PROFILE       data profile, raid0, raid1, raid5, raid6, raid10, dup or single
        -m|--metadata PROFILE   metadata profile, values like for data profile
        -M|--mixed              mix metadata and data together
  features:
        -n|--nodesize SIZE      size of btree nodes
        -s|--sectorsize SIZE    data block size (may not be mountable by current kernel)
        -O|--features LIST      comma separated list of filesystem features (use '-O
list-all' to list features)
        -L|--label LABEL        set the filesystem label
        -U|--uuid UUID          specify the filesystem UUID (must be unique)
  creation:
        -b|--byte-count SIZE    set filesystem size to SIZE (on the first device)
        -r|--rootdir DIR        copy files from DIR to the image root directory
        -K|--nodiscard          do not perform whole device TRIM
        -f|--force              force overwrite of existing filesystem
  general:
        -q|--quiet              no messages except errors
        -V|--version            print the mkfs.btrfs version and exit
        --help                  print this help and exit
  deprecated:
        -A|--alloc-start START  the offset to start the filesystem
        -l|--leafsize SIZE      deprecated, alias for nodesize
mkfs.btrfs -L butter /dev/sdb1- create file system based on btrfs with label butter and used GPT partition /dev/sdb1
btrfs-progs v4.9.1
See http:https://btrfs.wiki.kernel.org for more information.

Label:              butter
UUID:               a181389f-27ac-4c61-9dde-205214c2cf43
Node size:          16384
Sector size:        4096
Filesystem size:    512.00MiB
Block group profiles:
  Data:             single            8.00MiB
  Metadata:         DUP              32.00MiB
  System:           DUP               8.00MiB
SSD detected:       no
Incompat features:  extref, skinny-metadata
Number of devices:  1
Devices:
   ID        SIZE  PATH
    1   512.00MiB  /dev/sdb1
mount- to check that partition mounted.
/dev/sdb1 on /media/butter type btrfs (rw,relatime,seclabel,space_cache,subvolid=5,subvol=/)
/etc/fstab- configuration file of fstab. Where:/dev/sda3- device we want to mount/quota- mount pointext4- file systemusrquota,grpquota- mount options, in case we need any. If you don't know which options to use, then use default
/dev/mapper/centos_centos-root /                       xfs     defaults                     0 0
UUID=f8248240-363e-449b-98a8-25ad950f2430 /boot                   xfs     defaults          0 0
/dev/mapper/centos_centos-swap swap                    swap    defaults                     0 0
/dev/sda3                                              /quota     ext4    usrquota,grpquota 0 0
mount -a- to mount all devices indicated in fstab but not mounted yet. Or you can reboot, devices will be mounted automatically.
/dev/sdb1 on /btrfs type btrfs (rw,relatime,seclabel,space_cache,subvolid=5,subvol=/)
/dev/sdc1 on /ext4 type ext4 (rw,relatime,seclabel,data=ordered)
/dev/sdc5 on /xfs type xfs (rw,relatime,seclabel,attr2,inode64,noquota)
- If we have some errors in
/etc/fstab, you'll receive an error whenmount -acommand executed:
[root@centos /]# mount -a
mount: special device /dev/sdc7 does not exist
[root@centos /]# mount -a
mount: wrong fs type, bad option, bad superblock on /dev/sdc5,
       missing codepage or helper program, or other error

       In some cases useful info is found in syslog - try
       dmesg | tail or so.
ls /usr/lib/systemd/system/ | grep mount- new solution to mount file systems available. What is called systemd mount.
dev-hugepages.mount                sys-fs-fuse-connections.mount
dev-mqueue.mount                   sys-kernel-config.mount
proc-sys-fs-binfmt_misc.automount  sys-kernel-debug.mount
proc-sys-fs-binfmt_misc.mount      tmp.mount
-
tmp.mount- will be used as an example to mount. -
sys-kernel-debug.mountwhere '-'(dashes) means /sys/kernel/debug/ mount point. -
cp tmp.mount /etc/systemd/system/btrfs.mount- copy mount file. Don't forget to copy it under /etc, because it's custom configuration. -
vim /etc/systemd/system/btrfs.mount- let's modify content of this mount file.
#  This file is part of systemd.
#
#  systemd is free software; you can redistribute it and/or modify it
#  under the terms of the GNU Lesser General Public License as published by
#  the Free Software Foundation; either version 2.1 of the License, or
#  (at your option) any later version.

[Unit]
Description=Temporary Directory
Documentation=man:hier(7)
Documentation=http:https://www.freedesktop.org/wiki/Software/systemd/APIFileSystems
DefaultDependencies=no
Conflicts=umount.target
Before=local-fs.target umount.target

[Mount]
What=/dev/sdb1
Where=/btrfs
Type=btrfs
Options=defaults

# Make 'systemctl enable tmp.mount' work:
[Install]
WantedBy=local-fs.target
- most important part is [Mount]. Same we did in fstab already.
[Mount]
What=/dev/sdb1
Where=/btrfs
Type=btrfs
Options=defaults
systemctl daemon-reload- reload daemon, so systemd will be aware of our changes.systemctl start btrfs.mount- mount our file systemmount- verify that our partition mounted.
/dev/sdb1 on /btrfs type btrfs (rw,relatime,seclabel,space_cache,subvolid=5,subvol=/)
systemctl status btrfs.mount- also accessible from systemctl
[root@centos system]# systemctl status btrfs.mount
● btrfs.mount - Temporary Directory
   Loaded: loaded (/etc/systemd/system/btrfs.mount; disabled; vendor preset: disabled)
   Active: active (mounted) since Wed 2019-08-28 16:07:28 CEST; 1min 38s ago
    Where: /btrfs
     What: /dev/sdb1
     Docs: man:hier(7)
           http:https://www.freedesktop.org/wiki/Software/systemd/APIFileSystems
  Process: 2782 ExecMount=/bin/mount /dev/sdb1 /btrfs -t btrfs -o defaults (code=exited, status=0/SUCCESS)
   Memory: 148.0K

Aug 28 16:07:28 centos.example.com systemd[1]: Mounting Temporary Directory...
Aug 28 16:07:28 centos.example.com systemd[1]: Mounted Temporary Directory.
-
SWAP space- used as emulated RAM file on hard disk. Used to store data of RAM, which is not used at all. -
fdisk /dev/sdc- access our partition and change it type.t change a partition's system idHex code (type L to list all codes): L- list all HEX codes- we need code
82 - Linux swap / Solaris
0  Empty           24  NEC DOS         81  Minix / old Lin bf  Solaris
 1  FAT12           27  Hidden NTFS Win 82  Linux swap / So c1  DRDOS/sec (FAT-
 2  XENIX root      39  Plan 9          83  Linux           c4  DRDOS/sec (FAT-
 3  XENIX usr       3c  PartitionMagic  84  OS/2 hidden C:  c6  DRDOS/sec (FAT-
 4  FAT16 <32M      40  Venix 80286     85  Linux extended  c7  Syrinx
 5  Extended        41  PPC PReP Boot   86  NTFS volume set da  Non-FS data
 6  FAT16           42  SFS             87  NTFS volume set db  CP/M / CTOS / .
 7  HPFS/NTFS/exFAT 4d  QNX4.x          88  Linux plaintext de  Dell Utility
 8  AIX             4e  QNX4.x 2nd part 8e  Linux LVM       df  BootIt
 9  AIX bootable    4f  QNX4.x 3rd part 93  Amoeba          e1  DOS access
 a  OS/2 Boot Manag 50  OnTrack DM      94  Amoeba BBT      e3  DOS R/O
 b  W95 FAT32       51  OnTrack DM6 Aux 9f  BSD/OS          e4  SpeedStor
 c  W95 FAT32 (LBA) 52  CP/M            a0  IBM Thinkpad hi eb  BeOS fs
 e  W95 FAT16 (LBA) 53  OnTrack DM6 Aux a5  FreeBSD         ee  GPT
 f  W95 Ext'd (LBA) 54  OnTrackDM6      a6  OpenBSD         ef  EFI (FAT-12/16/
10  OPUS            55  EZ-Drive        a7  NeXTSTEP        f0  Linux/PA-RISC b
11  Hidden FAT12    56  Golden Bow      a8  Darwin UFS      f1  SpeedStor
12  Compaq diagnost 5c  Priam Edisk     a9  NetBSD          f4  SpeedStor
14  Hidden FAT16 <3 61  SpeedStor       ab  Darwin boot     f2  DOS secondary
16  Hidden FAT16    63  GNU HURD or Sys af  HFS / HFS+      fb  VMware VMFS
17  Hidden HPFS/NTF 64  Novell Netware  b7  BSDI fs         fc  VMware VMKCORE
18  AST SmartSleep  65  Novell Netware  b8  BSDI swap       fd  Linux raid auto
1b  Hidden W95 FAT3 70  DiskSecure Mult bb  Boot Wizard hid fe  LANstep
1c  Hidden W95 FAT3 75  PC/IX           be  Solaris boot    ff  BBT
1e  Hidden W95 FAT1 80  Old Minix
Command (m for help): p- to get information about partitions.
/dev/sdc5 1052672 2097151 522240 82 Linux swap / Solaris
mkswap /dev/sdc5- to create swap structure.
mkswap: /dev/sdc5: warning: wiping old xfs signature.
Setting up swapspace version 1, size = 522236 KiB
no label, UUID=7ffc7dc8-57fc-452f-9b51-2128d7ed2162
free -m- get information about memory and swapswapon /dev/sdc5orswapoff /dev/sdc5- enable/disable our swap partitionswapon -s- to see which devices are currently used by swap
              total        used        free      shared  buff/cache   available
Mem:            991         103         691           0         195         726
Swap:           819           0         819
- we can put swap configuration in /etc/fstab file
/dev/sdc5 swap swap defaults 0 0
swapon -a- enable swap which is indicated in /etc/fstab

For encrypted devices we need underlying devices:
- /dev/sdc1
fdisk- start configuration.cryptsetup luksFormat- command to format physical device.cryptsetup luksOpen- device will be available in/dev/mapper/xyz- /dev/mapper/xyz - opened after
cryptsetup luksOpencommand and available for putting file system on it.mkfs /dev/mapper/xyz- file system createdmount ...- mount your directory and start working on it.cryptsetup luksClose- once you done to work with your partition, luksClose will close your device and move back to /dev/sdc1
fdisk /dev/sdc- start from selecting device./dev/sdc5- create logical partition on this step.cryptsetup luksFormat /dev/sdc5- subcommand for starting formatting and setup.
[root@centos ~]# cryptsetup luksFormat /dev/sdc5

WARNING!
========
This will overwrite data on /dev/sdc5 irrevocably.
- enter passphrase, to encrypt your device.
Are you sure? (Type uppercase yes): YES
Enter passphrase for /dev/sdc5:
Verify passphrase:
xxd /dev/sdc5- shows content of the device. You can see it's encrypted.
0000010: 0000 0000 0000 0000 0000 0000 0000 0000  ................
0000020: 0000 0000 0000 0000 7874 732d 706c 6169  ........xts-plai
0000030: 6e36 3400 0000 0000 0000 0000 0000 0000  n64.............
0000040: 0000 0000 0000 0000 7368 6132 3536 0000  ........sha256..
0000050: 0000 0000 0000 0000 0000 0000 0000 0000  ................
0000060: 0000 0000 0000 0000 0000 1000 0000 0020  ...............
0000070: 0cd0 06c8 981b 613a bd73 8a0f 4f33 546d  ......a:.s..O3Tm
0000080: 0e0d a0b5 eaaf 5ff4 1f64 53b4 96e6 e68d  ......_..dS.....
0000090: 0517 467a 862a 17f8 7ae0 ff14 c984 f60f  ..Fz.*..z.......
00000a0: 351b b176 0000 5d05 3338 3462 3135 3435  5..v..].384b1545
00000b0: 2d66 3032 322d 3431 3962 2d39 6162 652d  -f022-419b-9abe-
00000c0: 3661 3765 6664 3666 6230 3666 0000 0000  6a7efd6fb06f....
00000d0: 00ac 71f3 0006 9434 7b19 4368 0099 a073  ..q....4{.Ch...s
00000e0: 97c0 12c6 77a5 8ab3 a06f f1b6 19a0 e704  ....w....o......
00000f0: dbe0 3da7 4c69 fac2 0000 0008 0000 0fa0  ..=.Li..........
0000100: 0000 dead 0000 0000 0000 0000 0000 0000  ................
0000110: 0000 0000 0000 0000 0000 0000 0000 0000  ................
0000120: 0000 0000 0000 0000 0000 0108 0000 0fa0  ................
0000130: 0000 dead 0000 0000 0000 0000 0000 0000  ................
-
now we have encrypted device, we need following:
- open this device
- created file system on top of encrypted device.
-
cryptsetup luksOpen /dev/sdc5 secret- ppen device, don't forget to mention name of the device. We called it secret -
Enter passphrase for /dev/sdc5:- to access it we need to enter passphrase. -
/dev/mapper/- resulting device will be created in this directory. -
mkfs.ext4 /dev/mapper/secret- create file system ext4 on /dev/mapper/secret device. -
don't messup with creation file system on device /dev/sdc5, because that device contains encryption layer. We need
/dev/mapper/secret- which is encrypted device. -
mount /dev/mapper/secret /media/ext4/- mount created file system to the directory. -
vim /etc/crypttab- required to automate mount process of encrypted device. Add following line inside of this file. Name of the device we want to have - secret, name of the device we want to mount /dev/sdc5:
secret /dev/sdc5
vim /etc/fstab- second file to modify and add lines for/dev/mapper/secretdevice.
/dev/mapper/secret /media/ext4 ext4 noauto 0 0
- where noauto means - mount procedure will be done manually to avoid boot failure.
- because of SSD disk doesn't clean properly we need fstrim utility, which is located in
/usr/lib/systemd/
[root@centos system]# ls -l fstrim.*
-rw-r--r--. 1 root root  95 Mar 14 11:37 fstrim.service
-rw-r--r--. 1 root root 174 Mar 14 11:37 fstrim.timer
systemctl enable fstrim.timer- if you want to run this utility on regular basis - enable timer for fstrim.service
[root@centos system]# cat fstrim.timer
[Unit]
Description=Discard unused blocks once a week
Documentation=man:fstrim

[Timer]
OnCalendar=weekly
AccuracySec=1h
Persistent=true

[Install]
WantedBy=multi-user.target

- Volume group - abstraction of all storage that you have on your system.
- volume disk
- volume partition
- On top of volume group you have logical volumes
- On top of logical volumes you have your file system - mkfs, mkswap and so on.
- If you running out of space - you simply can add disk or partitions to your volume group.
gdisk /dev/sdc- starting from partition creation.Hex code or GUID (L to show codes, Enter = 8300): 8e00- where 8e00 - Linux LVM partition type.gdisk -l /dev/sdb- verify your configuration
umber  Start (sector)    End (sector)  Size       Code  Name
   1            2048         2099199   1024.0 MiB  8E00  Linux LVM
pvcreate /dev/sdb1- create physical volume on our LVM partition.
Physical volume "/dev/sdb1" successfully created.
vgcreate vgdata /dev/sdb1- next we need to put physical volume in volume group. Let's create volume group.
Volume group "vgdata" successfully created
lvcreate -L 1020M -n lvdata vgdata- create logical volume with size 1020 megabytes and name lvdata using group vgdata
Logical volume "lvdata" created.
lvs- list currently existing logical volumes.
LV     VG            Attr       LSize    Pool Origin Data%  Meta%  Move Log Cpy%Sync Convert
  root   centos_centos -wi-ao----   <6.20g
  swap   centos_centos -wi-ao----  820.00m
  lvdata vgdata        -wi-a----- 1020.00m
vgs- get information about volume groups. PV - physical volumes, LV - logical volumes.
VG            #PV #LV #SN Attr   VSize    VFree
  centos_centos   1   2   0 wz--n-   <7.00g    0
  vgdata          1   1   0 wz--n- 1020.00m    0
pvs- currently used physical volumes
  PV         VG            Fmt  Attr PSize    PFree
  /dev/sda2  centos_centos lvm2 a--    <7.00g    0
  /dev/sdb1  vgdata        lvm2 a--  1020.00m    0

-
Device Mapper used by:
- LVM
- luks
-
Device mapper will create devices when you create LVM:
- /dev/dm-1
- /dev/dm-2
-
/dev/mapper/vg-lv- device mapper has directory mapper, where device will be created symbolic link with vg-lv name. Where vg - volume group name, lv - logical volume name. That symbolic link refers to /dev/dm-1 -
/dev/mapper/secret- encrypted device, which symbolic link will refer to /dev/dm-2 device -
/dev/vg/lv- another type of naming for LVM which will also refer too the same device /dev/dm-1 -
ls -l /dev/mapper- let's start from /dev/mapper directory. We can see vgdata-lvdata referring to the dm-2, logical volume that we created in previous steps.
total 0
lrwxrwxrwx. 1 root root       7 Aug 29 15:59 centos_centos-root -> ../dm-0
lrwxrwxrwx. 1 root root       7 Aug 29 15:59 centos_centos-swap -> ../dm-1
crw-------. 1 root root 10, 236 Aug 28 23:03 control
lrwxrwxrwx. 1 root root       7 Aug 29 16:07 vgdata-lvdata -> ../dm-2
/dev/vgdata/lvdata- same approach. We can find symbolic link here which also refers to dm-2
[root@centos vgdata]# ls -l
total 0
lrwxrwxrwx. 1 root root 7 Aug 29 16:07 lvdata -> ../dm-2
mkdir /lvmountpoint- let's create mountpointvim /etc/fstab- add lvm to the fstab for persistency.
/dev/mapper/vgdata-lvdata /lvmountpoint ext4 defaults 0 0
mkfs.ext4 /dev/mapper/vgdata-lvdata- creata file system ext4 before mountmount -a- mount all items indicated in /etc/fstabmount- get information about mounted devices.
/dev/mapper/vgdata-lvdata on /lvmountpoint type ext4 (rw,relatime,seclabel,data=ordered)
tune2fs --help- in case if you want to make changes on already created ext4 file system.
Usage: tune2fs [-c max_mounts_count] [-e errors_behavior] [-g group]
        [-i interval[d|m|w]] [-j] [-J journal_options] [-l]
        [-m reserved_blocks_percent] [-o [^]mount_options[,...]] [-p mmp_update_interval]
        [-r reserved_blocks_count] [-u user] [-C mount_count] [-L volume_label]
        [-M last_mounted_dir] [-O [^]feature[,...]]
        [-E extended-option[,...]] [-T last_check_time] [-U UUID]
        [ -I new_inode_size ] device
-
tune2fs -L lvdata /dev/vgdata/lvdata- we can create volume label for LVM device. -
vim /etc/fstab- now we can change device name indicated in fstab from /dev/mapper/vgdata-lvdata to LABEL=lvdata
LABEL=lvdata /lvmountpoint ext4 defaults 0 0
blkid- list all UUID's for currently existing file systems.
/dev/mapper/vgdata-lvdata: LABEL="lvdata" UUID="339fb123-bee6-41e4-accc-5cb1ca71204f" TYPE="ext4"
vim /etc/fstab- so we can put UUID right here. Problem of UUID - they're unreadable. Better to use labeling.
UUID="339fb123-bee6-41e4-accc-5cb1ca71204f" /lvmountpoint ext4 defaults 0 0

-
LVM structure:
- device
- physical volume
- volume group
- logical volume
- file system
-
lvresize- In order to make File System bigger, we need to be sure that it's available on Logical Volume and resize it. -
vgresize- If disk space is not available in volume group, we have to resize it -
You have to put physical volume in volume group to be able to resize volume group
df -H- get information about file system
Filesystem                      Size  Used Avail Use% Mounted on
/dev/mapper/centos_centos-root  6.7G  1.8G  5.0G  26% /
devtmpfs                        508M     0  508M   0% /dev
tmpfs                           520M     0  520M   0% /dev/shm
tmpfs                           520M  545k  520M   1% /run
tmpfs                           520M     0  520M   0% /sys/fs/cgroup
/dev/sda1                       1.1G  203M  861M  20% /boot
tmpfs                           104M     0  104M   0% /run/user/1000
/dev/mapper/vgdata-lvdata       1.1G  2.7M  964M   1% /lvmountpoint
vgs- information about volume group
VG            #PV #LV #SN Attr   VSize    VFree
  centos_centos   1   2   0 wz--n-   <7.00g    0
  vgdata          1   1   0 wz--n- 1020.00m    0
pvs- information about physical volume
PV         VG            Fmt  Attr PSize    PFree
  /dev/sda2  centos_centos lvm2 a--    <7.00g    0
  /dev/sdb1  vgdata        lvm2 a--  1020.00m    0
-
gdisk /dev/sdc- create new partition with 8E00 (Linux LVM) code. -
vgextend --help- for resizing volume group
vgextend - Add physical volumes to a volume group

  vgextend VG PV ...
        [ -A|--autobackup y|n ]
        [ -f|--force ]
        [ -Z|--zero y|n ]
        [ -M|--metadatatype lvm2|lvm1 ]
        [    --labelsector Number ]
        [    --metadatasize Size[m|UNIT] ]
        [    --pvmetadatacopies 0|1|2 ]
        [    --metadataignore y|n ]
        [    --dataalignment Size[k|UNIT] ]
        [    --dataalignmentoffset Size[k|UNIT] ]
        [    --reportformat basic|json ]
        [    --restoremissing ]
        [ COMMON_OPTIONS ]

  Common options for lvm:
        [ -d|--debug ]
        [ -h|--help ]
        [ -q|--quiet ]
        [ -v|--verbose ]
        [ -y|--yes ]
        [ -t|--test ]
        [    --commandprofile String ]
        [    --config String ]
        [    --driverloaded y|n ]
        [    --lockopt String ]
        [    --longhelp ]
        [    --profile String ]
        [    --version ]

  Use --longhelp to show all options and advanced commands.
vgextend vgdata /dev/sdc1- extend volume group by indicating volume group name vgata and physical volume dev/sdc1. We can see now 496.00MB free space and 2 physical volumes.
[root@centos vgdata]# vgs
  VG            #PV #LV #SN Attr   VSize  VFree
  centos_centos   1   2   0 wz--n- <7.00g      0
  vgdata          2   1   0 wz--n-  1.48g 496.00m
-
lvextend --help- resize command for logical volume.-L|--size [+]Size[m|UNIT] LV- to extend space by numbers indication (like +100M)-l|--extents [+]Number[PERCENT]- extend by % of free space. (-l +100%FREE)-r|--resizefs- automatically resize file system too
-
lvextend -l +100%FREE -r /dev/mapper/vgdata-lvdata- resize logical volume.
  Size of logical volume vgdata/lvdata changed from 1020.00 MiB (255 extents) to 1.48 GiB (379 extents).
  Logical volume vgdata/lvdata successfully resized.
resize2fs 1.42.9 (28-Dec-2013)
Filesystem at /dev/mapper/vgdata-lvdata is mounted on /lvmountpoint; on-line resizing required
old_desc_blocks = 1, new_desc_blocks = 1
The filesystem on /dev/mapper/vgdata-lvdata is now 388096 blocks long.

- RAID's
- RAID 0: no redundancy and no easy recover.
- RAID 1: 2 disks written all times and identical.
- RAID 5: parity information - checksum of the disks. Which can be calculated in case of failure and restore your data.
- RAID 6: exhancement of the RAID 5 - with dual distributed parity
- RAID 10: mix of RAID 0 and RAID 1, you will have big amount of data and mirrored in the same time.
- create two GPT partitions with
gdiskand select FD00 code for Linux RAID mdadm --create /dev/md0 --level=1 --raid-disks=2 /dev/sdd2 /dev/sde1:md- multiple deviceadm- admin--create- create device /dev/md0--level=1- RAID level is 1 (mirroring)--raid-disks=2- disks count/dev/sdd2 /dev/sde1- device names
mdadm: Note: this array has metadata at the start and
    may not be suitable as a boot device.  If you plan to
    store '/boot' on this device please ensure that
    your boot-loader understands md/v1.x metadata, or use
    --metadata=0.90
Continue creating array? y
mdadm: Defaulting to version 1.2 metadata
mdadm: array /dev/md0 started.
mkfs.ext4 /dev/md0- create filesystem on our RAID device. -mdadm --detail --scan >> /etc/mdadm.conf- write configuration to the configuration file. This file helps to reinitialize RAID device after reboot
[root@centos ~]# cat /etc/mdadm.conf
ARRAY /dev/md0 metadata=1.2 name=centos.example.com:0 UUID=8d13efce:eb82a88a:7c16eb8b:18f7d075
vim /etc/fstab- configuration can be added in fstab for persistency.
/dev/md0 /raid ext4 defaults 0 0
cat /proc/mdstatormdadm --detail /dev/md0- get information about your RAID
Personalities : [raid1]
md0 : active raid1 sdb1[1] sdc1[0]
      1022976 blocks super 1.2 [2/2] [UU]

unused devices: <none>
[root@centos ~]# mdadm --detail /dev/md0
/dev/md0:
           Version : 1.2
     Creation Time : Fri Aug 30 15:44:52 2019
        Raid Level : raid1
        Array Size : 1022976 (999.00 MiB 1047.53 MB)
     Used Dev Size : 1022976 (999.00 MiB 1047.53 MB)
      Raid Devices : 2
     Total Devices : 2
       Persistence : Superblock is persistent

       Update Time : Fri Aug 30 15:51:36 2019
             State : clean
    Active Devices : 2
   Working Devices : 2
    Failed Devices : 0
     Spare Devices : 0

Consistency Policy : resync

              Name : centos.example.com:0  (local to host centos.example.com)
              UUID : 8d13efce:eb82a88a:7c16eb8b:18f7d075
            Events : 17

    Number   Major   Minor   RaidDevice State
       0       8       33        0      active sync   /dev/sdc1
       1       8       17        1      active sync   /dev/sdb1

-
mdadm --create /dev/md0 -l 5 -x 1 /dev/sdb /dev/sdc /dev/sdd /dev/sde-l 5- RAID level 5-x 1- one hot spare
-
mdadm --fail /dev/md0 /dev/sdb- failed device, we can see in syslog that it starts generating an errors -
mdadm --remove /dev/md0 /dev/sdb- remove device after failure from RAID array. -
mdadm --add /dev/md0 /dev/sde- add new device. -
mdadm --create /dev/md0 --level=5 --raid-devices=3 /dev/sdb1 /dev/sdc1 /dev/sdd1 --spare-devices=1 /dev/sde1- create RAID 5, with 3 active and 1 spare devices.
systemctl status httpd- check status of apache/var/www/- webserver document root/etc/httpd/- configuration files of apache.conf- main configuration fileconf.d- additional configuration file.conf.modules.d- more additional configuration

httpd- can run several virtual hosts.sales.example.com- each virtual host has it's own configuration- document root
account.example.com- each virtual host has it's own configuration- document root
/etc/hosts- virtual hosts starts with name resolution
10.0.2.15   account.example.com
10.0.2.15   sales.example.com
cd /etc/httpd/conf.d/- create virtual host configuration here with separate configuration files for each virtual host.vim account.example.com.conf<VirtualHost *:80> ServerAdmin [email protected] DocumentRoot /web/account ServerName account.example.com </VirtualHost>mkdir /web/account- create directory for configuration we've just specified.vim index.html- let's create welcome file in that directory
vsftpd- commonly used FTP solution - Very Secure FTP daemonpureftpd- Pure very simple FTP process
yum install vsftpd-3.0.2-25.el7.x86_64- install vsftpdsystemctl enable --now vsftpd- start and enable vsftpd/etc/vsftpd/vsftpd.conf- configuration file of vsftpd
anonymous_enable=YES
local_enable=YES
write_enable=YES
local_umask=022
yum install lftp- for testing we will install lftp client.[root@centos vsftpd]# lftp localhost- connect to localhost as a client
lftp localhost:~>
lftp localhost:~> ls
drwxr-xr-x    2 0        0               6 Oct 30  2018 pub
lftp localhost:/> cd pub/
lftp localhost:/pub> ls
grep ftp /etc/passwd- let's find home directory of ftp user. We can see same directory pub in /var/ftp/
ftp:x:14:50:FTP User:/var/ftp:/sbin/nologin
cd /var/ftp/pub- let's move here and create few files. We can see files from lftp client too.
lftp localhost:/pub> ls
-rw-r--r--    1 0        0               0 Sep 02 09:34 a
-rw-r--r--    1 0        0               0 Sep 02 09:34 b
-rw-r--r--    1 0        0               0 Sep 02 09:34 c
lftp localhost:/pub>get a- download file a from ftp server.

.- local DNS going to the root domain, presented as a dot.?com- DNS server asking root domain can I get list of all com domains?rhatcert- DNS server asking com domain to get list of all rhatcert name services.- DNS server has cache. Directly will provide information from cache to the client.
- DNS server with cache-only - building this kind of server makes lookup process a lot of faster.
-
yum install unbound- we will start from unbound installation -
iptables -A INPUT -p udp --dport 53- allow DNS port in iptables -
iptables -A INPUT -p tcp --dport 53- in case if packages get too big switches to tcp port. -
/etc/unbound/unbound.conf- configuration file of unboundinterface: 0.0.0.0- select interface, because by default it listens only on localhost. We want server be accessible to others as well.access-control: 10.0.0.0/16 allow- allow access to the IP addresses which starts from 10.0......domain-insecure: "example.com"- uncomment it in case if you don't have dns-sec in your systemforward-zone- next important parameter. What to forward and where. We want to forward everything, which indicated as '.' and forward-addr, because we don't have our DNS server, we're forwarding it to the Google's DNS server.
forward-zone: name: "." forward-addr: 8.8.8.8 -
netstat -tulpen- get information about ports and processes which use these ports.
tcp6       0      0 ::1:8953                :::*                    LISTEN      0          34018      3473/unbound
tcp6       0      0 ::1:25                  :::*                    LISTEN      0          21369      1279/master
tcp6       0      0 :::80                   :::*                    LISTEN      0          27331      2398/httpd
tcp6       0      0 :::8080                 :::*                    LISTEN      0          27327      2398/httpd
tcp6       0      0 :::21                   :::*                    LISTEN      0          27790      2468/vsftpd
tcp6       0      0 :::22                   :::*                    LISTEN      0          20712      1035/sshd
udp        0      0 0.0.0.0:53              0.0.0.0:*                           0          34016      3473/unbound
udp        0      0 0.0.0.0:53              0.0.0.0:*                           0          34014      3473/unbound
udp        0      0 0.0.0.0:53              0.0.0.0:*                           0          34012      3473/unbound
udp        0      0 0.0.0.0:53              0.0.0.0:*                           0          34010      3473/unbound
udp        0      0 0.0.0.0:68              0.0.0.0:*                           0          19303      800/dhclient
udp        0      0 0.0.0.0:123             0.0.0.0:*                           0          17305      723/chronyd
udp        0      0 127.0.0.1:323           0.0.0.0:*                           0          17302      723/chronyd
udp6       0      0 ::1:323                 :::*                                0          17303      723/chronyd
[root@centos system]# which vsftpd- search from where process comes from.
/sbin/vsftpd
[root@centos system]# rpm -qf /sbin/vsftpd- Query package owning FILE
vsftpd-3.0.2-25.el7.x86_64
systemctl status unbound- get informatio about unbound service
● unbound.service - Unbound recursive Domain Name Server
   Loaded: loaded (/usr/lib/systemd/system/unbound.service; enabled; vendor preset: disabled)
   Active: active (running) since Mon 2019-09-02 14:37:45 CEST; 10min ago
  Process: 3470 ExecStartPre=/usr/sbin/unbound-anchor -a /var/lib/unbound/root.key -c /etc/unbound/icannbundle.pem (code=exited, status=0/SUCCESS)
  Process: 3469 ExecStartPre=/usr/sbin/unbound-checkconf (code=exited, status=0/SUCCESS)
 Main PID: 3473 (unbound)
   Memory: 20.5M
   CGroup: /system.slice/unbound.service
           └─3473 /usr/sbin/unbound -d
systemctl status nfs-server- get status of NFS server./etc/exports- file where we need to specify our configuration./share- directory for sharing*- accessible to everyone(rw,no_root_squash)- read-write access to all users, except root, but we usedno_root_squash, so client's root user will be able to access NFS too
/share *(rw) or /share *(rw,no_root_squash)
showmount -e localhost- export list for localhost. Prove of that your NFS is working
Export list for localhost:
/share *
mount centos:/share /centos/nfs- mount your shared directory /share from centos machine under /centos/nfs directory- for adding persistency we need to add line in /etc/fstab file
nfs- file system_netdev- because this is a network device.
centos:/share /centos/nfs nfs _netdev 0 0
yum install samba- start from samba installation/etc/samba/smb.conf- configuration file of samba/etc/samba/smb.conf.example- better use this file, it contains a lot of examples inside.
chcon -t samba_share_t /path/to/directory- CentOS managed by SELinux so context type is also required during Samba configuration.smbpasswd -a anna- create samba user anna, user should exists on linux system already.
[root@centos /]# smbpasswd -a anna
New SMB password:
Retype new SMB password:
Added user anna.
yum install samba-client- we need samba-client to verify that we installed everything properly.smbclient -L localhost- access localhost through samba-client
Enter MYGROUP\root's password:
Anonymous login successful

        Sharename       Type      Comment
        ---------       ----      -------
        share           Disk      Samba Share
        IPC$            IPC       IPC Service (Samba Server Version 4.8.3)
Reconnecting with SMB1 for workgroup listing.
Anonymous login successful

        Server               Comment
        ---------            -------

        Workgroup            Master
        ---------            -------
mount -o username=anna //10.0.10.11/share /mnt- for temporary mountvim /etc/fstab- to add our configuration persistently
//centos/share /centos/samba cifs _netdev,username=anna,password=P@ssw0rd 0 0
###Lesson 26: Configuring a Database Server
- Database Solutions:
- MariaDB
- PostgreSQL
- MongoDB
- MSSQL
-
yum search mariadb- we will start from the installationyum install mariadbyum install mariadb-server
-
systemctl enable --now mariadb- enable and start service mariadb -
mysql_secure_installation- start MariaDB configurationEnter current password for root (enter for none):- we don't have password for root yet. Just enter.Set root password? [Y/n] Y- set root password
New password:
Re-enter new password:
Password updated successfully!
Reloading privilege tables..
... Success!
Remove anonymous users? [Y/n] Y- remove anonymous users
Normally, root should only be allowed to connect from 'localhost'.  This
ensures that someone cannot guess at the root password from the network.
Disallow root login remotely? [Y/n] Y- for security purpopes it's a good idea.Remove test database and access to it? [Y/n] Y- we don't need any test database.Reload privilege tables now? [Y/n] Y- new settings are becoming effective.
Cleaning up...

All done!  If you've completed all of the above steps, your MariaDB
installation should now be secure.

Thanks for using MariaDB!
mysql -u root -p- connect to MariaDB as a root user and prompt for a password.MariaDB [(none)]> create database people;- create database with name peopleMariaDB [(none)]> use people;- connect to people database
Database changed
MariaDB [people]>
MariaDB [people]> create table users(firstname VARCHAR(20), lastname VARCHAR(20), birthyear INT);- create table named users with data inside.MariaDB [people]> INSERT INTO users(firstname,lastname,birthyear) values('Linda', 'Thompsen', 1972);- insert data into columns.MariaDB [people]> select * from users;- select data from table users
+-----------+----------+-----------+
| firstname | lastname | birthyear |
+-----------+----------+-----------+
| Linda     | Thompsen |      1972 |
+-----------+----------+-----------+
1 row in set (0.00 sec)

null client- linux server that is running SMTP processforwarderorSMTP Server- e-mail server which is capable to send e-mails to the rest of the world.IMAP/POP SMTP- Protocols which are used for receiving e-mails.
systemctl status postfix- check status of postfix/etc/postfix- main directory of postfixmain.cf- postfix configuration file.inet_interfaces = localhost- your postfix won't accept any incoming messages. we can see it fromnetstat -tulpencommand. Server listens only to localhost
tcp 0 0 127.0.0.1:25 0.0.0.0:* LISTEN 0 56313 7576/masterrelayhost = [an.ip.add.ress]- relay messages to another host. You can define name or IP address.
#relayhost = $mydomain
#relayhost = [gateway.my.domain]
#relayhost = [mailserver.isp.tld]
#relayhost = uucphost
#relayhost = [an.ip.add.ress]
/etc/postfix/main.cf- we will configure this fileinet_interfaces = all- list on all internet interfaces.myorigin = $mydomain- from where message comes from. In our case domain part will be used. For instance [email protected]relayhost = [10.0.10.11]- to which host forward your messages.mynetworks = 10.0.10.0/24- receive packages only from local network.inet_protocols = all- which protocols to use (IPv4, IPv6), better to use ipv4, because for ipv6 we need fully working IPv6 environment.
Web Proxystands for:- prevent direct access to the Internet
- cache frequently accesses web pages
- filtering or content filtering
- works with http and ftp traffic mostly
-
yum install squid- install squid package -
/etc/squid- directory of squidsquid.conf- configuration file. Where default configuration already set up.
acl localnet src 10.0.0.0/8 # RFC1918 possible internal network acl localnet src 172.16.0.0/12 # RFC1918 possible internal network acl localnet src 192.168.0.0/16 # RFC1918 possible internal network acl localnet src fc00::/7 # RFC 4193 local private network range acl localnet src fe80::/10 # RFC 4291 link-local (directly plugged) machines acl SSL_ports port 443 acl Safe_ports port 80 # http acl Safe_ports port 21 # ftp acl Safe_ports port 443 # https acl Safe_ports port 70 # gopher acl Safe_ports port 210 # wais acl Safe_ports port 1025-65535 # unregistered ports acl Safe_ports port 280 # http-mgmt acl Safe_ports port 488 # gss-http acl Safe_ports port 591 # filemaker acl Safe_ports port 777 # multiling http acl CONNECT method CONNECT -
netstat -tulpen | less- search for port which squid is using. tcp port is 3128
- Linux Virtualization Solutions:
- Hypervisor based - will use linux a virtualization server. You won't be do anything else on your linux machine
- KVM - Kernel Virtual Machine. Part of Linux Kernel
- Xen - Was quite popular. Started in 2004.
- Worstation based - virtualization application that runs on top of Linux Kernel. Slower that Hypervisor based solution. Because application sents information to the Kernel and only then to the hardware.
- Virtualbox
- VMware Workstation
- Hypervisor based - will use linux a virtualization server. You won't be do anything else on your linux machine
yum group list- get list of available groups in YUMyum groupinstall 'Virtualization Host'- install all required packages for Virtualization Hostsystemctl enable --now libvirtd- start virtualization daemonyum install virt-manager- package required for managing VM's on your host.virt-manager- to run GUI application.- create new VM
- create virtual storage
- mount .ISO
- install operating system

virsh- the most usable command for managing your KVM machines.virsh list --all- list all virtual machines, even Turned offvirsh start centos7.0- start your VM with name centos7.0virsh shutdown centos7.0- gracefull shutdown of your centos7.0virsh autostart centos7.0- when host started, your VM will start automatically.