- Where To Find
- In The Box
- How To Make It Works
- Device's Functionalities and Features
- Safety Guidelines
- SDK
- Accessories
- Putting The Device Back
- More Documentations
Storage Room - Shelf A1
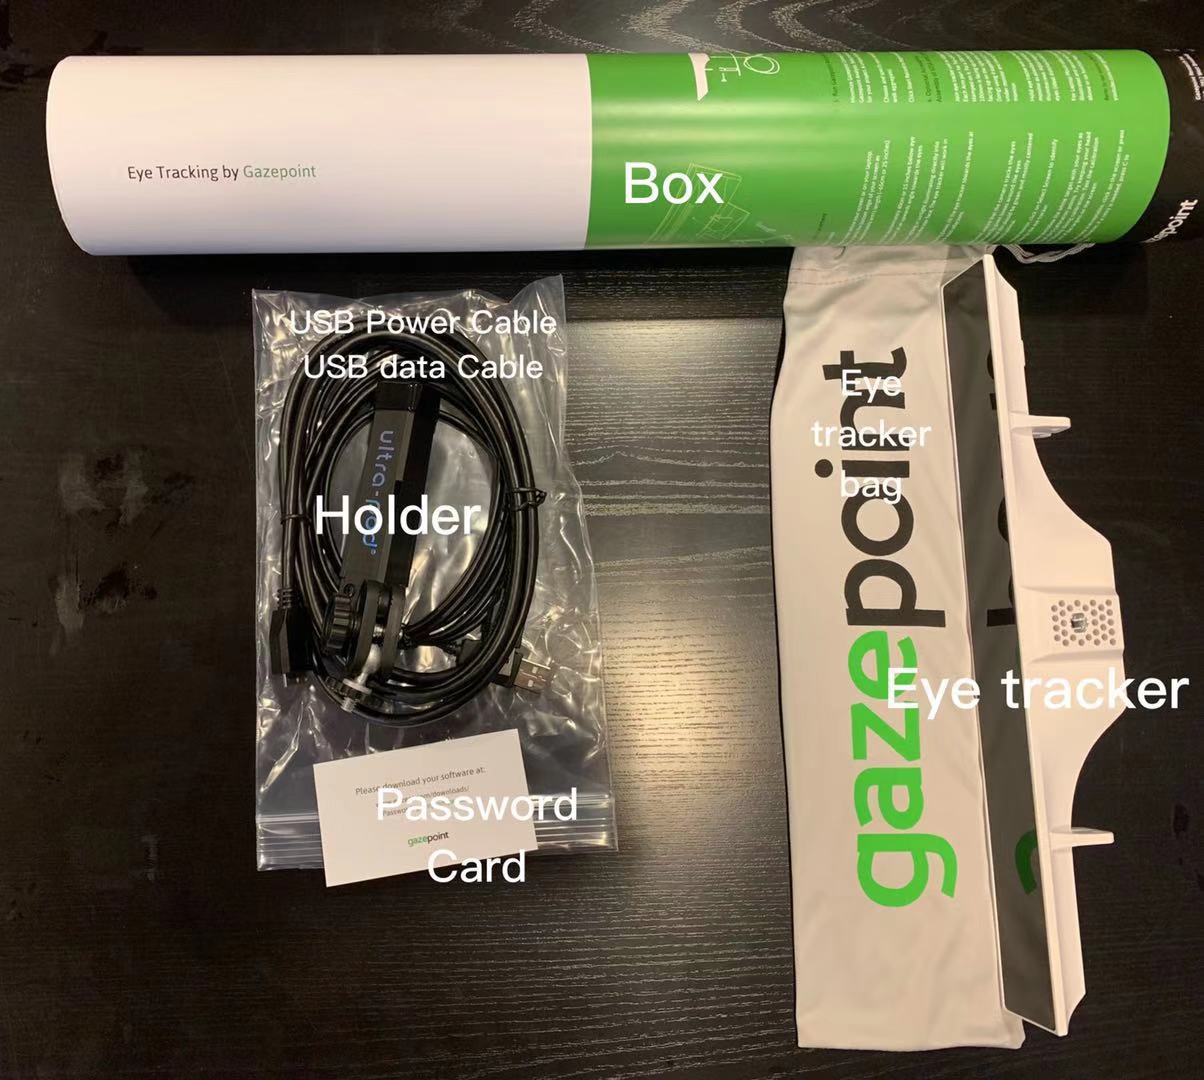
Below is the product list that the eye tracker contains. Please check the contents when you receive it and before you return.
- Box
- Eye tracker
- Eye tracker bag
- Password card
- Eye tracker holder/Tripod
- USB power cable
- USB data cable
-
Download and install Gazepoint software on your computer. (https://www.gazept.com/downloads/)
-
Unpack your Gazepoint GP3 device.
-
Attach tripod (or optional VESA or laptop mount) and cables to the GP3.
- By Tripod
- Plug in USB power cable and USB data cable to eye tracker and connect to your computer. Recommandation: connect eye tracker directely to computer and avoid USB hub or switch. GP3 HD requirs USB 3.0 data port for 150Hz.
- By VESA and Laptop Mount
- Join eye tracker unit to VESA arms (short) with 2 thumbscrews. Each arm part has Top-Left 100mm and Top-Right 100mm stamped on it. For a 100MM VESA mount, make sure Top-Left 100.. is facing up on the left Arm and Top-Left 100mm is facing up on the right Arm. Attach VESA arms with VESA rods (long) using 4 supplied 1/2n 6-32 screws. Position eye tracker under monitor and line up VESA Rods with VESA mount holes on monitor.
- Hold eye tracker with one hand as close to bottom edge of monitor as possible and attach VESA rods to monitor with 4 thumbscrews. Adjust angle of eye tracker to point towards the eyes (ideal distance is 65cm).
- For Laptop Mount attach eye tracker to Laptop Mount as illustrated and secure with 2 thumbscrews. Placce on laptop aboce or on function keys. Tilt angle towards eyes as necessary.
- By Tripod
-
Position the GP3 to point at your eyes at an upwards angle. Ideally, the unit is 30 cm below eye level and 65 cm away.
- Position the eye tracker below your screen or on your laptop, centered and as close to the bottom edge of your screen as possible. This is approximately arm's length (-65cm or 25 inches) from the user.
- The device should be appoximately 40cm or 15 inches below eye level and it should point at an upwards angle towards the eyes. Avoid incandescent lighting or sunlight illuminating directly into the eye tracker or onto the user face, The eye tracker will work in low light.
- If the user is wearing glasses, tilt the eye tracker towards the eyes at a steeper angle to avoid reflections.
-
Plug USB cables into your computer.
-
Start Gazepoint Control to calibrate your unit.
- In Gazepoint Control, ensure that the camera tracks the eyes correctly as indicated by green boxes around the eyes. The sliding horizontal dot should be green and mostly centered when the distance is optional.
- If using an external monitor, click on Select Screen to identify the Active Screen for the eye tracker.
- Click on Calibrate and follow the white target with your eyes as it cycles through the 5 calibration points. Try keeping your head still and avoid blinking during the calibration. Test the calibration by looking at any of the targets on the screen.
- If calibration accuracy is acceptable, click on the screen or press ESC to accept calibration. If a retry is needed, press C to calibrate again.
-
Start Gazepoint Analysis to begin capturing gaze data.
- Minimize Gazepoint Control and leave it running and start Gazepoint Analysis. Select new project and define a new folder for your project. A unique folder is required for each project.
- Choose and specify your media type (text/image/video/web/web aggregate)
- Click Start Record to begin experiment.
-
Prepare your text, image, and video file that will be used in your experiment.
A text file can be used to give instructions to your text subject at the start of your experiment. A text file is limited to 15 lines of display.
-
Start Gazepoint Control and calibrate your eye tracker.
-
Start Gazepoint Analysis, begin a new project, and choose media type Text. Choose your .txt file and set the display duration.
-
In the Media List box on the left side, click the Add icon to add additional media items, which may be an image file. Choose your .jpg file and set your display duration. Repeat to add media item for the video file.
-
Minimize Control and Analysis windows or move them to your tester screen. We recommend a dual screen setup so that there is one for the test subject and one for the tester to start, stop, and monitor the testing.
-
Press CTRL + ALT + R or click Record to begin your experiment, and start recording. (Test subjects can use the spacebar to advance to the next media item.) Recording will stop after the last media item has been displayed.
-
Click Analyze Data icon.
-
Click Fixationmap icon.
-
Click Play icon to review recording.
-
Click Export icon to export the data. Data is exported to the \result folder inside your project folder.
-
Start Gazepoint Control and calibrate your eye tracker.
-
Start Gazepoint Analysis, begin a new project, and choose media type Screen capture.
-
Minimize Control and Analysis windows.
-
Load your stimulus material, which can include an image, video, PDF, game, webpage, or other testing software.
-
Press CTRL + ALT + R to start recording, and begin your test.
-
Press CTRL + ALT + S to stop recording.
-
Click Analyze Data icon.
-
Click Visualization icon, and a settings window will provide different size and opacity choices.
-
Click Play icon to review recording
-
Start Gazepoint Control and calibrate your eye tracker.
-
Start Gazepoint Analysis, begin a new project, and choose media type Screen capture.
-
Minimize Control and Analysis windows.
-
Load your stimulus material, which can be an image, video, PDF, game, webpage, or other testing software.
-
Press CTRL + ALT + R to start recording, and begin your test
-
Press CTRL + ALT + S to stop recording.
-
Click the Analyze Data icon and click the Visualization icon to access the Visualization Settings. Choose a fixation map.
-
Click the Play icon to review recording.
-
Click the Export icon to export the data. Data is exported to the \result folder inside your project folder.
Data Files:
0001-user.csv – contains all captured data
0001-user-fix.csv – only the fixations are listed
CurrentAOIStatisticsX.csv – lists the statistics for the AOIs (only created if AOIs are used)
CurrentImageX.png – copy of image currently in the Analysis display window (can be paused at any point of recording)
-
Click Export icon to export the data. Data is exported to the \result folder inside your project folder.
-
CTRL+ALT+R = start data record
-
CTRL+ALT+S = stop data record
-
ALT+ left arrow = go to start of recording
-
ALT+ right arrow = go to end of recording
-
ALT+ z = toggle playback zoom
-
ALT+ p = play recording or pause recording
-
ALT+ up arrow = skip to previous recording
-
ALT+ down arrow = skip to next recording
- The required SDK and API are packaged with Gazepoint software, no additional installation is required.
- A key requirement of the API is that it does not require any DLL’s, libraries, or any programming language or platform specific components.
- The API uses a standard TCP/IP socket for communication between a client (the application) and the server (the source of eye-tracking data).
- The data format uses the extensible markup language (XML) to format the data transmit between the client and server.
- Since both TCP/IP and XML are open standards, they can be readily implemented in any language or operating system.
For a complete API reference go to the link.
- eye-tracker-api is a generic Java API to interface with various eye tracking systems. An API written in Java for establishing connections, configuring, calibrating, and receiving data from various eye tracking systems. Currently supported and tested systems include SMI iViewX RED250 and ITU GazeTracker.
- The goal of this project is to provide a common software interface to eye tracking systems and promote the establishment of a standard gaze data format.
- PyOpenGaze is a python library or a wrapper for GazePoint's OpenGaze API (version 2.0).
- It should be compatible with all eye trackers that work through the OpenGaze API. This includes the GazePoint GP3.