neuroPG - Open Source MATLAB Tool for DMD-based Pattern Generation, Stimulation, Electrical Signal Recording, and Microscope Camera Control in Optogenetics Experiments
To run neuroPG on your system with a Mightex Polygon400 DMD, you will need the following files:
- CameraWindow.m
- configCamera.m
- configNeuroPG.m
- configWindows.m
- MatPad.m
- MT_Polygon400_SDK.dll
- MT_Polygon400_SDK.h
- MT_Polygon400_SDK.lib
- neuroPGGUIDE.fig
- neuroPGGUIDE.m
- nPGHeatMap.fig
- nPGHeatMap.m
- polymex.cpp
- user32.h
- AppData\MDSIConfig.dcg
Place these files somewhere accessible to your MATLAB install and maintain the relative path of the AppData folder and its file.
You will need a MATLAB compatible compiler (ie Microsoft Windows SDK 7.1) to compile polymex.cpp. This is the wrapper file that allows MATLAB to interact with the Polygon400 drivers. It must be compiled ahead of time and the resulting file needs to be located in a directory included in the MATLAB path. If the neuroPG directory is added to the MATLAB path, it is suggested to place the compiled mex file in the same directory.
First, make sure all the equipment and devices on the workstation are installed and connected properly. Verify that your signal sources are connected to analog inputs on your DAQ hardware, and make sure the output trigger on the Polygon400 (or alternate DMD) is connected to an analog input on the DAQ. Finally, connect a Timer/Counter ouput to the input trigger on the Polygon400, being careful to use a voltage divider if the DAQ outputs 5 volts instead of 3.3.

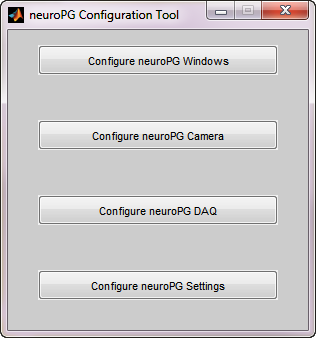
Now you are now ready to configure neuroPG. Run the function configNeuroPG.m from MATLAB and a window with four buttons should appear. If you are planning on configuring a camera for CameraWindow and you don't know the resolution you will be using, configure the camera first. If you are not using a camera, skip the next section.
The configCamera.m function, accessed by clicking 'Configure Camera', brings up a window and auto-detects any compatible cameras on the system. During the configuration process, configCamera will need to initialize the selected camera to discover its properties. Because of this, you should be sure to close any software that connects to the intended camera. If there are multiple cameras, you can select the one you intend to configure and configCamera will populate the list with its available formats. Once a format is selected, the next list will be populated with the available properties. Find the property that controls the exposure time of the camera and select it from the list. Clicking the 'Set Exposure Property' button will assign the selected property as the exposure control. Repeat this process for exposure mode, contrast, and contrast mode, if they exist. Add any additional properties that you wish to control by using the same procedure with the 'Add Additional Property' button. Once you are finished with properties, click on 'Edit initial commands'. If there are any commands that you wish to run when the camera is started (ie horizontal flip) then enter them here using the format indicated in the prompt. If not, leave the text blank and click 'OK'. It is important to open this window at least once, even if you have no initial commands. It makes an entry in the configuration file that CameraWindow needs to run. Finally, if you have default exposure values for previewing and image capture under fluorescence, enter them into the boxes in the lower right of configCamera. These values are used when CameraWindow is switched into fluorescent mode. To finalize your configuration, click 'Done'.
The configWindows.m function, accessed by clicking 'Configure Windows', will render all of the windows potentially used by neuroPG and CameraWindow on screen. Some can be resized and some cannot. Position them in the places you find optimal and they will automatically open in those positions and (where applicable) with the same size. If you know the resolution of your camera, position the mock camera window and size it to your liking. Then, click on the 'Resize Camera Window' button and enter the width and height when prompted. The mock camera window will attempt to reshape itself to the proper aspect ratio while preserving its position and relative size. Once all the windows are how you want them, click the large 'OK' button on the gray window to finalize your changes. To discard, simply close the gray window.
The configDAQ.m function, accessed by clicking 'Configure DAQ', will auto-detect all compatible DAQ hardware installed on the workstation. In much the same way as configCamera, select which channels to use as analog in 1, analog in 2, analog timer input, and timer out.
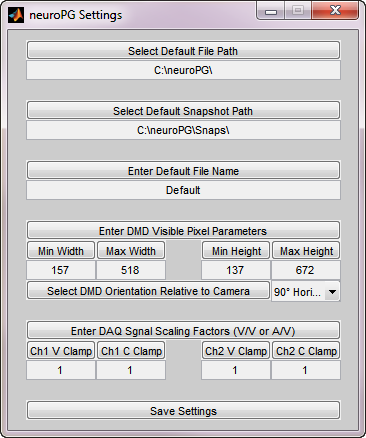
Finally, the nueroPG settings configuration allows you to set such things as default save paths and filenames. It also allows you to set the DMD pixel area that is visible to your microscope camera, as well as its relative orientation. Default scaling factors used for properly scaling input signals in voltage and current clamp modes can be set here as well.
The configuration process creates the file 'neuroPG.config', which is necessary for neuroPG to run. This file saves all of your configuration settings. If there seems to be a problem with your settings, delete or rename this file and re-configure neuroPG. In many instances, this will solve the problem.
You should now be able to run neuroPG and/or CameraWindow on your workstation.
Here is a video quickly demonstrating neuroPG's basic operation.
Opens in this window

The functionality of neuroPG and CameraWindow is non-blocking, meaning that other MATLAB scripts, functions, and GUI's may be run concurrently without problems. Of course, your workstation hardware must be up to the task of running everything simultaneously or there could be performance issues.
All of the windows and UIControls (buttons, text boxes, etc...) are accessible via their Tag property, meaning that the user can monitor them or alter them from their own program or script.
Below are some images of what we have done with neuroPG at RobinsonLab.
 Manual Pattern Generation for tageted neuronal stimulation.
 SmartGrid Pattern Generation for automated stimulation and recording.
 Analyzing neural response from SmartGrid stimulation.


