Depth Estimation for Wildlife Conservation (1st place solution)
- GPU (model or N/A): 8x NVIDIA Tesla V100
- Memory (GB): 8 x 32GB
- OS: Amazon Linux
- CUDA Version : 11.0
- Driver Version : 450.119.04
- CPU RAM : 128 GiB
- DISK : 2 TB
Required software are listed on requirements.txt. Please install all the dependencies before executing the pipeline.
You can check the run.ipynb notebook for the main point of entry to our code.
First, the training and testing data should be downloaded from the competition website.
ideally, the data can be placed in the data/raw folder in the repo directory. The repo tree would then look like below:
../deep-chimpact/
├── LICENSE.md
├── README.md
├── configs
│   ├── checkpoints.json
│   └── deep-chimpact.yaml
├── data
│   └── raw
│        ├── submission_format.csv
│        ├── test_metadata.csv
│        ├── test_videos
│        ├── train_labels.csv
│        ├── train_metadata.csv
│        ├── train_videos
│        ├── video_access_metadata.csv
│        └── video_download_instructions.txt
...
Then run prepare_data.py with appropriate arguments which are explained below:
- --data-dir directory for raw data (unprocessed videos) , default is 'data/raw'
- --save-dir directory to save processed data (images extracted from videos)
- --debug uses only 10 videos for processing if this mode id used
- --infer-only generates images only for test videos
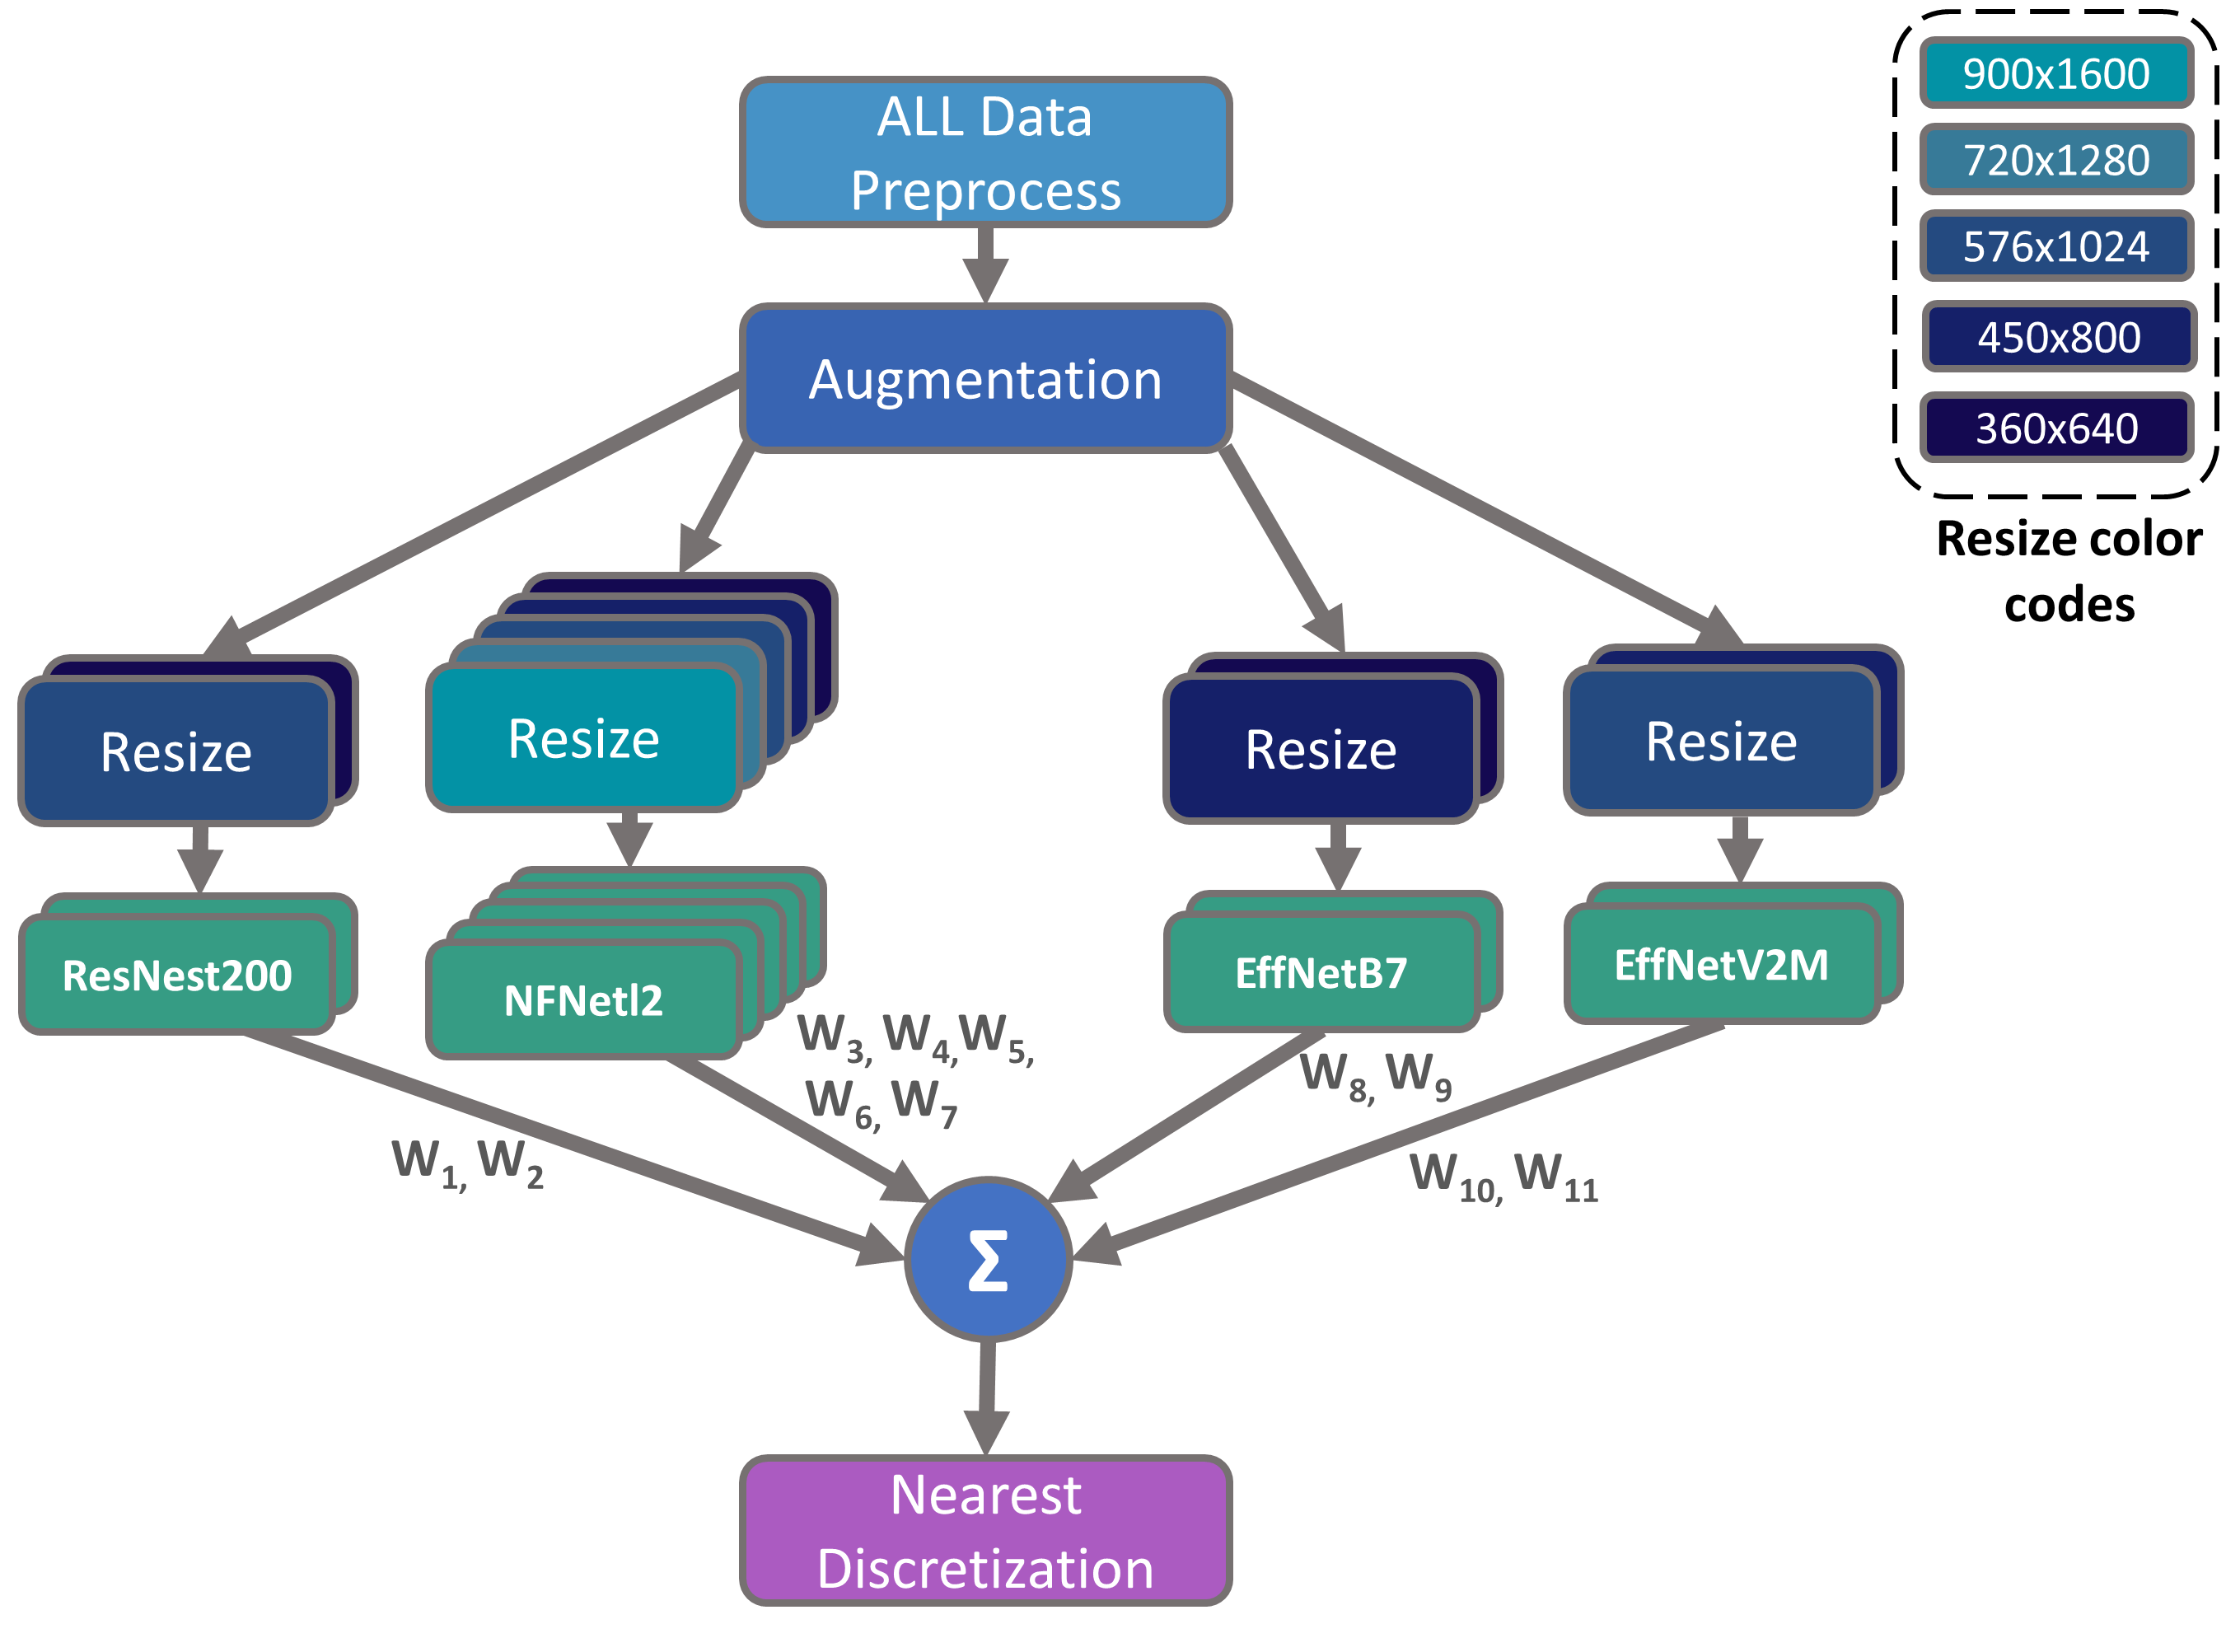
Run train.py to train final 11 models using appropriate arguments.
- --cfg config file path
- --debug trains only with a small portion of the entire files
- --model-name name of the model
- --img-size image size. e.g. --img-size 576 1024
- --batch-size batch size
- --selected-folds selected folds for training. e.g. --selected-folds 0 1 2
- --all-data use all data for training. No validation data
- --ds-path dataset path
- --output-dir path to save model weights and necessary files
Run predict_soln.py in order to predict on test images.
- --cfg config file path
- --ckpt-cfg config file for already given checkpoints. If new models are to be evaluated,
--cfgshould be altered accordingly. - --model-dir the directory where the models listed in config files are located. The complete model location is model-dir/{ckpt-cfg model name}.
- --debug predicts only with a small portion of the entire files
- --output-dir output folder to to save submission file
- --tta number of TTA's
!python3 prepare_data.py --data-dir data/raw

!python3 train.py --model-name 'ECA_NFNetL2' --img-size 360 640 --batch-size 32 --scheduler 'cosine' --loss 'Huber'
!python3 train.py --model-name 'ECA_NFNetL2' --img-size 450 800 --batch-size 24 --scheduler 'cosine' --loss 'Huber'
!python3 train.py --model-name 'ECA_NFNetL2' --img-size 576 1024 --batch-size 12 --scheduler 'cosine' --loss 'Huber'
!python3 train.py --model-name 'ECA_NFNetL2' --img-size 720 1280 --batch-size 8 --scheduler 'cosine' --loss 'Huber'
!python3 train.py --model-name 'ECA_NFNetL2' --img-size 900 1600 --batch-size 4 --scheduler 'cosine' --loss 'Huber'

!python3 train.py --model-name 'ResNest200' --img-size 360 640 --batch-size 16 --scheduler 'step' --loss 'MAE'
!python3 train.py --model-name 'ResNest200' --img-size 576 1024 --batch-size 8 --scheduler 'step' --loss 'MAE'

!python3 train.py --model-name 'EfficientNetB7' --img-size 360 640 --batch-size 32 --scheduler 'cosine' --loss 'MAE'
!python3 train.py --model-name 'EfficientNetB7' --img-size 450 800 --batch-size 24 --scheduler 'cosine' --loss 'MAE'

!python3 train.py --model-name 'EfficientNetV2M' --img-size 450 800 --batch-size 24 --scheduler 'exp' --loss 'Huber'
!python3 train.py --model-name 'EfficientNetV2M' --img-size 576 1024 --batch-size 12 --scheduler 'exp' --loss 'Huber'

!python predict_soln.py- Infer without Training: First download the checkpoints from here and place them on
./outputdirectory then run the following codes.
!python prepare_data.py --infer-only --data-dir data/raw
!python predict_soln.py
- Infer after Training: After training is done, run the following codes.
!python predict_soln.py
Before prediction, file tree would look like this:
../deep-chimpact/
...
├── data
│   └── processed
│        ├── sample_submission.csv
│        ├── test.csv
│        ├── test_images
│        ├── train.csv
│        └── train_images
...
├── output
│    ├── ECA_NFNetL2-360x640
│    ├── ECA_NFNetL2-450x800
│    ├── ECA_NFNetL2-576x1024
│    ├── ECA_NFNetL2-720x1280
│    ├── ECA_NFNetL2-900x1600
│    ├── EfficientNetB7-360x640
│    ├── EfficientNetB7-450x800
│    ├── EfficientNetV2M-450x800
│    ├── EfficientNetV2M-576x1024
│    ├── ResNest200-360x640
│    └── ResNest200-576x1024
...
Batch-Size for Inference is auto-configured for 1xP100 16GB GPU. If anyone wants to use different device with different memory following codes needs to be modified,
mx_dim = np.sqrt(np.prod(dim))
if mx_dim>=768:
    CFG.batch_size = CFG.replicas * 16
elif mx_dim>=640:
    CFG.batch_size = CFG.replicas * 32
else:
CFG.batch_size = CFG.replicas * 64- Weights & Biases for tracking training.
- keras_cv_attention_models for models.
- efficientnet for efficientnet model.

