A Home Assistant rain radar card using the new tiled images from the Australian BOM
Hey dude! Help me out for a couple of 🍻 or a ☕!

The BOM have completely changed the way they deliver radar information. As such this card is no longer able to display radar tiles from the BOM. This can't be fixed and will require a complete rewrite of the card. Unfortunately I don't have the time to work on that.
The new Austalian BOM radar products (mobile app and https://weather.bom.gov.au/) now use map tiles to distribute the radar images. This allows for one continous map that can be zoomed and panned seamlessly. This card allows this to be displayed within Home Assistant. The one drawback of the new system is that currently the BOM only publishes new tiles every 10 minutes (compared to 6 minutes with the old radar products) and there is a bigger lag in them being published. This results in the most recent radar image being between 10 to 20 minutes old at any point in time. The upside is that the radar tiles are available for a much longer time frame. This means you can create radar loops of up to at least 24 hours. The alternative tiles provided by RainViewer update every 5 minutes and are much more timely.
All of the options below can be selected using the GUI config editor, there is no need to edit the yaml config directly.
| Name | Type | Requirement | Description | Default |
|---|---|---|---|---|
| type | string | Required | must be 'custom:bom-radar-card' |
|
| card_title | string | Optional | The title to display on the card | no title displayed |
| data_source | string | Optional | Specifies whcih set of radar tiles to use | 'BoM' see section below for valid values |
| map_style | string | Optional | Specifies the style for the map | 'light' see section below for valid values |
| zoom_level | number | Optional | The initial zoom level, can be from 4 to 10 | 4 |
| center_latitude | number | Optional | The initial center latitude of the map | -27.85 |
| center_longitude | number | Optional | The initial center longitude of the map | 133.75 |
| marker_latitude | number | Optional | The latitude for the home icon if enabled | the same as center_latitude |
| marker_longitude | number | Optional | The longitude for the home icon if enabled | the same as center_longitude |
| frame_count | number | Optional | The number of frames to use in the loop | 10 |
| frame_delay | number | Optional | The number of milliseconds to show each frame | 500 |
| restart_delay | number | Optional | The additional number of milliseconds to show the last frame | 1000 |
| static_map | boolean | Optional | Set to true to disable all panning and zooming | false |
| show_zoom | boolean | Optional | Show the zoom controls in the top left corner | false |
| square_map | boolean | Optional | Will keep the map square (not in panel mode) | false |
| show_marker | boolean | Optional | Show the home icon at the marker position | false |
| show_playback | boolean | Optional | Show the playback controls in the bottom right toolbar | false |
| show_recenter | boolean | Optional | Show the re-center control in the bottom right toolbar | false |
| show_scale | boolean | Optional | Show a scale in the bottom left corner | false |
| show_range | boolean | Optional | Show range rings around marker position | false |
| extra_labels | boolean | Optional | Show more town labels (labels become smaller) | false |
| show_radar_location | boolean | Optional | Show an cirlce at radar sites | false |
| show_radar_coverage | boolean | Optional | Show an overlay of the radar coverage | false |
| radar_location_radius | number | Optional | Set the radius of the location circles | 2 |
| radar_location_line_colour | string | Optional | Set the colour of the outer line of the location circles | '#00FF00' green |
| radar_location_fill_colour | string | Optional | Set the colour of the fill of the location circles | '#FF0000' red |
There are currently two sources of radar tiles available. The standard tiles provided by the Australian Bureau of Meteorolgy and an alternative set provided by RainViewer (with 8 different colour schemes). The BoM tiles are only updated every 10 minutes and lag by a further 10 minutes (ie. the most recent image is between 10 and 20 minutes old). The RainViewer tiles are updated every 5 minutes with a lag of just one minute (ie. the most recent image is between 1 and 6 minutes old). The valid values for this field are:
- BoM
- RainViewer-Original
- RainViewer-UniversalBlue
- RainViewer-TITAN
- RainViewer-TWC
- RainViewer-Meteored
- RainViewer-NEXRAD
- RainViewer-Rainbow
- RainViewer-DarkSky
Specifies the style of map to use. Valid values are:
- light
- dark
- voyager
- satellite
These are based off the Carto and ESRI map styles that are available.
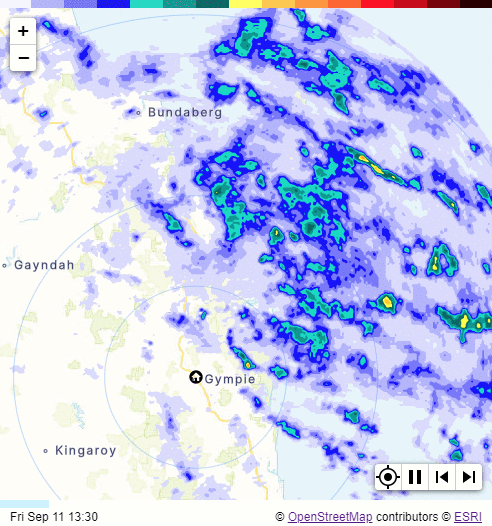
This is the configuration used to generate the radar loop on this page.
type: 'custom:bom-radar-card'
frame_count: 10
center_latitude: -25.567607
center_longitude: 152.930597
marker_latitude: -26.175328
marker_longitude: 152.653189
show_marker: true
show_range: true
show_zoom: true
show_recenter: true
show_playback: true
zoom_level: 8
This will display a radar for the whole of Australia showing the previous 24 hours of radar images with a 100mSec delay between frames.
type: 'custom:bom-radar-card'
frame_count: 144
frame_delay: 100
marker_latitude: -33.857058
marker_longitude: 151.215179
show_marker: true
show_range: falseIf you use HACS, the card is now part of the default HACS store.
If you don't use HACS (seriously you should as it makes life so much easier), you can download the required files from latest releases. Drop all of the files in www/community/bom-radar-card folder in your config directory. It should look like this:
    └── ...
    └── configuration.yaml
    └── www
        └── community
            └── bom-radar-card
                └── bom-radar-card.js
                └── home-circle-dark.svg
                └── home-circle-light.svg
                └── leaflet.css
                └── leaflet.js
                └── leaflet.toolbar.min.css
                └── leaflet.toolbar.min.js
                └── pause.png
                └── play.png
                └── radar-colour-bar-bom.png
                └── radar-colour-bar-darksky.png
                └── radar-colour-bar-meteored.png
                └── radar-colour-bar-nexrad.png
                └── radar-colour-bar-original.png
                └── radar-colour-bar-rainbow.png
                └── radar-colour-bar-titan.png
                └── radar-colour-bar-twc.png
                └── radar-colour-bar-universalblue.png
                └── recenter.png
                └── skip-back.png
                └── skip-next.png
Next add the following entry in lovelace configuration:
resources:
  - url: /local/community/bom-radar-card/bom-radar-card.js
    type: module