
Demo:
- Mohammadreza Sadeghi
- Kamand Sedaghat Shayegan
The main purpose of this project was to learn new tools and libraries that are more commonly used in Flutter. After enough research, we realized that the tools that we had already used to write the Flutter applications for each homework were not always the best practices (especially in the case of state management). We came across libraries like BLoC and Cubit, which are state management libraries, and we decided to create an application that handles state management using these packages. Moreover, we focused on using Material best practices and Object-Oriented-Design principles to write robust and efficient code.
We started by creating an onboarding page which is aimed at on-boarding the user with the application that they will use. Then we created the main page, which consists of a navigation bar of 4 pages. Due to lack of time and the fact that learning to use a better and more efficient state management library (BLoC and Cubit) took a long time, we were unable to complete the application; however, we will keep the rest of the application that is stayed unimplemented, as a concept of future work. Moreover, it is worth mentioning that through creating this application MVP, we learned many things regarding mobile development and UI design.
This project would not have gotten to this point without the contribution of both of us (Kamand and Mohammad). We both came to the university every day (even on weekends) for 6 days to work on the code. Fortunately, we both live close to the university, and working on the project together at the university was easy. Our contribution includes long hours of taking turns to do pair programming, once on Mohammad's laptop and once on Kamand's computer.
There were two main purposes for creating MUNCH:
- To learn a more efficient way to implement state management: We realized that an application includes more than just a couple of pages, and if more pages are added, managing state with setState() can become cumbersome and lead to code that is difficult to maintain. In contrast, using BLoC can help us have a more scalable application. We will dive deeper into the details of the application and how we used it.
- To challenge ourselves with new widgets and components of Flutter: Creating an application using a variety of widgets and components, learning how to use them, and successfully implementing them was definitely a challenge that we accepted to help us enhance our knowledge of Flutter. Moreover, it helped us discover creative solutions for UI/UX challenges and helped us improve the quality of our application.
It should be mentioned that Cubit is now part of the BLoC library, and so we will only mention BLoC from now on. It is worth mentioning that we care about Human-Computer Interaction (HCI) principles and have decided to focus on obeying HCI principles in the application, and BLoC helps us to achieve this goal. There are several benefits that BLoC brings to us in comparison to setState(), and we will briefly mention them here:
- Separation of Concerns: This aspect emphasizes that by using BLoC, we will separate the business logic from the code that is implemented for the user interface of the application.
- Reusability Creating modular logic helps make code easier to understand and maintain by allowing us to reuse it in different parts of the application. This not only improves how the app functions but also makes it easier for others to work on the project, as they can easily comprehend and modify the code.
- Performance Optimization: By minimizing unnecessary UI updates through writing efficient state management modules (such as updating components only when the underlying data changes) the application's performance is optimized, which would result in a more responsive user interface of Munch.
Developing Munch, our food ordering application, had several challenges that we had to overcome. First, as already mentioned, learning BLoC, which is a method for managing app state, took a significant amount of time because it has complexities. However, once we mastered it, developing other parts of the application became much easier. Additionally, we faced challenges in understanding and implementing various new widgets. Learning how to use these widgets without issues was a considerable challenge for us. Furthermore, we had several bugs from time to time, which required hours of debugging to resolve. However, despite these challenges, persevering through them allowed us to create a more robust and functional application.
It is advisable to review the code as well as the submitted video for a comprehensive understanding of our app, Munch. We say this because the app may appear to have limited features, but we devoted significant effort to writing a scalable, readable, and reusable codebase. It is worth mentioning that we also made efforts to adhere to Object-Oriented Principles (OOP) like Encapsulation, Inheritance, Polymorphism, and Abstraction. To achieve this level of code quality (which is not perfect of course, but we tried our best) demanded research and reading various documentation sources so that we make sure that we followed best practices.
The two first options below were the most challenging parts of the development process.
munch/lib/main.dart
home: BlocProvider(
        create: (_) => AppCubit(),
        child: const AppCubitLogics(),
      )
In the home part of the MaterialApp, we have to initialize BLoC to be able to use BLoC. We will get into AppCubitLogics() soon.
munch/lib/cubit/app_cubits.dart
class AppCubit extends Cubit<CubitState> {
  AppCubit() : super(InitialState()) {
    emit(WelcomeState());
  }

  setMainPage() => emit(MainPageState());
  setDetailPage() => emit(DetailPageState());
}
Here, AppCubit extends Cubit, which follows the inheritance principle. We do this because we want to extend the functionality of the Cubit class in our AppCubit. This class initializes the state with InitialState() and immediately emits a WelcomeState() (Which is the first page that the user sees when they open Munch). Additionally, it provides methods setMainPage() and setDetailPage() to change the state to MainPageState() and DetailPageState(), respectively. Essentially, it manages the state transitions within the application. What are these states?
munch/lib/cubit/app_cubit_states.dart
class InitialState extends CubitState {
  @override
  List<Object> get props => [];
}

class WelcomeState extends CubitState {
  @override
  List<Object> get props => [];
}
...
Here, we had to define each state as a CubitState object because the emit() function that was mentioned above, receives CubitState objects.
munch/lib/cubit/app_cubit_logics.dart
Widget build(BuildContext context) {
    return Scaffold(
      body: BlocBuilder<AppCubit, CubitState>(
        builder: (context, state) {
          if (state is WelcomeState) {
            return const WelcomePage();
          } else if (state is MainPageState) {
            return const MainPage();
          } else if (state is DetailPageState) {
            return const DetailPage();
          } else {
            return Container();
          }
        },
      ),
    );
  }
BlocBuilder is a widget provided by the BLoC library that helps rebuild UI components in response to changes in the state of a BLoC! This means that whenever the state changes, BlocBuilder is triggered to rebuild this page.
munch/lib/pages/welcome_page.dart
      floatingActionButton: ResponsiveButton(
        onTap: () {
          context.read<AppCubit>().setMainPage();
        },
      ),
Wherever there is access to context, the state can be changed. Just like here in this ResponsiveButton(), the user is in the WelcomePage() and when it clicks on ResponsiveButton() it is taken to the MainPage().
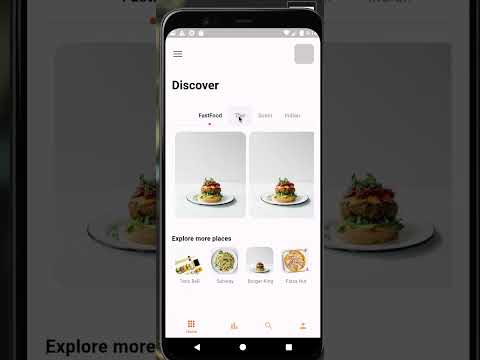
One of the very interesting Material widgets that we came across and considered to use in our application was TabBar(). munch/lib/pages/navbar_pages/home_page.dart
TabController _tabController = TabController(length: 4, vsync: this);
We define a TabController() and give it the number of tabs that we will have.
           child: TabBar(
                labelColor: Colors.black,
                labelPadding: const EdgeInsets.only(left: 16, right: 16),
                indicatorSize: TabBarIndicatorSize.label,
                indicator: DotIndicator(color: MyColors.primary, radius: 3),
                unselectedLabelColor: Colors.grey,
                isScrollable: true,
                controller: _tabController,
                tabs: const [
                  Tab(text: "FastFood"),
                  Tab(text: "Thai"),
                  Tab(text: "Sushi"),
                  Tab(text: "Indian"),
                ],
              ),
            ),
Then, we determine what are the values of each tab, and customize the tab bar as we want to.
child: TabBarView(
                controller: _tabController,
                children: [
                  ListView.builder(
                    scrollDirection: Axis.horizontal,
                    itemCount: 3,
                    itemBuilder: (BuildContext context, int index) => InkWell(
                      onTap: () {
                        context.read<AppCubit>().setDetailPage();
                      },
                      child: Container(
                        margin: const EdgeInsets.only(left: 8, top: 16),
                        decoration: BoxDecoration(
                          borderRadius: BorderRadius.circular(16),
                          color: Colors.red,
                          image: const DecorationImage(
                              image: AssetImage('img/welcome_1.JPG'),
                              fit: BoxFit.cover),
                        ),
                        height: double.maxFinite,
                        width: 180,
                      ),
                    ),
                  ),
                  const Center(child: Text('Thai Food')),
                  const Center(child: Text('Sushi')),
                  const Center(child: Text('Indian')),
                ],
              ),
At this point, we make sure that when the user clicks on each item, the state changes, and the user is sent to the DetailPage(). This page is static for now and the focus was mostly on the design, and making the page user-friendly. To design this page, we looked at similar examples.
munch/lib/utils/my_colors.dart
class MyColors {
  static const Color textColor2 = Color(0xffffcc99);
  static const Color textColor1 = Color(0xffff9966);
  static const Color bigTextColor = Color(0xff2e2e31);
  static const Color primary = Color(0xffff642f);
  static const Color secondary = Color(0xffF89344);
  static const Color BG700 = Color(0xff393A3A);
  static const Color BG500 = Color(0xff575959);
  static const Color BG300 = Color(0xffF4F4F4);
  static const Color starColor = Color(0xffffd27d);
  // static final Color starColor = Color();
}
For usability purposes, we decided to create a MyColors{} class and put the most commonly used colors there and name them in a meaningful way so that we know when we want to use them.
munch/lib/widgets/buttons.dart
class MyButton extends StatelessWidget {
  String? text;
  IconData? icon;
  final bool isIcon;
  final Color color;
  final Color backgroundColor;
  final Color borderColor;
  final double size;

  MyButton(
      {Key? key,
      this.icon,
      this.text = 'null',
      required this.isIcon,
      required this.color,
      required this.backgroundColor,
      required this.borderColor,
      required this.size})
      : super(key: key);

  @override
  Widget build(BuildContext context) {
    return Container(
      margin: EdgeInsets.only(left: 8),
      width: size,
      height: size,
      decoration: BoxDecoration(
      ...
Lastly, again, for usability purposes, we decided to create a reusable button and call it MyButton(). This button will show null if there are no texts given to it as the text at the center of the button.
Of course, there are many other parts of the application to explain, but we decided to keep it short and mention the new and challenging parts of the code. Lastly, it is worth mentioning that the focus of this application was to use best practices, design a user-friendly UI, and write efficient and reusable code. Please do not hesitate to contact us ([email protected], [email protected]) in case there is any ambiguity.
https://api.flutter.dev/flutter/material/TabBar-class.html
https://docs.flutter.dev/cookbook/design/tabs
https://pub.dev/packages/flutter_bloc
https://medium.com/codex/flutter-bloc-an-introduction-with-cubit-7eae1e740fd0
https://burakakten.medium.com/flutter-bloc-cubit-5ee4d053f61d