安卓开发依赖库
- BaseHelper 负责基本的字符串、数字、图片、文件、系统状态、时间和摄像头处理。其它库均依赖此模块
- NetHelper 负责基本的网络连接,提供TCP和UDP的支持
- AsyncLoadingImage 负责异步的网络图片加载,依赖于BaseHelper和NetHelper模块
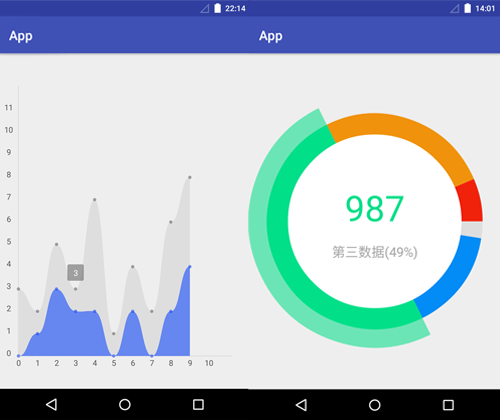
- ChartCreater 负责数据图表的展现,包括折线图和饼状图
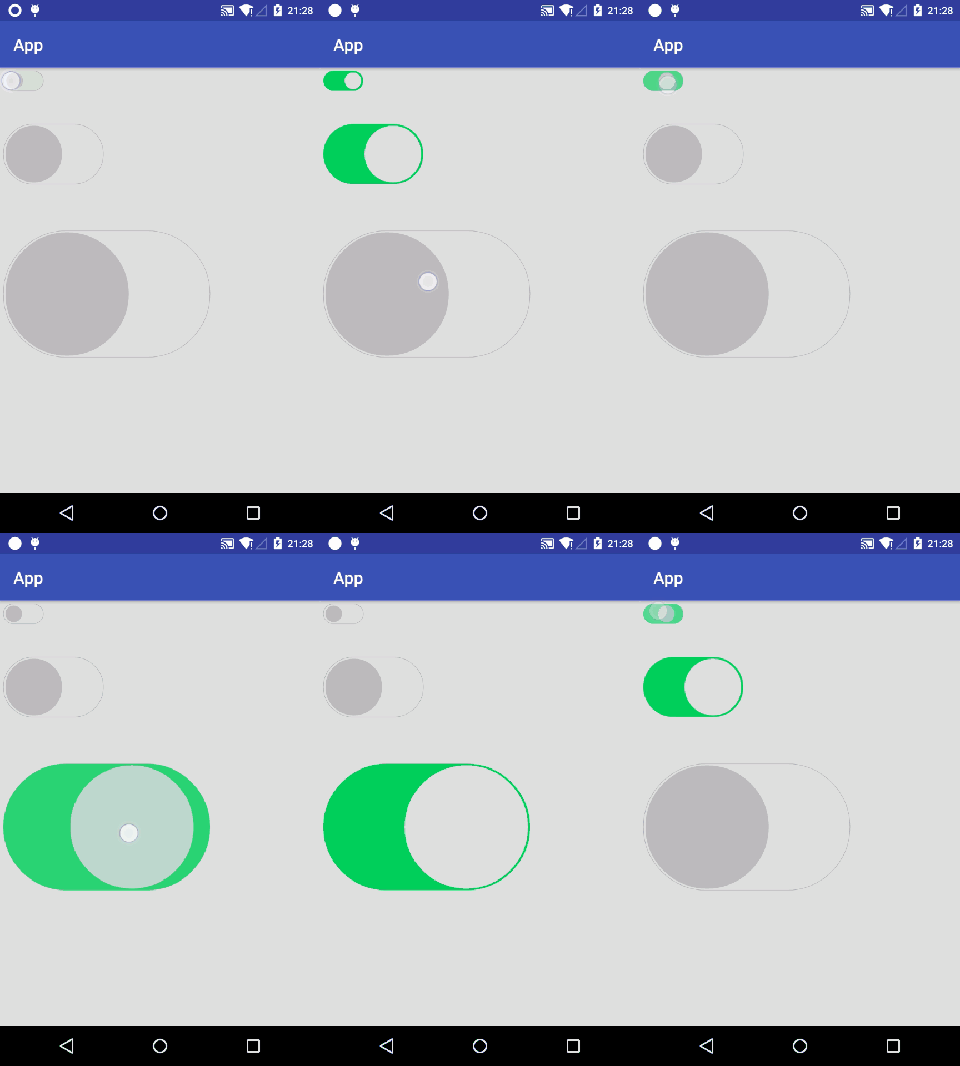
- UserInterface 负责视图UI交互的封装,包括手势、圆形的ImageView,和主流的滑动开关SwitchButton
- SwipeBackFrame 负责activity或fragment手势滑动返回的框架
- DialogPresenter 负责整体对话框的交互,新特性包括毛玻璃和MaterialDesign的设计
- 增加ChartCreater的折线图功能
- 增加ChartCreater的饼状图功能
- 修改ChartPaint相关设置
- 增加BaseHelper的摄像头支持(Camera2)
- 修改API支持等级为21
- 增加GestureImageView组件,支持手势对图片的拖拽和缩放
- 增加UserInterface库,包括手势ImageView、圆形ImageView、滑动开关SwitchButton
- 增加SwipeBackFrame框架,支持activity和fragment横向滑动的返回,支持内嵌RecyclerView和ViewPager滑动事件
- 修复滑动开关SwitchButton响应事件Bugs,修复动态设置isOn状态时,控件不刷新问题
- 增加DialogPresenter库,支持毛玻璃和MaterialDesign的对话框
有问题或建议可以发邮件或者加QQ
Email: [email protected]
QQ: 372110675
- 负责基本的字符串、数字、图片、文件、系统状态、时间和摄像头处理
- 根据其他库的需求不定期更新
- 在Android Studio的build.gradle中,在dependencies里添加一行:
compile project(':BaseHelper')
- 调取摄像头
   @Override
   protected void onCreate(Bundle savedInstanceState) {
       ...
       textureView = (AutoFitTextureView) findViewById(R.id.texture);
   }

   @Override
   protected void onResume() {
       ...
       CameraEventHandle cameraEventHandle = new CameraEventHandle() { // 设置摄像头事件回调
           @Override
           public void captureStillPictureResult(final byte[] imageByteArray) { // 拍照后的时间回调,这里可以对照片进行储存或处理
               File file = new File(getExternalFilesDir(null), "pic.jpg");
               try (FileOutputStream output = new FileOutputStream(file)) {
                   output.write(imageByteArray);
                   Toast.makeText(MainActivity.this, "保存: " + file, Toast.LENGTH_SHORT).show();
               } catch (Exception e) {
                   e.printStackTrace();
               }
           }
           @Override
           public void setUpCameraOutputsError() { } // 错误回调
           @Override
           public void cameraAccessExceptionError() { } // 错误回调
           @Override
           public void onConfigureFailedError() { } // 错误回调
           @Override
           public void createCameraPreviewSessionError() { } // 错误回调
       };
       cameraHelper = new CameraHelper(MainActivity.this, textureView, cameraEventHandle); // 实例化摄像头
       cameraHelper.actionOpenCamera(); // 开启摄像头并预览
       // 拍照调用接口(成功后会把结果输出到事件接口里):cameraHelper.actionCaptureStillPicture();
   }

   @Override
   protected void onPause() {
       ...
       cameraHelper.actionCloseCamera(); // 记得关闭并释放摄像头
   }
- 布局
   <org.infinitytron.basehelper.camera.AutoFitTextureView
       android:id="@+id/texture"
       android:layout_width="wrap_content"
       android:layout_height="wrap_content" />
- 负责基本的网络连接
- 提供对TCP的支持
- HTTP协议
- GET封装
- POST封装,指出主流的三种提交方式,包括x-www-form-urlencoded、json、form-data
- MQTT协议
- HTTP协议
- 提供对UDP的支持
- 提供SOCKET助理
- 提供线程池的支持,支持多线程请求
- 在Android Studio的build.gradle中,在dependencies里添加一行:
compile project(':NetHelper')
- GET请求
   GetHelper getHelper = new GetHelper();
   getHelper.setSendAddress("http:https://192.168.43.83:8080/index.php"); // 设置请求地址
   getHelper.setNetEventHandle(new NetEventHandle() { // 设置请求事件回调
       @Override
       public void onSend() { } // 发送时回调
       @Override
       public void onReceive(Map<String, List<String>> receiveHeader, byte[] receiveMessage) { } // 接收时回调
       @Override
       public void onTimeout() { } // 超时回调
       @Override
       public void error(Integer errorCode) { } // 错误回调
   });
   NetHelper.getInstance().startNetworkWithoutReturn(getHelper); // 提交一个网络请求,并在线程池中运行
- 其它设置项
   Map<String, String> sendMessageMap = new HashMap<>(); // 设置消息集合
   sendMessageMap.put("name", "Pthyem Lee");
   sendMessageMap.put("tool", "By NetHelper");

   getHelper.setSendTextMap(sendMessageMap); // 设置要发送的消息
   getHelper.setSendHeaderCookieMap(sendMessageMap); // 设置要携带的Cookie消息
   getHelper.setReceiveCachePart(1024); // 设置接收消息缓存大小(默认1024个字节)
   getHelper.setReceiveTimeout(10000); // 设置请求超时时间(默认10秒)
   getHelper.setSendHeaderAccept("..."); // 设置请求头(默认text/html,application/xhtml+xml,application/xml;q=0.9,image/webp,image/apng,*/*;q=0.8)
   getHelper.setSendHeaderAcceptEncoding("..."); // 设置请求头(默认gzip, deflate)
   getHelper.setSendHeaderAcceptLanguage("..."); // 设置请求头(默认zh-CN,zh;q=0.8,zh-TW;q=0.6,en;q=0.4)
   getHelper.setSendHeaderConnection("..."); // 设置请求头(默认keep-alive)
   getHelper.setSendHeaderHost("..."); // 设置请求头(默认为空)
   getHelper.setSendHeaderReferer("..."); // 设置请求头(默认为空)
   getHelper.setSendHeaderUserAgent("..."); // 设置请求头(默认Mozilla/5.0 (Windows NT 10.0; Win64; x64) AppleWebKit/537.36 (KHTML, like Gecko) Chrome/59.0.3071.115 Safari/537.36)
- POST请求
   PostHelper postHelper = new PostHelper();
   postHelper.setSendAddress("http:https://192.168.43.83:8080/index.php"); // 设置请求地址
   postHelper.setSendMethod("x-www-form-urlencoded"); // 设置请求方法(x-www-form-urlencoded, json, form-data)
   postHelper.setNetEventHandle(new NetEventHandle() { // 设置请求事件回调
       @Override
       public void onSend() { } // 发送时回调
       @Override
       public void onReceive(Map<String, List<String>> receiveHeader, byte[] receiveMessage) { } // 接收时回调
       @Override
       public void onTimeout() { } // 超时回调
       @Override
       public void error(Integer errorCode) { } // 错误回调
   });
   NetHelper.getInstance().startNetworkWithoutReturn(postHelper); // 提交一个网络请求,并在线程池中运行
- 其它设置项
   Map<String, String> sendMessageMap = new HashMap<>(); // 设置消息集合
   sendMessageMap.put("name", "Pthyem Lee");
   sendMessageMap.put("tool", "By NetHelper");
   Map<String, File> fileMap = new HashMap<>(); // 设置文件集合
   fileMap.put("test1", new File("mnt/sdcard/test.png"));

   postHelper.setSendTextMap(sendMessageMap); // 设置要发送的消息(发送消息组合形式会随发送方式改变)
   postHelper.setSendFileMap(fileMap); // 设置要发送的文件(发送文件仅支持以form-data方式发送)
   postHelper.setSendHeaderCookieMap(sendMessageMap); // 设置要携带的Cookie消息
   postHelper.setReceiveCachePart(1024); // 设置接收消息缓存大小(默认1024个字节)
   postHelper.setReceiveTimeout(10000); // 设置请求超时时间(默认10秒)
   postHelper.setSendHeaderAccept("..."); // 设置请求头(默认text/html,application/xhtml+xml,application/xml;q=0.9,image/webp,image/apng,*/*;q=0.8)
   postHelper.setSendHeaderAcceptEncoding("..."); // 设置请求头(默认gzip, deflate)
   postHelper.setSendHeaderAcceptLanguage("..."); // 设置请求头(默认zh-CN,zh;q=0.8,zh-TW;q=0.6,en;q=0.4)
   postHelper.setSendHeaderConnection("..."); // 设置请求头(默认keep-alive)
   postHelper.setSendHeaderHost("..."); // 设置请求头(默认为空)
   postHelper.setSendHeaderReferer("..."); // 设置请求头(默认为空)
   postHelper.setSendHeaderUserAgent("..."); // 设置请求头(默认Mozilla/5.0 (Windows NT 10.0; Win64; x64) AppleWebKit/537.36 (KHTML, like Gecko) Chrome/59.0.3071.115 Safari/537.36)
- TCP通信
   TcpHelper tcpHelper = new TcpHelper();
   tcpHelper.setSendAddress("192.168.43.83"); // 设置请求地址
   tcpHelper.setSendPort(8000); // 设置请求端口
   tcpHelper.setSendMessage(message.getBytes());  // 设置请求内容
   tcpHelper.setNetEventHandle(new NetEventHandle() { // 设置请求事件回调
       @Override
       public void onSend() { } // 发送时回调
       @Override
       public void onReceive(Map<String, List<String>> receiveHeader, byte[] receiveMessage) { } // 接收时回调
       @Override
       public void onTimeout() { } // 超时回调
       @Override
       public void error(Integer errorCode) { } // 错误回调
   });
   NetHelper.getInstance().startNetworkWithoutReturn(tcpHelper); // 提交一个网络请求,并在线程池中运行
- 其它设置项
   tcpHelper.setReceiveCachePart(1024); // 设置接收消息缓存大小(默认1024个字节)
   tcpHelper.setReceiveTimeout(10000); // 设置请求超时时间(默认10秒)
- UDP通信
   UdpHelper udpHelper = new UdpHelper();
   udpHelper.setSendAddress("255.255.255.255"); // 设置请求地址
   udpHelper.setSendPort(1900); // 设置请求端口
   udpHelper.setSendMessage("hello world");  // 设置请求内容
   udpHelper.setNetEventHandle(new NetEventHandle() { // 设置请求事件回调
       @Override
       public void onSend() { } // 发送时回调
       @Override
       public void onReceive(Map<String, List<String>> receiveHeader, byte[] receiveMessage) { } // 接收时回调
       @Override
       public void onTimeout() { } // 超时回调
       @Override
       public void error(Integer errorCode) { } // 错误回调
   });
   NetHelper.getInstance().startNetworkWithoutReturn(udpHelper); // 提交一个网络请求,并在线程池中运行
- 其它设置项
   udpHelper.setReceiveCachePart(1024); // 设置接收消息缓存大小(默认1024个字节)
   udpHelper.setReceiveTimeout(10000); // 设置请求超时时间(默认10秒)
- 负责异步的网络图片加载,依赖于BaseHelper和NetHelper模块
- 可进行特殊请求的图片加载(特殊请求方式参照GetHelper方法)
- 提供图片的软引用方法
- 提供图片在本地储存方法(以图片url地址做MD5计算重命名保存)
- 提供线程池的支持,支持多线程网络图片加载
- 在Android Studio的build.gradle中,在dependencies里添加三行:
    compile project(':NetHelper')
    compile project(':BaseHelper')
    compile project(':AsyncLoadingImage')
- 进行异步加载网络图片
   GetHelper getHelper = new GetHelper();
   getHelper.setSendAddress("http:https://192.168.43.83/image/test.jpg"); // 设置请求地址
   imageView.setTag(R.id.asyncLoadingImage, getHelper.getSendAddress()); // 给imageView设置标记,图片加载完毕后会寻找对应标记的控件进行图片设置
   AsyncLoadingImage.getInstance().asyncLoading(TestActivity.this, getHelper, imageView, "/savePath/"); // 提交一个网络图片加载请求,并在线程池中运行
- 负责数据图表的展现,包括折线图和饼状图
- 提供自适布局大小应方法
- 支持高度自定义,包括x轴y轴样式,数据样式,点击后的气泡展现样式等
- 在Android Studio的build.gradle中,在dependencies里添加一行:
compile project(':ChartCreater')
- 折线图
   List<Map<Integer, Integer>> dataMapList = new ArrayList<>(); // 设置数据集合列表(支持多组数据展现,每组数据以Map形式储存,以List集合)

   Map<Integer, Integer> dataMapOn = new HashMap<>(); // 第一组数据
   dataMapOn.put(0, 3);
   ...
   dataMapOn.put(9, 8);

   dataMapList.add(dataMapOn); // 添加第一组数据到List列表

   Map<Integer, Integer> dataMapTw = new HashMap<>(); // 第二组数据
   dataMapTw.put(0, 0);
   ...
   dataMapTw.put(9, 4);

   dataMapList.add(dataMapOn); // 添加第二组数据到List列表

   SquareChartView squareChartView = new SquareChartView(this);
   squareChartView.setDataMapList(dataMapList); // 设置图表数据
   squareChartView.invalidate(); // 通知view组件重绘
   ((RelativeLayout) findViewById(R.id.relativeLayout)).addView(squareChartView); // 添加图表到Layout中,图表大小及比例取决于存放的Layout大小
- 设置图表样式(默认样式如下)
   Map<Integer, String> squareChartStyleMap = new HashMap<>();

   squareChartStyleMap.put(ChartEntity.chartSimpleTextSize, "24"); // 设置气泡文字代销
   squareChartStyleMap.put(ChartEntity.chartSimpleTextColor, "#ffffff"); // 设置气泡文字颜色
   squareChartStyleMap.put(ChartEntity.chartSimpleLayoutWidth, "50"); // 设置气泡宽度
   squareChartStyleMap.put(ChartEntity.chartSimpleLayoutHeight, "50"); // 设置气泡高度
   squareChartStyleMap.put(ChartEntity.chartSimpleLayoutBackground, "#8c5e5e5e"); // 设置气泡背景颜色,支持透明颜色属性

   squareChartView.setSquareChartStyleMap(squareChartStyleMap); // 设置图表样式
- 设置x轴和y轴下标内容(默认x轴和y轴下标都是0~9)
   List<Map<Integer, String>> xyMapList = new ArrayList<>();

   Map<Integer, String> xMap = new HashMap<>();
   xMap.put(0, "0");
   ...
   xMap.put(10, "10");

   xyMapList.add(xMap); // 添加x轴下标到列表

   Map<Integer, String> yMap = new HashMap<>();
   yMap.put(0, "0");
   ....
   yMap.put(11, "11");

   xyMapList.add(yMap); // 添加y轴下标到列表

   squareChartView.setXyMapList(xyMapList); // 设置x轴和y轴下标内容
- 设置x轴和y轴样式(默认样式如下)
   List<Map<Integer, String>> xySettingMapList = new ArrayList<>();

   Map<Integer, String> xMapStyle = new HashMap<>();
   xMapStyle.put(ChartEntity.xMarginBottom, "100"); // 设置x轴距底部边界的距离,以适应文字长度与大小
   xMapStyle.put(ChartEntity.xTextSize, "24"); // 设置x轴下标文字大小
   xMapStyle.put(ChartEntity.xTextColor, "#5e5e5e"); // 设置x轴下标文字颜色
   xMapStyle.put(ChartEntity.xTextMarginTopLine, "30"); // 设置x轴下标文字距x轴的距离,以适应文字长度与大小
   xMapStyle.put(ChartEntity.xLineWidth, "3"); // 设置x轴宽度
   xMapStyle.put(ChartEntity.xLineColor, "#dedede"); // 设置x轴颜色

   xySettingMapList.add(xMapStyle);

   Map<Integer, String> yMapStyle = new HashMap<>();
   yMapStyle.put(ChartEntity.yMarginLeft, "60"); // 设置y轴距左边界的距离,以适应文字长度与大小
   yMapStyle.put(ChartEntity.yTextSize, "16"); // 设置y轴下标文字大小
   yMapStyle.put(ChartEntity.yTextColor, "#5e5e5e"); // 设置y轴下标文字颜色
   yMapStyle.put(ChartEntity.yTextMarginRightLine, "30"); // 设置y轴下标文字距y轴的距离,以适应文字长度与大小
   yMapStyle.put(ChartEntity.yLineWidth, "3"); // 设置y轴宽度
   yMapStyle.put(ChartEntity.yLineColor, "#dedede"); // 设置y轴颜色

   xySettingMapList.add(yMapStyle);

   squareChartView.setXyStyleMapList(xySettingMapList); // 设置x轴和y轴样式
- 设置数据样式(默认样式如样式一)
   List<Map<Integer, String>> dataStyleList = new ArrayList<>(); // 设置数据样式集合列表(样式与数据组序一一对应,未设置或缺省则以默认样式显示)

   Map<Integer, String> dataStyleOn = new HashMap<>();
   dataStyleOn.put(ChartEntity.dataLineColor, "#dedede"); // 设置数据连线颜色
   ataStyleOn.put(ChartEntity.dataLineWidth, "3"); // 设置数据连线宽度
   dataStyleOn.put(ChartEntity.dataPointColor, "#8c5e5e5e"); // 设置数据点颜色
   dataStyleOn.put(ChartEntity.dataPointRadius, "5"); // 设置数据点半径

   dataStyleList.add(dataStyleOn); // 设置第一组数据样式

   Map<Integer, String> dataStyleTw = new HashMap<>();
   dataStyleTw.put(ChartEntity.dataLineColor, "#6686f0"); // 设置数据连线颜色
   dataStyleTw.put(ChartEntity.dataLineWidth, "3"); // 设置数据连线宽度
   dataStyleTw.put(ChartEntity.dataPointColor, "#8c0c42f1"); // 设置数据点颜色
   dataStyleTw.put(ChartEntity.dataPointRadius, "5"); // 设置数据点半径

   dataStyleList.add(dataStyleTw); // 设置第二组数据样式

   squareChartView.setDataStyleMapList(dataStyleList); // 设置数据样式
- 饼状图
   List<Map<Integer, String>> dataWithStyleMapList = new ArrayList<>(); // 数据内容集合列表(有别于折线,饼状图的数据与样式成为一个集合存放于列表中)

   Map<Integer, Integer> dataWithStyleMapOn = new HashMap<>(); // 第一组数据
   dataWithStyleMapOn.put(ChartEntity.data, String.valueOf(50)); // 放置数据
   dataWithStyleMapOn.put(ChartEntity.dataShowColor, "#dedede"); // 设置数据在饼状图中弧边的颜色(这里只能填RGB)
   dataWithStyleMapOn.put(ChartEntity.dataShowText, "第一数据"); // 设置数据类型名称

   dataWithStyleMapList.add(dataWithStyleMapOn); // 添加第一组数据到List列表

   Map<Integer, Integer> dataWithStyleMapTw = new HashMap<>(); // 第二组数据
   ...
   dataWithStyleMapList.add(dataWithStyleMapTw); // 添加第二组数据到List列表

   RoundChartView roundChartView = new RoundChartView(this);
   roundChartView.setDataWithStyleMapList(dataWithStyleMapList); // 设置图表数据
   roundChartView.invalidate(); // 通知view组件重绘
   ((RelativeLayout) findViewById(R.id.relativeLayout)).addView(squareChartView); // 添加图表到Layout中,图表大小及比例取决于存放的Layout大小
- 设置图表样式(默认样式如下)
   Map<Integer, String> roundChartStyleMap = new HashMap<>();

   roundChartStyleMap.put(ChartEntity.roundChartPadding, "56"); // 设置图表内边距(可根据某项数据展示的弧度宽度适当调整)
   roundChartStyleMap.put(ChartEntity.roundChartWidth, "120"); //  设置图表弧度的宽度
   roundChartStyleMap.put(ChartEntity.roundChartShowWidth, "128"); // 设置某项数据展示的弧度宽度
   roundChartStyleMap.put(ChartEntity.roundChartShowDataSize, "108"); // 设置图表某项数据在中间展现的字体大小
   roundChartStyleMap.put(ChartEntity.roundChartShowTextSize, "40"); // 设置图表某项数据的类型名称在中间展现的字体大小
   roundChartStyleMap.put(ChartEntity.roundChartShowTextColor, "#8c5e5e5e"); // 设置图表某项数据的类型名称在中间展现的字体颜色
   roundChartStyleMap.put(ChartEntity.roundChartShowTextBackground, "#ffffff"); // 设置图表某项数据在中间展现背景颜色

   squareChartView.setSquareChartStyleMap(squareChartStyleMap); // 设置图表样式
- GestureImageView提供双击缩放图片,单指拖拽、双指缩放图片的方法。继承于AppCompatImageView,故用法跟ImageView无区别,可在布局的src里或在代码的setImageResource里设置图片来源
- CircleImageView提供圆形的ImageView。继承于AppCompatImageView,故用法跟ImageView无区别
- SwitchButton提供可滑动的开关,继承于View,支持自适应大小和任意比例,提供手指拖动或点击激活释放开关,内嵌滑动监听器OnSwitchListener
- 在Android Studio的build.gradle中,在dependencies里添加一行:
compile project(':UserInterface')
- GestureImageView
   <org.infinitytron.userinterface.GestureImageView
       android:layout_width="match_parent"
       android:layout_height="match_parent"
       android:src="@mipmap/test" />
- CirlceImageView
   <org.infinitytron.userinterface.CirlceImageView
       android:layout_width="match_parent"
       android:layout_height="match_parent"
       android:src="@mipmap/test" />
- SwitchButton
- 布局
   <org.infinitytron.userinterface.SwitchButton
       android:layout_width="56dp"
       android:layout_height="32dp"
       app:enable="true" // 设置控件是否可用
       app:isOn="false" // 设置控件开关状态
       app:closeUpFrameColor="#a7a7a7" // 设置关闭时框架颜色
       app:closeUpCircleColor="#b9b9b9" // 设置关闭时小圆点颜色
       app:turnOnFrameColor="#05d05d" // 设置打开时框架颜色
       app:turnOnCircleColor="#dedede" // 设置打开时小圆点颜色
   />
- 代码
   ((SwitchButton) findViewById(R.id.switchButton)).setOnSwitchListener(new OnSwitchListener() { // 设置监听器
       @Override
       public void onSwith(boolean isOn) {
           Log.i("开关状态", isOn + "");
       }
   });
- SwipeBackFrame提供activity和fragment下的手势滑动返回的框架
- 主框架BaseSlidingPaneLayout继承并重写于SlidingPaneLayout,修改滑动事件捕捉并传递给子控件,所以内嵌的ViewPager和RecyclerView的滑动操作不受影响
- 在Android Studio的build.gradle中,在dependencies里添加一行:
compile project(':SwipeBackFrame')
- 滑动返回
   // 想要让activity支持滑动返回,只需继承SwipeBackActivity即可
   // 想要让fragment支持滑动返回,只需继承SwipeBackFragment即可

   // 启动activity
   new SwipeBackActivity().startSwipeBackActivty(MainActivity.this, TempOnActivity.class); // 用于本activity没继承SwipeBackActivity时
   startSwipeBackActivty(MainActivity.this, TempOnActivity.class); // 用于本activity继承SwipeBackActivity时
   // 启动fragment
   new SwipeBackFragment().startSwipeBackFragment(MainActivity.this, null, new TempOnFragment(), R.id.linearLayout); // 用于本activity没继承SwipeBackActivity时
- 负责整体的对话框交互
- 包含毛玻璃和MaterialDesign的设计效果
- 在Android Studio的build.gradle中,在dependencies里添加一行:
compile project(':DialogPresenter')
- Dialog
 * LoadingDialog

   // 显示对话框,并设置效果为加载中
   LoadingDialog.getInstance().display(MainActivity.this, 1, "加载中...", false);

   // 设置变化成加载完成效果
   LoadingDialog.getInstance().setMode(2, "加载成功");

   // 设置变化成加载失败效果
   LoadingDialog.getInstance().setMode(3, "加载失败");

   // 关闭对话框
   LoadingDialog.getInstance().close();

 * TipDialog

   // 显示对话框
   TipDialog.getInstance().display(MainActivity.this, "提示", "是否确认切换用户?", true, new TipDialogListener() {
       @Override
       public void onNegative() { } // 取消键事件
       @Override
       public void onPositive() { } // 确认键事件
   });


