by Gene Ting-Chun Kao
http:https://35.157.162.112.xip.io/
After setup Amazon Lightsail, go to Networking and make a static IP address.
To make the OAuth works in my ledger application. We need to have a DNS refers to IP address, so I used xip.io.
Use sudo apt-get update to update the packages' source.
Then use sudo apt-get upgrade or sudo apt-get dist-upgrade to upgrade all
packages.
sudo apt-get install emacs24-nox Install
Emacs, because it is the best editor in
the world! And Emacs rocks.
First, we make SSH key pair because using our own terminal to in the remote Linux machine is much more comfortable.
We use ssh-keygen in our local machine to generate our public and
private keys. For example, we will have aws.pub and aws. In default, it is
created in ~/.ssh directory.
cat ~/.ssh/aws.pub and copy the public key.
Then SSH to the Linux machine through AWS browser terminal interface, create
authorized_keys in ~/.ssh by typing mkdir ~/.ssh && touch authorized_keys, and paste your public key into the file.
change the permission
$ chmod 700 .ssh
$ chmod 644 .ssh/authorized_keys

$ service ssh restart
Now we can log in to remote server from our local terminal!
$ ssh [email protected] -p 22 -i ~/.ssh/awsAnd we have to disable root account remote login as early as possible by
modifying /etc/ssh/sshd_config.
PermitRootLogin noReferences:
- http:https://manpages.ubuntu.com/manpages/xenial/en/man5/sshd_config.5.html
- https://www.digitalocean.com/community/tutorials/how-to-tune-your-ssh-daemon-configuration-on-a-linux-vps
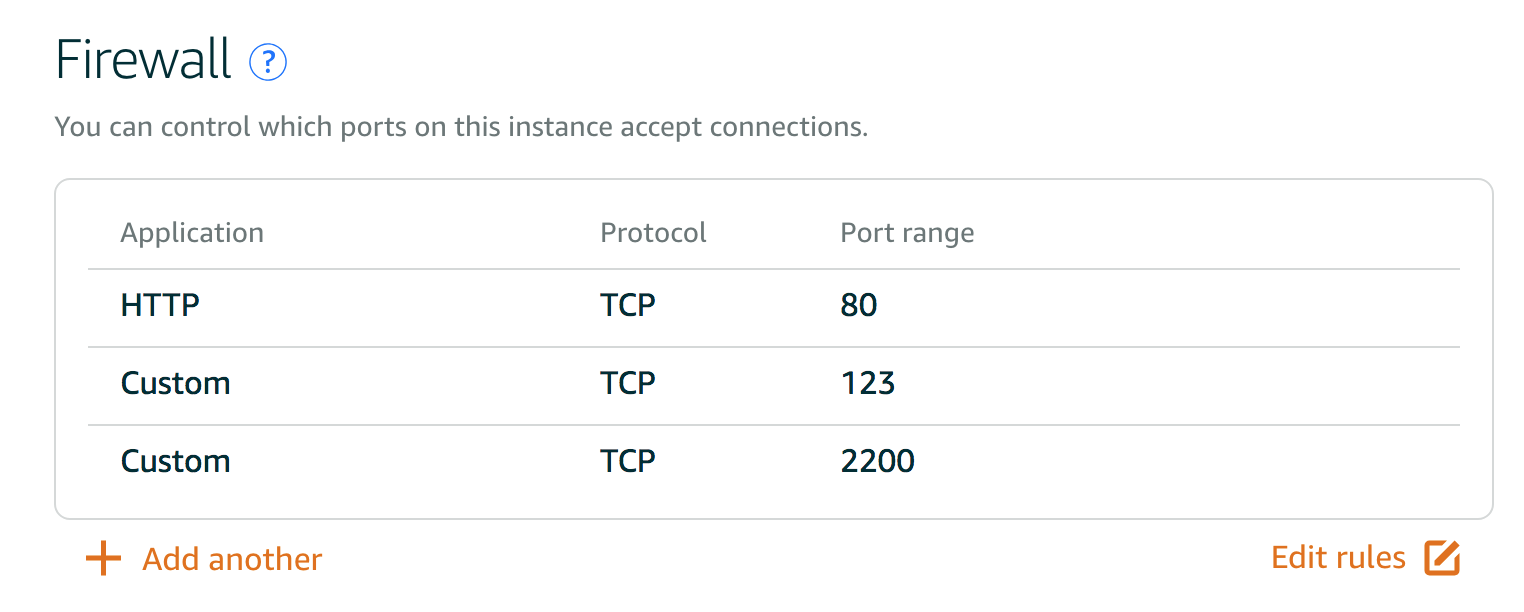
Firs, let's configure the AWS Networking settings.
In the remote server
$ sudo ufw default deny incoming
$ sudo ufw default allow outgoing
$ sudo ufw allow 2200/tcp
$ sudo ufw allow www
$ sudo ufw allow 123/udp               # this allow port 123 for ntp.
$ sudo ufw enable
To remove the rules. refer to this site.
$ sudo ufw status numbered
$ sudo ufw delete 2                    # 2 is the number you would like to delete.
By typing sudo ufw status, we should now see some firewall status.
To                         Action      From
--                         ------      ----
2200/tcp                   ALLOW       Anywhere
80/tcp                     ALLOW       Anywhere
123/udp                    ALLOW       Anywhere
2200/tcp (v6)              ALLOW       Anywhere (v6)
80/tcp (v6)                ALLOW       Anywhere (v6)
123/udp (v6)               ALLOW       Anywhere (v6)
Now we should be able to re-login to the server with different SSH port 2200.
$ ssh [email protected] -p 2200 -i ~/.ssh/aws$ sudo adduser grader # Add a user called grader.
$ sudo cp /etc/sudoers.d/90-cloud-init-users /etc/sudoers.d/grader
$ sudo emacs /etc/sudoers.d/grader # And change line 4 to grader ALL=(ALL) NOPASSWD:ALLAnd repeat the ssh-keygen process like before.
ssh [email protected] -p 2200 -i ~/.ssh/graderType sudo dpkg-reconfigure tzdata and choose None of the above -> UTC.
$ sudo apt-get install apache2
$ sudo apt-get install libapache2-mod-wsgi-py3
We should be able to see Apache working.
$ sudo apt-get install postgresql
By default, PostgreSQL don't allow remote connection. Check
/etc/postgresql/9.5/main/pg_hba.conf to make sure that.
To create a new database user named catalog, first login as postgres sudo su - postgres, then psql to enter the database.
postgres=# CREATE DATABASE catalog;
postgres=# CREATE USER catalog;
postgres=# ALTER ROLE catalog WITH PASSWORD 'password';
postgres=# GRANT ALL PRIVILEGES ON DATABASE catalog TO catalog;By default, git is already install. If not sudo apt-get install git.
$ cd /var/www/ && mkdir flaskApp && cd flaskApp

# Do not have "-" in the name, otherwise, python from...import doesn't work.
$ sudo git clone https://github.com/GeneKao/ledger-app.git ledgerapp
$ sudo git checkout aws-deploy
Don't forget to download your own google OAuth API key and place it as client_secrets.json in the ledgerapp directory.
I created a different branch with minor code changes, to see the difference, go to this commit in the aws-deploy branch.
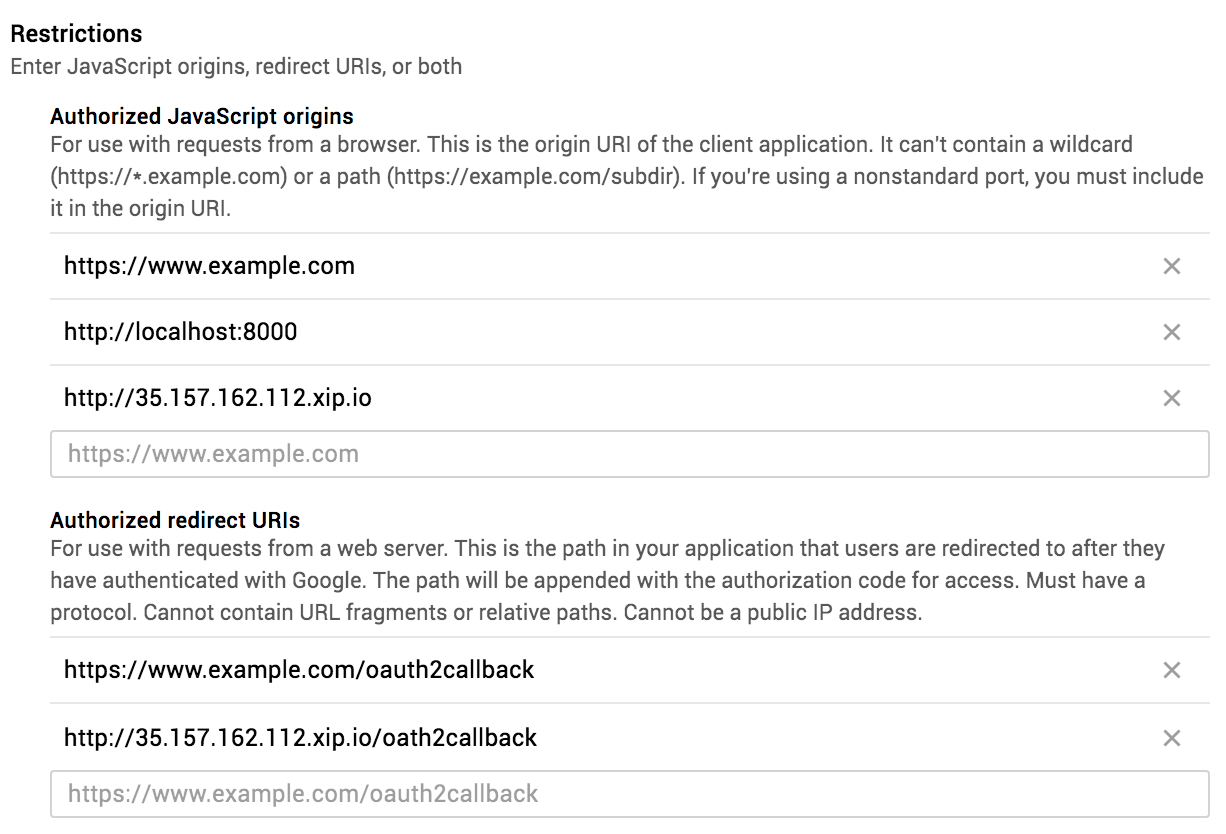
To config Google Cloud Platform make sure you put url to restrictions.
$ cd /var/www/flaskApp/ledgerapp

# Install pip and virtualenv
$ sudo apt-get install python3-pip
$ sudo apt-get install python-virtualenv

$ sudo virtualenv -p python3 env
$ sudo chown -R grader:grader env/
$ source ./env/bin/activate
$ pip install flask packaging oauth2client redis passlib flask-httpauth
$ pip install sqlalchemy flask-sqlalchemy psycopg2-binary bleach requests

# To run the code
$ python models.py    # Set up database schema.
$ python __init__.py  # To test if the code is running, then Ctrl-C to go out.
References:
First disable apache default application.
sudo a2dissite 000-default.confChange setting in /etc/apache2/mods-enabled/wsgi.conf to use python3.
#WSGIPythonPath directory|directory-1:directory-2:...
WSGIPythonPath /var/www/flaskApp/ledgerapp/env/lib/python3.5/site-packages
Create /etc/apache2/sites-available/ledgerapp.conf to enable Apache render
ledgerapp.
<VirtualHost *:80>
	ServerName 18.184.36.243
	WSGIScriptAlias / /var/www/flaskApp/ledgerapp.wsgi
	<Directory /var/www/flaskApp/ledgerapp/>
	    Order allow,deny
	    Allow from all
    </Directory>
    Alias /static /var/www/flaskApp/ledgerapp/static
    <Directory /var/www/flaskApp/ledgerapp/static/>
        Order allow,deny
        Allow from all
    </Directory>
    ErrorLog ${APACHE_LOG_DIR}/error.log
    LogLevel warn
    CustomLog ${APACHE_LOG_DIR}/access.log combined
</VirtualHost>
Enable ledgerapp
$ sudo a2ensite ledgerapp
$ sudo service apache2 reload
Create /var/www/flaskApp/ledgerapp.wsgi to connet to flask and virtualenv.
activate_this = '/var/www/flaskApp/ledgerapp/env/bin/activate_this.py'
with open(activate_this) as file_:
    exec(file_.read(), dict(__file__=activate_this))

#!/usr/bin/python
import sys
import logging
logging.basicConfig(stream=sys.stderr)
sys.path.insert(0, "/var/www/flaskApp/ledgerapp")
sys.path.insert(1, "/var/www/flaskApp/")

from ledgerapp import app as application
application.secret_key = "super_secret_key"
Restart Apache HTTP server whenever we modify some server-side code.
$ sudo service apache2 restartReferences:
- http:https://flask.pocoo.org/docs/0.12/deploying/mod_wsgi/#working-with-virtual-environments
- https://stackoverflow.com/questions/30642894/getting-flask-to-use-python3-apache-mod-wsgi
- https://www.digitalocean.com/community/tutorials/how-to-deploy-a-flask-application-on-an-ubuntu-vps
- https://stackoverflow.com/questions/47736881/running-flask-with-mod-wsgi-through-virtualenv
- https://www.jakowicz.com/flask-apache-wsgi/
Now we should be able to see the website in public! Yeah!
$ sudo apt-get install tree
$ sudo tree -L 3 /var/www/flaskApp/

/var/www/flaskApp/
├── ledgerapp
│   ├── client_secrets.json
│   ├── env
│   │   ├── bin
│   │   ├── include
│   │   ├── lib
│   │   ├── pip-selfcheck.json
│   │   └── share
│   ├── images
│   │   ├── AddLedger.png
│   │   ├── LedgersJSON.png
│   │   ├── Ledgers.png
│   │   ├── ProjectsJSON.png
│   │   └── Projects.png
│   ├── __init__.py
│   ├── models.py
│   ├── models.pyc
│   ├── __pycache__
│   │   ├── __init__.cpython-35.pyc
│   │   └── models.cpython-35.pyc
│   ├── README.md
│   ├── static
│   │   └── styles.css
│   └── templates
│       ├── deleteLedgerItem.html
│       ├── deleteProject.html
│       ├── editLedgerItem.html
│       ├── editProject.html
│       ├── header.html
│       ├── ledger.html
│       ├── login.html
│       ├── main.html
│       ├── newLedgerItem.html
│       ├── newProject.html
│       ├── projects.html
│       ├── publicLedger.html
│       └── publicProject.html
└── ledgerapp.wsgi

10 directories, 28 files$ sudo cat /var/log/apache2/error.log
$ sudo cat /var/log/apache2/access.log$ sudo service postgresql restart
# then type "DROP DATABASE catalog;" in psql.


