All the lambda functions are within the aws_lambdas-folder. The workflow is provided in both, .json and .yaml- format.
The input.json is the mock-input for the workflow!
We provide 3 example files for the step functions, which are within the file-examples- folder. The datasets that we used were from kaggle:
The media folder just contains some images for this README.md
First of all, you need to set up a redis database on an EC2 machine. The database can simply be started using redis-server. Preferably it would be good to write a custom config file, adding a requirepass password for more security. Make sure to configure the inbound rules for the EC2 instance on port 6379 to be open for everyone, so that the Lambda functions can have access to the database running on your EC2 instance.
Additionally change the config on the redis server. We used this one:
requirepass 1SQRr7hyIb7peXvdcT4pSV3iu7lykHVd2qmMm+aOUBvC/Xt3vuLCzNg2QkSztjdY
protected-mode no
bind 0.0.0.0
IMPORTANT NOTE: After some time your EC2 instance will change its name, leading to every Lambda function which connects to the database to not work since it is using an old hostname. Please always check to have the most current hostname in the Lambda functions that try to connect to the redis Database running on your EC2 instance. In every Lambda function this has also been marked using comments above the respective line of code!
- Paste the workflow.yaml in the Step Function
- Do not forget to give the right permissions to the Step Function (LabRole)
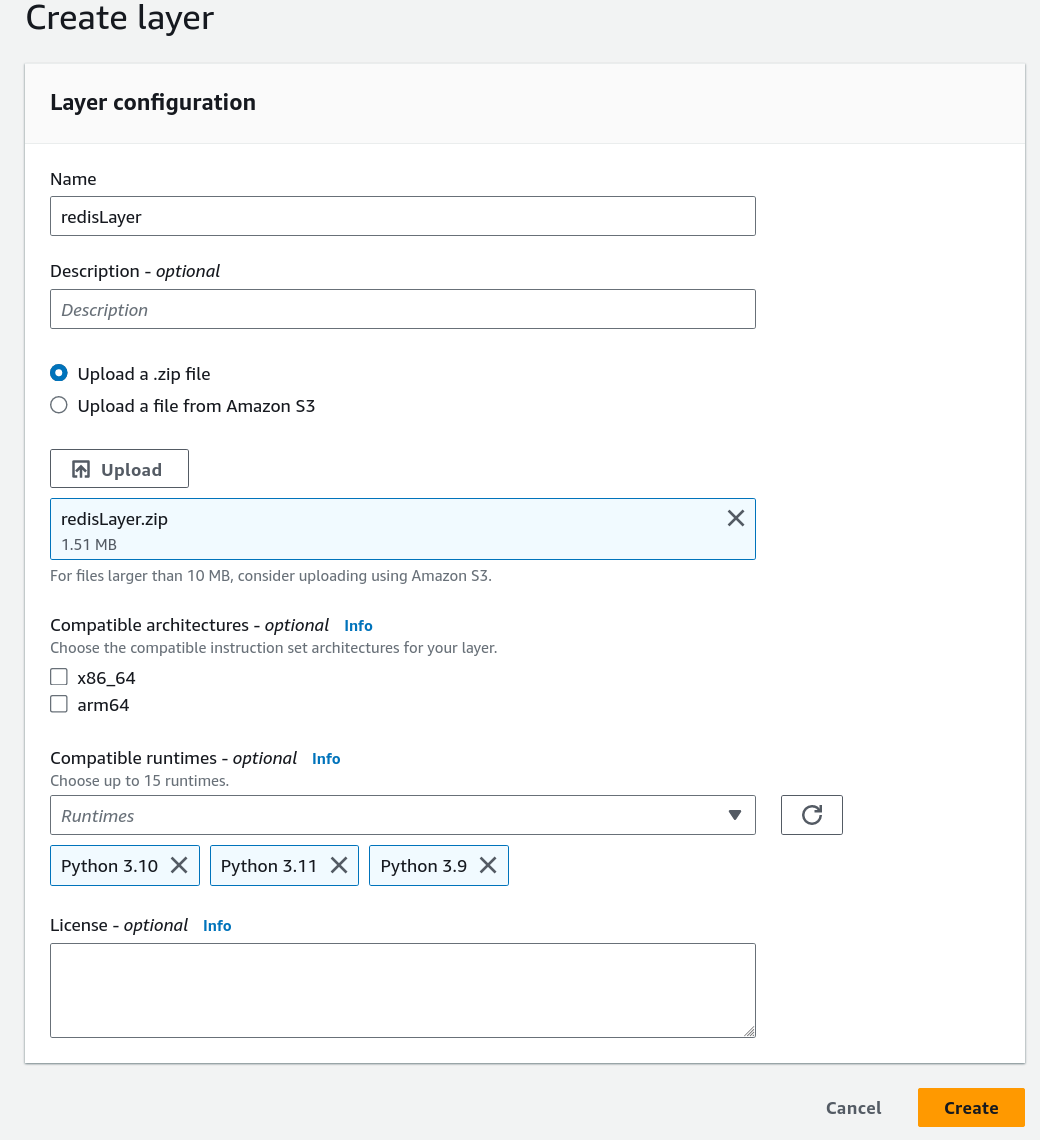
- Before importing the lambda code, we have to create a layer. To do that you just will need to import the "layer.zip" into a custom layer like we did on week 6. When creating the layer it should look something like this:
- For each lambda-process you have to create the lambda function separately and paste the code
- We recommend to set an appropriate timeout for the functions especially for the rekognition lambda (filename:
rekognition.py) (we used 2 minutes) - The layer create before must be added to the following functions (name took from the Step-function):
- upload_police_report
- update_firedepartment_report
- post_on_billboard

- Create a bucket in S3
To trigger the whole State Machine of the Step Function you have to create an EventBridge rule that triggers the Step Function when a file is uploaded in the bucket.
- Create an EventBridge rule
- Define the rule detail with the rule type as Event Pattern
- As Event Source "AWS events or EventBridge partner events"
a. Creation method: Use pattern form
b. Event pattern
{
  "source": ["aws.s3"],
  "detail-type": ["Object Created"],
  "detail": {
    "bucket": {
      "name": ["smartcity1"]
    }
  }
}
c. Event type Specification 2: specific bucket name previously created
For reference, you can also follow this tutorial, that was also helpful for us.
Now you could upload a video in the bucket and the State Machine will be triggered - but theres still some configurations to make
It is important that the first lambda-function has a timeout of about one minute, because Amazon Rekognition needs a bit of time to process this. So you have to edit the timeout in the lambda setting of the function Lambda Invoke on S3 PUT.
We are also using SNS Service, so you have to create 2 Topics and add one subscription to see the effects. When you create a topic it should look something like this:
 Additionally to add the subscriptions, you need to add a phone number to each subscription:

Then you have to add the Topics to the state machine so that they will be triggered by the workflow and send a message.
This project is just a demo project and does not contain clean code! It is just here for demo purposes.
First of all you need the demo project, which can be cloned from this Repo.
Then enter the repository and install the dependencies for the backend from the requirements.txt file:
pip install -r requirements.txtFor the frontend, install the packages with npm:
npm installAnother very important thing is, that the host must be set differently, because the hostname changes after every restart. To do that, you have to go into the demo-project and then navigate to ./backend/backend.py and change the following string accordingly (line 11):
host= 'ec2-54-174-129-113.compute-1.amazonaws.com'Then you can start the backend with:
uvicorn backend:appand to start the frontend, enter the frontend_ds folder and type:
ng serveNow if new Videos get added to the bucket and either violence, fire or smoking persons get detected, you will see the change on the website.
parameter length between states of the state machine in lambda step functions:
- The state/task 'lambda' returned a result with a size exceeding the maximum number of bytes service limit.