TensorFI-GUI: An automated fault-injection tool in TensorFlow based on TensorFI.
UNIX platform with Tensorflow v1
You have to install TensorFI first. See 2. Dependencies and 3. Installation Instructions in TensorFI homepage.
Download the whole project.
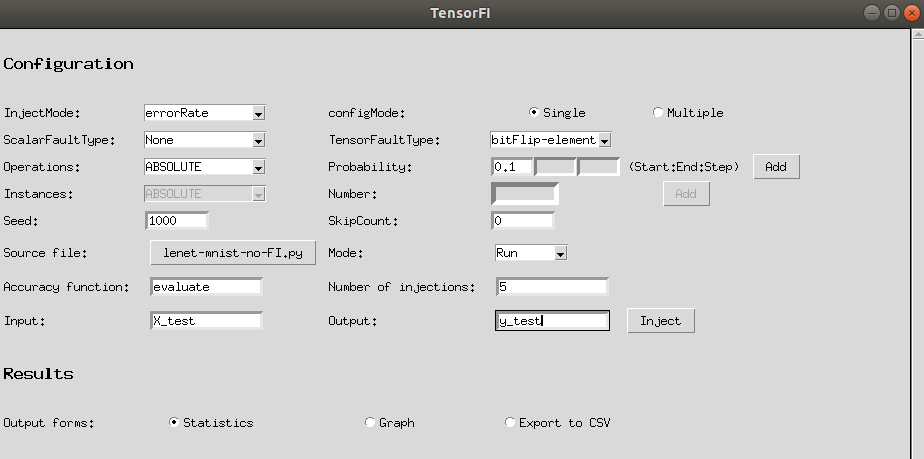
TensorFI-GUI is shown as follows:
- Have a trained ML program( as this saves time during injections).
Note: make sure that the model is restored from the absolute path of the checkpoint files.
- Run TensorFI-GUI.py
- Fill blanks for FI(fault injection) setting and ML program selection.
- Click Inject button, the whole FI process begins and statistic data about accuracy will appear when all is done. You can either view these data in figure or export it to a csv file.
Detailed explanation for each field is as follows:
-
InjectMode:
- errorRate: Uses the error rate specified in Probability to determine which operations are injected with faults
- dynamicInstance: Injects each operation type in the program once
- oneFaultPerRun: Perform one random injection per run
Note: When InjectMode is errorRate, Instances and Number fields are disabled. When InjectMode is dynamicInstance or oneFaultPerRun, Ops and Probability fields are disabled.
-
configMode:
- Single: User only wants to generate one configuration file.
- Multiple: User can set the range of Probability and get several YAML file. This is useful when user wants to generate a bunch of configfiles with different errorrate(Probability) in errorRate InjectMode to get statistic figure.
-
ScalarFaultType:
- None: Does not inject fault
- Rand: Shuffle all the data items in the output of the target op into random values
- Zero: Change the value into all zeros
- Rand-element: Shuffle one of the data item in the output of the target op into random value
- bitFlip-element: Single bit-flip over one data item in the output of the target op
- bitFlip-tensor: Single bit-flip over all data items in the output of the target op
-
TensorFaultType: Same as ScalarFaultType
-
Operations: For now, the supported operations include:
'ABSOLUTE', 'ADD', 'ASSIGN', 'ALL', 'ARGMAX', 'ARGMIN', 'BIASADD', 'CAST', 'COUNT-NONZERO', 'CONV2D', 'ELU', 'END', 'EQUAL', 'EXPAND-DIMS', 'FILL', 'FLOOR-MOD', 'GREATER-EQUAL', 'IDENTITY', 'LESS-EQUAL', 'LOG', 'LRN', 'MATMUL', 'MAX-POOL', 'MEAN', 'MINIMUM', 'MUL', 'NEGATIVE', 'NOT-EQUAL', 'NOOP', 'ONE-HOT', 'PACK', 'POW', 'RANDOM_UNIFORM', 'RANK', 'RANGE', 'REALDIV', 'RELU', 'RESHAPE', 'RSQRT', 'SIGMOID', 'SIZE', 'SHAPE', 'SOFT-MAX', 'SQUARE', 'STRIDED-SLICE', 'SUB', 'SUM', 'SWITCH', 'TANH', 'UNPACK'
Each operation coincides with a probability. This is used for the errorRate inject mode, where the probability represents the probability that a fault will be injected into that particular operation. This is used when InjectMode is "errorRate".
-
Probability: Represents the probability that a fault will be injected into that particular operation.
- Only one blank available: This is when Mode is set Single. One Probability corresponds with one Operation.
- Three blanks available: This is when Mode is set Multiple. One Operation corresponds with a list of Probability. The 1st blank(from left to right) is for start value, the 2nd blank is for end value and the 3rd blank is for step value.
Example:
Then user can get 6 YAML files named with test-x.yaml, in which the ABSOLUTE operation is 0.1, 0.2, 0.3, 0.4, 0.5, 0.6 respectively, so that the user can analyze the SDC rates under operations with increasing probability.
Note:
- For each operation with certain probability(ies), user must click Add button.
- When Mode is Multiple, make sure for each operation, the number of Probability(i.e., the number of YAML files generated) must be the same.
Example:
If the user want to add ABSOLUTE operation and ADD operation.
The above setting works.
However, this following doesn't work as the range(0.1, 0.6, 0.1) will generate 6 YAML files, while the range(0.2, 0.6, 0.1) only generates 5 YAML files.
-
Instances: Shares the same operations as Operations. Each operation coincides with a number representing the Number of instances it occurs in a given model. This is used when InjectMode is "dynamicInstance". The sum of all these numbers is used when InjectMode is "oneFaultPerRun".
-
Number: Each operation coincides with a number representing the Number of instances it occurs in a given model.
-
Seed: Seed the randomness of the fault injection. Fault injection will be random if unspecified. The default value is 1000.
-
SkipCount: Representing the number of operations to skip at the beginning of the program before beginning injecting fault. The default value is 0.
-
Source file: The path of the ML program to be injected. User can choose it by Select button.
-
Mode:
- Run: Choose it when user don't care about the logfiles.
- Debug: This is helpful when user wants to get the logfiles for debugging. When in 'Debug' mode, other fields have to be completed, i.e., logDir, logLevel, name, fiPrefix, etc. Note: This function is unfinished.
-
Accuracy function: Name of the accuracy function whose inputs are the datasets and the labels(output), and output is the accuracy of prediction. The accuracy function must in the following form: Example:
def evaluate(X_data, y_data):
  ...
accuracy = sess.run(accuracy_operation, feed_dict={x: X_data, y: y_data})
return accuracy
In this case, the field Accuracy function should be filled with 'evaluate'
-
Number of injections: Accuracy of the ML application result is reported after lots of repeated injections, say 1000 or even 10000 and more.
-
Input: Input variable name in dateset.
Example:
X_test, y_test = mnist.test.images[:256], mnist.test.labels[:256]Here
X_testis the Input andy_testis the Output -
Output: Output variable name in datasets/labels.
Example:
You are almost done!
Click Inject button and wait for the results!
After the Inject button becomes Injection Completed!, results in different forms will be presented
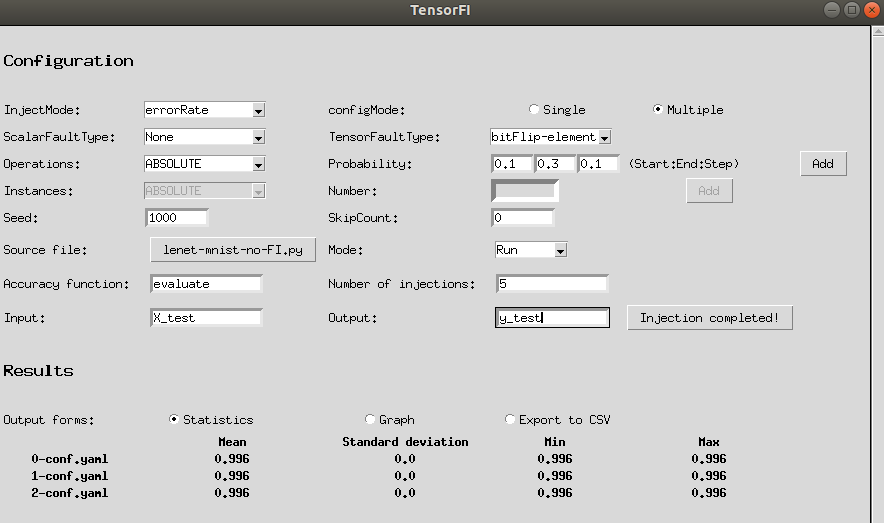
- Statistics : This part shows statistic data in accuracy.
Example:
In the above image, since the second colomn, each colomn shows the mean, standard deviation, minimum and maximum of the accuracy in the setting of x-conf.yaml. Each floating point number retains three decimal places.
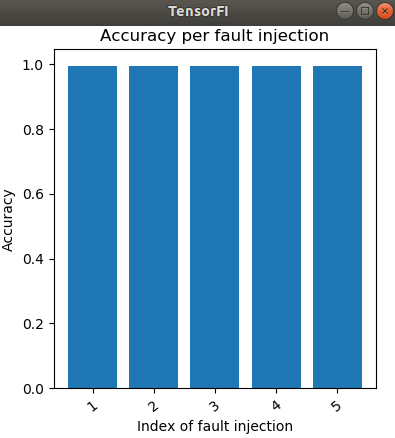
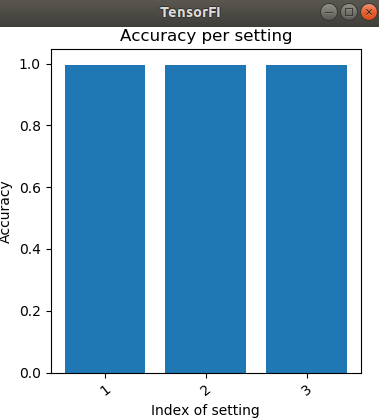
- Figure : This part draws the (average) accuracy per injection/YAML file setting. Figure varies according to configMode.
X axis represents the index of fault injection and thus its length equals to number of injections.
Y axis represents the accuracy in each fault injection.
X axis no longer represents the index of FI but represents the index of config YAML file. Its length equals to the number of YAML files.
Y axis represents the average accuracy in each YAML file. And average value is calculated based on the number of fault injection.
- Export to CSV : This part allows the user to get a csv file containing all accuracy data with the specified name.
Example:
User can specify the file name in the blank, and after clicking Export, he can find a corrosponding csv file in the current path.
The project is still in progess.


