This is a simple dynamic django server that uses django channels, django ninja, celery, vectordb and Redis to interact with GPU servers for language model inference.
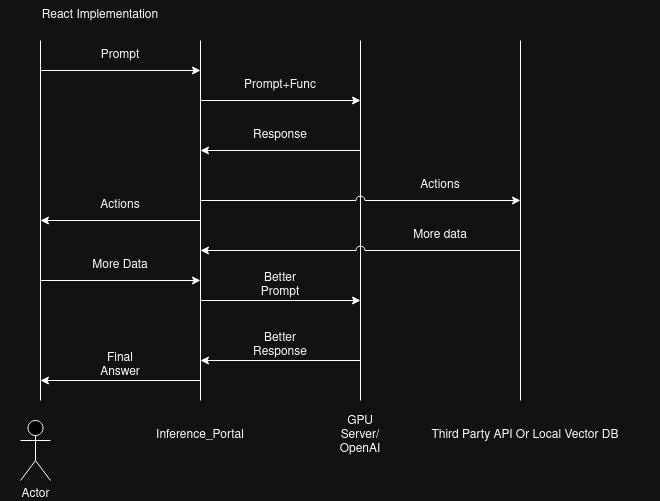
The purpose of this project is to offer users simple interfaces to interact with GPU servers. This website processses API and HTTP requests from users, forwards them to the GPU servers and forwards the responses back in a dynamic manner, this includes real-time chat rooms. In addition, this website also provides an implementation of REACT agent (refer to Yao et al., 2022).
Explain:
- Redis server fowards the message for the websockets that are used for real time chat.
- SQL stores API key and model metadata using the default SQLlite shipped with Django.
- The chat and prompt history of user is vectorised and stored for vector search
- Django Ninja open REST api endpoints forward the user requests to GPU servers.
- GPU servers do inference, each GPU server holds one model and uses vLLM to open endpoints.
- Nginx is used as a proxy for the Django server and serve static files.
- Celery is used to run multiple background tasks including spin up, stop, create and terminate EC GPU instances. Celery is also used to queue API requests to GPU servers.
- Django server is used to connect all components.
The implementation of React and data flow is explained in the diagram below
First of all, for start using django-inference-portal, you must download it using git
git clone https://github.com/Drzhivago264/Inference_Portal.git
Next you must install dependencies:
pip install -r "requirements.txt"
Next you must install Redis and start Redis Server at port 6380:
sudo apt install lsb-release curl gpg
curl -fsSL https://packages.redis.io/gpg | sudo gpg --dearmor -o /usr/share/keyrings/redis-archive-keyring.gpg
echo "deb [signed-by=/usr/share/keyrings/redis-archive-keyring.gpg] https://packages.redis.io/deb $(lsb_release -cs) main" | sudo tee /etc/apt/sources.list.d/redis.list
sudo apt-get update
sudo apt-get install redis
redis-server --port 6380
Next you must install celery and celery-beat with redis support and launch a Celery Worker and a Celery Beat Worker:
pip install celery[redis]
celery -A inferenceportal worker --loglevel=info --pool threads
celery -A inferenceportal worker --loglevel=info --pool threads -Q "periodic"
celery -A inferenceportal beat --loglevel=info
Next you must setup STRIPE CLI and start a webhook:
curl -s https://packages.stripe.dev/api/security/keypair/stripe-cli-gpg/public | gpg --dearmor | sudo tee /usr/share/keyrings/stripe.gpg
echo "deb [signed-by=/usr/share/keyrings/stripe.gpg] https://packages.stripe.dev/stripe-cli-debian-local stable main" | sudo tee -a /etc/apt/sources.list.d/stripe list
sudo apt update
sudo apt install stripe
stripe listen --forward-to localhost:8000/webhooks/stripe/
Next you must setup Monero and start a rpc server, I am working on a full tutorial to deploy your own node and payment server:
./monero-wallet-rpc --daemon-address {Your node address} --rpc-bind-port 18082 --wallet-file {your wallet file} --password {your password} --disable-rpc-login
*Noting that in production server you must generate "View-only" wallet from your local wallet (secret key) to avoid being robbed by the society.
Next you need to set up .env file and setup the following key:
STRIPE_PUBLISHABLE_KEY=""
STRIPE_SECRET_KEY=""
BACKEND_DOMAIN=""
PAYMENT_SUCCESS_URL=""
PAYMENT_CANCEL_URL=""
STRIPE_WEBHOOK_SECRET=""
EMAIL_ADDRESS = "" (The EMAIL_ADDRESS that fowards contact form)
MAIL = "" (The password for EMAIL_ADDRESS that fowards contact form)
DJANGO_SETTINGS_MODULE="inferenceportal.settings"
aws_access_key_id="" (The AWS key that can perform boot/stop/reboot/terminiate operation on your GPU instances)
aws_secret_access_key="" (The AWS secret key that can perform boot/stop/reboot/terminiate operation on your GPU instances)
ADMIN_PATH = "" (your admin path, keep it hard to guess)
DJANGO_SECRET_KEY = ""
GPT_KEY = "" (OPENAI key for the agent function)
CMC_API = "" (Coinmarketcap API to get the exchange rate of Monero, you may use different API but you need to rewrite the update_crypto_rate() in celery_tasks.py)
*Noting that if you run your own private node and process payment via RPC, querying 3rd party exchange for conversion rate does not affect your privacy, unless, you give them a request pattern along with payment pattern to trace you down. However, if people go that far to trace you down, you seem to have bigger problems to deal with already. Good luck with them.
Finally you can test the server with:
python manage.py runserver
In production environment, you may want to configure the server to be served by Daphne or both Daphne and Gurnicorn (refer to Channels Docs).
Contents in staticfiles directory are served as /static/. In production environment this folder need to be removed from root and served by NGINX or APACHE
About the GPU intances, you need to set up a vLLM server to serve the models listed in LLM.model:
# Install vLLM with CUDA 12.1.
pip install vllm
python -m vllm.entrypoints.api_server --model {your model}
If you expose this instance to the internet you may need Nginx or Apache server in front of it. If you route it through your subnet or have a security policy that only accept requests from your Django server then you are good to go.
In addition, as we need to automatically boot and shutdown your GPU intances, you may consider using Supervisor or equivalent to setup the vLLM on startup.
After finishing the steps above, you need to set up a vLLM server to serve the models listed in model.LLM (check admin page and remember to avoid 8000 and 6380 port that Django is running)):
pip install vllm
python -m vllm.entrypoints.api_server --model gpt2 --port 8080
If you have more than 1 GPU, you can serve multiple models at multiple ports (remember of use unique ports):
CUDA_VISIBLE_DEVICES = 0 python -m vllm.entrypoints.api_server --model gpt2 --port 8080
CUDA_VISIBLE_DEVICES = 1 python -m vllm.entrypoints.api_server --model gpt2-large --port 8888
If you have issue, you may need to seperate vLLM into multiple local environments.
This project is in testing stage but feel free to test it and if you have any suggestions you can tell me.

