This repository contains the dart detection python server + scripts that are used on Raspberry Pis to take the images of the dartboard. The calculated score is then sent to webserver https://github.com/DartCaller/api which will then sent to the frontend https://github.com/DartCaller/web to display the score.
This project currently runs on python v3.6.0
It might also build if you have a different Node Version, but I cannot promise it. In any case, it has to be Python 3.
After that, you can install the dependencies
# install dependencies
$ pip install -r requirements.txtThis project needs a lot of setup if you want to run it yourself since you have to set up the image taking raspberry pi's just like I did. So let's get to it.
My setup currently features one Raspberry Pi 3 Model B, one Raspberry Pi Zero with wifi (although wifi is optional on this one), and one camera for each of them. Now I setup OTG on the raspberry pi zero, which basically means, when I connect the pi zero only via USB-MicroUSB cable to the pi 3, then through the power of OTG, the pi zero not only gets enough power over the cable to startup but also lets me ssh onto the pi zero from the pi 3. It's basically a master-slave structure where I now can control and synchronize the picture taking on both raspberry pi's via SSH. A detailed description of how to set up OTG is available here https://gist.github.com/gbaman/50b6cca61dd1c3f88f41. An article on what OTG is here https://en.wikipedia.org/wiki/USB_On-The-Go
Now, if you have the cameras attached and working on both raspberry pi's and you can ssh into the pi3 via its wifi address and then also ssh from the pi3 onto the pi zero, you have the first and biggest step complete. Now you can put the https://github.com/DartCaller/darts-recognition/blob/main/scripts/doubleStream.py script onto the pi3 under home/pi/Desktop (or alternatively adjust this line here
darts-recognition/core/server.py
Line 27 in 97b86ac
home/pi/Desktop (or, again, alternatively edit this line darts-recognition/scripts/doubleStream.py
Line 14 in 6ab3dcb
Now make sure that you can ssh into the raspi3 without specifying a password by creating an ~/.ssh/config file for it and that this var here
darts-recognition/core/server.py
Line 17 in 97b86ac
~/.ssh/config file.
And that's it. Now you should be ready to fire up the server and receive and process images of the dartboard. Have fun!
You'll need several environment variables to run this project. Since this server is going to post his result to the Backend using the Client Credentials Grant Flow we need to set a few variables for that
| ENV VAR | Description |
|---|---|
| CLIENT_ID | client id of your authorization server |
| CLIENT_SECRET | client secret of your authorization server |
| TOKEN_URL | the url of your authorization server where the access token can be requested from |
| AUDIENCE | some authorization servers such as Auth0 also require an audience to be set when requesting the token |
| OATUHLIB_INSECURE_TRANSPORT | you might need to set this to true when the backend, to which you want to send the score, doesn't support HTTPS, for example, in the case of localhost |
With these env vars, you can then run
# start both image taking scripts on the raspberry pi's and start the server to receive their images and process the results
$ python core/server.pyThis chapter is about how I find the darts and then calculate the position of the darts.
In this repository, I utilize the fact that I get a constant stream of images from the dartboard. Images are taken roughly every second and send to this server. When a dart is thrown, I'll have one image right before the dart hit the board, when it was still empty. And one image showing the new dart on the dartboard. I can subtract these two frames pixel by pixel from one another, and I end up with a diff looking like the one below.
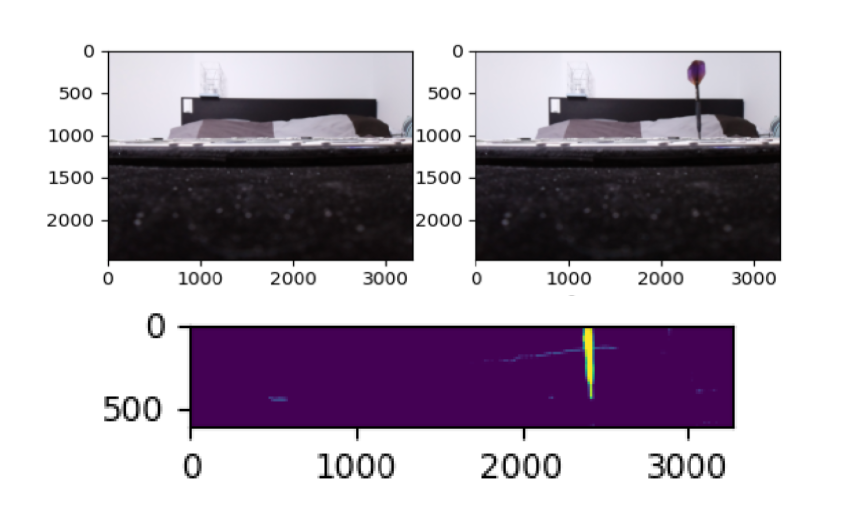
I wrote https://github.com/DartCaller/darts-recognition/blob/main/core/helper_functions/binary_diff_images.pyx a cython implementation where I specify a certain threshold, and if each of the RGB values between the pixel in the before image and pixel in the after image exceeds the threshold, then I'll mark that pixel white, otherwise black. This way, I end up with a binary image of the dart that has been added between the two frames.
At least, that is the perfect case scenario. In reality, I have to remove unwanted noise from the diff image. I experimented a bit with binary morphological operators (link for explanation) and especially the opening operator worked out great. So what is this morphological operator? It's basically iterating over every pixel of the image, applying a so-called structure element that defines which surrounding pixels are taken into account when determining what to do with the center pixel.

Then you have the basic morphological operators dilation and Erosion, seen in the image above. Dilation is taking the structure element onto each pixel, and if at least one pixel inside the area that the structuring element is forming onto the image is white, then the center pixel is set to white. If no pixel in the area formed by the structuring element is white, then the center pixel will be set to black. This has the effect that white pixels or the so-called foreground pixel areas grow.
Erosion is the counterpart and does the exact opposite where now the black pixels or the so-called background pixel areas are growing, and the foreground objects are shrinking.
But with Dilation, you see in the image that we are also enlarging the noise around the dart tip, and with Erosion, you see that we enlarge the holes in the dart. The combination does the trick. The images show the closing operator, which first applies the dilation operator to remove the holes inside the dart and then applies the erosion operator with the same structure element to minimize the noise again.
I achieved the best results with the opening operator, which does the exact same but first applies the Erosion to the image to remove small noise foreground pixels and then applies Dilation to fill the holes in the dart again.
After that, I often still have multiple patches of white pixels in my image, so I calculate the size of each patch and choose the biggest patch since this diff patch is most likely to be caused by a dart.
After I have the biggest patch, I'll take the bottom-most 20 pixels of that patch since I want to know where the location of the dart as close to the dartboard's surface as possible. I'll calculate the center of mass on the bottom-most pixel, and voila, I now know the pixel location of the center of the dart.

I use one camera per axis. Using triangulation and the known position of each camera, I'm then able to calculate the intersection of the two constructed lines. This gives me the dart position on the board.
In order to calculate the field that was hit, based on the coordinates on the dartboard, I followed the approach shown in this repository https://github.com/vassdoki/opencv-darts/blob/master/src/darts/DartsUtil.scala. In this approach, he takes the coordinates in order to calculate the distance from the center and the rotation around the board. With the distance from the center he can then easily calculate if the dart hit the Single, Double, Triple or was outside of the dartboard. And with the angle around the board, you can calculate which number between 1 and 20 you have hit. These two combined then result in Double 3 for example.
And that's already it. A bit more logic on how to handle the constant stream of images because sometimes a dart appears first on one axis and needs one more frame to appear on the second image. Or to handle the case when you have the hands in the image to take the darts out. Then a bit of memoization when calculating the diff of two images so that we have better performance when processing nearly one image per second.
And done is my dart-recognition server in python.
# run linter
$ cd core && pytest -n auto
This repo currently uses parameterized integration tests to work through all the labeled images in https://github.com/DartCaller/darts-recognition/tree/main/labeled_images and tests if its calculations match with the manually created label on the image.
In order to create labeled images more easily, I created a second mode that the server can run in. We have the standard mode where the server extracts the dart position on the incoming images, and I have created the label mode where after each image, you are asked in the terminal to enter a label for the received image. Then you are able to label the incoming images, for example, as S13, meaning it shows a dart that hit the single 13. The image is saved under that label and later tested against it.
# start the server in label mode
$ python core/server.py --label-modeDistributed under the GNU GPLv3 License. See LICENSE for more information.