The source code of my 32 pedals 'GZ Pedalboard' device running on Teensy 3.5 / Arduino, built by myself for my Hauptwerk custom Organ.
- A Pedalboard taken from an old non-functionning analogic Organ
- Teensy 3.5 - USB Development Board with Pins - I'm a developer, not an electronic nor soldering expert
- Breadboard - For testing and prototyping and also as my final device mount.
- Electronic testing wires (Female to Male)
- Some glue
- Visual Studio 2017 - At the time when the code was written.
- VisualMicro - Arduino IDE for Visual Studio

Before anything else, it's important to mention and show the type of Pedalboard used, as there is many Pedalboard mecanism used through the time ! The one i found is working in two parts:
- The Pedalboard itself, that is only wood
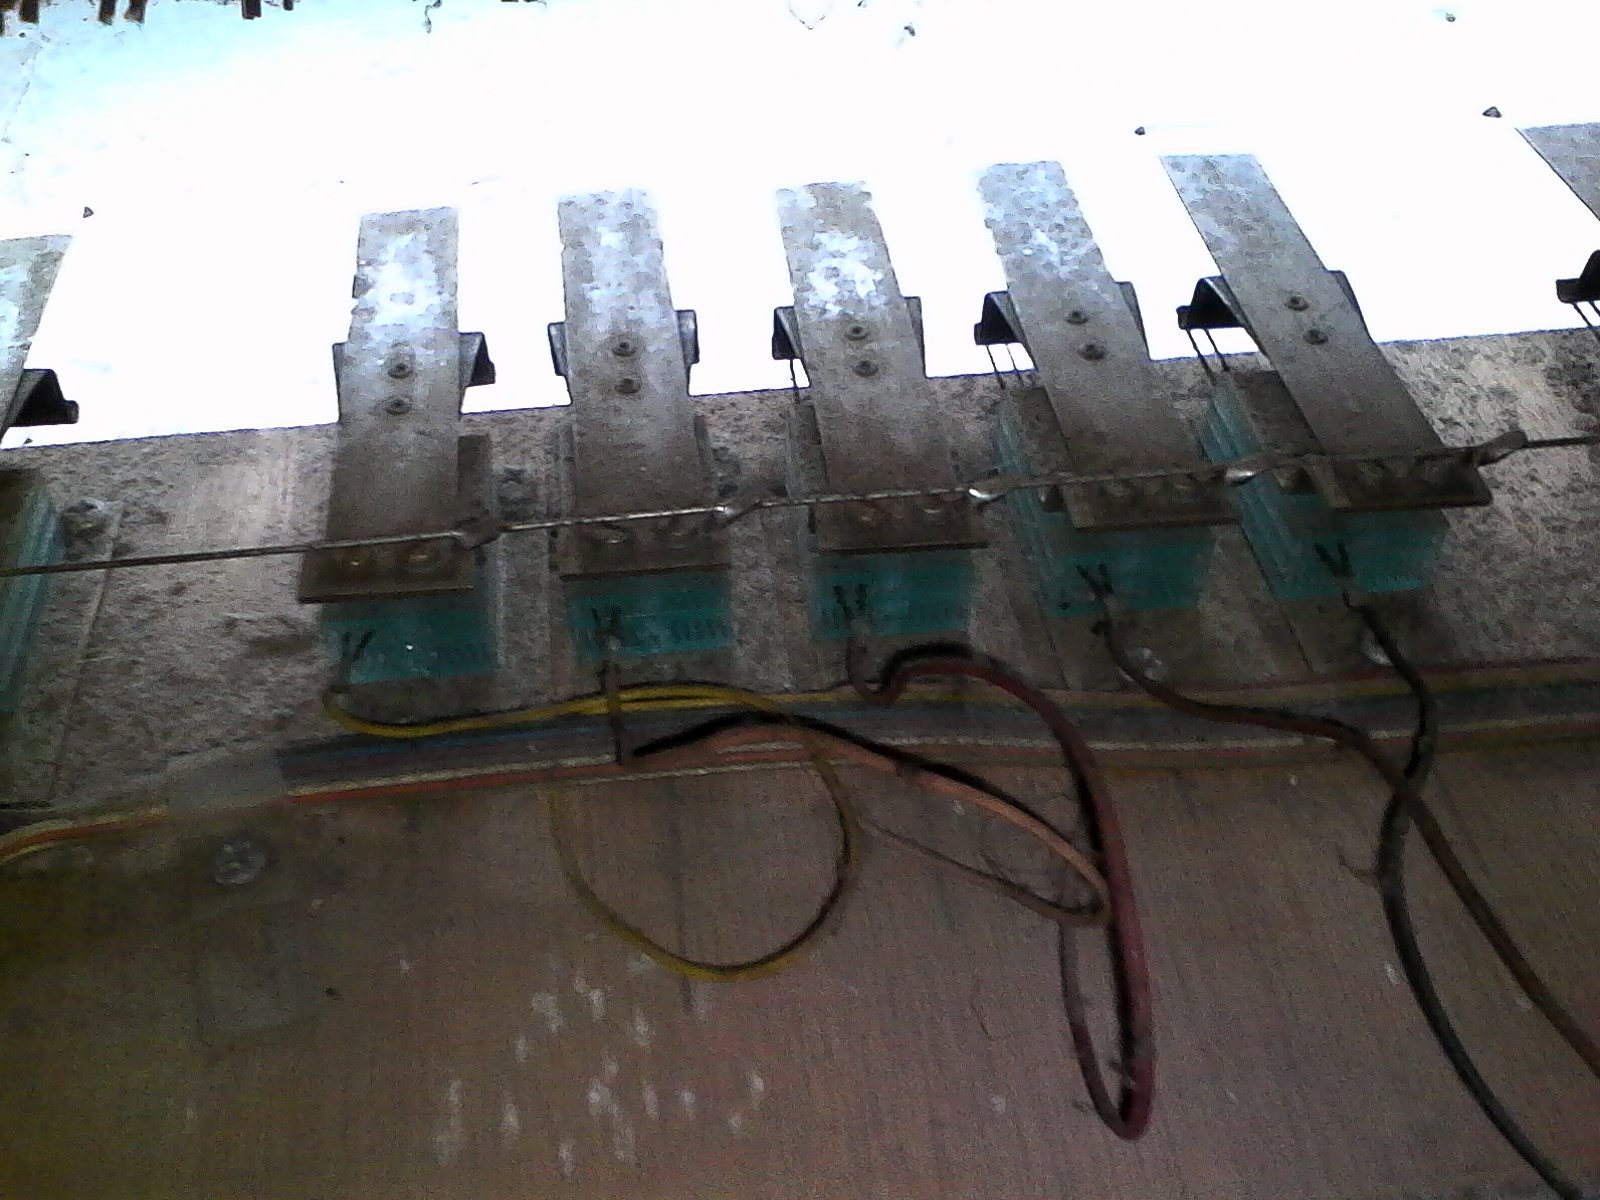
- The Pedalboard analogical input mecanism: This part is behind the Pedalboard and is composed from 32 key switchs, that look like 32 rigid metal bands. When the user push a key on his Pedalboard, the rigid metal band bend and go in contact with two metal rods just placed behind.
The main idea on this kind of mecanism is that when the metal rods and the metal band are in contact, the electricity going through the wire can go to the ground, as one metal rod should be wired to the electronical system, and the other one to the ground, so current is going from whatever Volts value to 0 Volts !
So on this code implementation, we are just checking for everynote if we have voltage or not. If not, this mean that the key is actually pressed and that we should send the correct MIDI signal.
Here are two "old" photos from the Pedalboard. Not very clean, it was like some times before i construct the project myself, but you will get the idea of what the mecanism look like for this kind of project. On theses photos, everything is still inside the old not working Organ console.


- Attach your pin-ed Teensy 3.5 to the Breadboard
- If not done yet, cut all old wires from the original Pedalboard input system
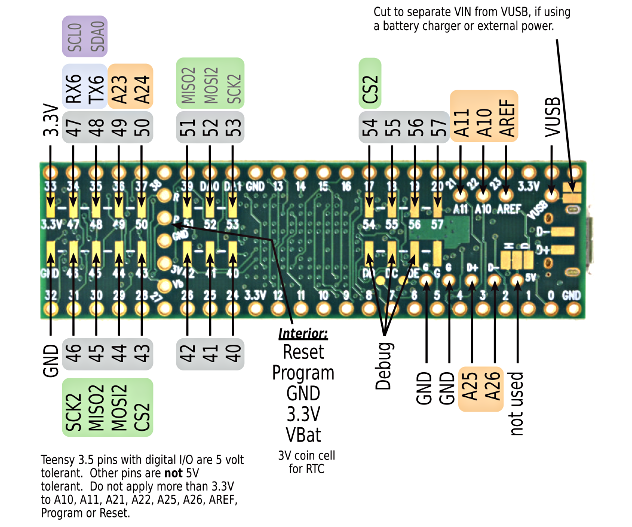
- Connect all your left metal rods of the input system, with a wire / test-wire on an available pin of your Teensy 3.5, this for each of your keys, of course each on a dedicated pin. I had to use Female (Pedal board metal road input) to Male (Breadboard) test-wires. Below is how, from the lowest to the highest pedalboard key, things are connected to the Teensy card:
KeyNote keys[] = {
	{ 0, 60 }, //Key 1, Note value => 60 (C4)
	{ 1, 61 }, //Key 2
	{ 2, 62 }, //Key 3
	{ 3, 63 }, //Key 4
	{ 4, 64 }, //Key 5
	{ 5, 65 }, //Key 6
	{ 6, 66 }, //Key 7
	{ 7, 67 }, //Key 8
	{ 8, 68 }, //Key 9
	{ 9, 69 }, //Key 10
	{ 10, 70 }, //Key 11
	{ 11, 71 }, //Key 12
	{ 12, 72 }, //Key 13
	{ 32, 73 }, //Key 14 //NOTE: Using Pin 32 instead of Pin 13, because LED is interupting normal signals
	{ 14, 74 }, //Key 15
	{ 15, 75 }, //Key 16
	{ 16, 76 }, //Key 17
	{ 17, 77 }, //Key 18
	{ 18, 78 }, //Key 19
	{ 19, 79 }, //Key 20
	{ 20, 80 }, //Key 21
	{ 21, 81 }, //Key 22
	{ 22, 82 }, //Key 23
	{ 23, 83 }, //Key 24
	{ 24, 84 }, //Key 25
	{ 25, 85 }, //Key 26
	{ 26, 86 }, //Key 27
	{ 27, 87 }, //Key 28
	{ 28, 88 }, //Key 29
	{ 29, 89 }, //Key 30
	{ 30, 90 }, //Key 31
	{ 31, 91 }  //Key 32
};
The first numerical value is the related PIN number, so see the Teensy 3.5 Pin documentation on this page to find where it is physically, the second numerical value is about the MIDI note value / message to be sent when pressed, and the Key xx comment just after is for readability convenience on your physical Pedalboard, so Key 1 is your first Key, a DO / C key.
Actually you just have to match your Key ordering to the related PIN number, and it should work out of the box.
- The second part of the work is to wire all your second metal rods to the ground (GND). So you should find one or some GND PINs on your Teensy 3.5 card, and connect all you wire to them through your Breadboard. I don't have a look to them at the time i'm writing this, but you should have a kind of dedicated range of hole on your Breadboard that connect all positives or negatives together vertically. I can't verify now, but if i'm not mistaken, you should connect all possible second metal rods to any V- hole. Then one of the available V- hole must be connected with a wire to a GND pin hole, so as you have pined your Teensy on the Breadboard, it should be the first horizontal available hole next to the GND pin of your card.
There is surely some missing bits in this source-code and the current configuration. VisualMicro should not be mandatory even if used for compilation on this published source code.
At least the minimum required tools for building are:
-
The Arduino IDE environment installation
-
The Teensyduino library installation - downloadable here
-
The PedalBoardToMidi.ino and name.c files content in your project.
-
Additionnaly, your Teensy card must be built with a MIDI USB profile, or MIDI HID don't remember the name exactly. According to some properties in the vcxproj file, the last profile i used seemed to be named midi4.
-
Connect your Teensy 3.5 card with a micro-USB cable and build your code: You MIDI instrument should be working !
- It's advised to change the device name before any test, as Windows may cache the device name for the future. Not a "real" problem but you are warned.
- Open name.c and change theses two define values:
// Edit these lines to create your own name.  The length must
// match the number of characters in your custom name.

#define MIDI_NAME   {'G','Z',' ','P','e','d','a','l','b','o','a','r','d'}
#define MIDI_NAME_LEN  13