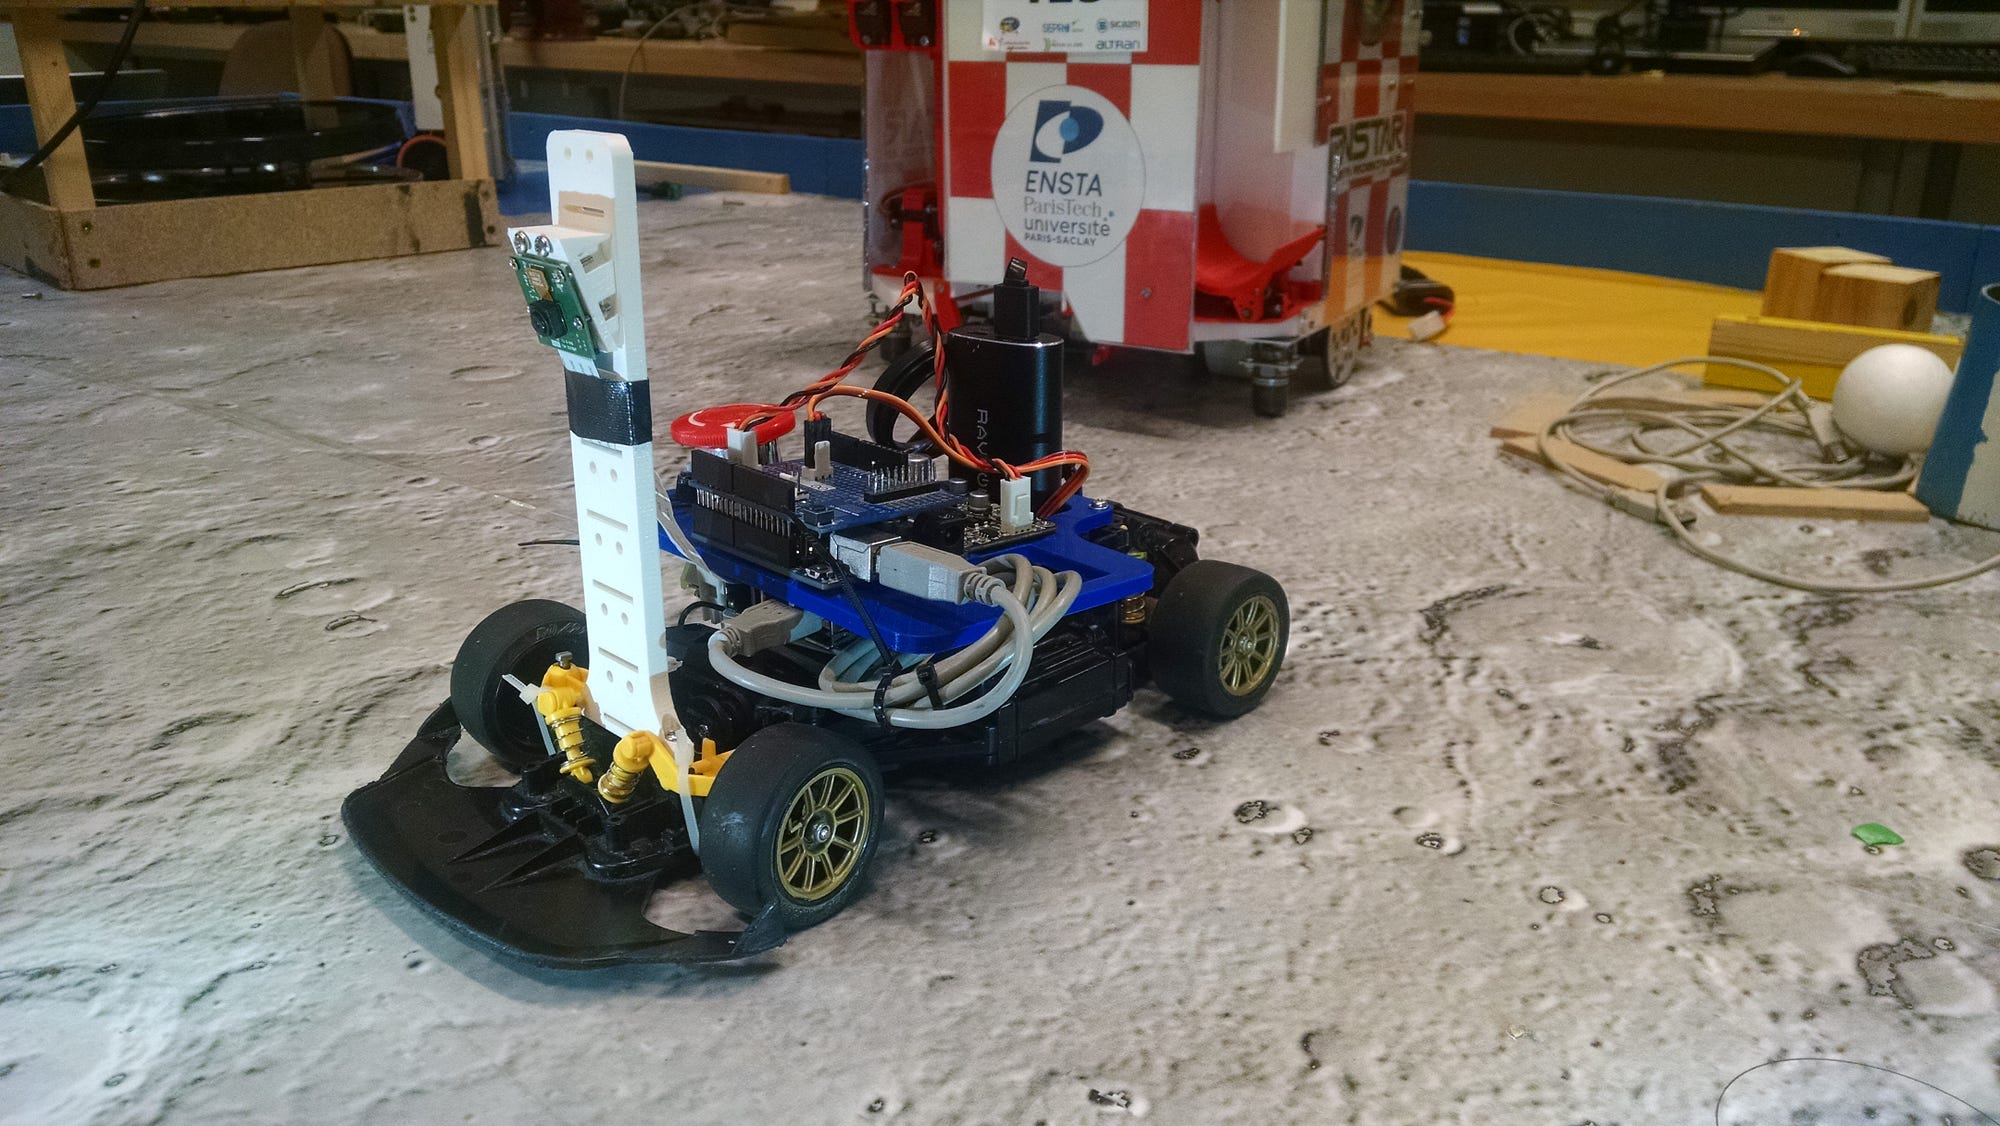
Autonomous toy racing car. CAMaleon team at the Toulouse Robot Race 2017. Medium article: https://medium.com/@araffin/autonomous-racing-robot-with-an-arduino-a-raspberry-pi-and-a-pi-camera-3e72819e1e63
Video of the car: https://www.youtube.com/watch?v=xhI71ZdSh6k
We wrote an article on medium that detailed our approach. You can read it here
En français: http:https://enstar.ensta-paristech.fr/blog/public/racing_car/
3D models (we used onshape.com):
Note: the Battery Holder was designed for this External Battery
Outdated (you have to use convert_old_format.py to use current code, now labels of training images are in a pickle file)
The training data (7600+ labeled images) can be downloaded here
There are two folders:
- input_images/ (raw images from remote control)
- label_regions/ (labeled regions of the input images)
The name of the labeled images is as follow: "x_center"-"y_center"_"id".jpg
For example:
-
0-28_452-453r0.jpg=> center = (0, 28) | id = "452-453r0" -
6-22_691-23sept1506162644_2073r2.jpg=> center = (6, 22) | id = "691-23sept1506162644_2073r2"
For installation, see section Installation.
- Compile and upload the code on the Arduino
cd arduino/
make
make upload
- Launch the main script on the Raspberry Pi, it will try to follow a black&white line.
All useful constants can be found in
constants.py.
python main.py
- You need a computer in addition to the raspberry pi
- Create a Local Wifi Network (e.g. using create ap)
- Connect the raspberry pi to this network (Wifi on RPI)
- Launch teleoperation server (it will use the port 5556)
python command/python/teleop_server.py
- Launch teleoperation client on your computer (you have to edit the raspberry pi
IPin the code)
python command/python/teleop_client.py
- Enjoy! You can now control the car with the keyboard.
- Record a video in the teleoperation mode:
python command/python/teleop_server.py -v my_video
- Convert the recorded video from h264 to mp4 using ffmpeg or MP4Box
MP4Box -add video.h264 video.mp4
- Split the video into a sequence of images
python -m train.split_video -i video.mp4 --no-display -o path/output/folder
- Label the data using the labeling tool
python -m train.label_images -i path/to/input/folder -o path/to/output/folder
To label an image, you have to click on the center of line in the displayed image. If the image do not contain any line, or if you want to pass to the next frame, press any key.
- Train the neural network (again please change the paths in the script)
python -m train.train -f path/input/folder
The best model (lowest error on the validation data) will be saved as mlp_model_tmp.npz.
- Test the trained neural network
python -m train.test -f path/input/folder -w mlp_model_tmp
For profiling 5000 iterations of image processing:
python -m opencv.benchmark -i path/to/input/image.jpg -n 5000
-
You need a 32GB micro sd card (warning, all data on that card will be overwritten) WARNING: for a smaller sd card, you need to resize the image before writing it (this link may help)
-
Download the image here
Infos about the linux image: OS: Ubuntu MATE 16.04 for raspberry pi
Username: enstar
Password: enstar
Installed softwares:
- all the dependencies for that project (OpenCV >= 3.1, PyTorch, ...)
- the current project (in the folder RacingRobot/)
- ROS Kinetic Camera and ssh are enabled.
- Identify the name of your sd card using:
fdisk -l
For instance, it gives:
/dev/mmcblk0p1            2048   131071   129024   63M  c W95 FAT32 (LBA)
/dev/mmcblk0p2          131072 30449663 30318592 14,5G 83 Linux
In that case, your sd card is named /dev/mmcblk0 (p1 and p2 stand for partition).
- Write the downloaded image on the sd card.
gunzip --stdout ubuntu_ros_racing_robot.img.gz | sudo dd bs=4M of=/dev/mmcblk0
- Enjoy!
The current project is located in
RacingRobot/. There is also a ROS version of the remote control incatkin_ws/src/.
If you want to back up an image of a raspberry pi:
sudo dd bs=4M if=/dev/mmcblk0 | gzip > ubuntu_ros_racing_robot.img.gz
Update your pi
sudo apt-get update
sudo apt-get upgrade
sudo rpi-update
Arduino + Arduino Makefile + rlwrap + screen
sudo apt-get install arduino-core arduino-mk rlwrap screen
- Arduino 1.0.5
- Arduino-Makefile
- OpenCV 3.1
- libserial-dev (apt-get)
- Python 2 or 3
OpenCV
- PreCompiled This is the recommended method
- Guide
Libserial (apt-get or compile from source)
# Boost
sudo apt-get install libboost-all-dev

# After libserial installation:
sudo ldconfig
All the required packages can be found in requirements.txt
PySerial
sudo pip install pyserial
# Add user to dialout group to have the right to write on the serial port
sudo usermod -a -G dialout $USER
# You need to logout/login again for that change to be taken into account
TQDM (for progressbar)
pip install tqdm
PyGame For teleoperation
pip install pygame
Enum for python 2
pip install enum34
ZeroMQ (Message Passing with sockets) for remote control mode
sudo apt-get install libzmq3-dev
pip install pyzmq
or
git clone https://github.com/zeromq/libzmq/
./autogen.sh
./configure
make
sudo make install
sudo ldconfig
pip install pyzmq
Additional python dev-dependencies for training the neural network: On your laptop:
pip install http:https://download.pytorch.org/whl/cu80/torch-0.3.0.post4-cp27-cp27mu-linux_x86_64.whl
pip install torchvision

pip install sklearn # or sudo apt-get install python-sklearn
On the raspberry pi :
- You can try to use Python 2 wheel (not tested) that was created for this project:
- Download Python Wheel here
And then:
pip install torch-0.4.0a0+b23fa21-cp27-cp27mu-linux_armv7l.whl
Or follow this tutorial: PyTorch on the raspberry pi
-
Make sure you have at least 3 Go of Swap. (see link above)
-
(optional) Install a recent version of cmake + scikit-build + ninja
-
Install PyTorch
# don't forget to set the env variables:
export NO_CUDA=1
export NO_DISTRIBUTED=1
git clone --recursive https://github.com/pytorch/pytorch
sudo -EH python setup.py install
# torchvision is not used yet
sudo -H pip install torchvision
Please read opencv/c_extension/README.md for more information.
- Sergio Nicolas Rodriguez Rodriguez
- Antonin Raffin