Welcome to the App4Auctions README.
This project was copied from its original repository in GitLab App4Auctions.
- Disclaimer: Docker needs to be installed in your system.
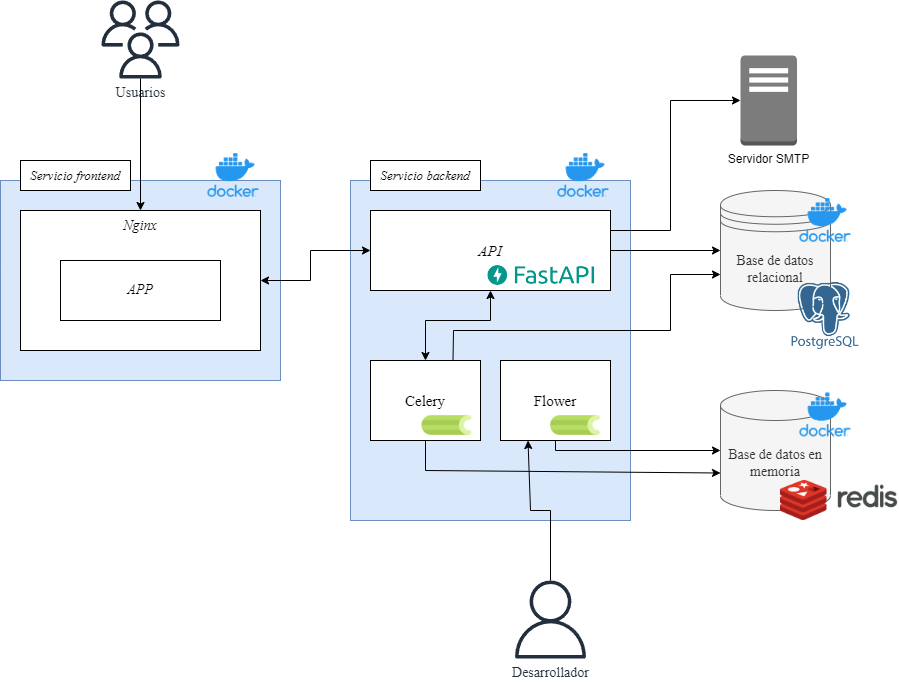
The application is Dockerized on different containers, you will just need to run from the root folder docker-compose up --build -d
You should now have several routes ready:
- http:https://localhost:5000 👉 API
- http:https://localhost:3000 👉 APP
- http:https://localhost:5555 👉 Flower
- Disclaimer: this setup is based on Ubuntu machines. Some commands may vary for different OS installations.
- You must have a running PostgreSQL installation for your setup, with valid credentials and a database to use.
- Python version: 3.10.x
Inside the /api folder:
-
Create a virtual environment for your API
python3.10 -m venv /path/to/your/venv. -
Activate your local environment
source /path/to/your/venv/bin/activate. -
Navigate under
/conf, create a new.envfile from the.env.templateand fill in the required values. If these values are not set, the API won't launch. -
Upgrade the database tables
alembic upgrade head. -
Launch the API with
python debug.py(will enable hot reload)You should see an output like:
    INFO:     Will watch for changes in these directories: ['/home/app4auctions/api']
    INFO:     Uvicorn running on http:https://0.0.0.0:5000 (Press CTRL+C to quit)
    INFO:     Started reloader process [4537] using StatReload
    2022-10-04 19:50:35.283 | WARNING  | main:<module>:30 - main - Running under DEBUG mode.
    INFO:     Started server process [4539]
    INFO:     Waiting for application startup.
    INFO:     Application startup complete.
If you run the debug file as python debug.py an ingestion process of development data will start against the database. Then, a user with admin role has been created on startup, its credentials are:
- Username: [email protected]
- Password: 1
Celery is installed and ready to use in the local deploy. To install it, first activate your previously created environment (in a new terminal):
- You must have a running Redis installation for your setup to use as broker, with valid credentials and a database to use. Run a redis install inside Docker with
docker run -d -p 6379:6379 redis --requirepass "app4auctions", do NOT change the requirepass value as it'll be used by the Celery executor. - You will need another console to run this service, as it's independent from the API.
- Change the directory where the celery instance is declared
cd /api. - Start the celery worker with
celery -A executor worker --loglevel=INFO. - Optionally you can add a flower instance with
celery -A executor flower --port=5555. Run this command in another console!
Inside a browser, navigate to http:https://localhost:5000 and access the OpenAPI schema (swagger). You can now use the API endpoints.
- Navigate into the
/appfolder and runnpm i&quasar dev.
