This repository establishes a test environment for investigating NMOS Scalability using the Mininet network rapid prototyping tool. Mininet emulates a complete network of hosts, links, and switches on a single machine. We extend Mininet with functions to build large-scale networks of NMOS Registries and Nodes.
For an overview of this study and its conclusions, watch the presentation "Scalability and Performance of the AMWA IS-04 and IS-05 NMOS Specifications for Networked Media" given at the SMPTE 2018 Annual Technical Conference.
A paper describing the study and initial results is also freely available at https://ieeexplore.ieee.org/document/8610041, thanks to the Society of Motion Picture and Television Engineers. An updated version with additional material is to appear in the July 2019 issue of the SMPTE Motion Imaging Journal.
Other presentations:
- IP Showcase at IBC 2018: video, presentation
- IP Showcase at NAB 2019: schedule of events
The contents of this repository are licensed under the terms of the Apache License 2.0.
The following instructions describe how to prepare the basic environment.
Mininet can be run under a variety of virtualisation programs. These instructions are tailored to use Oracle VM VirtualBox Manager 5.1 or 5.2 on Windows. (To use other virtualisation programs, see http:https://mininet.org/vm-setup-notes/ and adapt the setup accordingly.)

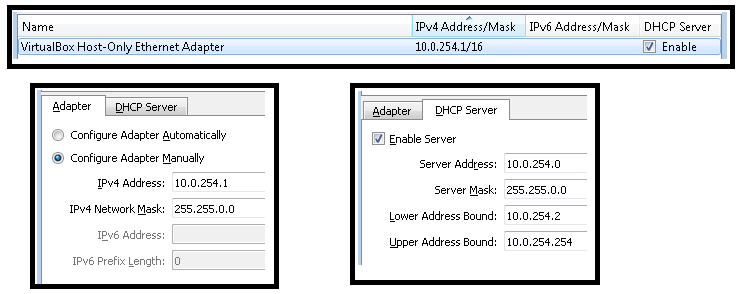
For scalability testing we require several thousand IP addresses for the hosts under Mininet. We have reserved the lower part of the 10.0/16 IP address range for this purpose. This has been achieved by setting up the 10.0/16 range as a Host-Only interface with part of this range (10.0.254.xx) used for DHCP for the host computer and virtual machine interfaces on this network. This allows communication between:
- Host computer
- Virtual machines
- Mininet hosts running on a virtual machine (needs additional configuration, for which see later)
-
To configure from VirtualBox Manager GUI
-
File -> Host Network Manager...
-
-
Alternatively configure from the command line as follows:
- Modify the existing default Host-Only Ethernet adapter
VBoxManage hostonlyif ipconfig "VirtualBox Host-Only Ethernet Adapter" --ip 10.0.254.1 --netmask 255.255.0.0
- Set the host-only DHCP server to use the 10.0.254.xx address range
VBoxManage dhcpserver modify --ifname "VirtualBox Host-Only Ethernet Adapter" --ip 10.0.254.0 --netmask 255.255.0.0 --lowerip 10.0.254.2 --upperip 10.0.254.254 --enable
- Modify the existing default Host-Only Ethernet adapter

The default NAT adapter address clashes with the host-only adapter configuration assigned above. The NAT adapter address needs to be modified.
This has to be applied to each VM used. (This NAT adapter configuration is performed automatically in the ImportVM script described below.)
Grab it from this link: https://github.com/mininet/mininet/releases/download/2.2.2/mininet-2.2.2-170321-ubuntu-14.04.4-server-amd64.zip, and expand the archive.
-
Increase the amount of memory and CPUs used by the VM
More memory and more CPUs are better (default is 1024 MB and 1 CPU). On our primary test machine, to simulate networks with several thousand NMOS Nodes, we used 40 GBytes of memory and 12 CPUs, but it's certainly possible to run many tests with fewer.
-
Guest Additions
Installing the Guest Additions to the VM adds facilities to improve the user experience, such as an easy way to add shared folders and mouse pointer integration if running with a GUI.
The Mininet VM can be imported via the VirtualBox GUI or via the VirtualBox command line. Scripts exist in this repository to simplify the importing and set up of the Mininet VM.
- Fetch the
nmos-scalability\install\ImportVM.batbatch file
- Optionally, to change the default 1 CPU and 1024MB of memory settings, first set the following environment variables to appropriate values for your system:
set NMOS_MININET_CPUS=12
set NMOS_MININET_MEMORY=40000
- Optionally, to set up a shared folder, set the following environment variable to the folder to be shared:
set NMOS_MININET_SHARED_DIR=C:\PathTo\DirToShare
- In this case the shared directory will be found on the VM at
/media/sf_DirToShare. If you wish to change the name to be appended to the prefix/media/sf_, set the following environment variable as well:set NMOS_MININET_SHARED_DIR_NAME=AlternativeName
- In this case the shared directory will be found on the VM at
- Call the
ImportVM.batbatch file to import the VM, passing it the.ovffile from the Mininet archive you downloaded:ImportVM.bat <Mininet-VM .ovf file>
- The above line will import the Mininet VM with the default VirtualBox name,
Mininet-VM. If additional VMs are required, or you wish to change the name used by VirtualBox for this VM, pass the name as a second parameter to the script. (Avoid the use of the underscore character if you wish to use the same name as the VM hostname.)ImportVM.bat <Mininet-VM .ovf file> <Alternative-VM-Name>
- The above line will import the Mininet VM with the default VirtualBox name,
- Once imported, the batch file will prompt you to press Enter to start the VM.
To import the VM manually from the GUI, or to check the VM configuration settings from the GUI, see this page.
The Host-Only DHCP server allocates the IP addresses starting from 10.0.254.2.
If this is the first VM started using this host-only interface it will have this first address.
This can be verified using ping:
ping 10.0.254.2The following procedure uses scp (secure copy) and ssh (secure shell).
These tools are natively available on a Windows 10 platform if Developer mode is enabled in Update and Security -> For developers.
Alternatively putty and its secure copy, pscp, can be used.
The nmos-scalability/install directory contains Linux scripts to further configure the Mininet VM for Mininet with our NMOS extensions.
We first need to transfer these onto the Mininet VM.
-
Download this repository as an archive: https://github.com/AMWA-TV/nmos-scalability/archive/master.tar.gz
-
Now use
scpto transfer this onto the VM:scp nmos-scalability-master.tar.gz mininet@10.0.254.2:/home/mininet/nmos-scalability-master.tar.gz <accept key (if first login)> <enter password 'mininet'>
-
Now login to the Mininet VM:
ssh mininet@10.0.254.2
    <enter password 'mininet'>
-
Expand the archive that was transferred via
scp:tar xvzf nmos-scalability-master.tar.gz mv nmos-scalability-master nmos-scalability
-
If working behind a proxy server, set the environment variable
VM_PROXY_SETTINGSto indicate the setting to use.- If
cntlmis already set up on the host computer, this can be utilised via the NAT network. Check the port number used by your hostcntlmas this can vary from the default 3128 used in this example. (10.0.254.1 is the default gateway of the VirtualBox internal NAT network after the address change in theImportVMscript.)export VM_PROXY_SETTINGS=http:https://10.0.254.1:3128 - Alternatively, the authentication can be specified along with your proxy server directly, as in this example.
(Note the authentication in this case will be stored on the VM in various places, see the script
nmos-scalability/install/SetProxies.shfor where.)export VM_PROXY_SETTINGS=http:https://<username>:<password>@proxy.example.com:10080
- If
-
Run the
SetupPart1.shscript, optionally passing in a new name for the VM (e.g. lowercase version of VirtualBox name to follow the default naming convention).nmos-scalability/install/SetupPart1.sh mininet-vm01
-
You will be prompted to press enter to reboot. Log in again:
ssh mininet@10.0.254.2
    <enter password 'mininet'>
-
If you specified a new name, this should have now changed. Verify internet access is available, e.g. with:
wget www.google.com
-
Run part 2 of the setup:
nmos-scalability/install/SetupPart2.sh
-
This takes about 40 minutes or so to complete building and setup. When completed you will be prompted to reboot again.
This page has further instructions for:
- Installing Ubuntu Desktop for a GUI interface
- Adding additional disk space
- Connecting a USB drive to the VM
- Installing Samba to share out
/home/mininetto a Windows host
Run the command sudo mn to experiment with the basic Mininet tool.
With no additional options, this constructs a small network and starts the built-in Mininet CLI:
*** Creating network
*** Adding controller
*** Adding hosts:
h1 h2
*** Adding switches:
s1
*** Adding links:
(h1, s1) (h2, s1)
*** Starting controller
c0
*** Starting 1 switches
s1 ...
*** Starting CLI:
mininet>
Type h1 ping -c1 h2 to confirm that Mininet is basically functional.
Try h1 ping -c1 "h2" to confirm that DNS is working within the virtual network.
Type help for a list of the built-in commands.
Type exit to quit.
There is a step-by-step Mininet Walkthrough at: http:https://mininet.org/walkthrough/
We're now ready to run Mininet with our NMOS extensions.
cd <nmos-scalability>
sudo bin/nmos-mn
A simple network will be created, almost as before.
At the mininet> prompt, type help for a list of the built-in commands, including the NMOS extensions.
Type mdnsd h1 h4 to run mdnsd for all hosts (h1 to h4).
Type start_registry h1 to start up a registry on host h1.
Type start_node h2 h4 to start up nodes on hosts h2, h3 and h4.
Type query_nodes h1 to print a list of the registered nodes.
Type exit to quit.
The extended Mininet CLI, nmos-mn supports all of the same command-line options.
For example, this command-line creates a network of 256 hosts without a controller:
sudo bin/nmos-mn --topo=tree,2,16 --controller=noneThen at the mininet> prompt, set the switches into standalone mode, start up the mDNS daemon, a registry and lots of nodes:
ovs_standalone
mdnsd h1 h256
start_registry h1
start_node h2 h256By default the Mininet hosts are isolated from the host-only network on the VM.

Open vSwitch can be used to bridge the Mininet network with the VM.
The following scripts perform the creation and tear down of the bridge br0 to perform this function:
nmos-scalability/bin/add_bridge.sh br0 eth0 s1
nmos-scalability/bin/delete_bridge.sh br0 eth0 s1
With this bridge in place, communication can freely occur between the Mininet hosts, the VM and the host computer.
The nmos-scalability Mininet CLI (nmos-mn) has new commands that run the necessary script to create and tear down the bridge:
add_bridgedelete_bridge