
Getting Started with the OpenCV SDK
- Step 1:
First step what you need is setup opencv library to your Xcode project. A lot of tutorial you can find in the open spaces of the Internet. For instance medium.
What you need know about openCV: OpenCV is an image processing library.
Mat - The Basic Image Container.
When we get image from real world our  device transforming this to digital values after that OpenCV to record are numerical values for each of the points of the image.
Any images is a matrix containing all the intensity values of the pixel points.
For UI implementation we will use Swift classes, but for detection implementation we will use Objective-C classes How to use to use Objective-C classes in Swift you can read here
Firstly what we do it’s create Objective C class OpenCVDetector which will work with OpenCV library.
In this class will declare namespace for conveniently work with OpenCV library:
using namespace cv;
using namespace std;
OpenCV has class CvVideoCamera is basically a wrapper around AVFoundation, so we provide as properties some of the AVFoundation camera options.
@implementation OpenCVDetector

- (instancetype)initWithCameraView:(UIView *)view scale:(CGFloat)scale preset:(AVCaptureSessionPreset) preset type:(OpenCVDetectorType) type {
self = [super init];

if (self) {

self.videoCamera = [[CvVideoCamera alloc] initWithParentView: view];
self.videoCamera.defaultAVCaptureSessionPreset = preset;
self.videoCamera.defaultAVCaptureVideoOrientation = AVCaptureVideoOrientationPortrait;
self.videoCamera.defaultFPS = 30;
self.videoCamera.delegate = self;

self.scale = scale;
The property defaultFPS sets the FPS of the camera The OpenCVDetector has to implement the CvVideoCameraDelegate protocol and has to be set as delegate to the video camera:
#pragma mark - CvVideoCameraDelegate

- (void)processImage:(cv::Mat&)image {
}
Add some methods to the header of class OpenCVDetector and implement them:
- (void)startCapture {
	[self.videoCamera start];
}

- (void)stopCapture {
	[self.videoCamera stop];
}
Create Swift class CameraViewController.
class CameraViewController: UIViewController {

lazy var detecor = OpenCVDetector(cameraView: view, scale: 1, preset: .vga640x480, type: .back)

override func viewDidLoad() {
super.viewDidLoad()
detecor.startCapture()
}
In this case, we initialize the camera and provide the self view as a target for rendering each frame.
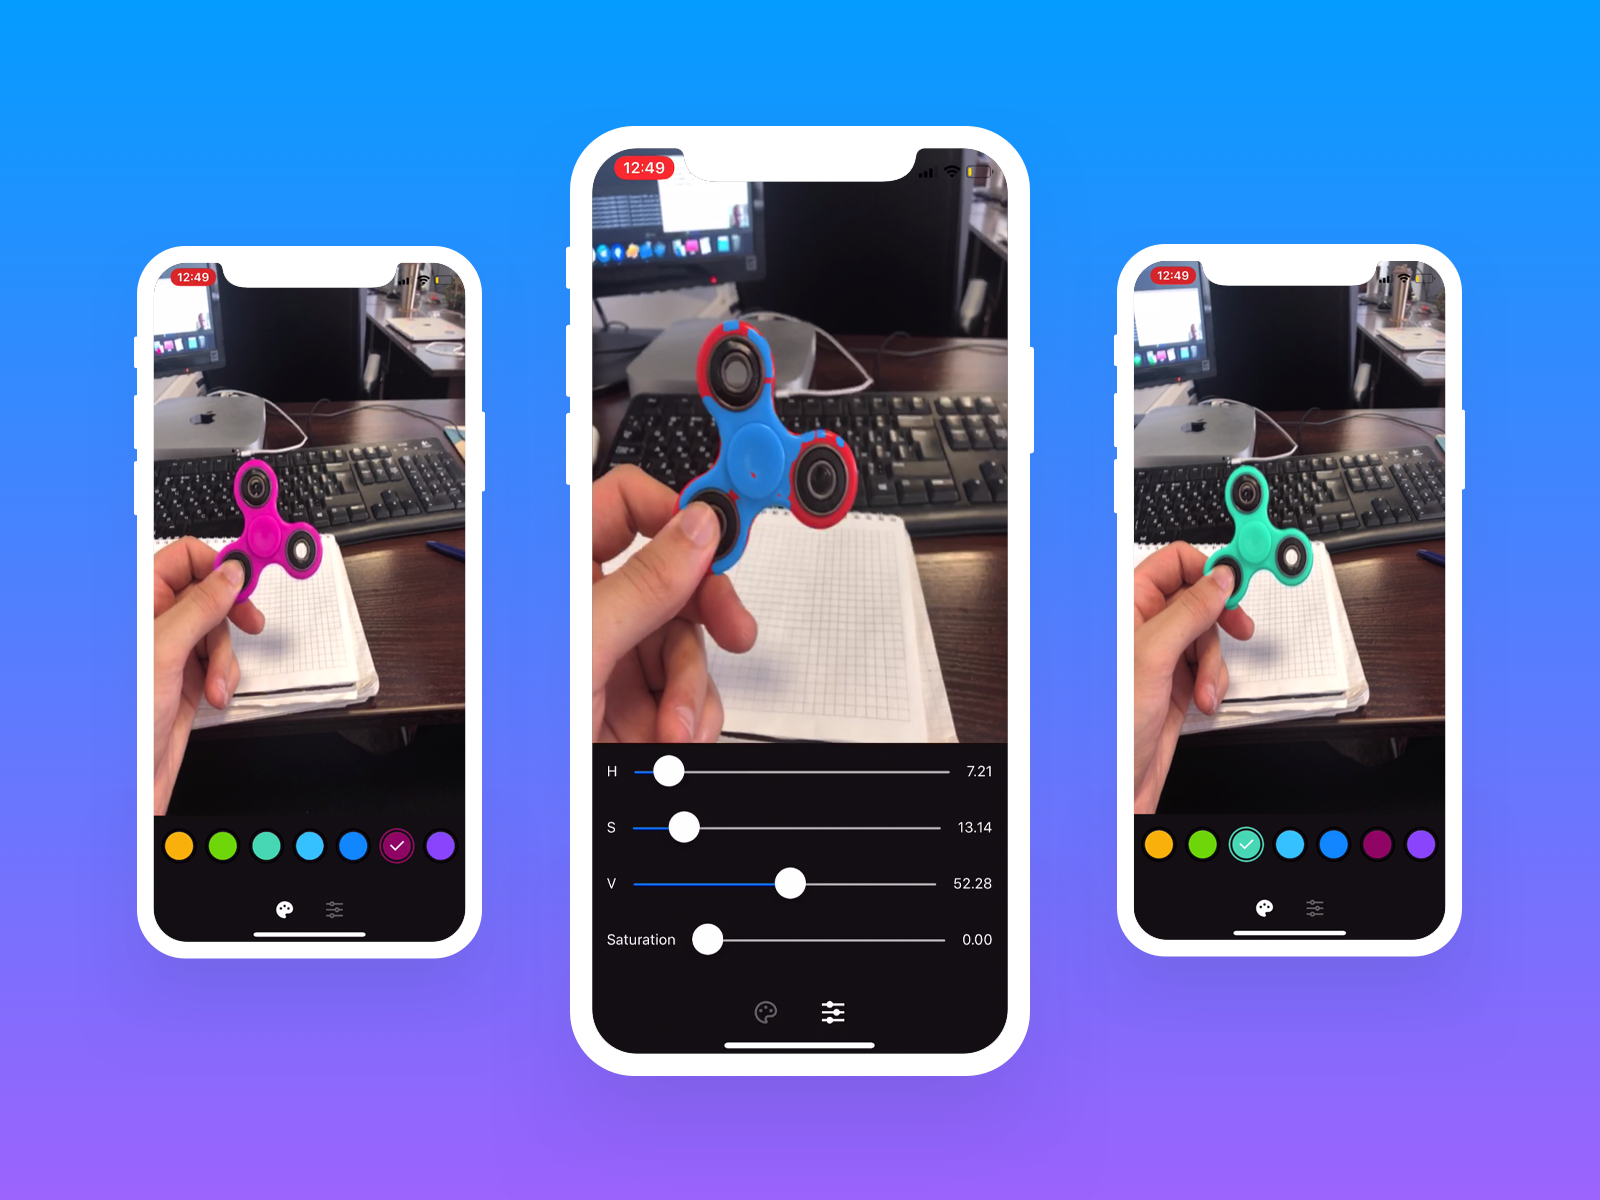
For this tutorial we will change color for some object, In my case it will red spinner. Red spinner are easily identifiable by their color, so they’re a good candidate for our task.
In the most common color space, RGB (Red Green Blue), colors are represented in terms of their red, green, and blue components. In more technical terms, RGB describes a color as a tuple of three components. Each component can take a value between 0 and 255, where the tuple (0, 0, 0) represents black and (255, 255, 255) represents white. OpenCV by default reads images in BGRA format.
- Step 2: Red color detection.
Since the RGB values are highly sensitive to illumination we will transform the color space of our image from RGB to HSV (Hue – Saturation – Value).
The HSV color space represents colors using three values
Hue. This channel encodes color color information. Hue can be thought of an angle where 0 degree corresponds to the red color, 120 degrees corresponds to the green color, and 240 degrees corresponds to the blue color.
Saturation. This channel encodes the intensity/purity of color. For example, pink is less saturated than red.
Value. This channel encodes the brightness of color. Shading and gloss components of an image appear in this channel.
To understand different color spaces refer to detailed blog on color spaces.
In the below code we first convert the image from BGR to HSV color space and then define a specific range of H-S-V values to detect red color.
Scalar lower_red, upper_red;

//Mask for lower red
lower_red = Scalar(0, 120, 70);
upper_red = Scalar(10, 255, 255);
inRange(hsv, lower_red, upper_red, mask1);

//Mask for upper red
lower_red = Scalar(170, 120, 70);
upper_red = Scalar(180, 255, 255);
inRange(hsv, lower_red, upper_red, mask2);

// Generating the final mask
mask1 = mask1 + mask2;
The inRange function simply returns a binary mask, where white pixels (255) represent pixels that fall into the upper and lower limit range and black pixels (0) do not.
The Hue values are actually distributed over a circle (range between 0-360 degrees) but in OpenCV to fit into 8bit value the range is from 0-180. The red color is represented by 0-30 as well as 150-180 values.
We use the range 0-10 and 170-180 to avoid detection of skin as red. For saturation and value range I just picked up the some value. It isn’t a big deal for our task.
Then we combine masks generated for both the red color range. It is basically doing an OR operation pixel-wise. It is a simple example of operator overloading of +.
- Step 3: Segmenting out the detected red colored spinner.
In the previous step, we generated a mask to determine the region in the frame corresponding to the detected color. We refine this mask and then use it for segmenting out the spinner from the frame. The code below illustrates how it is done.
cv::Size blurSize(8,8);
blur(mask1, mask1, blurSize);
threshold(mask1, mask1, 50, 255, THRESH_BINARY);

Mat kernel = Mat::ones(3,3, CV_32F);
morphologyEx(mask1, mask1, cv::MORPH_OPEN, kernel);
morphologyEx(mask1, mask1, cv::MORPH_DILATE, kernel);

// creating an inverted mask to segment out the object from the frame
bitwise_not(mask1, mask2);

Mat res1, res2, final_output;

// Segmenting the object out of the frame using bitwise and with the inverted mask
bitwise_and(img, img, res1, mask2);
- Step 4 Create new background for our spinner.
Mat background = Mat(hsv.rows, hsv.cols, hsv.type(), Scalar(fillingHSVColor[0], NAN, NAN));

for (int i = 0; i < background.cols; i++) {
for (int j = 0; j < background.rows; j++) {
CvPoint point = cvPoint(i, j);
background.at<Vec3b>(point).val[1] = MIN(hsv.at<Vec3b>(point).val[1] + 50, 255);
background.at<Vec3b>(point).val[2] = MIN(hsv.at<Vec3b>(point).val[2] + 50, 255);
}
}

cvtColor(background, background, COLOR_HSV2BGR);
We create new background from our HSV image with another H-value color. And then increase S-V-value for bigger saturation and brightness our spinner.
- Step 5: Generating the final output.
Finally, we replace the pixel values of the detected red color region with corresponding pixel values of the background and finally generate an augmented output. To do this we use bitwise_and operation first to create an image with pixel values, corresponding to the detected region, equal to the pixel values of the background and then add the output to the image (res1) from which we had segmented out the red spinner.
// creating image showing static background frame pixels only for the masked region
bitwise_and(background, background, res2, mask1);

// Generating the final augmented output.
cv::add(res1, res2, final_output);