Introduction
Welcome to the future of watch evolution. The Pebble E-Paper Watch is the "first watch built for the 21st century." It can track your bikerides, display your text messages, and even tell the time! We had no choice but to bust the Pebble open and see what made it tick.
Update: We did not initially find hardware evidence of Bluetooth Low Energy support, but the engineers at Pebble got in touch to clarify things. Their RF module does in fact support BLE, and they assure us that a firmware update to support this feature is forthcoming.
Waste no time! Head on over to Twitter to follow us for the latest teardown news.
What you need
-
-
A pebble is a small rock often thrown into ponds or lakes. The Pebble, on the other hand, is a smartwatch fueled by internet-connected apps and unlimited innovation.
-
The watch will connect to your smartphone (iPhone or Android) via Bluetooth, bringing alerts of incoming calls, emails, and texts to your wrist.
-
But what type of hardware is responsible for powering the Pebble? These are the tech specs listed:
-
144 x 168 pixel display black and white e-paper
-
Bluetooth 2.1+ EDR and 4.0 (Low Energy)
-
Vibrating motor
-
3-axis accelerometer with gesture detection
-
-
-
The rear side of the Pebble is adorned by lovely, gold-colored writing.
-
It is waterproof up to 5 ATM (50 meters or 165 feet), making it wearable while washing dishes, playing sports, and swimming in shallow water. 'Where is it not wearable?' you ask.
-
Probably not here. Certainly not here. And most assuredly not here.
-
To protect the Pebble from water damage, the front portion is tightly fitted with a clear plastic frame and sealed tight.
-
-
-
For a watch with no visible outer screws, your first question is probably something along the lines of, 'Hey iFixit, how do you open that which cannot be opened?'
-
Our response: 'With the help of our iOpener, of course!'
-
With more than a little heat and some clever prying, we hope to outsmart the world's smartest watch.
-
-
-
Pebble employs tons of adhesive to keep water—and tinkerers—out. Add in a bezel around the screen, and it's impossible to separate the cases without compromising the display.
-
With plenty of elbow grease and our iSesamo, we get our proverbial foot in the door and start prying this Pebble open.
-
We manage to part the cases, leaving the stubborn smartwatch in only slightly better condition than if we had bombarded it with actual pebbles until it popped open.
-
-
-
-
While there is no exact definition for what makes a display technology e-paper, it essentially entails paper-like readability in ambient light and very low power draw. The Pebble makes use of a new Sharp Memory LCD that puts it in the realm of e-ink and e-paper.
-
The display is capable of maintaining its current image with very low power draw (less than 15 μW for a static image, according to the manufacturer).
-
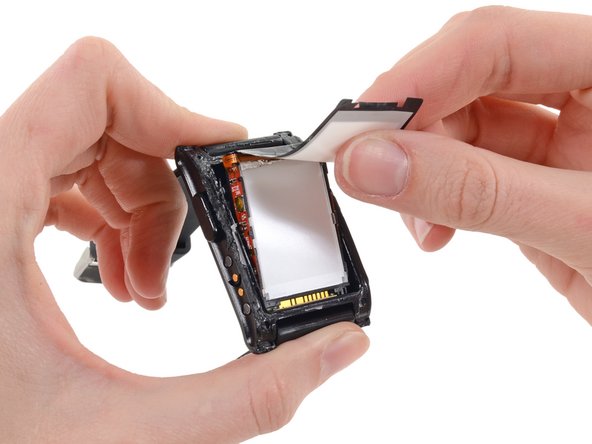
Peeling up the Pebble's e-paper display film reveals backlight LEDs. The small display only requires three LEDs (controllable by a wrist gesture) to light its face.
-
-
-
Just a swish and a flick of the spudger and the lone ribbon cable surrounding the whole assembly is freed.
-
The cable's adhesive also secures the backlight guide, allowing the LEDs to shine on, providing backlighting for the e-paper screen.
-
We learned in our Nook Simple Touch with GlowLight teardown that light guides work by bouncing light shined in one end through a diffraction grating to provide an even glow—in this case beneath the e-paper display.
-
-
-
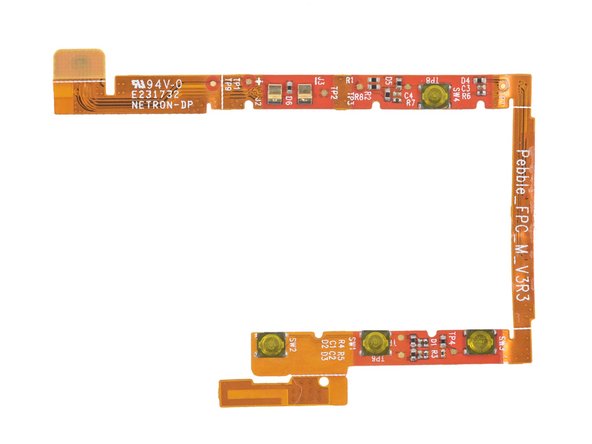
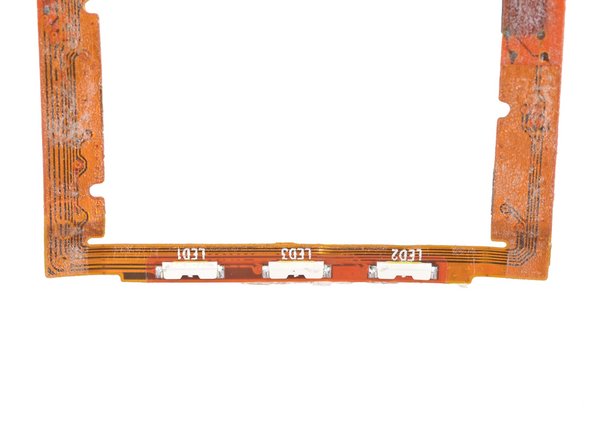
Removing the ribbon cable from the main assembly gives us a closer look at the buttons and Bluetooth antenna on one side, and the backlight LEDs on the reverse.
-
Since the cable houses all 4 buttons, 3 LEDs, and the Bluetooth 2.1 antenna, replacing an individual component will be impossible (even if you can somehow get inside without compromising the display).
-
-
-
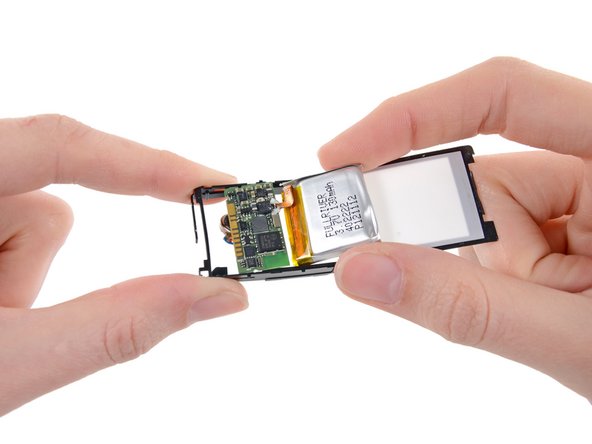
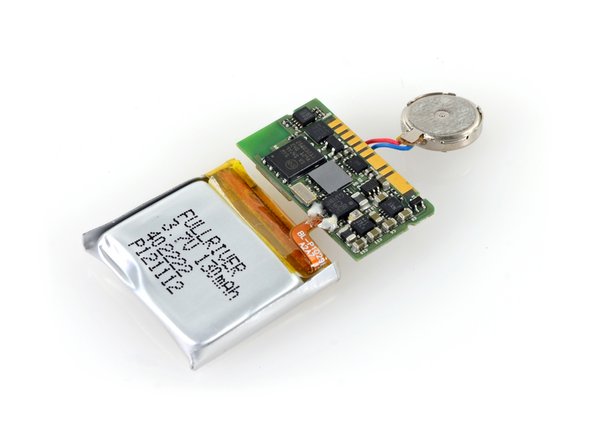
Removing the backlight guide panel from the device grants us access to the motherboard/battery/vibrator assembly.
-
Much like the ribbon cable, three components make up this assembly, held together by very delicate soldering. If any one of them fails (most significantly the battery), they will all need to be replaced as a single unit.
-
-
-
The ICs of interest on the top side of the motherboard are as follows:
-
Micron N25Q032A11ESE40F 32 Mb serial flash
-
STMicroelectronics STM32F205RE high-performance ARM Cortex-M3 MCU, with a maximum speed of 120 MHz
-
STMicroelectronics LIS3DH 3-axis accelerometer
-
Oscillator
-
Texas Instruments BQ24040 1A Battery Charger
-
Xtrinsic MAG3110 3D Digital Magnetometer
-
-
-
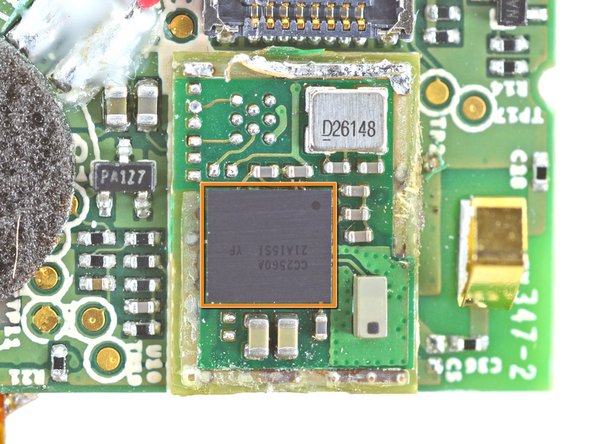
The back of the motherboard hosts a Panasonic pan1316 RF module, promising the Pebble's advertised Bluetooth and Bluetooth Low Energy (BLE) functionality, powered by a Texas Instruments CC2564 Bluetooth Controller.
-
After some dainty desoldering, the module's EMI shield is removed to surprisingly reveal a slightly different Texas Instruments CC2560A, that appears to not include BLE support.
-
The Bluetooth antenna printed into the flex circuit board connects to the pan1316 BT module here.
-
Word on the street was that Pebble had BLE functionality just waiting to be activated with a firmware update, but we can't find evidence of the hardware to back up this hidden potential.
-
-
-
The Fullriver battery is rated at 3.7 Volts and 130 mAh. According to the GetPebble website, the battery is rechargeable via included USB charger, and lasts for over 7 days on a single charge.
-
This seems like a challenge to us, but with the use of e-paper, we believe that even heavy use would allow for such long battery life.
-
-
-
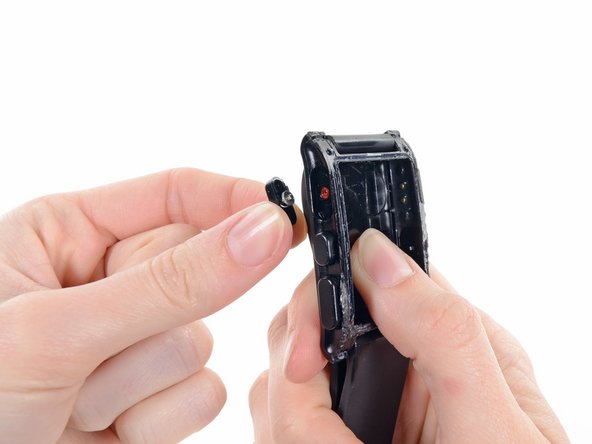
Just to be thorough, we go ahead and pop out a couple of the Pebble's spring-loaded buttons.
-
In keeping with the über tight waterproofing, the buttons have gaskets to allow for motion without leakage.
-
If you break one of the buttons, it can be replaced individually from the others; however, you still need to get into the watch in the first place, a feat we have not yet mastered.
-
-
-
Smartwatches might be the next big thing, but—right now—the Pebble is a unique device. We don't have a repairability metric for a watch…yet.
-
In lieu of a numeric score, we'd like to list a few of our repairability and durability findings:
-
Low power consumption decreases the frequency of charges, increasing the battery life.
-
Watch band is a standard size and easily replaceable.
-
Inaccessible battery limits life of the device to 6-10 years (by our estimates).
-
It is impossible to open the device without destroying it or at least compromising its waterproofing, making internal repairs infeasible.
-
We got in touch with Pebble's design team and voiced some concerns about end-of-life recycling. We were happy to learn that they currently have a plan in the works for a responsible recycling program for dead Pebbles.
-
11 Comments
Anybody knows what are the other ICs on the "Step 11" screenshot?
you need to redo the guide, the new pebble are much easier to open
hye fabio.. can the screen take out easily on your open pebble
I got a replacement Pebble due to screen problems, and the device that's arrived (May 2014) says in the "About" section that it's "Hardware V3R2" and what's more it has 4 torx screws on the back, that the original did not have. Has anyone tried to take this model apart (I'm not going to as it's my only working one)?
Oh, sorry Fabio, just seen your image!


