Introduction
FFmpeg is a command-line audio and video converter available for Linux, macOS, and Windows. This open-source tool helps users manipulate multimedia content and offers free access to several audio and video libraries.
Even though FFmpeg doesn't have a clickable GUI, the installation process is straightforward.
In this guide, you will learn how to install FFmpeg on Windows in four simple steps.

Prerequisites
- A system running Windows (This tutorial uses Windows 10).
- A file archiver (This guide uses 7-Zip).
- Command Prompt or Windows PowerShell access.
- Administrator privileges.
How To Install FFmpeg on Windows
Installing FFmpeg on Windows requires adding the utility to the Windows PATH. Additionally, users can manually navigate to the folder containing the executable and run the program. However, the process is time-consuming and impractical.
A straightforward way to work with FFmpeg is to add it to PATH by editing Windows environment variables. Therefore, Windows knows where to look for the executable. Users can run FFmpeg directly from the command line without typing in the full path to the app's folder.
Step 1: Download FFmpeg for Windows
Visit the FFmpeg download page. The More downloading options section has FFmpeg packages and executable files for Linux, Windows, and Mac. To get the Windows version:
1. Hover over the Windows logo and click the Windows builds from gyan.dev link. A new page opens.

2. In the git master builds section, look for the latest version of the FFmpeg build. Click the ffmpeg-git-full-7z link to download the full build since that version has the most up-to-date libraries.

3. Choose the download location and save the file if the download does not start automatically.
Step 2: Extract the Downloaded Files
Once downloaded, extract the contents:
1. Locate the downloaded file. The default location is the Downloads folder.
2. Right-click the file and hover over 7-Zip (or another file archiver of choice).
3. From the archiver submenu, choose Extract here. Wait for a few seconds for the extracting process to complete.

5. Rename the extracted folder to ffmpeg.

6. Move the folder to the root of the C drive or the folder of your choice.

Step 3: Add FFmpeg to PATH
Set Windows environment variables to add FFmpeg to the PATH. Follow these steps:
1. Type system variables into the search bar and click the Edit the system environment variables option.

2. Click the Environment Variables... button under the Advanced tab.

3. Under the User variables section, select Path and click the Edit button.

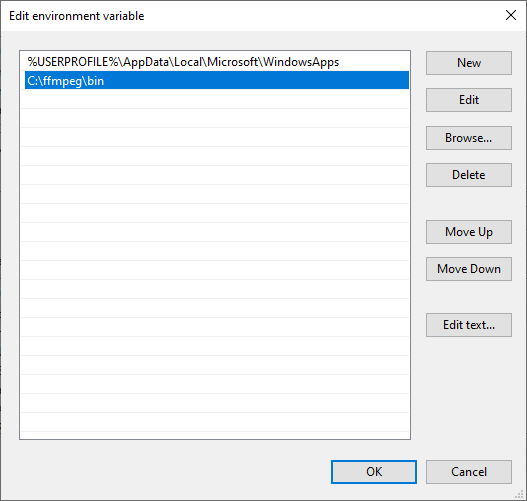
4. Choose New from the side menu.

5. Add C:\ffmpeg\bin to the empty field and confirm changes with OK.

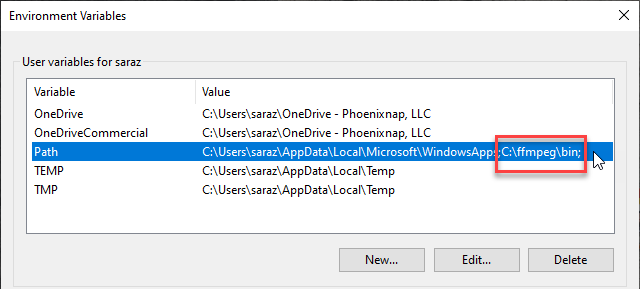
The change in the Path variable line confirms the FFmpeg is added to PATH.

Note: If you stored FFmpeg in a folder other than the C drive, use that path accordingly.
Step 4: Verify FFmpeg PATH
To verify the FFmpeg is correctly added to the Windows PATH, open the Command Prompt or PowerShell and run:
ffmpegThe output confirms the installation:

Conclusion
This article provided an easy step-by-step guide on installing FFmpeg on Windows.
For more tutorials refer to our article and learn how to install FFmpeg on MacOS.
Next, learn how to change or reset the administrator password on the Windows server.