- 1. Overview
- 2. Configuration
- 3. CLI Usage
dotnet-releaser allows to easily automate the build of your .NET libraries and applications by wrapping:
dotnet buildwith potentially multiple solutionsdotnet test- Plus the automatic support for coverage.
dotnet packfor creating NuGet packagesdotnet publishthat can automatically cross-compile to 9+ CPU/OS platforms.- And create additionally, by default, multiple packages (zip, debian, rpm...) to distribute your app
dotnet nuget pushto publish your package to a NuGet registry- Pretty changelog creation from pull-requests and commits.
- Create and upload the changelog and all the packages packed to your GitHub repository associated with the release tag.
- It will publish automatically the coverage results to https://coveralls.io if your repository is created there.

dotnet-releaser expects that .NET 6 SDK is installed.
Then you just need to install it as a global tool. Update to the latest version if you have installed it already!
dotnet tool install --global dotnet-releaserYou need to create a TOML configuration file that will instruct which project to build and package, and to which GitHub repository.
You can use dotnet-releaser new to create this configuration file.
Let's create a .NET HelloWorld project:
dotnet new console --name HelloWorldcd HelloWorld
dotnet-releaser new --project HelloWorld.csprojThis will create a dotnet-releaser.toml. Replace the GitHub user/repository associated with the tool. You only need to specify them if you are going to publish to GitHub.
# configuration file for dotnet-releaser
[msbuild]
project = "HelloWorld.csproj"  # You can put directly a solution file here, or also multiple projects or solution files.
[github]
user = "github_user_or_org_here"
repo = "github_repo_here"
In practice, you don't need to configure more than these defaults.
You can cross-compile and build all packages by running the sub-command build:
dotnet-releaser build --force dotnet-releaser.tomlIt will create a sub folder artifacts-dotnet-releaser (Don't forget to add it to your .gitignore!) that will contain:
> ls artifacts-dotnet-releaser
HelloWorld.1.0.0.linux-arm.deb
HelloWorld.1.0.0.linux-arm.tar.gz
HelloWorld.1.0.0.linux-arm64.deb
HelloWorld.1.0.0.linux-arm64.tar.gz
HelloWorld.1.0.0.linux-x64.deb
HelloWorld.1.0.0.linux-x64.tar.gz
HelloWorld.1.0.0.nupkg
HelloWorld.1.0.0.osx-arm64.tar.gz
HelloWorld.1.0.0.osx-x64.tar.gz
HelloWorld.1.0.0.rhel-x64.rpm
HelloWorld.1.0.0.rhel-x64.tar.gz
HelloWorld.1.0.0.win-arm.zip
HelloWorld.1.0.0.win-arm64.zip
HelloWorld.1.0.0.win-x64.zip The publish command allows to build and publish all packages to GitHub and NuGet.
dotnet-releaser publish --force --github-token "${{secrets.GITHUB_TOKEN}}" --nuget-token "${{secrets.YOUR_NUGET_SECRET_TOKEN}}" dotnet-releaser.tomlNOTE: When running from a GitHub Action, it is recommended to use the predefined
GITHUB_TOKENaccessible from your secrets:${{secrets.GITHUB_TOKEN}}, but you might want to create your ownPAT_GITHUB_TOKENto leverage more features of dotnet-releaser. See section later in this document About GITHUB_TOKEN.It is recommended to use
dotnet-releaser runinstead when running from a GitHub Action, as explained in the following section.
If you want to run this from a command line, you need to a personal access token
You can easily replace all the steps used to build, tests, cover, pack and publish your library or application with dotnet-releaser, as it will automate entirely the publication of your package.
In order to use dotnet-releaser on your GitHub CI, you need:
- Checkout your repository with the correct settings with actions/checkout
- Verify that you are using
v2and by setting the propertyfetch-depth: 0to get all previous tags. See example below.
- Verify that you are using
- To install
dotnet 6.0 - To install the global tool
dotnet-releaser
dotnet tool install --global dotnet-releaser- To run the dotnet-releaser command assuming that you have added all the secret tokens to your GitHub repository
dotnet-releaser run --nuget-token "${{secrets.NUGET_TOKEN}}" --github-token "${{secrets.GITHUB_TOKEN}}" src/dotnet-releaser.tomlIt is recommended to use shell: bash on GitHub Action so that if a secrets token is empty, bash won't remove the quotes, unlike pwsh.
Depending on the kind of GitHub event, the run command will automatically:
- If it is a pull-request or a push to a non release branch, it will perform a full build.
- If it is a
pushto a branch and the branch is a release branch (configured ingithub.branches), then it will perform a full build and it will upload a release draft with changelog with the name of the branch prefixed bydraft-{name_of_the_branch}(example:draft-main). You can disable the create of a draft release but it is usually convenient to look at what will be your next release notes. - If it is a
pushwith a tag version (e.gv1.9.6as configured with[github]section in the configuration) it will perform a full build with publish- For an application, it will publish multiple cross-compiled packages to your release
An example of a setup with GitHub Actions:
    steps:
    - name: Checkout
      uses: actions/checkout@v2
      with:
        fetch-depth: 0

    - name: Install .NET 6.0
      uses: actions/setup-dotnet@v1
      with:
        dotnet-version: '6.0.x'

    - name: Build, Tests, Cover, Pack and Publish (on push tag)
      shell: bash
      run: |
        dotnet tool install --global dotnet-releaser
        dotnet-releaser run --nuget-token "${{secrets.NUGET_TOKEN}}" --github-token "${{secrets.GITHUB_TOKEN}}" src/dotnet-releaser.toml
NOTE about tokens:
It is recommended to use
shell: bashon GitHub Action so that if a secrets token is empty, bash won't remove the quotes, unlike pwsh.In order to publish changelogs, NuGet and app packages to NuGet and GitHub, you need to specify secrets tokens:
${{secrets.GITHUB_TOKEN}}is available by default on GitHub Action and allow to interact directly with your repository. Nothing to create here. Unless you are going to publish an application to a separate Homebrew repository, and in that case you need to create an extra token. See Homebrew documentation for more details.${{secrets.NUGET_TOKEN}}needs to be created in your repository settings and add a secrets with the keyNUGET_TOKENby generating the token directly on your NuGet account here.
dotnet-releaseris currently not available as a GitHub Action, as it requires anywaydotnetto be installed (in order to compile the projects). As you can see, the integration is very straightforward with .NET global tools.
If you want to see an example of integration in a real project on GitHub, checkout this ci.yml from the project grpc-curl.
dotnet-releaser is relying on a proper configuration of your projects to detect which project should be packaged.
For all projects that you want to create and publish a package for (library or executable apps), it is recommended to configure all the fields required for proper NuGet packaging.
Some of these fields are also used for deb, rpm packages for example, or used to create the homebrew project:
<Description>to describe what your application is doing.<PackageLicenseExpression>where you should specify a valid license (see GitHub guidance for license for your repository/project)
  <PropertyGroup>
    <Description>dotnet-releaser is a all-in-one command line tool that fully automates the release cycle of your .NET libraries and applications to NuGet and GitHub</Description>
    <Copyright>Alexandre Mutel</Copyright>
    <NeutralLanguage>en-US</NeutralLanguage>
    <Authors>Alexandre Mutel</Authors>
    <PackageTags>releaser;packaging;deb;rpm;tool</PackageTags>
    <PackageReadmeFile>readme.md</PackageReadmeFile>
    <PackageReleaseNotes>https://github.com/xoofx/$(AssemblyName)/blob/master/changelog.md</PackageReleaseNotes>
    <PackageIcon>$(AssemblyName).png</PackageIcon>
    <PackageProjectUrl>https://github.com/xoofx/$(AssemblyName)</PackageProjectUrl>
    <PackageLicenseExpression>BSD-2-Clause</PackageLicenseExpression>
    <PublishRepositoryUrl>true</PublishRepositoryUrl>```
<PropertyGroup>In your msbuild project (e.g csproj or fsproj), you need to disable packaging for all projects that you don't want to package (e.g tests):
  <PropertyGroup>
    <IsPackable>false</IsPackable>
</PropertyGroup>dotnet-releaser doesn't impose the way you are going to define the versioning of your package.
The version can be:
- Manually defined in your csproj (or
Directory.Build.propsto share it). e.g:If you don't define a version, msbuild will use the version<PropertyGroup> <Version>1.2.0</Version> </PropertyGroup>
1.0.0by default. - Automatically setup by an auto-versioning helper:
- Minver, for example is used by
dotnet-releaseritself to define its versioning. - Nerdbank.GitVersioning
- GitVersion
- Minver, for example is used by
NOTE:
There are some requirements for compatible versioning of your libraries/applications with
dotnet-releaser:
- All the publish-able packages in your project should use the same version.
- The version defined in the package to publish (e.g
<Version>1.2.0</Version>) must match the version used for tagging a release. By default, the tag is expected to match the version. You can define a prefix for your tag viagithub.version_prefix(see[github]section below). For example you could definegithub.version_prefix = "v"to specify that expected tag will be e.gv1.2.0.
The configuration is all done with a configuration file in the TOML format.
The following properties can only be set before any of the sections (e.g [msbuild], [nuget]...)
| Global | Type | Description |
|---|---|---|
profile |
string |
Defines which packs are created by default. See packaging for more details. |
artifacts_folder |
string |
Defines to which folder to output created packages. By default it is setup to artifacts-dotnet-releaser relative to where to TOML configuration file is. |
# This is the default, creating all the OS/CPU/Packages listed on the front readme.md
profile = "default"
# Setting `custom` will make no default packs. You need to configure them manually
# profile = "custom"
# Store the artifacts to `myfolder`
artifacts_folder = "myfolder"This section defines:
- The application project to build. This property is mandatory. There is no default!
- The MSBuild configuration (e.g
DebugorRelease). Default isRelease - Additional MSBuild properties
Example:
# MSBuild section
[msbuild]
project = "../Path/To/My/Project.csproj"
configuration = "Release"
[msbuild.properties]
PublishReadyToRun = false # Disable PublishReadyToRun
[msbuild] |
Type | Description |
|---|---|---|
project |
string[] |
Specifies a list of the path to the project (e.g csproj) or solution *.sln files to compile with MSBuild. If this path uses a relative path, it will be relative to the location of your TOML configuration file. |
configuration |
string |
Specifies the MSBuild Configuration property. By default this is set to Release. |
configuration_debug |
string |
Specifies the MSBuild Configuration property for a debug build. By default this is set to Debug. |
properties |
map<string, string> |
Allows to defines properties that will be pass by MSBuild. |
build_debug |
bool |
Specifies if you want to build also the debug version (usually only for running tests with more diagnostics). By default this is set to false. |
By default, dotnet-releaser is using the following MSBuild defaults if you are going to compile a .NET executable as a single file/self contained application:
# Default values used by `dotnet-releaser`
[msbuild.properties]
PublishTrimmed = true
PublishSingleFile = true
SelfContained = true
PublishReadyToRun = true
CopyOutputSymbolsToPublishDirectory = false
SkipCopyingSymbolsToOutputDirectory = true [test] |
Type | Description |
|---|---|---|
enable |
bool |
Specifies whether or not to run tests if the projects contain any tests. Default is true. |
run_tests |
bool |
Run tests with the release Configuration specified in [msbuild]. Default is true. |
run_tests_for_debug |
bool |
Run tests with the debug Configuration specified in [msbuild]. Default is false. |
Example:
[test]
run_tests_for_debug = true # Run the tests in debug. By default this is false.Coverage will produce artifacts in the output folder.
2022/02/25 05:18:37.727 info: [16492] Coverage Results:
|       | Project      | Line   | Branch | Method |
| ----- | ------------ | ------ | ------ | ------ |
|       | Tomlyn       | 84.25% | 79.65% | 82.28% |
|       | Tomlyn.Tests | 96.86% | 65.22% | 92.31% |
| Total |              | 86.86% | 78.79% | 83.02% |
[coverage] |
Type | Description |
|---|---|---|
enable |
bool |
Specifies whether or not to run coverage when running tests. Default is true. |
package |
string |
The name of the NuGet package used to generate the coverage. Default is coverlet.collector |
version |
string |
The version of the NuGet package used. Default is 3.1.*. |
format |
string[] |
Coverage output format. These are either json (the default always added), cobertura, lcov, opencover or teamcity as well as combinations of these formats. |
single_hit |
bool |
Specifies whether to limit code coverage hit reporting to a single hit for each location. Default is false |
source_link |
bool |
Specifies whether to use SourceLink URIs in place of file system paths. Default is true. |
include_test_assembly |
bool |
Include coverage of the test assembly. Default is true. |
skip_auto_props |
bool |
Neither track nor record auto-implemented properties. Default is true. |
does_not_return_attribute |
bool |
Methods marked with these attributes are known not to return, statements following them will be excluded from coverage. Default is true. |
deterministic_report |
bool |
Generates deterministic report in context of deterministic build. Take a look at documentation for further informations directly on coverlet. Default is false. |
exclude |
string[] |
Exclude from code coverage analysing using filter expressions. |
exclude_by_file |
string[] |
Ignore specific source files from code coverage. |
include |
string[] |
Explicitly set what to include in code coverage analysis using filter expressions. |
include_directory |
string[] |
Explicitly set which directories to include in code coverage analysis. |
badge_upload_to_gist |
bool |
Enable to publish a badge for the coverage to a GitHub gist. |
badge_gist_id |
string |
Gist identifier used to publish a badge for the coverage to a GitHub gist. |
Example to disable coverage:
[coverage]
enable = false
Example to disable the use of source link:
[coverage]
source_link = falsedotnet-releaser allow to publish a coverage badge directly to a GitHub gist that can then be linked back from your readme.
Using this feature requires a few setup steps:
- Create a gist with a readme.md that explain that it is a gist used by dotnet-releaser for all your repositories. For example see this gist here
- Get the id of the gist: In the URL for example
https://gist.github.com/xoofx/4b1dc8d0fa14dd6a3846e78e5f0eafaethe ID of the gist is4b1dc8d0fa14dd6a3846e78e5f0eafae - You can then configure the coverage by enabling pushing the badge to the specified gist:
[coverage]
badge_upload_to_gist = true
badge_gist_id = "4b1dc8d0fa14dd6a3846e78e5f0eafae"
- Then you need to create a custom GITHUB_TOKEN with the appropriate permissions
- You need to use this token when passing it to
dotnet-releaser run - You can then reference the badge with a URL directly to the SVG published. The file created in the gist by dotnet-releaser will be of the form
dotnet-releaser-coverage-badge-{owner}-{repo}.svg. For example for the project xoofx/TurboXml the file created will bedotnet-releaser-coverage-badge-xoofx-TurboXml.svg. The link to the SVG would be simply:Notice the gist ID in the URL that you should replace with your own gist ID.
The coverage results can be uploaded automatically to https://coveralls.io/
dotnet-releaser will detect automatically if there is an existing owner/repository by checking the end-point https://coveralls.io/{owner}/{repository}.json
and will skip the upload to coveralls if it is not detected.
In order for the upload to coveralls to work, the --github-token passed to must be coming from ${{secrets.GITHUB_TOKEN}}.
[coveralls] |
Type | Description |
|---|---|---|
publish |
bool |
Specifies whether or not to publish to coveralls. Default is true. |
url |
string |
The coveralls URL endpoint. Default is https://coveralls.io |
Example to disable the use of source link:
[coveralls]
publish = falseIn order to publish to GitHub, you need to define at least the actual user and repo of your command line application.
Example:
[github]
user = "xoofx"
repo = "dotnet-releaser"
# base = "https://github.com"
# version_prefix = "v"
[github] |
Type | Description |
|---|---|---|
user |
string |
Defines the user or organization on your GitHub server. |
repo |
string |
Defines the repository under your user or organization on your GitHub server. |
base |
string |
Defines the base URL for your GitHub server. By default, it is using the public GitHub repository https://github.com |
version_prefix |
string |
Defines the prefix to add to the package version in order to find the associated tag release on GitHub. By default, there is no prefix defined (so the package version must be == the GitHub tag). Usually, it can require that you setup a v on your prefix in case your GitHub tags are prefixed by this letter (e.g v1.0.0). |
branches |
string[] |
The list of release branches that are authorized to receive a tag for a release. By default main and master are configured. If you push a version tag to a branch not listed here, you will get an error in the log. |
Example:
[github]
user = "xoofx"
repo = "dotnet-releaser"
branches = ["main", "release_v2", "release_v3"] # all the branches that can be tagged with a versionThis is where you define the matrix of all the OS, CPUs and archives/packages you want to cross-compile and generate.
The kind of packaging can be define at the top level with the profile property.
profile = "default"
This defines the packaging to use the default OS/CPU/packages.
## This is the default no need to specify it
profile = "default"
For this profile, it will use by default several packs pre-configured.
A group of packages in the TOML configuration is defined by:
[[pack]] |
Type | Description |
|---|---|---|
publish |
bool |
You can disable a particular pack to be build/published. |
rid |
string |
The target OS + CPU by defining its runtime identifier. See https://docs.microsoft.com/en-us/dotnet/core/rid-catalog for all the possible values. |
kinds |
string |
Defines the kinds of package to create: zip, tar, deb or rpm. |
For each rid define in a pack, it will create the packages defined by kinds.
For example, the default profile is creating the following packs:
# Create zip files only for Windows platforms
[[pack]]
rid = ["win-x64", "win-arm", "win-arm64"]
kinds = ["zip"]
# Default targets for Linux/Ubuntu Debian compatible distro with debian and tar packages
[[pack]]
rid = ["linux-x64", "linux-arm", "linux-arm64"]
kinds = ["deb", "tar"]
# Default targets for Linux/Redhat compatible distro with rpm and tar packages
[[pack]]
rid = ["rhel-x64"]
kinds = ["rpm", "tar"]
# Default targets for macOS, only tar files for this platform
[[pack]]
rid = ["osx-x64", "osx-arm64"]
kinds = ["tar"]
You can decide to override a specific rid, e.g
For example, defining this pack with the default profile:
[[pack]]
rid = ["win-x64"]
kinds = ["zip", "tar"]
Will only override the win-x64 to generate a zip and a tar.gz
You can disable a particular pack to be build/published.
[[pack]]
publish = false
rid = ["win-x64"]
kinds = ["zip"]
By default, all packs declared are publish = true.
profile = "custom"
If you want to disable the list of default packages, you can use the custom profile.
In that case, you need to define all packs manually as described above.
You can for example target e.g win-x86 which is not generated by default.
But you can also extend the default profile by just defining this rid. It's up to what is more convenient for your setup!
Allow to publish to a NuGet registry. By default it is on and publishing to the official NuGet public registry.
[nuget] |
Type | Description |
|---|---|---|
publish |
bool |
Allow to disable publishing to NuGet. |
source |
string |
Allow to override the default publish NuGet registry (https://api.nuget.org/v3/index.json) when publishing to NuGet. |
publish_draft |
bool |
Allow to publish NuGet draft packages with dotnet-releaser run. Default is false. When this option is true, even if there is no release tag on the current commit, the NuGet package will still be pushed if the current branch is listed in the main branches in github.branches. This option is useful when you want to push draft/pre-release NuGet packages per commit. |
For example:
[nuget]
source = "https://my.special.registry.nuget.org/v3/index.json"
# publish = falseBy default, a Homebrew repository and formula will be created if a tar file is generated for either a Linux or MacOS platform.
[brew] |
Type | Description |
|---|---|---|
publish |
bool |
Enable or disable Homebrew support. Default is enabled. |
home |
string |
Allow to override the default homebrew repository name. See more details below. |
By default, if your application name is my-application, and your GitHub user xyz, it will create and update automatically a repository at https://github.com/xyz/homebrew-my-application.
If you want to change this default behavior, and use your own homebrew repository, you can specify it by setting home:
[brew]
home = "homebrew-all-my-apps"
This repository will contain:
- a top level
readme.md - a folder
Formula - a Homebrew Ruby file
Formula/my-application.rbthat contains the formula with all the tar files that can be installed.
See for example the generated Homebrew repository for grpc-curl
NOTE: In order to create and publish to a different repository, you will need to create a personal access GitHub Token and pass it to
--github-token-extra.By default the
${{secrets.GITHUB_TOKEN}}is only valid to interact with the current repository.
By default, a Scoop repository (bucket) and manifest will be created if a zip file is generated for the Windows platform.
[scoop] |
Type | Description |
|---|---|---|
publish |
bool |
Enable or disable Scoop support. Default is enabled. |
home |
string |
Allow to override the default scoop repository name. See more details below. |
By default, if your application name is my-application, and your GitHub user xyz, it will create and update automatically a repository at https://github.com/xyz/scoop-my-application.
If you want to change this default behavior, and use your own scoop bucket, you can specify it by setting home:
[scoop]
home = "scoop-all-my-apps"
This repository will be created using the Scoop bucket template.
NOTE: In order to create and publish to a different repository, you will need to create a personal access GitHub Token and pass it to
--github-token-extra.By default the
${{secrets.GITHUB_TOKEN}}is only valid to interact with the current repository.
dotnet-releaser comes with great defaults that can generate automatically your changelog from your commits and pull-requests.
The generated changelog can then be uploaded as part of the publish process when pushing a new release with packages.
Please follow the dedicated user-guide for configuring changelog.
dotnet-releaser allows to package an application as a service that can be be automatically started by the platform supporting such kind of packages.
Currently, only Systemd services are supported for deb and rpm packages.
In order to activate support for services, you need to set:
[service]
publish = true # Allow to package the application as a service for the packages supporting it.
Then for each kind of service system, your application might require specific configuration.
An example of a specific configuration for a systemd service
[service.systemd]
arguments = "/etc/my_configuration_file.toml"
user = "xoofx"
create_user = true
[service.systemd.sections.Unit]
After = "network.target"
In the example above, we would like to pass to our service a file as an argument /etc/my_configuration_file.toml, launch the service with the user xoofx and make sure the service is started after the network.
[service.systemd] |
Type | Description |
|---|---|---|
arguments |
string |
Specifies the arguments that will be passed to your application when being run by systemd. |
user |
string |
Specifies the user to use to launch the application as a service. |
create_user |
string |
Creates the user/group with the name specified by service.systemd.user that will be used by the service. Default is false. |
sections |
map |
The sections provides access to the underlying Unit file. See details below. |
Anything that is defined after sections will be transferred to the final Unit file.
There are pre-existing sections created, like Unit or Install or Service, but you can add your own section.
[service.systemd.sections.Unit]
After = "network.target"
The service created by dotnet-releaser comes with the following defaults:
[Unit]
Description = your package description will be set here
StartLimitBurst = 4
StartLimitIntervalSec = 60
[Install]
WantedBy = multi-user.target
[Service]
ExecStart = /usr/local/bin/your-app your-arguments-or-empty
Restart = always
RestartSec = 1
Type = simple
See the Systemd configuration manual for the meaning of these defaults.
It is possible to define package dependencies if the underlying package model supports it.
NOTE: Package dependencies are currently only supported for
debandrpm.
# Adds one dependency to `a-first-runtime`
[[deb.depends]]
name = "a-first-runtime"
# Adds a dependency to a runtime with multiple versions
[[deb.depends]]
name = ["your-runtime1.0", "your-runtime2.0", "your-runtime3.0"]
In order to specify dependencies for rpm, you can use a similar syntax with [[rpm.depends]].
By default, GitHub Actions are providing a GITHUB_TOKEN for the repository. In order for dotnet-releaser to be able to use this token correctly you need to configure in the settings of your repository:
-
Go to the menu
Code and Automation/Actions/General: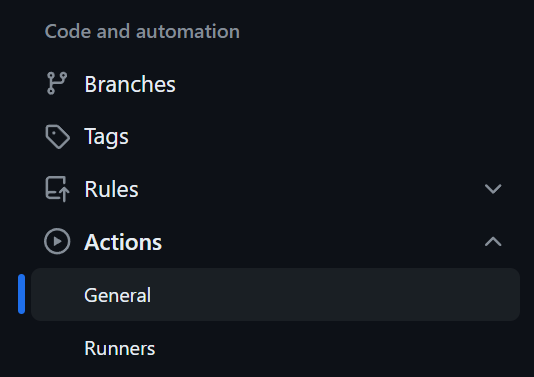
-
At the bottom of the page, under
Workflow permissions, selectRead and write permissions: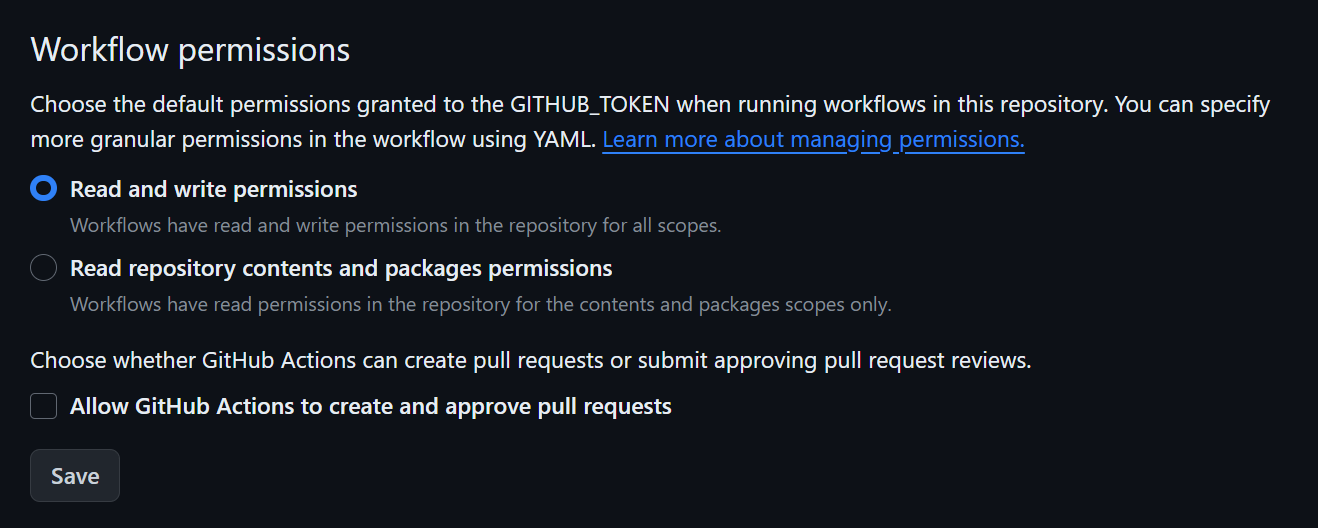


The default GITHUB_TOKEN should cover the basic scenarios, but you might want to create your own token to leverage more features of dotnet-releaser:
- Automatic creation of homebrew repository
- Publishing coverage badge on GitHub gist
You can create and reuse the same token for all your repositories or you can create a token for each repository more selectively:
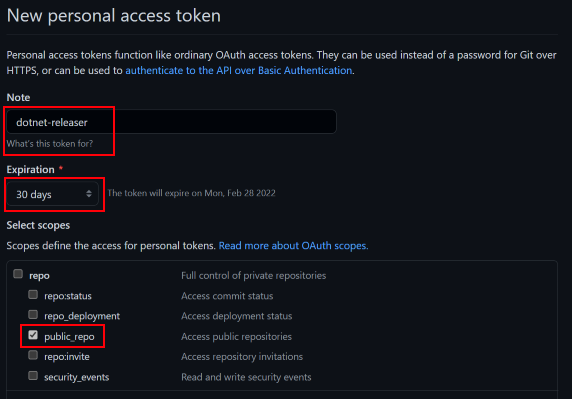
First, go to the settings for the tokens https://github.com/settings/tokens
Standard tokens
You should tick the public_repo in the list:
- public_repo
And put an appropriate expiration date.
Fine-grained tokens
- Select
Fine-grained tokens (Beta)and press the buttonGenerate new token - Select an expiration date
- Select the repository access

- In the
Repository permissions, select:Actions⇒ Access: Read and writeAdministration⇒ Access: Read and writeContents⇒ Access: Read and write
- In the
Account permissions, select:Gists⇒ Access: Read and write

You can then create the token and copy it and add it as a secrets environment for your GitHub Action workflows. You can use the name PAT_GITHUB_TOKEN with PAT for Personal Access Token.
Get some help by typing dotnet-releaser --help
dotnet-releaser 0.2.0 - 2022 (c) Copyright Alexandre Mutel

Usage: dotnet-releaser [command] [options]

Options:
  --version     Show version information.
  -?|-h|--help  Show help information.

Commands:
  build         Build only the project.
  changelog     Generate changelog for the specified GitHub owner/repository and optionally upload them back.
  new           Create a dotnet-releaser TOML configuration file for a specified project.
  publish       Build and publish the project.
  run           Automatically build and publish a project when running from a GitHub Action based on which branch is active, if there is a tag (for publish), and if the change is a `push`.

Run 'dotnet-releaser [command] -?|-h|--help' for more information about a command.
Create a dotnet-releaser TOML configuration file for a specified project.

Usage: dotnet-releaser new [options] <dotnet-releaser.toml>

Arguments:
  dotnet-releaser.toml      TOML configuration file path to create. Default is: dotnet-releaser.toml

Options:
  --project <project_file>  A - relative - path to a solution file (.sln) or project file (.csproj, .fsproj, .vbproj). By default, it will try to find a solution file where this command is run or where the output dotnet-releaser.toml file
                            is specified.
  --user <GitHub_user/org>  The GitHub user/org where the packages will be published. If not specified, it will try to detect automatically if there is a git repository configured from the folder (and parents) of the TOML configuration
                            file, and extract any git remote that could give this information.
  --repo <GitHub_repo>      The GitHub repo name where the packages will be published. If not specified, it will try to detect automatically if there is a git repository configured from the folder (and parents) of the TOML configuration
                            file, and extract any git remote that could give this information.
  --force                   Force overwriting the existing TOML configuration file.
  -?|-h|--help              Show help information.
Example:
$ dotnet-releaser newThe command above will create a dotnet-releaser.toml configuration file and detect automatically which solution file and user/repo GitHub project from current folder.
Build only the project.

Usage: dotnet-releaser build [options] <dotnet-releaser.toml>

Arguments:
  dotnet-releaser.toml                The input TOML configuration file.

Options:
  --github-token <token>              GitHub Api Token. Required if publish to GitHub is true in the config file
  --skip-app-packages-for-build-only  Skip building application packages (e.g tar) when building only (but not publishing). This is useful when running on a CI and you want to build app packages only when publishing.
  --table                             Specifies the rendering of the tables. Default is square.
                                      Allowed values are: None, Ascii, Ascii2, AsciiDoubleHead, Square, Rounded, Minimal, MinimalHeavyHead, MinimalDoubleHead, Simple, SimpleHeavy, Horizontal, Heavy, HeavyEdge, HeavyHead, Double, DoubleEdge,
                                      Markdown.
                                      Default value is: Square.
  --force                             Force deleting and recreating the artifacts folder.
  -?|-h|--help                        Show help information.
Example:
$ dotnet-releaser build --project HelloWorld.csproj --user xoofx --repo HelloWorldNOTE: this command fails if the release assets have been already uploaded; use
--force-uploadto replace them.
Build and publish the project.

Usage: dotnet-releaser publish [options] <dotnet-releaser.toml>

Arguments:
  dotnet-releaser.toml          The input TOML configuration file.

Options:
  --github-token <token>        GitHub Api Token. Required if publish to GitHub is true in the config file
  --nuget-token <token>         NuGet Api Token. Required if publish to NuGet is true in the config file
  --github-token-extra <token>  GitHub Api Token. Required if publish homebrew to GitHub is true in the config file. In that case dotnet-releaser needs a personal access GitHub token which can create the homebrew repository. This token has
                                usually more access than the --github-token that is only used for the current repository.
  --table                       Specifies the rendering of the tables. Default is square.
                                Allowed values are: None, Ascii, Ascii2, AsciiDoubleHead, Square, Rounded, Minimal, MinimalHeavyHead, MinimalDoubleHead, Simple, SimpleHeavy, Horizontal, Heavy, HeavyEdge, HeavyHead, Double, DoubleEdge,
                                Markdown.
                                Default value is: Square.
  --force                       Force deleting and recreating the artifacts folder.
  --force-upload                Force uploading the release assets.
  -?|-h|--help                  Show help information.
NOTE:
This command is meant to be used only from your GitHub Action yml file.
Automatically build and publish a project when running from a GitHub Action based on which branch is active, if there is a tag (for publish), and if the change is a `push`.

Usage: dotnet-releaser run [options] <dotnet-releaser.toml>

Arguments:
  dotnet-releaser.toml                The input TOML configuration file.

Options:
  --github-token <token>              GitHub Api Token. Required if publish to GitHub is true in the config file
  --nuget-token <token>               NuGet Api Token. Required if publish to NuGet is true in the config file
  --github-token-extra <token>        GitHub Api Token. Required if publish homebrew to GitHub is true in the config file. In that case dotnet-releaser needs a personal access GitHub token which can create the homebrew repository. This
                                      token has usually more access than the --github-token that is only used for the current repository.
  --skip-app-packages-for-build-only  Skip building application packages (e.g tar) when building only (but not publishing). This is useful when running on a CI and you want to build app packages only when publishing.
  --table                             Specifies the rendering of the tables. Default is square.
                                      Allowed values are: None, Ascii, Ascii2, AsciiDoubleHead, Square, Rounded, Minimal, MinimalHeavyHead, MinimalDoubleHead, Simple, SimpleHeavy, Horizontal, Heavy, HeavyEdge, HeavyHead, Double, DoubleEdge,
                                      Markdown.
                                      Default value is: Square.
  --force                             Force deleting and recreating the artifacts folder.
  -?|-h|--help                        Show help information.
This command is useful if you want to have a look at the changelog that will be generated by dotnet-releaser.
This command can also be used to upload proper release notes for past tags in your GitHub project. See for example what was generated for Tomlyn.
Generate changelog for the specified GitHub owner/repository and optionally upload them back.

Usage: dotnet-releaser changelog [options] <dotnet-releaser.toml> <version>

Arguments:
  dotnet-releaser.toml    The input TOML configuration file.
  version                 An optional version to generate the changelog for. If it is not defined, it will fetch all existing tags and generate the logs for them.

Options:
  --update                Update the changelog on GitHub for the specified version or all versions if no versions are specified.
  --github-token <token>  GitHub Api Token. Required if publish to GitHub is true in the config file
  -?|-h|--help            Show help information.
This is an example of logs generated by dotnet-releaser when running from your CI:
