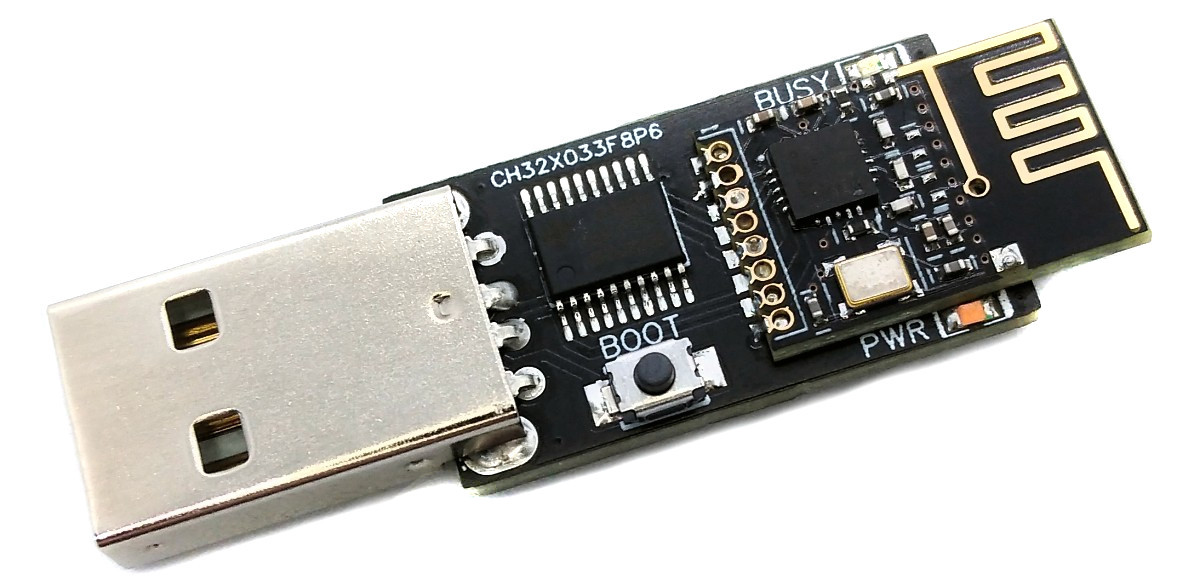
NRF2USB is a simple development tool designed specifically for wireless applications that utilize the low-cost nRF24L01+ 2.4GHz transceiver module. The integrated CH32X033 microcontroller provides a USB interface for communication with the module. The versatility of this tool makes it an ideal choice for a wide range of wireless applications.
Depending on the firmware, it can be used, for example, to transfer serial data wirelessly between two PCs (USB CDC - Communications Device Class) or as a receiver for wireless keyboards, mice or joysticks (USB HID - Human Interface Device). It is also possible to receive sensor data or control remote actuators. This makes it ideal for IoT (Internet of Things) applications where data collected from sensors needs to be transmitted wirelessly to a central device for analysis.
The nRF24L01+ is a highly integrated, ultra-low power (ULP) 2Mbps RF transceiver IC for the 2.4GHz ISM (Industrial, Scientific and Medical) band. It is designed to be used as a wireless communication module in a variety of applications, such as home automation, wireless gaming, and the Internet of Things (IoT). The module is equipped with an SPI interface, which makes it simple to connect to a variety of microcontrollers, such as the Arduino, Raspberry Pi, and others.
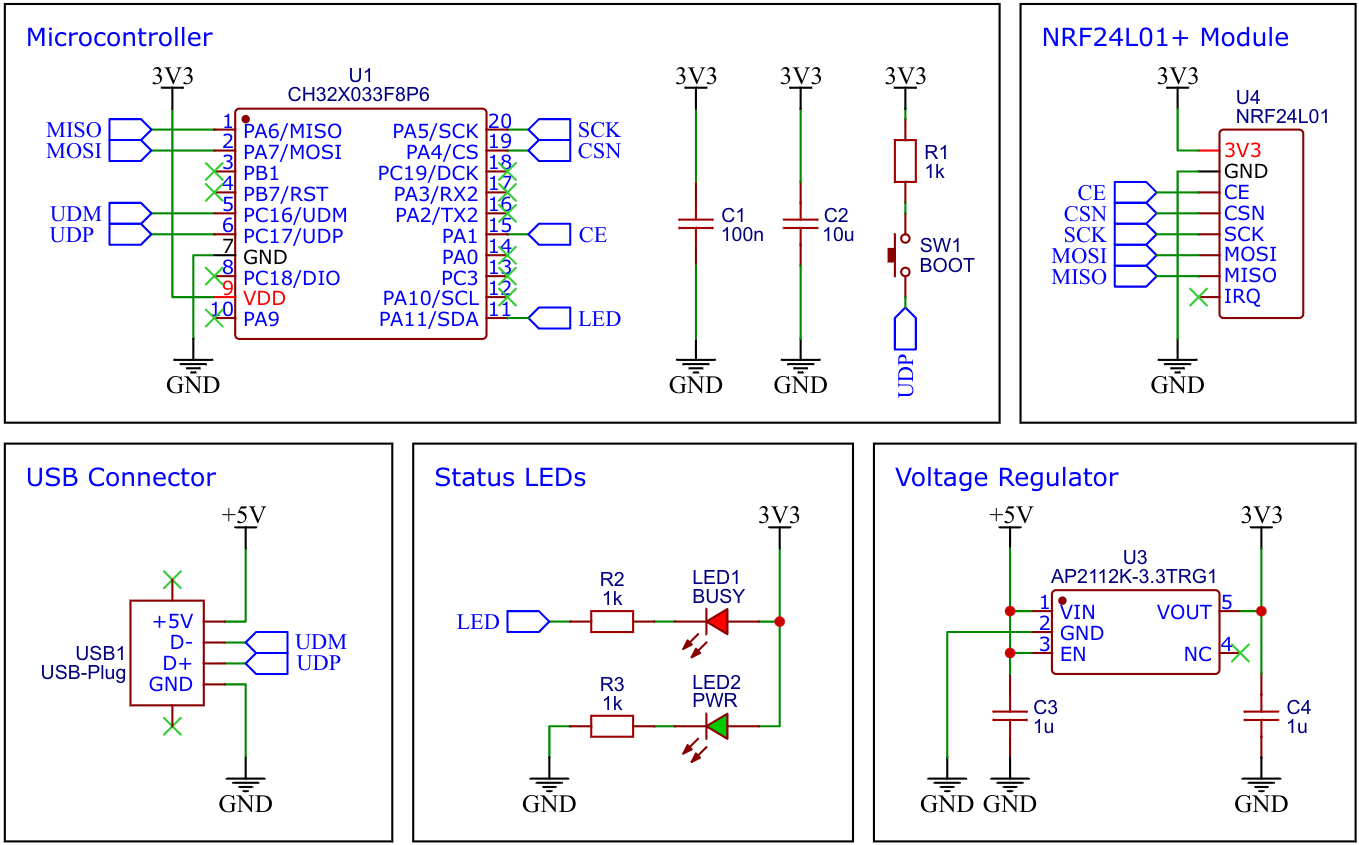
CH32X033 is a low-cost microcontroller that utilizes the QingKe 32-bit RISC-V4C core, supporting the RV32IMAC instruction set along with self-extending instructions. This microcontroller comes with a built-in USB PHY and supports USB2.0 full-speed device functions. It features a programmable protocol I/O controller (PIOC), 2 groups of operational amplifiers (OPA) with programmable gain (PGA), 2 groups of analog comparators (CMP), a 12-bit analog-to-digital converter (ADC), a 10-channel touch-key controller, 4 groups of USART, I2C, SPI, multiple timers, and various other peripheral resources. The device can operate at clock frequencies of up to 48MHz and is compatible with a supply voltage range of 2.0V to 5.5V. The CH32X033 includes 62KB of flash, 20KB of SRAM, and an embedded USB bootloader.
This firmware provides a serial interface for communication with the module via USB CDC. It can be used to transfer serial data wirelessly between two PCs, receive data from a remote sensor or trasmit commands to an actuator.
Open a serial monitor and set the correct serial port (BAUD rate doesn't matter). Enter the text to be sent, terminated with a Newline (NL or '\ n'). A string that begins with an exclamation mark ('!') is recognized as a command. The command is given by the letter following the exclamation mark. Command arguments are appended as bytes in 2-digit hexadecimal directly after the command. The following commands can be used to set the NRF:
| Command | Description | Example | Example Description |
|---|---|---|---|
| c | set channel | !c2A | set channel to 0x2A (0x00 - 0x7F) |
| t | set TX address | !t7B271F1F1F | addresses are 5 bytes, LSB first |
| r | set RX address | !r41C355AA55 | addresses are 5 bytes, LSB first |
| s | set speed | !s02 | data rate (00:250kbps, 01:1Mbps, 02:2Mbps) |
Enter just the exclamation mark ('!') for the actual NRF settings to be printed in the serial monitor.
- in development...
The GNU Compiler Collection for RISC-V, Python3, and PyUSB must be installed on your system for compiling and flashing. On Linux (Debian-based), all of this can be done with the following commands:
sudo apt install build-essential libnewlib-dev gcc-riscv64-unknown-elf
sudo apt install python3 python3-pip
python3 -m pip install pyusb
On Linux you do not need to install a driver. However, by default Linux will not expose enough permission to upload your code with the USB bootloader. In order to fix this, open a terminal and run the following commands:
echo 'SUBSYSTEM=="usb", ATTR{idVendor}=="4348", ATTR{idProduct}=="55e0", MODE="666"' | sudo tee /etc/udev/rules.d/99-ch55x.rules
echo 'SUBSYSTEM=="usb", ATTR{idVendor}=="1a86", ATTR{idProduct}=="55e0", MODE="666"' | sudo tee -a /etc/udev/rules.d/99-ch55x.rules
sudo udevadm
The bootloader must be started manually for new uploads. To do this, the board must first be disconnected from the USB port. Now press the BOOT button and keep it pressed while reconnecting the board to the USB port of your PC. The chip now starts in bootloader mode, the BOOT button can be released and new firmware can be uploaded via USB within the next couple of seconds.
Open a terminal and navigate to the folder with the makefile. Run the following command to compile and upload:
make flash
If you want to just upload the pre-compiled binary, run the following command instead:
python3 ./tools/chprog.py nrf2cdc.bin
WCH offers the free but closed-source software WCHISPTool to upload firmware with Windows via the USB bootloader. Press the BOOT button and keep it pressed while connecting the board to the USB port of your PC. Release the BOOT button, open the .hex file in WCHISPTool and upload it to the microcontroller.
On Linux you do not need to install a CDC driver. On Windows you may need the Zadig tool to install the correct driver for the CDC device. Click "Options" and "List All Devices" to select the CDC device, then install the CDC driver.
- EasyEDA Design Files
- MCU Templates
- MCU Flash Tools
- CH32X033 Datasheets
- nRF24L01+ Datasheet
- ATtiny814 USB2NRF
- CH552G USB2NRF
- nRF24L01+ on Aliexpress

This work is licensed under Creative Commons Attribution-ShareAlike 3.0 Unported License. (http:https://creativecommons.org/licenses/by-sa/3.0/)