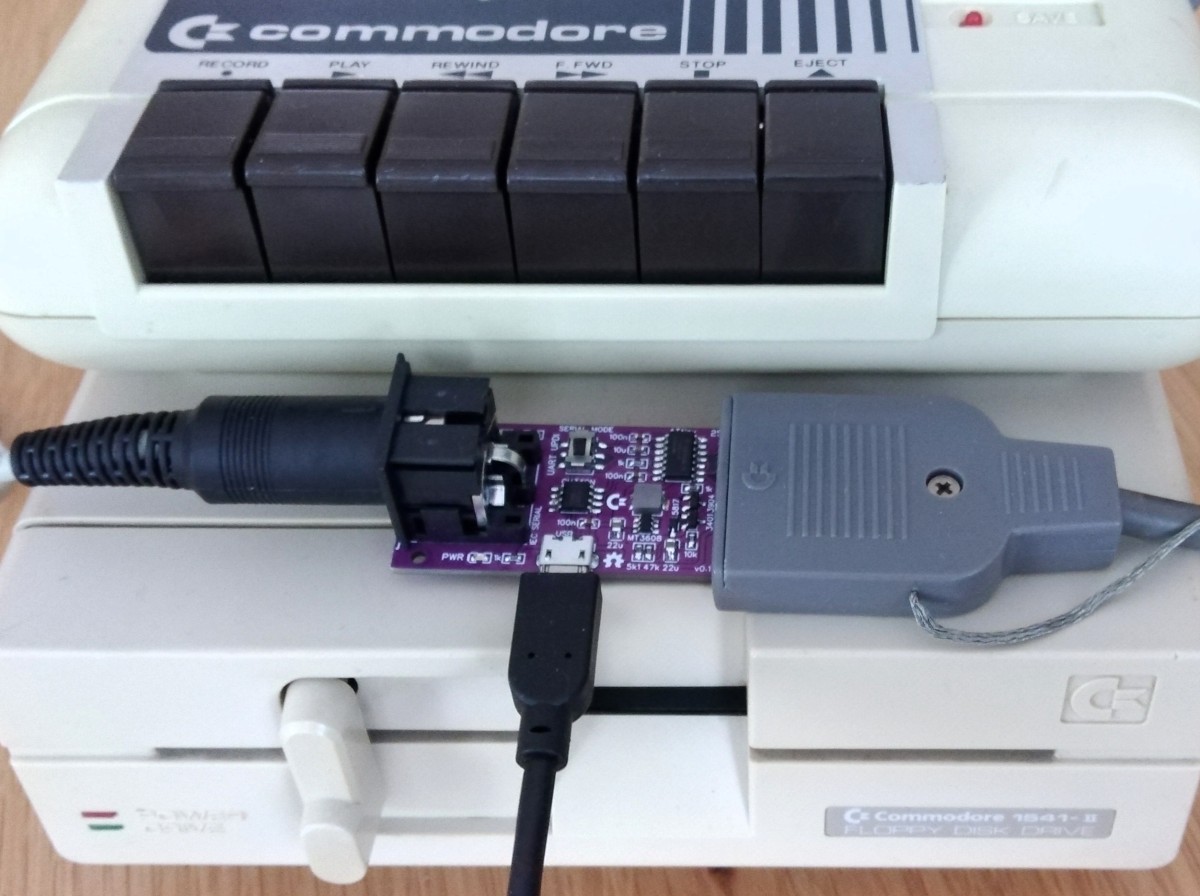
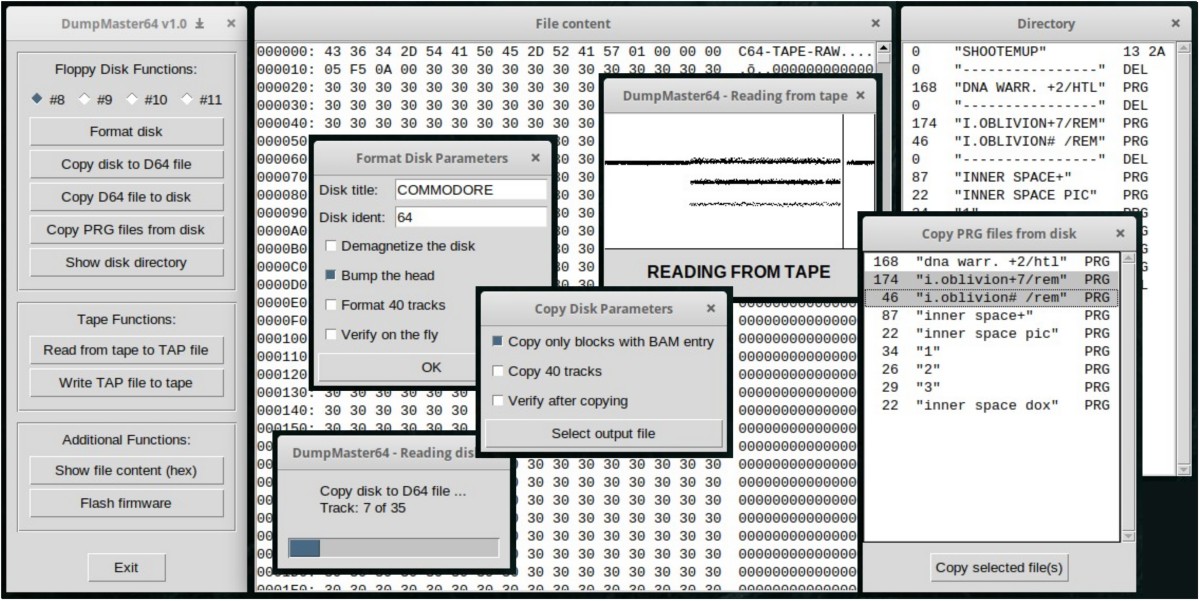
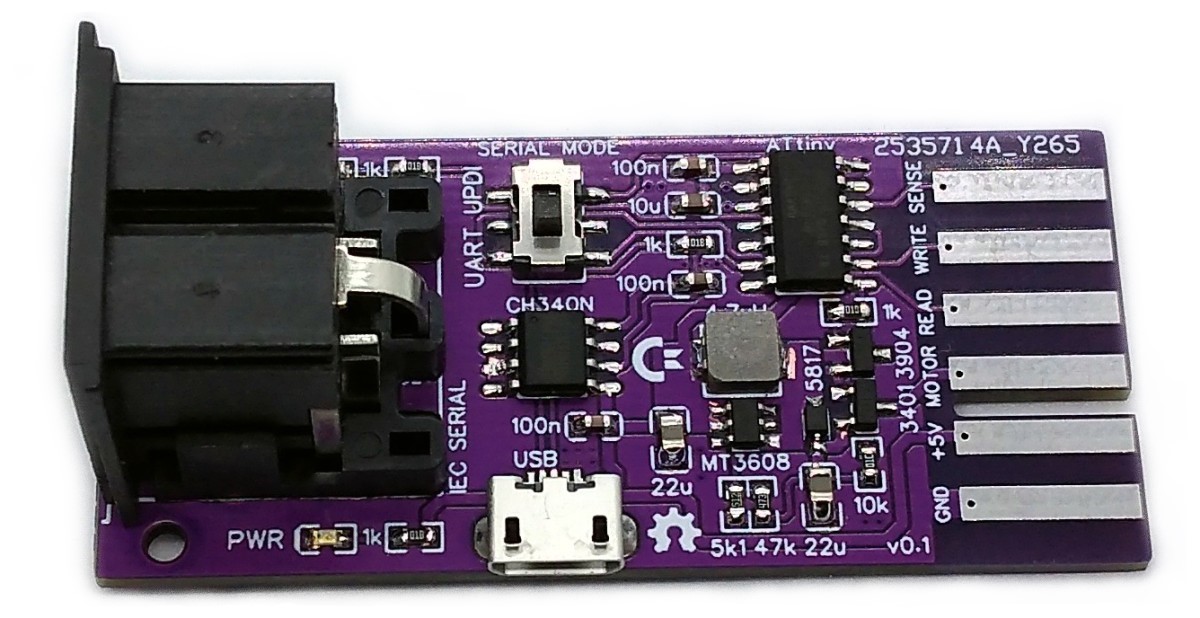
The DumpMaster64 adapter bridges the gap between your modern PC and your ancient mass storage devices for the Commodore C64. It can interface Commodore 1541(II) floppy disk drives as well as Commodore C2N/1530 Datasettes. It is a combination of the DiskBuddy64 and the TapeBuddy64. The DumpMaster64 is controlled via a command line interface or a graphical front end written in Python.
The DumpMaster64 is a proprietary interface. It does not turn the floppy disk drive or the Datasette into a standard USB mass storage device. Instead, it offers the ability to send low-level commands back and forth over USB. The provided Python scripts were developed to support this interface and can directly access the floppy disk drive and the contents of an inserted floppy disk or read from and write on tapes. Thanks to the integrated fast loader, the adapter reads or writes floppy disks at twelve times the normal speed, dumping an entire disk in about 32 seconds. DumpMaster64 cannot read or write copy-protected disks.
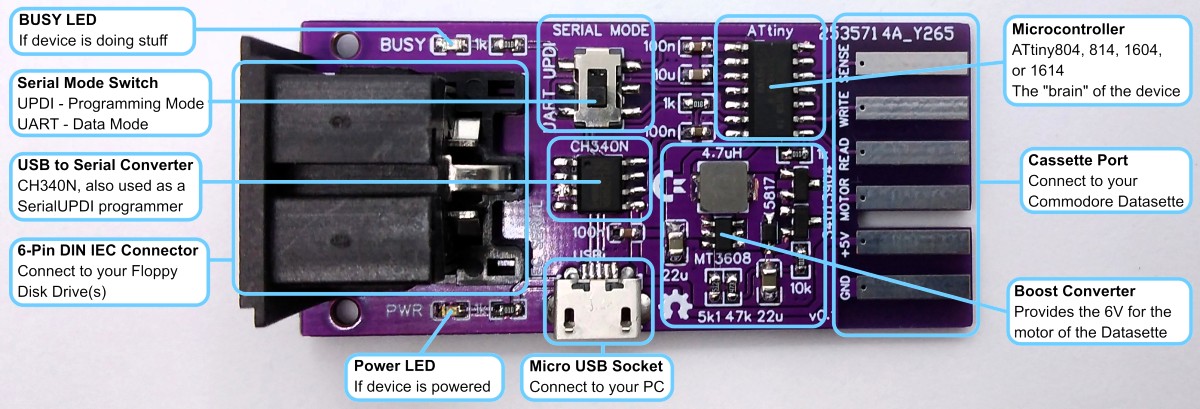
The integrated USB to serial converter can also be used as a SerialUPDI programmer for the on-board ATtiny microcontroller, so that no additional hardware is required to flash the firmware.
The schematic is shown below:
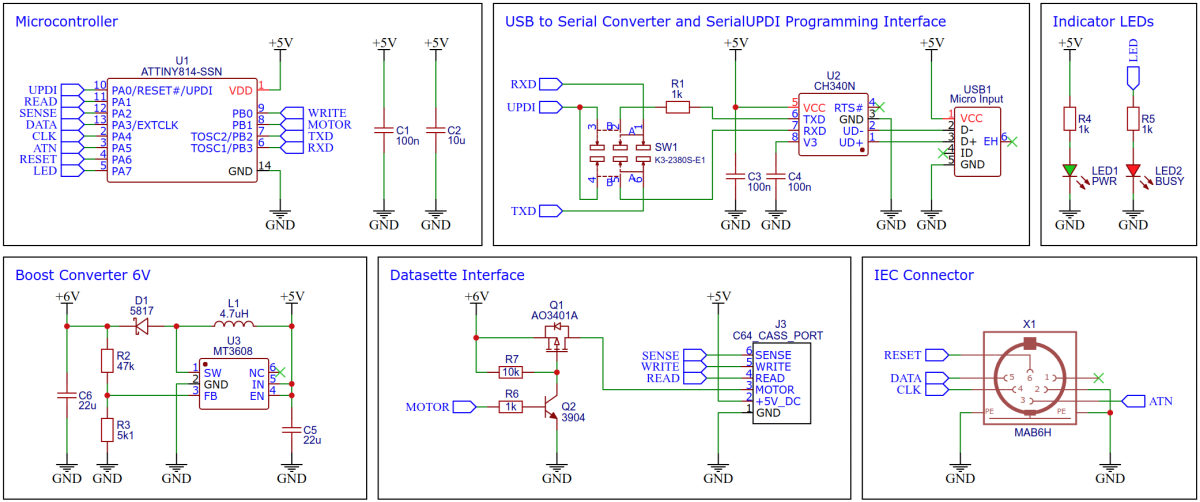
One of the (not quite so) new 14-pin tinyAVRs has been chosen for this project. It has enough pins, hardware UART and a timer/counter B (TCB), which is specially designed for CPU-independent frequency and pulse length measurements. Any of these MCUs can be used: ATtiny804, ATtiny814, ATtiny1604, or ATtiny1614. Don't buy them in China, they are much cheaper e.g. at Digikey (€0.68).
The CH340N (or CH330N) is now in use everywhere with me. At around €0.45 (if you buy 10 pieces) it is very cheap, fast, small, uncomplicated, reliable and hardly requires any external components (not even a crystal). It's probably the best choice for this small project too. And it is also used as a SerialUPDI programmer for the ATtiny.
In order to provide the approximately 6V for the motor of the Datasette, a boost converter based on the inexpensive MT3608 is installed on the board. Controlling the motor with 5V would certainly also be possible, but the reduced speed would then have to be compensated by software later. It is difficult to estimate what this would mean for the accuracy of the sampled data. The ATtiny can switch the motor on and off via a MOSFET.
The floppy disk drive is connected to the adapter via the 6-pin DIN jack. Alternatively, a serial cable can be soldered directly to the corresponding pads.
The cassette port is a 12-pin edge connector as part of the printed circuit board (PCB) with a spacing of 3.96mm, where 6 pins are on each sides (top and down) of the PCB. The opponent contacts are connected with each other, A with 1, B with 2, and so on. The connector of the datasette is pushed directly onto this port. A notch between B/2 and C/3 prevents accidental polarity reversal.
For a more detailed insight into how it works, refer to the TapeBuddy64 and DiskBuddy64 projects, since the DumpMaster64, to put it simply, is just a combination of both devices on a single board and in a single microcontroller.
- Set the serial mode switch on the device to "UPDI".
- Connect the device to a USB port of your PC.
- Use one of the following methods:
- Execute the respective Python script on your PC:
python dumpmaster-gui.py. - Click on Flash firmware.
- Execute the respective Python script on your PC:
python flash-firmware.py.
- Open your Arduino IDE.
- Make sure you have installed megaTinyCore.
- Go to Tools -> Board -> megaTinyCore and select ATtiny1614/1604/814/804/414/404/214/204.
- Go to Tools and choose the following board options:
- Chip: Select the chip you have installed on your device
- Clock: 16 MHz internal
- Programmer: SerialUPDI
- Leave the rest at the default settings.
- Go to Tools -> Burn Bootloader to burn the fuses.
- Open the DumpMaster64 sketch in the software/avr folder and click Upload.
- Make sure you have installed the latest avr-gcc toolchain.
- Open a terminal.
- Navigate to the folder with the makefile and the Arduino sketch.
- Run
DEVICE=attiny804 make installto compile, burn the fuses and upload the firmware (change DEVICE accordingly).
Python needs to be installed on your PC in order to use the software. Most Linux distributions already include this. Windows users can follow these instructions. In addition PySerial and Tkinter (8.6 or newer) must be installed. However, these are already included in most Python installations.
Windows users may also need to install a driver for the CH340N USB to serial adapter. This is not necessary for Linux or Mac users.
- Set the serial mode switch on your DumpMaster64 adapter to "UART".
- Connect the adapter to your Datasette and/or your floppy disk drive(s).
- Connect the adapter to a USB port of your PC.
- Switch on your floppy disk drive(s) if connected.
- Use the provided Python scripts in the software/pc/ folder on your PC.
- Execute the respective Python script on your PC:
python dumpmaster-gui.py. - The rest should be self explanatory.
The following command line tools are available:
python disk-detect.py
python disk-dir.py [-h] [-d {8,9,10,11}]

optional arguments:
-h, --help                  show help message and exit
-d, --device                device number of disk drive (8-11, default=8)
python disk-format.py [-h] [-x] [-n] [-c] [-v] [-d {8,9,10,11}] [-t TITLE] [-i IDENT]

optional arguments:
-h, --help                  show help message and exit
-x, --extend                format 40 tracks
-n, --nobump                do not bump head
-c, --clear                 clear (demagnetize) disk (recommended for new disks)
-v, --verify                verify each track after it is formatted
-d, --device                device number of disk drive (8-11, default=8)
-t TITLE, --title TITLE     disk title (max 16 characters, default=commodore)
-i IDENT, --ident IDENT     disk ident (2 characters, default=64)

Example: python disk-format.py -t games -i a7
python disk-read.py [-h] [-x] [-b] [-d {8,9,10,11}] [-i INTER] [-f FILE]

optional arguments:
-h, --help                    show help message and exit
-x, --extend                  read disk with 40 tracks
-b, --bamonly                 only read blocks with BAM entry (recommended)
-d, --device                  device number of disk drive (8-11, default=8)
-i INTER, --interleave INTER  sector interleave (default=4)
-f FILE, --file FILE          output file (default=output.d64)

Example: python disk-read.py -b -f game.d64
python disk-write.py [-h] [-b] [-d {8,9,10,11}] [-i INTER] -f FILE

optional arguments:
-h, --help                    show help message and exit
-b, --bamonly                 only write blocks with BAM entry (recommended)
-d, --device                  device number of disk drive (8-11, default=8)
-i INTER, --interleave INTER  sector interleave (default=4)
-f FILE, --file FILE          input file (*.d64)

Example: python disk-write.py -b -f game.d64
python disk-verify.py [-h] [-b] [-d {8,9,10,11}] [-i INTER] [-e ERRORS] -f FILE

optional arguments:
-h, --help                    show help message and exit
-b, --bamonly                 only verify blocks with BAM entry (recommended)
-d, --device                  device number of disk drive (8-11, default=8)
-i INTER, --interleave INTER  sector interleave (default=4)
-e ERRORS, --errors ERRORS    tolerated errors until abort (default=0)
-f FILE, --file FILE          d64 file to compare the disk with

Example: python disk-verify.py -b -f game.d64
python disk-load.py [-h] [-d {8,9,10,11}]

optional arguments:
-h, --help            show help message and exit
-d, --device          device number of disk drive (8-11, default=8)
python tape-read.py FILE

Example: python tape-read.py outputfile.tap
python tape-write.py FILE

Example: python tape-write.py inputfile.tap
python flash-firmware.py
| LED | Description |
|---|---|
| PWR | Steady: device is powered via USB |
| BUSY | Steady: device is accessing a disk or cassette Flashing: device waits for the prompted key on the Datasette being pressed |
There are numerous applications to create and modify D64 image files and add or delete PRG files yourself. The whole thing is very quick and easy, for example with WebDrive on cbm8bit.com. As a web application, it is platform-independent and requires no installation. In addition, you can even visualize the image of the diskette - very cool!
If you are looking for a command line tool for working with D64 files, cc1541 is a good choice.
The TAP files generated by DumpMaster64 can be used directly in your favorite emulator or with the Tapuino, but perhaps you want to check it beforehand, optimize it or convert it into another format. This works perfectly with the command line tool TAPClean. To check the quality of the generated TAP image, use the following command:
tapclean -t outputfile.tap
Remember, a TAP file is almost never 100% clean, as pauses in particular are not always correctly recognized. You can optimize the quality of the file with the following command:
tapclean -o outputfile.tap
Slight deviations in the pulse lengths are compensated for and everything is adapted to the exact timing specifications. TAPClean not only knows the required pulse lengths of the standard Commodore coding, but also those of all common fast loaders.
If you want to convert the TAP file into a WAV audio file, then use the following command:
tapclean -wav outputfile.tap
There is also a graphical front end for TAPClean.
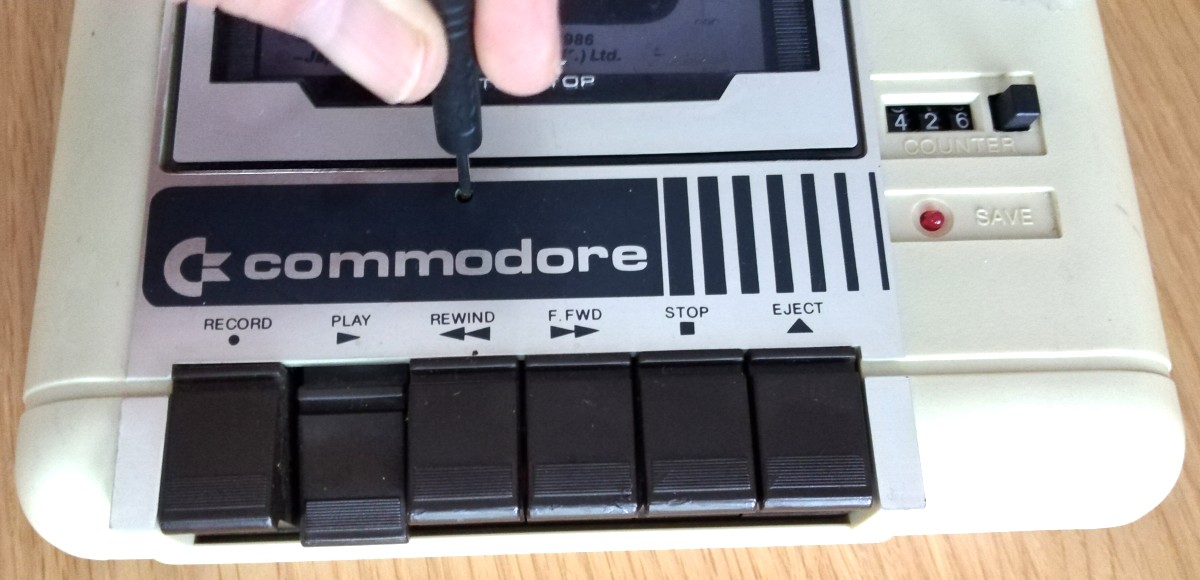
If you have problems loading programs from tape, the azimuth of the tape head may be out of position. Before setting the azimuth, however, all other causes of error should be ruled out. Try other cassettes first, as the tapes will age over time and the signals will weaken. Also clean the connector contacts with contact cleaner and the read head with isopropyl alcohol. If it still doesn't work, it's time for the screwdriver.
To make the azimuth setting, there is a tiny screw hole above the rewind button through which a small jeweler's screwdriver can fit. When the tape drive is playing, the hole will align with the head adjustment screw. Don't put too much pressure on and avoid over-tightening or over-loosening the screw! Follow these steps:
- Insert a cassette into the Datasette that you know is working well.
- Execute
python dumpmaster-gui.py - Select "Read from tape to TAP file", then select the output file. You can delete it later.
- Press PLAY on the Datasette when promted.
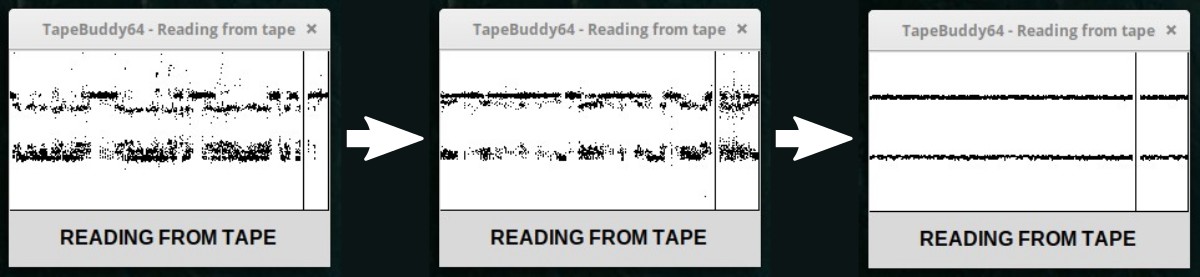
- As soon as the pulse lines are displayed, take a thin screwdriver and slowly adjust the azimuth until the displayed lines are as narrow as possible.
- DiskBuddy64 Project
- TapeBuddy64 Project
- SD2IEC Project
- XU1541 Project
- Tapuino Project
- Immers/Neufeld/Moser: D64 File Format
- Schepers/Sundell/Brenner: TAP File Format
- Michael Steil: Commodore Peripheral Bus
- Michael Steil: A 256 Byte Autostart Fast Loader
- Michael Steil: Ultimate Commodore 1541 Drive Talk
- Jim Butterfield: How The VIC/64 Serial Bus Works
- J. Derogee: IEC disected
- Harrie De Ceukelaire: How TurboTape Works
- Luigi Di Fraia: Analyzing C64 Tape Loaders
- Michael Steil: Archiving C64 Tapes Correctly
- OpenCBM Software
- cc1541 Software
- cbm8bit WebDrive
- TAPClean Software
- TAPClean Front End
- CBM: 1540/1541 Service Manual
- CBM: Datasette Service Manual
- Microchip: ATtiny Datasheet
- WCH: CH340N Datasheet
- AeroSemi: MT3608 Datasheet

This work is licensed under Creative Commons Attribution-ShareAlike 3.0 Unported License. (http:https://creativecommons.org/licenses/by-sa/3.0/)