- ⬆ NGINX Basics
If you compile NGINX with default parameters all files and directories are available from
/usr/local/nginxlocation.
For upstream NGINX packaging paths can be as follows (it depends on the type of system/distribution):
-
/etc/nginx- is the default configuration root for the NGINX service- other locations:
/usr/local/etc/nginx,/usr/local/nginx/conf
- other locations:
-
/etc/nginx/nginx.conf- is the default configuration entry point used by the NGINX services, includes the top-level http block and all other configuration contexts and files- other locations:
/usr/local/etc/nginx/nginx.conf,/usr/local/nginx/conf/nginx.conf
- other locations:
-
/usr/share/nginx- is the default root directory for requests, containshtmldirectory and basic static files- other locations:
html/in root directory
- other locations:
-
/var/log/nginx- is the default log (access and error log) location for NGINX- other locations:
logs/in root directory
- other locations:
-
/var/cache/nginx- is the default temporary files location for NGINX- other locations:
/var/lib/nginx
- other locations:
-
/etc/nginx/conf- contains custom/vhosts configuration files- other locations:
/etc/nginx/conf.d,/etc/nginx/sites-enabled(I can't stand this debian-like convention...)
- other locations:
-
/var/run/nginx- contains information about NGINX process(es)- other locations:
/usr/local/nginx/logs,logs/in root directory
- other locations:
🔖 Use reload option to change configurations on the fly - Base Rules - P2
nginx -h- shows the helpnginx -v- shows the NGINX versionnginx -V- shows the extended information about NGINX: version, build parameters, and configuration argumentsnginx -t- tests the NGINX configurationnginx -c <filename>- sets configuration file (default:/etc/nginx/nginx.conf)nginx -p <directory>- sets prefix path (default:/etc/nginx/)nginx -T- tests the NGINX configuration and prints the validated configuration on the screennginx -s <signal>- sends a signal to the NGINX master process:stop- discontinues the NGINX process immediatelyquit- stops the NGINX process after it finishes processing inflight requestsreload- reloads the configuration without stopping processesreopen- instructs NGINX to reopen log files
nginx -g <directive>- sets global directives out of configuration file
Some useful snippets for management of the NGINX daemon:
-
testing configuration:
/usr/sbin/nginx -t -c /etc/nginx/nginx.conf
/usr/sbin/nginx -t -q -g 'daemon on; master_process on;' # ; echo $?
-
starting daemon:
/usr/sbin/nginx -g 'daemon on; master_process on;'

service nginx start
systemctl start nginx

/usr/local/etc/rc.d/nginx start

# You can also start NGINX from start-stop-daemon script:
/sbin/start-stop-daemon --quiet --start --exec /usr/sbin/nginx --background --retry QUIT/5 --pidfile /run/nginx.pid
-
stopping daemon:
/usr/sbin/nginx -s quit     # graceful shutdown (waiting for the worker processes to finish serving current requests)
/usr/sbin/nginx -s stop     # fast shutdown (kill connections immediately)

service nginx stop
systemctl stop nginx

/usr/local/etc/rc.d/nginx stop

# You can also stop NGINX from start-stop-daemon script:
/sbin/start-stop-daemon --quiet --stop --retry QUIT/5 --pidfile /run/nginx.pid
-
reloading daemon:
/usr/sbin/nginx -g 'daemon on; master_process on;' -s reload

service nginx reload
systemctl reload nginx

kill -HUP $(cat /var/run/nginx.pid)
kill -HUP $(pgrep -f "nginx: master")
-
restarting daemon:
service nginx restart
systemctl restart nginx

/usr/local/etc/rc.d/nginx restart
🔖 Organising Nginx configuration - Base Rules - P2
🔖 Format, prettify and indent your Nginx code - Base Rules - P2
NGINX uses a micro programming language in the configuration files. This language's design is heavily influenced by Perl and Bourne Shell. For me NGINX configuration has a simple and very transparent structure.
NGINX configuration files don't support comment blocks, they only accept # at the beginning of a line for a comment.
Lines containing directives must end with a ; or NGINX will fail to load the configuration and report an error.
Variables start with $. Some modules introduce variables can be used when setting directives.
There are some directives that do not support variables, e.g.
access_logorerror_log.
To assign value to the variable you should use a set directive:
set $var "value";See
if,break, andsetsection to learn more about variables.
Some interesting things about variables:
Make sure to read the agentzh's Nginx Tutorials - it's about NGINX tips & tricks. This guy is a Guru and creator of the OpenResty. In these tutorials he describes, amongst other things, variables in great detail. I also recommend nginx built-in variables.
- the most variables in NGINX only exist at runtime, not during configuration time
- the scope of variables spreads out all over configuration
- variable assignment occurs when requests are actually being served
- variable have exactly the same lifetime as the corresponding request
- each request does have its own version of all those variables' containers (different containers values)
- requests do not interfere with each other even if they are referencing a variable with the same name
- the assignment operation is only performed in requests that access location
Strings may be inputted without quotes unless they include blank spaces, semicolons or curly braces, then they need to be escaped with backslashes or enclosed in single/double quotes.
Quotes are required for values which are containing space(s) and/or some other special characters, otherwise NGINX will not recognize them. You can either quote or \-escape some special characters like " " or ";" in strings (characters that would make the meaning of a statement ambiguous). So the following instructions are the same:
# 1)
add_header X-Header "nginx web server;";

# 2)
add_header X-Header nginx\ web\ server\;;
Variables in quoted strings are expanded normally unless the $ is escaped.
Read this great article about the NGINX configuration inheritance model by Martin Fjordvald.
Configuration options are called directives. We have four types of directives:
-
standard directive - one value per context:
worker_connections 512;
-
array directive - multiple values per context:
error_log /var/log/nginx/localhost/localhost-error.log warn;
-
action directive - something which does not just configure:
rewrite ^(.*)$ /msie/$1 break;
-
try_filesdirective:try_files $uri $uri/ /test/index.html;
Directives are organised into groups known as blocks or contexts. Generally, context is a block directive that can have other directives inside braces. It appears to be organised in a tree-like structure, defined by sets of brackets - { and }.
As a general rule, if a directive is valid in multiple nested scopes, a declaration in a broader context will be passed on to any child contexts as default values. The children contexts can override these values at will.
Directives placed in the configuration file outside of any contexts are considered to be in the global/main context.
Directives can only be used in the contexts that they were designed for. NGINX will error out on reading a configuration file with directives that are declared in the wrong context.
If you want to review all directives see alphabetical index of directives.
Contexts can be layered within one another (a level of inheritance). Their structure looks like this:
Global/Main Context
        |
        |
        +-----» Events Context
        |
        |
        +-----» HTTP Context
        |          |
        |          |
        |          +-----» Server Context
        |          |          |
        |          |          |
        |          |          +-----» Location Context
        |          |
        |          |
        |          +-----» Upstream Context
        |
        |
        +-----» Mail Context
NGINX also provides other contexts (mainly used for mapping) such as:
-
map- is used to set the value of a variable depending on the value of another variable. It provides a mapping of one variable’s values to determine what the second variable should be set to -
geo- is used to specify a mapping. However, this mapping is specifically used to categorize client IP addresses. It sets the value of a variable depending on the connecting IP address -
types- is used to map MIME types to the file extensions that should be associated with them -
if- provide conditional processing of directives defined within, execute the instructions contained if a given test returnstrue -
limit_except- is used to restrict the use of certain HTTP methods within a location context
Also look at the graphic below. It presents the most important contexts with reference to the configuration:

NGINX lookup starts from the http block, then through one or more server blocks, followed by the location block(s).
include directive may appear inside any contexts to perform conditional inclusion. It attaching another file, or files matching the specified mask:
include /etc/nginx/proxy.conf;Sizes can be specified in:
korK: KilobytesmorM: MegabytesgorG: Gigabytes
client_max_body_size 2M;Time intervals can be specified in:
ms: Millisecondss: Seconds (default, without a suffix)m: Minutesh: Hoursd: Daysw: WeeksM: Months (30 days)y: Years (365 days)
proxy_read_timeout 20s;🔖 Enable PCRE JIT to speed up processing of regular expressions - Performance - P1
Before start reading next chapters you should know what regular expressions are and how they works (they are not a black magic really). I recommend two great and short write-ups about regular expressions created by Jonny Fox:
Why? Regular expressions can be used in both the server_name and location (also in other) directives, and sometimes you must have a great skills of reading them. I think you should create the most readable regular expressions that do not become spaghetti code - impossible to debug and maintain.
NGINX uses the PCRE library to perform complex manipulations with your location blocks and use the powerful rewrite and return directives. Below is something interesting:
- Learn PCRE in Y minutes
- PCRE Regex Cheatsheet
- Regular Expression Cheat Sheet - PCRE
- Regex cheatsheet
- Regular expressions in Perl
- Regexp Security Cheatsheet
You can also use external tools for testing regular expressions. For more please see online tools chapter.
If you're good at it, check these very nice and brainstorming regex challenges:
# 1) Download vim plugin for NGINX:

# Official NGINX vim plugin:
mkdir -p ~/.vim/syntax/

wget "http:https://www.vim.org/scripts/download_script.php?src_id=19394" -O ~/.vim/syntax/nginx.vim

# Improved NGINX vim plugin (incl. syntax highlighting) with Pathogen:
mkdir -p ~/.vim/{autoload,bundle}/

curl -LSso ~/.vim/autoload/pathogen.vim https://tpo.pe/pathogen.vim
echo -en "\nexecute pathogen#infect()\n" >> ~/.vimrc

git clone https://github.com/chr4/nginx.vim ~/.vim/bundle/nginx.vim

# 2) Set location of NGINX config files:
cat > ~/.vim/filetype.vim << __EOF__
au BufRead,BufNewFile /etc/nginx/*,/etc/nginx/conf.d/*,/usr/local/nginx/conf/*,*/conf/nginx.conf if &ft == '' | setfiletype nginx | endif
__EOF__
It may be interesting for you: Highlight insecure SSL configuration in Vim.
Install cabal - system for building and packaging Haskell libraries and programs (on Ubuntu):
add-apt-repository -y ppa:hvr/ghc
apt-get update

apt-get install -y cabal-install-1.22 ghc-7.10.2

# Add this to the main configuration file of your shell:
export PATH=$HOME/.cabal/bin:/opt/cabal/1.22/bin:/opt/ghc/7.10.2/bin:$PATH
source $HOME/.<shellrc>

cabal update-
nginx-lint:git clone https://github.com/temoto/nginx-lint cd nginx-lint && cabal install --global
-
sublime-nginx+SublimeLinter-contrib-nginx-lint:Bring up the Command Palette and type
install. Among the commands you should see Package Control: Install Package. Typenginxto install sublime-nginx and after that do the above again for install SublimeLinter-contrib-nginx-lint: typeSublimeLinter-contrib-nginx-lint.
🔖 Adjust worker processes - Performance - P3
🔖 Disable daemon, master process, and all workers except one - Debugging - P4
NGINX has one master process and one or more worker processes.
The main purposes of the master process is to read and evaluate configuration files, as well as maintain the worker processes (respawn when a worker dies), handle signals, notify workers, opens log files, and, of course binding to ports.
Master process should be started as root user, because this will allow NGINX to open sockets below 1024 (it needs to be able to listen on port 80 for HTTP and 443 for HTTPS).
The worker processes do the actual processing of requests and get commands from master process. They runs in an event loop (registering events and responding when one occurs), handle network connections, read and write content to disk, and communicate with upstream servers. These are spawned by the master process, and the user and group will as specified (unprivileged).
NGINX has also cache loader and cache manager processes but only if you enable caching.
The following signals can be sent to the NGINX master process:
| SIGNAL | NUM | DESCRIPTION |
|---|---|---|
TERM, INT |
15, 2 | quick shutdown |
QUIT |
3 | graceful shutdown |
KILL |
9 | halts a stubborn process |
HUP |
1 | configuration reload, start new workers, gracefully shutdown the old worker processes |
USR1 |
10 | reopen the log files |
USR2 |
12 | upgrade executable on the fly |
WINCH |
28 | gracefully shutdown the worker processes |
There’s no need to control the worker processes yourself. However, they support some signals too:
| SIGNAL | NUM | DESCRIPTION |
|---|---|---|
TERM, INT |
15, 2 | quick shutdown |
QUIT |
3 | graceful shutdown |
USR1 |
10 | reopen the log files |
NGINX supports a variety of connection processing methods which depends on the platform used.
In general there are four types of event multiplexing:
select- is anachronism and not recommended but installed on all platforms as a fallbackpoll- is anachronism and not recommended
And the most efficient implementations of non-blocking I/O:
epoll- recommend if you're using GNU/Linuxkqueue- recommend if you're using BSD (is technically superior toepoll)
There are also great resources (also makes comparisons) about them:
- Kqueue: A generic and scalable event notification facility
- poll vs select vs event-based
- select/poll/epoll: practical difference for system architects
- Scalable Event Multiplexing: epoll vs. kqueue
- Async IO on Linux: select, poll, and epoll
- A brief history of select(2)
- Select is fundamentally broken
- Epoll is fundamentally broken
- I/O Multiplexing using epoll and kqueue System Calls
- Benchmarking BSD and Linux
- The C10K problem
Look also at libevent benchmark (read about libevent – an event notification library):
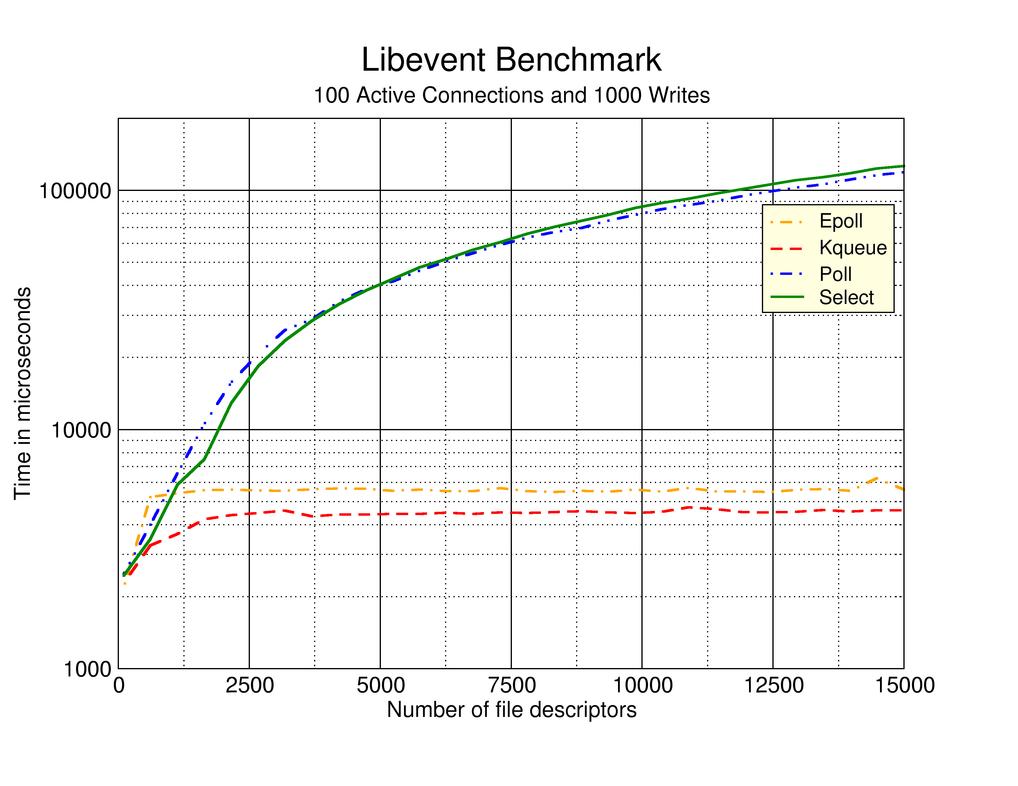
This infographic comes from daemonforums - An interesting benchmark (kqueue vs. epoll).
You may also view why big players use NGINX on FreeBSD instead of on GNU/Linux:
Thread Pools in NGINX Boost Performance 9x! - this official article is an amazing explanation about thread pools and generally about handling connections. I also recommend Inside NGINX: How We Designed for Performance & Scale. Both are really great.
NGINX uses Event-Driven architecture which heavily relies on Non-Blocking I/O. One advantage of non-blocking/asynchronous operations is that you can maximize the usage of a single CPU as well as memory because is that your thread can continue it's work in parallel.
There is a perfectly good and brief summary about non-blocking I/O and multi-threaded blocking I/O by Werner Henze.
Look what the official documentation says about it:
It’s well known that NGINX uses an asynchronous, event‑driven approach to handling connections. This means that instead of creating another dedicated process or thread for each request (like servers with a traditional architecture), it handles multiple connections and requests in one worker process. To achieve this, NGINX works with sockets in a non‑blocking mode and uses efficient methods such as epoll and kqueue.
Because the number of full‑weight processes is small (usually only one per CPU core) and constant, much less memory is consumed and CPU cycles aren’t wasted on task switching. The advantages of such an approach are well‑known through the example of NGINX itself. It successfully handles millions of simultaneous requests and scales very well.
I must not forget to mention here about Non-Blocking and 3rd party modules (from official documentation):
Unfortunately, many third‑party modules use blocking calls, and users (and sometimes even the developers of the modules) aren’t aware of the drawbacks. Blocking operations can ruin NGINX performance and must be avoided at all costs.
To handle concurrent requests with a single worker process NGINX uses the reactor design pattern. Basically, it's a single-threaded but it can fork several processes to utilize multiple cores.
However, NGINX is not a single threaded application. Each of worker processes is single-threaded and can handle thousands of concurrent connections. NGINX does not create a new process/thread for each connection/requests but it starts several worker threads during start. It does this asynchronously with one thread, rather than using multi-threaded programming (it uses an event loop with asynchronous I/O).
That way, the I/O and network operations are not a very big bottleneck (remember that your CPU would spend a lot of time waiting for your network interfaces, for example). This results from the fact that NGINX only use one thread to service all requests. When requests arrive at the server, they are serviced one at a time. However, when the code serviced needs other thing to do it sends the callback to the other queue and the main thread will continue running (it doesn't wait).
Now you see why NGINX can handle a large amount of requests perfectly well (and without any problems).
For more information take a look at following resources:
- Asynchronous, Non-Blocking I/O
- Asynchronous programming. Blocking I/O and non-blocking I/O
- About High Concurrency, NGINX architecture and internals
- A little holiday present: 10,000 reqs/sec with Nginx!
- Nginx vs Apache: Is it fast, if yes, why?
- How is Nginx handling its requests in terms of tasks or threading?
- Why nginx is faster than Apache, and why you needn’t necessarily care
NGINX uses only asynchronous I/O, which makes blocking a non-issue. The only reason NGINX uses multiple processes is to make full use of multi-core, multi-CPU, and hyper-threading systems. NGINX requires only enough worker processes to get the full benefit of symmetric multiprocessing (SMP).
From official documentation:
The NGINX configuration recommended in most cases - running one worker process per CPU core - makes the most efficient use of hardware resources.
NGINX uses a custom event loop which was designed specifically for NGINX - all connections are processed in a highly efficient run-loop in a limited number of single-threaded processes called workers.
Multiplexing works by using a loop to increment through a program chunk by chunk operating on one piece of data/new connection/whatever per connection/object per loop iteration. It is all based on events multiplexing like epoll(), kqueue(), or select(). Within each worker NGINX can handle many thousands of concurrent connections and requests per second.
See Nginx Internals presentation as a lot of great stuff about the internals of NGINX.
NGINX does not fork a process or thread per connection (like Apache) so memory usage is very conservative and extremely efficient in the vast majority of cases. NGINX is a faster and consumes less memory than Apache. It is also very friendly for CPU because there's no ongoing create-destroy pattern for processes or threads.
Finally and in summary:
- uses Non-Blocking "Event-Driven" architecture
- uses the single-threaded reactor pattern to handle concurrent requests
- uses highly efficient loop for connection processing
- is not a single threaded application because it starts multiple worker processes (to handle multiple connections and requests) during start
Okay, so how many simultaneous connections can be processed by NGINX?
worker_processes * worker_connections = max connections
According to this: if you are running 4 worker processes with 4,096 worker connections per worker, you will be able to serve 16,384 connections. Of course, these are the NGINX settings limited by the kernel (number of connections, number of open files, or number of processes).
At this point, I would like to mention about Understanding socket and port in TCP. It is a great and short explanation. I also recommend to read Theoretical maximum number of open TCP connections that a modern Linux box can have.
I've seen some admins does directly translate the sum of worker_processes and worker_connections into the number of clients that can be served simultaneously. In my opinion, it is a mistake because certain of clients (e.g. browsers) opens a number of parallel connections (see this to confirm my words). Clients typically establish 4-8 TCP connections so that they can download resources in parallel (to download various components that compose a web page, for example, images, scripts, and so on). This increases the effective bandwidth and reduces latency.
Additionally, you must know that the worker_connections directive includes all connections per worker (e.g. connection structures are used for listen sockets, internal control sockets between NGINX processes, connections with proxied servers, and for upstream connections), not only incoming connections from clients.
Be aware that every worker connection (in the sleeping state) needs 256 bytes of memory, so you can increase it easily.
The number of connections is especially limited by the maximum number of open files (RLIMIT_NOFILE) on your system. The reason is that the operating system needs memory to manage each open file, and memory is a limited resource. This limitation only affects the limits for the current process. The limits of the current process are bequeathed to children processes too, but each process has a separate count.
To change the limit of the maximum file descriptors (that can be opened by a single worker process) you can also edit the worker_rlimit_nofile directive. With this, NGINX provides very powerful dynamic configuration capabilities with no service restarts.
The number of file descriptors is not the only one limitation of the number of connections - remember also about the kernel network (TCP/IP stack) parameters and the maximum number of processes.
I don't like this piece of the NGINX documentation. Maybe I'm missing something but it says the worker_rlimit_nofile is a limit on the maximum number of open files for worker processes. I believe it is associated to a single worker process.
If you set RLIMIT_NOFILE to 25,000 and worker_rlimit_nofile to 12,000, NGINX sets (only for workers) the maximum open files limit as a worker_rlimit_nofile. But the master process will have a set value of RLIMIT_NOFILE. Default value of worker_rlimit_nofile directive is none so by default NGINX sets the initial value of maximum open files from the system limits.
grep "LimitNOFILE" /lib/systemd/system/nginx.service
LimitNOFILE=5000

grep "worker_rlimit_nofile" /etc/nginx/nginx.conf
worker_rlimit_nofile 256;

   PID       SOFT HARD
 24430       5000 5000
 24431        256 256
 24432        256 256
 24433        256 256
 24434        256 256
This is also controlled by the OS because the worker is not the only process running on the machine. It would be very bad if your workers used up all of the file descriptors available to all processes, don't set your limits so that is possible.
In my opinion, relying on the RLIMIT_NOFILE than worker_rlimit_nofile value is more understandable and predictable. To be honest, it doesn't really matter which method is used to set, but you should keep a constant eye on the priority of the limits.
If you don't set the
worker_rlimit_nofiledirective manually, then the OS settings will determine how many file descriptors can be used by NGINX.
I think that the chance of running out of file descriptors is minimal, but it might be a big problem on a high traffic websites.
Ok, so how many fds are opens by NGINX?
- one file handler for the client's active connection
- one file handler for the proxied connection (that will open a socket handling these requests to remote or local host/process)
- one file handler for opening file (e.g. static file)
- other file handlers for internal connections, shared libraries, log files, and sockets
Also important is:
NGINX can use up to two file descriptors per full-fledged connection.
Look also at these diagrams:
-
1 file handler for connection with client and 1 file handler for static file being served by NGINX:
# 1 connection, 2 file handlers +-----------------+ +----------+ | | | | 1 | | | CLIENT <---------------> NGINX | | | | ^ | +----------+ | | | | 2 | | | | | | | | | +------v------+ | | | STATIC FILE | | | +-------------+ | +-----------------+ -
1 file handler for connection with client and 1 file handler for a open socket to the remote or local host/process:
# 2 connections, 2 file handlers +-----------------+ +----------+ | | +-----------+ | | 1 | | 2 | | | CLIENT <---------------> NGINX <---------------> BACKEND | | | | | | | +----------+ | | +-----------+ +-----------------+ -
2 file handlers for two simultaneous connections from the same client (1, 4), 1 file handler for connection with other client (3), 2 file handlers for static files (2, 5), and 1 file handler for a open socket to the remote or local host/process (6), so in total it is 6 file descriptors:
# 4 connections, 6 file handlers

                  4
      +-----------------------+
      |              +--------|--------+
+-----v----+         |        |        |
|          |    1    |        v        |  6
|  CLIENT <-----+---------> NGINX <---------------+
|          |    |    |        ^        |    +-----v-----+
+----------+    |    |        |        |    |           |
              3 |    |      2 | 5      |    |  BACKEND  |
+----------+    |    |        |        |    |           |
|          |    |    |        |        |    +-----------+
|  CLIENT  <----+    | +------v------+ |
|          |         | | STATIC FILE | |
+----------+         | +-------------+ |
                     +-----------------+
In the first two examples: we can take that NGINX needs 2 file handlers for full-fledged connection (but still uses 2 worker connections). In the third example NGINX can take still 2 file handlers for every full-fledged connection (also if client uses parallel connections).
So, to conclude, I think that the correct value of worker_rlimit_nofile per all connections of worker should be greater than worker_connections.
In my opinion, the safe value of worker_rlimit_nofile (and system limits) is:
# 1 file handler for 1 connection:
worker_connections + (shared libs, log files, event pool etc.) = worker_rlimit_nofile

# 2 file handlers for 1 connection:
(worker_connections * 2) + (shared libs, log files, event pool etc.) = worker_rlimit_nofile
That is probably how many files can be opened by each worker and should have a value greater than to the number of connections per worker (according to the above formula).
In the most articles and tutorials we can see that this parameter has a value similar to the maximum number (or even more) of all open files by the NGINX. If we assume that this parameter applies to each worker separately these values are altogether excessive.
However, after a deeper reflection they are rational because they allow one worker to use all the file descriptors so that they are not confined to other workers if something happens to them. Remember though that we are still limited by the connections per worker. May I remind you that any connection opens at least one file.
So, moving on, the maximum number of open files by the NGINX should be:
(worker_processes * worker_connections * 2) + (shared libs, log files, event pool) = max open files
To serve 16,384 connections by all workers (4,096 connections for each worker), and bearing in mind about the other handlers used by NGINX, a reasonably value of max files handlers in this case may be 35,000. I think it's more than enough.
Given the above to change/improve the limitations you should:
-
Edit the maximum, total, global number of file descriptors the kernel will allocate before choking (this step is optional, I think you should change this only for a very very high traffic):
# Find out the system-wide maximum number of file handles:
sysctl fs.file-max

# Shows the current number of all file descriptors in kernel memory:
#   first value:  <allocated file handles>
#  second value:  <unused-but-allocated file handles>
#   third value:  <the system-wide maximum number of file handles> # fs.file-max
sysctl fs.file-nr

# Set it manually and temporarily:
sysctl -w fs.file-max=150000

# Set it permanently:
echo "fs.file-max = 150000" > /etc/sysctl.d/99-fs.conf

# And load new values of kernel parameters:
sysctl -p       # for /etc/sysctl.conf
sysctl --system # for /etc/sysctl.conf and all of the system configuration files
-
Edit the system-wide value of the maximum file descriptor number that can be opened by a single process:
-
for non-systemd systems:
# Set the maximum number of file descriptors for the users logged in via PAM:
#   /etc/security/limits.conf
nginx       soft    nofile    35000
nginx       hard    nofile    35000
-
for systemd systems:
# Set the maximum number (hard limit) of file descriptors for the services started via systemd:
#   /etc/systemd/system.conf          - global config (default values for all units)
#   /etc/systemd/user.conf            - this specifies further per-user restrictions
#   /lib/systemd/system/nginx.service - default unit for the NGINX service
#   /etc/systemd/system/nginx.service - for your own instance of the NGINX service
[Service]
# ...
LimitNOFILE=35000

# Reload a unit file and restart the NGINX service:
systemctl daemon-reload && systemct restart nginx
-
-
Adjusts the system limit on number of open files for the NGINX worker. The maximum value can not be greater than
LimitNOFILE(in this example: 35,000). You can change it at any time:# Set the limit for file descriptors for a single worker process (change it as needed): # nginx.conf within the main context worker_rlimit_nofile 10000; # You need to reload the NGINX service: nginx -s reload
To show the current hard and soft limits applying to the NGINX processes (with nofile, LimitNOFILE, or worker_rlimit_nofile):
for _pid in $(pgrep -f "nginx: [master,worker]") ; do

  echo -en "$_pid "
  grep "Max open files" /proc/${_pid}/limits | awk '{print $4" "$5}'

done | xargs printf '%6s %10s\t%s\n%6s %10s\t%s\n' "PID" "SOFT" "HARD"
To list the current open file descriptors for each NGINX process:
for _pid in $(pgrep -f "nginx: [master,worker]") ; do

  _fds=$(find /proc/${_pid}/fd/*)
  _fds_num=$(echo "$_fds" | wc -l)

  echo -en "\n\n##### PID: $_pid ($_fds_num fds) #####\n\n"

  # List all files from the proc/{pid}/fd directory:
  echo -en "$_fds\n\n"

  # List all open files (log files, memory mapped files, libs):
  lsof -as -p $_pid | awk '{if(NR>1)print}'

done
You should also remember about the following rules:
-
worker_rlimit_nofileserves to dynamically change the maximum file descriptors the NGINX worker processes can handle, which is typically defined with the system's soft limit (ulimit -Sn) -
worker_rlimit_nofileworks only at the process level, it's limited to the system's hard limit (ulimit -Hn) -
if you have SELinux enabled, you will need to run
setsebool -P httpd_setrlimit 1so that NGINX has permissions to set its rlimit. To diagnose SELinux denials and attempts you can usesealert -a /var/log/audit/audit.log, oraudit2whyandaudit2allowtools
To sum up this example:
- each of the NGINX processes (master + workers) have the ability to create up to 35,000 files
- for all workers, the maximum number of file descriptors is 140,000 (
LimitNOFILEper worker) - for each worker, the initial/current number of file descriptors is 10,000 (
worker_rlimit_nofile)
nginx: master process         = LimitNOFILE (35,000)
  \_ nginx: worker process    = LimitNOFILE (35,000), worker_rlimit_nofile (10,000)
  \_ nginx: worker process    = LimitNOFILE (35,000), worker_rlimit_nofile (10,000)
  \_ nginx: worker process    = LimitNOFILE (35,000), worker_rlimit_nofile (10,000)
  \_ nginx: worker process    = LimitNOFILE (35,000), worker_rlimit_nofile (10,000)

                              = master (35,000), all workers (140,000 or 40,000)
Look also at this great article about Optimizing Nginx for High Traffic Loads.
Before starting this section I recommend to read the following articles:
- HTTP Keepalive Connections and Web Performance
- Optimizing HTTP: Keep-alive and Pipelining
- Evolution of HTTP — HTTP/0.9, HTTP/1.0, HTTP/1.1, Keep-Alive, Upgrade, and HTTPS
The original model of HTTP, and the default one in HTTP/1.0, is short-lived connections. Each HTTP request is completed on its own connection; this means a TCP handshake happens before each HTTP request, and these are serialized. The client creates a new TCP connection for each transaction (and the connection is torn down after the transaction completes).
HTTP Keep-Alive connection or persistent connection is the idea of using a single TCP connection to send and receive multiple HTTP requests/responses (Keep Alive's work between requests), as opposed to opening a new connection for every single request/response pair.
This mechanism hold open the TCP connection between the client and the server after an HTTP transaction has completed. It's important because NGINX needs to close connections from time to time, even if you configure NGINX to allow infinite keep-alive-timeouts and a huge amount of acceptable requests per connection, to return results and as well errors and success messages.

Persistent connection model keeps connections opened between successive requests, reducing the time needed to open new connections. The HTTP pipelining model goes one step further, by sending several successive requests without even waiting for an answer, reducing much of the latency in the network.

This infographic comes from Mozilla MDN - Connection management in HTTP/1.x.
Look also at this example that shows how a Keep-Alive header could be used:
 Client                        Proxy                         Server
   |                             |                              |
   +- Keep-Alive: timeout=600 -->|                              |
   |  Connection: Keep-Alive     |                              |
   |                             +- Keep-Alive: timeout=1200 -->|
   |                             |  Connection: Keep-Alive      |
   |                             |                              |
   |                             |<-- Keep-Alive: timeout=300 --+
   |                             |    Connection: Keep-Alive    |
   |<- Keep-Alive: timeout=5000 -+                              |
   |    Connection: Keep-Alive   |                              |
   |                             |                              |
NGINX official documentation say:
All connections are independently negotiated. The client indicates a timeout of 600 seconds (10 minutes), but the proxy is only prepared to retain the connection for at least 120 seconds (2 minutes). On the link between proxy and server, the proxy requests a timeout of 1200 seconds and the server reduces this to 300 seconds. As this example shows, the timeout policies maintained by the proxy are different for each connection. Each connection hop is independent.
Keepalive connections reduce overhead, especially when SSL/TLS is in use but they also have drawbacks; even when idling they consume server resources, and under heavy load, DoS attacks can be conducted. In such cases, using non-persistent connections, which are closed as soon as they are idle, can provide better performance.
NGINX closes keepalive connections when the
worker_connectionslimit is reached.
To better understand how Keep-Alive works, I recommend a great explanation by Barry Pollard.
NGINX provides the two layers to enable Keep-Alive:
-
the maximum number of keepalive requests a client can make over a given connection, which means a client can make e.g. 256 successfull requests inside one keepalive connection:
# Default: 100
keepalive_requests  256;
-
server will close connection after this time. A higher number may be required when there is a larger amount of traffic to ensure there is no frequent TCP connection re-initiated. If you set it lower, you are not utilizing keep-alives on most of your requests slowing down client:
# Default: 75s
keepalive_timeout   10s;
Increase this to allow the keepalive connection to stay open longer, resulting in faster subsequent requests. However, setting this too high will result in the waste of resources (mainly memory) as the connection will remain open even if there is no traffic, potentially: significantly affecting performance. I think this should be as close to your average response time as possible.
-
the number of idle keepalive connections that remain open for each worker process. The connections parameter sets the maximum number of idle keepalive connections to upstream servers that are preserved in the cache of each worker process (when this number is exceeded, the least recently used connections are closed):
# Default: disable
keepalive         32;
NGINX, by default, only talks HTTP/1.0 to the upstream servers. To keep TCP connection alive both upstream section and origin server should be configured to not finalise the connection.
Please keep in mind that keepalive is a feature of HTTP 1.1, NGINX uses HTTP 1.0 per default for upstreams.
Connection won't be reused by default because keepalive in the upstream section means no keepalive (each time you can see TCP stream number increases per every request to origin server).
HTTP keepalive enabled in NGINX upstream servers reduces latency thus improves performance and it reduces the possibility that the NGINX runs out of ephemeral ports.
The connections parameter should be set to a number small enough to let upstream servers process new incoming connections as well.
Update your upstream configuration to use keepalive:
upstream bk_x8080 {

  ...

  keepalive         16;

}
And enable the HTTP/1.1 protocol in all upstream requests:
server {

  ...

  location / {

    # Default is HTTP/1, keepalive is only enabled in HTTP/1.1:
    proxy_http_version  1.1;
    # Remove the Connection header if the client sends it,
    # it could be "close" to close a keepalive connection:
    proxy_set_header    Connection "";

    proxy_pass          http:https://bk_x8080;

  }

}

...

}There can be altogether 11 phases when NGINX handles (processes) a request:
-
NGX_HTTP_POST_READ_PHASE- first phase, read the request header- example modules: ngx_http_realip_module
-
NGX_HTTP_SERVER_REWRITE_PHASE- implementation of rewrite directives defined in a server block; to change request URI using PCRE regular expressions, return redirects, and conditionally select configurations- example modules: ngx_http_rewrite_module
-
NGX_HTTP_FIND_CONFIG_PHASE- replace the location according to URI (location lookup) -
NGX_HTTP_REWRITE_PHASE- URI transformation on location level- example modules: ngx_http_rewrite_module
-
NGX_HTTP_POST_REWRITE_PHASE- URI transformation post-processing (the request is redirected to a new location)- example modules: ngx_http_rewrite_module
-
NGX_HTTP_PREACCESS_PHASE- authentication preprocessing request limit, connection limit (access restriction)- example modules: ngx_http_limit_req_module, ngx_http_limit_conn_module, ngx_http_realip_module
-
NGX_HTTP_ACCESS_PHASE- verification of the client (the authentication process, limiting access)- example modules: ngx_http_access_module, ngx_http_auth_basic_module
-
NGX_HTTP_POST_ACCESS_PHASE- access restrictions check post-processing phase, the certification process, processingsatisfy anydirective- example modules: ngx_http_access_module, ngx_http_auth_basic_module
-
NGX_HTTP_PRECONTENT_PHASE- generating content- example modules: ngx_http_try_files_module
-
NGX_HTTP_CONTENT_PHASE- content processing- example modules: ngx_http_index_module, ngx_http_autoindex_module, ngx_http_gzip_module
-
NGX_HTTP_LOG_PHASE- log processing- example modules: ngx_http_log_module
You may feel lost now (me too...) so I let myself put this great and simple preview:
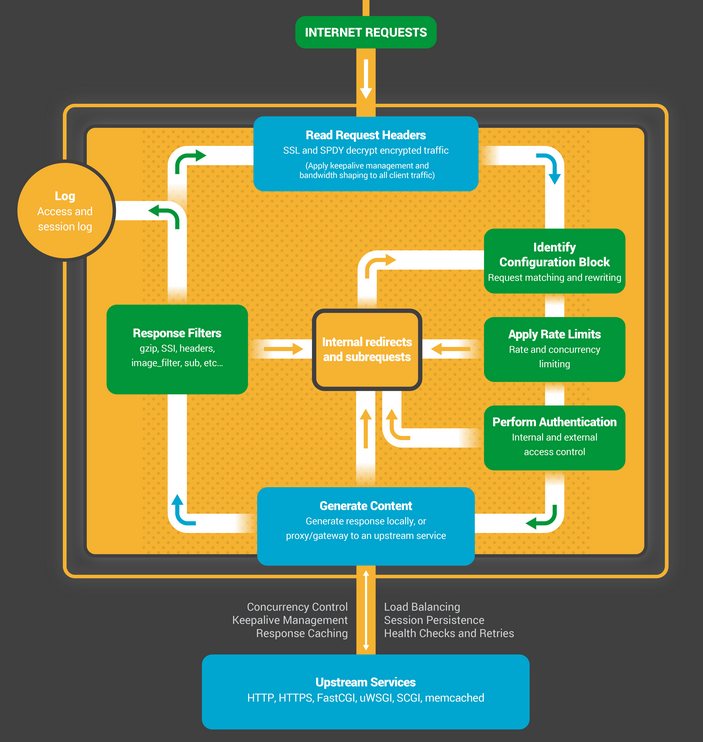
This infographic comes from Inside NGINX official library.
On every phase you can register any number of your handlers. Each phase has a list of handlers associated with it.
I recommend a great explanation about HTTP request processing phases in Nginx and, of course, official Development guide.
NGINX does have server blocks (like a virtual hosts in an Apache) that use
listenandserver_namedirectives to bind to TCP sockets.
It's a short example of two server block contexts with several regular expressions:
http {

  index index.html;
  root /var/www/example.com/default;

  server {

    listen 10.10.250.10:80;
    server_name www.example.com;

    access_log logs/example.access.log main;

    root /var/www/example.com/public;

    location ~ ^/(static|media)/ { ... }

    location ~* /[0-9][0-9](-.*)(\.html)$ { ... }

    location ~* \.(jpe?g|png|gif|ico)$ { ... }

    location ~* (?<begin>.*app)/(?<end>.+\.php)$ { ... }

    ...

  }

  server {

    listen 10.10.250.11:80;
    server_name "~^(api.)?example\.com api.de.example.com";

    access_log logs/example.access.log main;

    location ~ ^(/[^/]+)/api(.*)$ { ... }

    location ~ ^/backend/id/([a-z]\.[a-z]*) { ... }

    ...

  }

}🔖 Define the listen directives explicitly with address:port pair - Base Rules - P1
🔖 Prevent processing requests with undefined server names - Base Rules - P1
🔖 Never use a hostname in a listen or upstream directives - Base Rules - P1
🔖 Use exact names in a server_name directive where possible - Performance - P2
🔖 Separate listen directives for 80 and 443 - Base Rules - P3
🔖 Use only one SSL config for the listen directive - Base Rules - P3
NGINX uses the following logic to determining which virtual server (server block) should be used:
-
Match the
address:portpair to thelistendirective - that can be multiple server blocks withlistendirectives of the same specificity that can handle the requestNGINX use the
address:portcombination for handle incoming connections. This pair is assigned to thelistendirective.The
listendirective can be set to:-
an IP address/port combination (
127.0.0.1:80;) -
a lone IP address, if only address is given, the port
80is used (127.0.0.1;) - becomes127.0.0.1:80; -
a lone port which will listen to every interface on that port (
80;or*:80;) - becomes0.0.0.0:80; -
the path to a UNIX domain socket (
unix:/var/run/nginx.sock;)
If the
listendirective is not present then either*:80is used (runs with the superuser privileges), or*:8000otherwise.To play with
listendirective NGINX must follow the following steps:-
NGINX translates all incomplete
listendirectives by substituting missing values with their default values (see above) -
NGINX attempts to collect a list of the server blocks that match the request most specifically based on the
address:port -
If any block that is functionally using
0.0.0.0, will not be selected if there are matching blocks that list a specific IP -
If there is only one most specific match, that server block will be used to serve the request
-
If there are multiple server blocks with the same level of matching, NGINX then begins to evaluate the
server_namedirective of each server block
Look at this short example:
# From client side:
GET / HTTP/1.0
Host: api.random.com

# From server side:
server {

  # This block will be processed:
  listen 192.168.252.10;  # --> 192.168.252.10:80

  ...

}

server {

  listen 80;  # --> *:80 --> 0.0.0.0:80
  server_name api.random.com;

  ...

}
-
-
Match the
Hostheader field against theserver_namedirective as a string (the exact names hash table) -
Match the
Hostheader field against theserver_namedirective with a wildcard at the beginning of the string (the hash table with wildcard names starting with an asterisk)If one is found, that block will be used to serve the request. If multiple matches are found, the longest match will be used to serve the request.
-
Match the
Hostheader field against theserver_namedirective with a wildcard at the end of the string (the hash table with wildcard names ending with an asterisk)If one is found, that block is used to serve the request. If multiple matches are found, the longest match will be used to serve the request.
-
Match the
Hostheader field against theserver_namedirective as a regular expressionThe first
server_namewith a regular expression that matches theHostheader will be used to serve the request. -
If all the
Hostheaders doesn't match, then direct to thelistendirective marked asdefault_server(makes the server block answer all the requests that doesn’t match any server block) -
If all the
Hostheaders doesn't match and there is nodefault_server, direct to the first server with alistendirective that satisfies first step -
Finally, NGINX goes to the
locationcontext
This list is based on Mastering Nginx - The virtual server section.
🔖 Make an exact location match to speed up the selection process - Performance - P3
For each request, NGINX goes through a process to choose the best location block that will be used to serve that request.
The location block enables you to handle several types of URIs/routes, within a server block. Syntax looks like:
location optional_modifier location_match { ... }
location_match in the above defines what NGINX should check the request URI against. The optional_modifier below will cause the associated location block to be interpreted as follows (the order doesn't matter at this moment):
-
(none): if no modifiers are present, the location is interpreted as a prefix match. To determine a match, the location will now be matched against the beginning of the URI -
=: is an exact match, without any wildcards, prefix matching or regular expressions; forces a literal match between the request URI and the location parameter -
~: if a tilde modifier is present, this location must be used for case sensitive matching (RE match) -
~*: if a tilde and asterisk modifier is used, the location must be used for case insensitive matching (RE match) -
^~: assuming this block is the best non-RE match, a carat followed by a tilde modifier means that RE matching will not take place
And now, a short introduction to determines location priority:
-
the exact match is the best priority (processed first); ends search if match
-
the prefix match is the second priority; there are two types of prefixes:
^~and(none), if this match used the^~prefix, searching stops -
the regular expression match has the lowest priority; there are two types of prefixes:
~and~*; in the order they are defined in the configuration file -
if regular expression searching yielded a match, that result is used, otherwise, the match from prefix searching is used
So look at this example, it comes from the Nginx documentation - ngx_http_core_module:
location = / {
  # Matches the query / only.
  [ configuration A ]
}
location / {
  # Matches any query, since all queries begin with /, but regular
  # expressions and any longer conventional blocks will be
  # matched first.
  [ configuration B ]
}
location /documents/ {
  # Matches any query beginning with /documents/ and continues searching,
  # so regular expressions will be checked. This will be matched only if
  # regular expressions don't find a match.
  [ configuration C ]
}
location ^~ /images/ {
  # Matches any query beginning with /images/ and halts searching,
  # so regular expressions will not be checked.
  [ configuration D ]
}
location ~* \.(gif|jpg|jpeg)$ {
  # Matches any request ending in gif, jpg, or jpeg. However, all
  # requests to the /images/ directory will be handled by
  # Configuration D.
  [ configuration E ]
}
To help you understand how does location match works:
The process of choosing NGINX location block is as follows (a detailed explanation):
-
NGINX searches for an exact match. If a
=modifier exactly matches the request URI, this specific location block is chosen right away -
Prefix-based NGINX location matches (no regular expression). Each location will be checked against the request URI. If no exact (meaning no
=modifier) location block is found, NGINX will continue with non-exact prefixes. It starts with the longest matching prefix location for this URI, with the following approach:-
In case the longest matching prefix location has the
^~modifier, NGINX will stop its search right away and choose this location. -
Assuming the longest matching prefix location doesn’t use the
^~modifier, the match is temporarily stored and the process continues.
I'm not sure about the order. In the official documentation it is not clearly indicated and external guides explain it differently. It seems logical to check the longest matching prefix location first.
-
-
As soon as the longest matching prefix location is chosen and stored, NGINX continues to evaluate the case-sensitive and insensitive regular expression locations. The first regular expression location that fits the URI is selected right away to process the request
-
If no regular expression locations are found that match the request URI, the previously stored prefix location is selected to serve the request
In order to better understand how this process work please see this short cheatsheet that will allow you to design your location blocks in a predictable way:

I recommend to use external tools for testing regular expressions. For more please see online tools chapter.
Ok, so here's a more complicated configuration:
server {

 listen           80;
 server_name      xyz.com www.xyz.com;

 location ~ ^/(media|static)/ {
  root            /var/www/xyz.com/static;
  expires         10d;
 }

 location ~* ^/(media2|static2) {
  root            /var/www/xyz.com/static2;
  expires         20d;
 }

 location /static3 {
  root            /var/www/xyz.com/static3;
 }

 location ^~ /static4 {
  root            /var/www/xyz.com/static4;
 }

 location = /api {
  proxy_pass      http:https://127.0.0.1:8080;
 }

 location / {
  proxy_pass      http:https://127.0.0.1:8080;
 }

 location /backend {
  proxy_pass      http:https://127.0.0.1:8080;
 }

 location ~ logo.xcf$ {
  root            /var/www/logo;
  expires         48h;
 }

 location ~* .(png|ico|gif|xcf)$ {
  root            /var/www/img;
  expires         24h;
 }

 location ~ logo.ico$ {
  root            /var/www/logo;
  expires         96h;
 }

 location ~ logo.jpg$ {
  root            /var/www/logo;
  expires         48h;
 }

}
And here's the table with the results:
| URL | LOCATIONS FOUND | FINAL MATCH |
|---|---|---|
/ |
1) prefix match for / |
/ |
/css |
1) prefix match for / |
/ |
/api |
1) exact match for /api |
/api |
/api/ |
1) prefix match for / |
/ |
/backend |
1) prefix match for /2) prefix match for /backend |
/backend |
/static |
1) prefix match for / |
/ |
/static/header.png |
1) prefix match for /2) case sensitive regex match for ^/(media|static)/ |
^/(media|static)/ |
/static/logo.jpg |
1) prefix match for /2) case sensitive regex match for ^/(media|static)/ |
^/(media|static)/ |
/media2 |
1) prefix match for /2) case insensitive regex match for ^/(media2|static2) |
^/(media2|static2) |
/media2/ |
1) prefix match for /2) case insensitive regex match for ^/(media2|static2) |
^/(media2|static2) |
/static2/logo.jpg |
1) prefix match for /2) case insensitive regex match for ^/(media2|static2) |
^/(media2|static2) |
/static2/logo.png |
1) prefix match for /2) case insensitive regex match for ^/(media2|static2) |
^/(media2|static2) |
/static3/logo.jpg |
1) prefix match for /static32) prefix match for /3) case sensitive regex match for logo.jpg$ |
logo.jpg$ |
/static3/logo.png |
1) prefix match for /static32) prefix match for /3) case insensitive regex match for .(png|ico|gif|xcf)$ |
.(png|ico|gif|xcf)$ |
/static4/logo.jpg |
1) priority prefix match for /static42) prefix match for / |
/static4 |
/static4/logo.png |
1) priority prefix match for /static42) prefix match for / |
/static4 |
/static5/logo.jpg |
1) prefix match for /2) case sensitive regex match for logo.jpg$ |
logo.jpg$ |
/static5/logo.png |
1) prefix match for /2) case insensitive regex match for .(png|ico|gif|xcf)$ |
.(png|ico|gif|xcf)$ |
/static5/logo.xcf |
1) prefix match for /2) case sensitive regex match for logo.xcf$ |
logo.xcf$ |
/static5/logo.ico |
1) prefix match for /2) case insensitive regex match for .(png|ico|gif|xcf)$ |
.(png|ico|gif|xcf)$ |
Generally there are two ways of implementing redirects in NGINX with: rewrite and return.
These directives (comes from the ngx_http_rewrite_module) are very useful but (from the NGINX documentation) the only 100% safe things which may be done inside if in a location context are:
return ...;rewrite ... last;
Anything else may possibly cause unpredictable behaviour, including potential SIGSEGV.
The rewrite directives are executed sequentially in order of their appearance in the configuration file. It's slower (but still extremely fast) than a return and returns HTTP 302 in all cases, irrespective of permanent.
The rewrite directive just changes the request URI, not the response of request. Importantly only the part of the original url that matches the regex is rewritten. It can be used for temporary url changes.
I sometimes used rewrite to capture elementes in the original URL, change or add elements in the path, and in general when I do something more complex:
location / {

  ...

  rewrite   ^/users/(.*)$       /user.php?username=$1 last;

  # or:
  rewrite   ^/users/(.*)/items$ /user.php?username=$1&page=items last;

}
rewrite directive accept optional flags:
-
break- basically completes processing of rewrite directives, stops processing, and breakes location lookup cycle by not doing any location lookup and internal jump at all-
if you use
breakflag insidelocationblock:- no more parsing of rewrite conditions
- internal engine continues to parse the current
locationblock
Inside a location block, with
break, NGINX only stops processing anymore rewrite conditions. -
if you use
breakflag outsidelocationblock:- no more parsing of rewrite conditions
- internal engine goes to the next phase (searching for
locationmatch)
Outside a location block, with
break, NGINX stops processing anymore rewrite conditions.
-
-
last- basically completes processing of rewrite directives, stops processing, and starts a search for a new location matching the changed URI-
if you use
lastflag insidelocationblock:- no more parsing of rewrite conditions
- internal engine starts to look for another location match based on the result of the rewrite result
- no more parsing of rewrite conditions, even on the next location match
Inside a location block, with last, NGINX stops processing anymore rewrite conditions and then starts to look for a new matching of location block. NGINX also ignores any rewrites in the new location block.
-
if you use
lastflag outsidelocationblock:- no more parsing of rewrite conditions
- internal engine goes to the next phase (searching for
locationmatch)
Outside a location block, with
last, NGINX stops processing anymore rewrite conditions.
-
-
redirect- returns a temporary redirect with the 302 HTTP response code -
permanent- returns a permanent redirect with the 301 HTTP response code
Note:
- that outside location blocks,
lastandbreakare effectively the same - processing of rewrite directives at server level may be stopped via
break, but the location lookup will follow anyway
This explanation is based on the awesome answer by Pothi Kalimuthu to nginx url rewriting: difference between break and last.
Official documentation has a great tutorials about Creating NGINX Rewrite Rules and Converting rewrite rules.
Finally, look at difference between last and break flags in action:
lastdirective:

breakdirective:

This infographic comes from Internal rewrite - nginx by Ivan Dabic.
🔖 Use return directive for URL redirection (301, 302) - Base Rules - P2
🔖 Use return directive instead of rewrite for redirects - Performance - P2
The other way is a return directive. It's faster than rewrite because there is no regexp that has to be evaluated. It's stops processing and returns HTTP 301 (by default) to a client, and the entire url is rerouted to the url specified.
I use return directive in the following cases:
-
force redirect from http to https:
server {

  ...

  return  301 https://example.com$request_uri;

}
-
redirect from www to non-www and vice versa:
server {

  ...

  # It's only example. You shouldn't use 'if' statement in the following case.
  if ($host = www.domain.com) {

    return  301 https://domain.com$request_uri;

  }

}
-
close the connection and log it internally:
server {

  ...

  return 444;

}
-
send 4xx HTTP response for a client without any other actions:
server {

  ...

  if ($request_method = POST) {

    return 405;

  }

  # or:
  if ($invalid_referer) {

    return 403;

  }

  # or:
  if ($request_uri ~ "^/app/(.+)$") {

    return 403;

  }

  # or:
  location ~ ^/(data|storage) {

    return 403;

  }

}
-
and sometimes for reply with HTTP code without serving a file or body:
server {

  ...

  # NGINX will not allow a 200 with no response body (200's need to be with a resource in the response):
  return 204 "it's all okay";
  # Or without body:
  return 204;

  # Because default Content-Type is application/octet-stream, browser will offer to "save the file".
  # If you want to see reply in browser you should add properly Content-Type:
  # add_header Content-Type text/plain;

}
To the last example: be careful if you're using such a configuration to do a healthcheck. While a 204 HTTP code is semantically perfect for a healthcheck (success indication with no content), some services do not consider it a success.
We have one more very interesting and important directive: try_files (from the ngx_http_core_module). This directive tells NGINX to check for the existence of a named set of files or directories (checks files conditionally breaking on success).
I think the best explanation comes from official documentation:
try_fileschecks the existence of files in the specified order and uses the first found file for request processing; the processing is performed in the current context. The path to a file is constructed from the file parameter according to the root and alias directives. It is possible to check directory’s existence by specifying a slash at the end of a name, e.g.$uri/. If none of the files were found, an internal redirect to the uri specified in the last parameter is made.
Generally it may check files on disk, redirect to proxies or internal locations, and return error codes, all in one directive.
Take a look at the following example:
server {

  ...

  root /var/www/example.com;

  location / {

    try_files $uri $uri/ /frontend/index.html;

  }

  location ^~ /images {

    root /var/www/static;
    try_files $uri $uri/ =404;

  }

...-
default root directory for all locations is
/var/www/example.com -
location /- matches all locations without more specific locations, e.g. exact names-
try_files $uri- when you receive a URI that's matched by this block try$urifirstFor example:
https://example.com/tools/en.js- NGINX will try to check if there's a file inside/toolscalleden.js, if found it, serve it in the first place. -
try_files $uri $uri/- if you didn't find the first condition try the URI as a directoryFor example:
https://example.com/backend/- NGINX will try first check if a file calledbackendexists, if can't find it then goes to second check$uri/and see if there's a directory calledbackendexists then it will try serving it. -
try_files $uri $uri/ /frontend/index.html- if a file and directory not found, NGINX sends/frontend/index.html
-
-
location ^~ /images- handle any query beginning with/imagesand halts searching-
default root directory for this location is
/var/www/static -
try_files $uri- when you receive a URI that's matched by this block try$urifirstFor example:
https://example.com/images/01.gif- NGINX will try to check if there's a file inside/imagescalled01.gif, if found it, serve it in the first place. -
try_files $uri $uri/- if you didn't find the first condition try the URI as a directoryFor example:
https://example.com/images/- NGINX will try first check if a file calledimagesexists, if can't find it then goes to second check$uri/and see if there's a directory calledimagesexists then it will try serving it. -
try_files $uri $uri/ =404- if a file and directory not found, NGINX sendsHTTP 404(Not Found)
-
On the other hand, try_files is relatively primitive. When encountered, NGINX will look for any of the specified files physically in the directory matched by the location block. If they don’t exist, NGINX does an internal redirect to the last entry in the directive.
🔖 Avoid checks server_name with if directive - Performance - P2
The ngx_http_rewrite_module also provides additional directives:
-
break- stops processing, if is specified inside thelocation, further processing of the request continues in this location:# It's useful for: if ($slow_resp) { limit_rate 50k; break; }
-
if- you can useifinside aserverbut not the other way around, also notice that you shouldn't useifinsidelocationas it may not work as desired. The NGINX docs say:There are cases where you simply cannot avoid using an
if, for example if you need to test a variable which has no equivalent directive.You should also remember about this:
The
ifcontext in NGINX is provided by the rewrite module and this is the primary intended use of this context. Since NGINX will test conditions of a request with many other purpose-made directives,ifshould not be used for most forms of conditional execution. This is such an important note that the NGINX community has created a page called if is evil (yes, it's really evil and in most cases not needed). -
set- sets a value for the specified variable. The value can contain text, variables, and their combination
Example of usage if and set directives:
# It comes from: https://gist.github.com/jrom/1760790:
if ($request_uri = /) {

  set $test  A;

}

if ($host ~* example.com) {

  set $test  "${test}B";

}

if ($http_cookie !~* "auth_token") {

  set $test  "${test}C";

}

if ($test = ABC) {

  proxy_pass http:https://cms.example.com;
  break;

}Placing a
rootoraliasdirective in a location block overrides therootoraliasdirective that was applied at a higher scope.
With alias you can map to another file name. With root forces you to name your file on the server. In the first case, NGINX replaces the string prefix e.g /robots.txt in the URL path with e.g. /var/www/static/robots.01.txt and then uses the result as a filesystem path. In the second, NGINX inserts the string e.g. /var/www/static/ at the beginning of the URL path and then uses the result as a file system path.
Look at this. There is a difference, when the alias is for a whole directory will work:
location ^~ /data/ { alias /home/www/static/data/; }But the following code won't do:
location ^~ /data/ { root /home/www/static/data/; }This would have to be:
location ^~ /data/ { root /home/www/static/; }The root directive is typically placed in server and location blocks. Placing a root directive in the server block makes the root directive available to all location blocks within the same server block.
The root directive tells NGINX to take the request url and append it behind the specified directory. For example, with the following configuration block:
server {

  server_name example.com;
  listen 10.250.250.10:80;

  index index.html;
  root /var/www/example.com;

  location / {

    try_files $uri $uri/ =404;

  }

  location ^~ /images {

    root /var/www/static;
    try_files $uri $uri/ =404;

  }

}
NGINX will map the request made to:
http:https://example.com/images/logo.pnginto the file path/var/www/static/images/logo.pnghttp:https://example.com/contact.htmlinto the file path/var/www/example.com/contact.htmlhttp:https://example.com/about/us.htmlinto the file path/var/www/example.com/about/us.html
Like you want to forward all requests which start /static and your data present in /var/www/static you should set:
- first path:
/var/www - last path:
/static - full path:
/var/www/static
location <last path> {

  root <first path>;

  ...

}
NGINX documentation on the alias directive suggests that it is better to use root over alias when the location matches the last part of the directive’s value.
The alias directive can only be placed in a location block. The following is a set of configurations for illustrating how the alias directive is applied:
server {

  server_name example.com;
  listen 10.250.250.10:80;

  index index.html;
  root /var/www/example.com;

  location / {

    try_files $uri $uri/ =404;

  }

  location ^~ /images {

    alias /var/www/static;
    try_files $uri $uri/ =404;

  }

}
NGINX will map the request made to:
http:https://example.com/images/logo.pnginto the file path/var/www/static/logo.pnghttp:https://example.com/images/third-party/facebook-logo.pnginto the file path/var/www/static/third-party/facebook-logo.pnghttp:https://example.com/contact.htmlinto the file path/var/www/example.com/contact.htmlhttp:https://example.com/about/us.htmlinto the file path/var/www/example.com/about/us.html
This directive specifies that the location block is internal. In other words, the specified resource cannot be accessed by external requests.
On the other hand, it specifies how external redirections, i.e. locations like http:https://example.com/app.php/some-path should be handled; while set, they should return 404, only allowing internal redirections. In brief, this tells NGINX it's not accessible from the outside (it doesn't redirect anything).
Conditions handled as internal redirections are listed in the documentation for internal directive. Specifies that a given location can only be used for internal requests and are the following:
- requests redirected by the
error_page,index,random_index, andtry_filesdirectives - requests redirected by the
X-Accel-Redirectresponse header field from an upstream server - subrequests formed by the
include virtualcommand of thengx_http_ssi_module module, by thengx_http_addition_modulemodule directives, and byauth_requestandmirrordirectives - requests changed by the
rewritedirective
Example 1:
error_page 404 /404.html;

location = /404.html {

  internal;

}
Example 2:
The files are served from the directory /srv/hidden-files by the path prefix /hidden-files/. Pretty straightforward. The internal declaration tells NGINX that this path is accessible only through rewrites in the NGINX config, or via the X-Accel-Redirect header in proxied responses.
To use this, just return an empty response which contains that header. The content of the header should be the location you want to redirect to:
location /hidden-files/ {

  internal;
  alias /srv/hidden-files/;

}
Example 3:
Another use case for internal redirects in NGINX is to hide credentials. Often you need to make requests to 3rd party services. For example, you want to send text messages or access a paid maps server. It would be the most efficient to send these requests directly from your JavaScript front end. However, doing so means you would have to embed an access token in the front end. This means savvy users could extract this token and make requests on your account.
An easy fix is to make an endpoint in your back end which initiates the actual request. We could make use of an HTTP client library inside the back end. However, this will again tie up workers, especially if you expect a barrage of requests and the 3rd party service is responding very slowly.
location /external-api/ {

  internal;
  set $redirect_uri "$upstream_http_redirect_uri";
  set $authorization "$upstream_http_authorization";

  # For performance:
  proxy_buffering off;
  # Pass on secret from backend:
  proxy_set_header Authorization $authorization;
  # Use URI determined by backend:
  proxy_pass $redirect_uri;

}
There is a limit of 10 internal redirects per request to prevent request processing cycles that can occur in incorrect configurations. If this limit is reached, the error 500 (Internal Server Error) is returned. In such cases, the
rewrite or internal redirection cyclemessage can be seen in the error log.
Examples 2 and 3 (both are great!) comes from How to use internal redirects in NGINX.
Look also at Authentication Based on Subrequest Result from the official documentation.
External redirects originate directly from the client. So, if the client fetched https://example.com/directory it would be directly fall into preceding location block.
Internal redirect means that it doesn’t send a 302 response to the client, it simply performs an implicit rewrite of the url and attempts to process it as though the user typed the new url originally.
The internal redirect is different from the external redirect defined by HTTP response code 302 and 301, client browser won't update its URI addresses.
To begin rewriting internally, we should explain the difference between redirects and internal rewrite. When source points to a destination that is out of source domain that is what we call redirect as your request will go from source to outside domain/destination.
With internal rewrite you would be, basically, doing the same only the destination is local path under same domain and not the outside location.
There is also great explanation about internal redirects:
The internal redirection (e.g. via the
echo_execorrewritedirective) is an operation that makes NGINX jump from one location to another while processing a request (are very similar togotostatement in the C language). This "jumping" happens completely within the server itself.
There are two different kinds of internal requests:
-
internal redirects - redirects the client requests internally. The URI is changed, and the request may therefore match another location block and become eligible for different settings. The most common case of internal redirects is when using the
rewritedirective, which allows you to rewrite the request URI -
sub-requests - additional requests that are triggered internally to generate (insert or append to the body of the original request) content that is complementary to the main request (
additionorssimodules)
Log files are a critical part of the NGINX management. It writes information about client requests in the access log right after the request is processed (in the last phase: NGX_HTTP_LOG_PHASE).
By default:
- the access log is located in
logs/access.log, but I suggest you take it to/var/log/nginxdirectory - data is written in the predefined
combinedformat
It is the equivalent to the following configuration.
# In nginx.conf:
http {

  ...

  log_format combined '$remote_addr - $remote_user [$time_local] '
                      '"$request" $status $body_bytes_sent '
                      '"$http_referer" "$http_user_agent"';
  ...

}
For more information please see Configuring Logging.
I also recommend to read:
Sometimes certain entries are there just to fill up the logs or are cluttering them. I sometimes exclude requests - by client IP or whatever else - when I want to debug log files more effective.
So, in this example, if the $error_codes variable’s value is 0 - then log nothing (default action), but if 1 (e.g. 404 or 503 from backend) - to save this request to the log:
# Define map in the http context:
http {

  ...

  map $status $error_codes {

    default   1;
    ~^[23]    0;

  }

  ...

  # Add if condition to the access log:
  access_log /var/log/nginx/example.com-access.log combined if=$error_codes;

}NGINX will re-open its logs in response to the USR1 signal:
cd /var/log/nginx

mv access.log access.log.0
kill -USR1 $(cat /var/run/nginx.pid) && sleep 1

# >= gzip-1.6:
gzip -k access.log.0
# With any version:
gzip < access.log.0 > access.log.0.gz

# Test integrity and remove if test passed:
gzip -t access.log.0 && rm -fr access.log.0The following is a list of all severity levels:
| TYPE | DESCRIPTION |
|---|---|
debug |
information that can be useful to pinpoint where a problem is occurring |
info |
informational messages that aren’t necessary to read but may be good to know |
notice |
something normal happened that is worth noting |
warn |
something unexpected happened, however is not a cause for concern |
error |
something was unsuccessful, contains the action of limiting rules |
crit |
important problems that need to be addressed |
alert |
severe situation where action is needed promptly |
emerg |
the system is in an unusable state and requires immediate attention |
For example: if you set crit error log level, messages of crit, alert, and emerg levels are logged.
After reading this chapter, please see: Rules: Reverse Proxy.
This is one of the greatest feature of the NGINX. In simplest terms, a reverse proxy is a server that comes in-between internal applications and external clients, forwarding client requests to the appropriate server. It takes a client request, passes it on to one or more servers, and subsequently delivers the server’s response back to the client.
Official NGINX documentation say:
Proxying is typically used to distribute the load among several servers, seamlessly show content from different websites, or pass requests for processing to application servers over protocols other than HTTP.
You can also read a very good explanation about What's the difference between proxy server and reverse proxy server.
A reverse proxy can off load much of the infrastructure concerns of a high-volume distributed web application.

This infographic comes from Jenkins with NGINX - Reverse proxy with https.
This allow you to have NGINX reverse proxy requests to unicorns, mongrels, webricks, thins, or whatever you really want to have run your servers.
Reverse proxy gives you number of advanced features such as:
- load balancing, failover, and transparent maintenance of the backend servers
- increased security (e.g. SSL termination, hide upstream configuration)
- increased performance (e.g. caching, load balancing)
- simplifies the access control responsibilities (single point of access and maintenance)
- centralised logging and auditing (single point of maintenance)
- add/remove/modify HTTP headers
In my opinion, the two most important things related to the reverse proxy are:
- the way of requests forwarded to the backend
- the type of headers forwarded to the backend
If we talking about security of the proxy server look at this recommendations of the National Institute of Standards and Technology about Guidelines on Securing Public Web Servers. This document is a good starting point. Is old but still has interesting solutions and suggestions.
There is a great explanation about the benefits of improving security through the use of a reverse proxy server.
A reverse proxy gives you a couple things that may make your server more secure:
- a place to monitor and log what is going on separate from the web server
- a place to filter separate from your web server if you know that some area of your system is vulnerable. Depending on the proxy you may be able to filter at the application level
- another place to implement ACLs and rules if you cannot be expressive enough for some reason on your web server
- a separate network stack that will not be vulnerable in the same ways as your web server. This is particularly true if your proxy is from a different vendor
- a reverse proxy with no filtering does not automatically protect you against everything, but if the system you need to protect is high-value then adding a reverse proxy may be worth the costs support and performance costs
Another great answer about best practices for reverse proxy implementation:
In my experience some of the most important requirements and mitigations, in no particular order, are:
- make sure that your proxy, back-end web (and DB) servers cannot establish direct outbound (internet) connections (including DNS and SMTP, and particularly HTTP). This means (forward) proxies/relays for required outbound access, if required
- make sure your logging is useful (§9.1 in the above), and coherent. You may have logs from multiple devices (router, firewall/IPS/WAF, proxy, web/app servers, DB servers). If you can't quickly, reliably and deterministically link records across each device together, you're doing it wrong. This means NTP, and logging any or all of: PIDs, TIDs, session-IDs, ports, headers, cookies, usernames, IP addresses and maybe more (and may mean some logs contain confidential information)
- understand the protocols, and make deliberate, informed decisions: including cipher/TLS version choice, HTTP header sizes, URL lengths, cookies. Limits should be implemented on the reverse-proxy. If you're migrating to a tiered architecture, make sure the dev team are in the loop so that problems are caught as early as possible
- run vulnerability scans from the outside, or get someone to do it for you. Make sure you know your footprint and that the reports highlight deltas, as well as the theoretical TLS SNAFU du-jour
- understand the modes of failure. Sending users a bare default "HTTP 500 - the wheels came off" when you have load or stability problems is sloppy
- monitoring, metrics and graphs: having normal and historic data is invaluable when investigating anomalies, and for capacity planning
- tuning: from TCP time-wait to listen backlog to SYN-cookies, again you need to make make deliberate, informed decisions
- follow basic OS hardening guidelines, consider the use of chroot/jails, host-based IDS, and other measures, where available
🔖 Use pass directive compatible with backend protocol - Reverse Proxy - P1
When NGINX proxies a request, it sends the request to a specified proxied server, fetches the response, and sends it back to the client.
It is possible to proxy requests to:
-
an HTTP servers (e.g. NGINX, Apache, or other) with
proxy_passdirective:upstream bk_front { server 192.168.252.20:8080 weight=5; server 192.168.252.21:8080 } server { location / { proxy_pass http:https://bk_front; } location /api { proxy_pass http:https://192.168.21.20:8080; } location /info { proxy_pass http:https://localhost:3000; } location /ra-client { proxy_pass http:https://10.0.11.12:8080/guacamole/; } location /foo/bar/ { proxy_pass http:https://www.example.com/url/; } ... }
-
a non-HTTP servers (e.g. PHP, Node.js, Python, Java, or other) with
proxy_passdirective (as a fallback) or directives specially designed for this:-
fastcgi_passwhich passes a request to a FastCGI server (PHP FastCGI Example):server { ... location ~ ^/.+\.php(/|$) { fastcgi_pass 127.0.0.1:9000; include /etc/nginx/fcgi_params; } ... }
-
uwsgi_passwhich passes a request to a uWSGI server (Nginx support uWSGI):server { location / { root html; uwsgi_pass django_cluster; uwsgi_param UWSGI_SCRIPT testapp; include /etc/nginx/uwsgi_params; } ... }
-
scgi_passwhich passes a request to an SCGI server:server { location / { scgi_pass 127.0.0.1:4000; include /etc/nginx/scgi_params; } ... }
-
memcached_passwhich passes a request to a Memcached server:server { location / { set $memcached_key "$uri?$args"; memcached_pass memc_instance:4004; error_page 404 502 504 = @memc_fallback; } location @memc_fallback { proxy_pass http:https://backend; } ... }
-
redis_passwhich passes a request to a Redis server (HTTP Redis):server { location / { set $redis_key $uri; redis_pass redis_instance:6379; default_type text/html; error_page 404 = /fallback; } location @fallback { proxy_pass http:https://backend; } ... }
-
The proxy_pass and other *_pass directives specifies that all requests which match the location block should be forwarded to the specific socket, where the backend app is running.
However, more complex apps may need additional directives:
proxy_pass- seengx_http_proxy_moduledirectives explanationfastcgi_pass- seengx_http_fastcgi_moduledirectives explanationuwsgi_pass- seengx_http_uwsgi_moduledirectives explanationscgi_pass- seengx_http_scgi_moduledirectives explanationmemcached_pass- seengx_http_memcached_moduledirectives explanationredis_pass- seengx_http_redis_moduledirectives explanation
🔖 Be careful with trailing slashes in proxy_pass directive - Reverse Proxy - P3
If you have something like:
location /public/ {

  proxy_pass http:https://bck_testing_01;

}
and go to http:https://example.com/public, NGINX will automatically redirect you to http:https://example.com/public/.
Look also at this example:
location /foo/bar/ {

  # proxy_pass  http:https://example.com/url/;
  proxy_pass    http:https://192.168.100.20/url/;

}
If the URI is specified along with the address, it replaces the part of the request URI that matches the location parameter. For example, here the request with the /foo/bar/page.html URI will be proxied to http:https://www.example.com/url/page.html.
If the address is specified without a URI, or it is not possible to determine the part of URI to be replaced, the full request URI is passed (possibly, modified).
Look also at this. Here is an example with trailing slash in location, but no trailig slash in proxy_pass:
location /foo/ {

  proxy_pass  http:https://127.0.0.1:8080/bar;

}
See how bar and path concatenates. If one go to address http:https://yourserver.com/foo/path/id?param=1 NGINX will proxy request to http:https://127.0.0.1/barpath/id?param=1.
As stated in NGINX documentation if proxy_pass used without URI (i.e. without path after server:port) NGINX will put URI from original request exactly as it was with all double slashes, ../ and so on.
Look also at the configuration snippets: Using trailing slashes.
🔖 Always pass Host, X-Real-IP, and X-Forwarded headers to the backend - Reverse Proxy - P2
🔖 Use custom headers without X- prefix - Reverse Proxy - P3
By default, NGINX redefines two header fields in proxied requests:
-
the
Hostheader is re-written to the value defined by the$proxy_hostvariable. This will be the IP address or name and port number of the upstream, directly as defined by theproxy_passdirective -
the
Connectionheader is changed toclose. This header is used to signal information about the particular connection established between two parties. In this instance, NGINX sets this tocloseto indicate to the upstream server that this connection will be closed once the original request is responded to. The upstream should not expect this connection to be persistent
When NGINX proxies a request, it automatically makes some adjustments to the request headers it receives from the client:
-
NGINX drop empty headers. There is no point of passing along empty values to another server; it would only serve to bloat the request
-
NGINX, by default, will consider any header that contains underscores as invalid. It will remove these from the proxied request. If you wish to have NGINX interpret these as valid, you can set the
underscores_in_headersdirective toon, otherwise your headers will never make it to the backend server
It is important to pass more than just the URI if you expect the upstream server handle the request properly. The request coming from NGINX on behalf of a client will look different than a request coming directly from a client.
Please read Managing request headers from the official wiki.
NGINX use the proxy_set_header directive to sets headers that sends to the backend servers.
HTTP headers are used to transmit additional information between client and server.
add_headersends headers to the client (browser) and will work on successful requests only, unless you set upalwaysparameter.proxy_set_headersends headers to the backend server.
It's also important to distinguish between request headers and response headers. Request headers are for traffic inbound to the webserver or backend app. Response headers are going the other way (in the HTTP response you get back using client, e.g. curl or browser).
Ok, so look at following short explanation about proxy directives (for more information about valid header values please see this rule):
-
proxy_http_version- defines the HTTP protocol version for proxying, by default it it set to 1.0. For Websockets and keepalive connections you need to use the version 1.1:proxy_http_version 1.1;
-
proxy_cache_bypass- sets conditions under which the response will not be taken from a cache:proxy_cache_bypass $http_upgrade;
-
proxy_intercept_errors- means that any response with HTTP code 300 or greater is handled by theerror_pagedirective and ensures that if the proxied backend returns an error status, NGINX will be the one showing the error page (overrides the error page on the backend side):proxy_intercept_errors on; error_page 500 503 504 @debug; # go to the @debug location
-
proxy_set_header- allows redefining or appending fields to the request header passed to the proxied server-
UpgradeandConnection- these header fields are required if your application is using Websockets:proxy_set_header Upgrade $http_upgrade; proxy_set_header Connection "upgrade";
-
Host- the$hostvariable in the following order of precedence contains: host name from the request line, or host name from the Host request header field, or the server name matching a request: NGINX usesHostheader forserver_namematching. It does not use TLS SNI. This means that for an SSL server, NGINX must be able to accept SSL connection, which boils down to having certificate/key. The cert/key can be any, e.g. self-signed:proxy_set_header Host $host;
-
X-Real-IP- forwards the real visitor remote IP address to the proxied server:proxy_set_header X-Real-IP $remote_addr;
-
X-Forwarded-For- is the conventional way of identifying the originating IP address of the user connecting to the web server coming from either a HTTP proxy or load balancer:proxy_set_header X-Forwarded-For $proxy_add_x_forwarded_for;
-
X-Forwarded-Proto- identifies the protocol (HTTP or HTTPS) that a client used to connect to your proxy or load balancer:proxy_set_header X-Forwarded-Proto $scheme;
-
X-Forwarded-Host- defines the original host requested by the client:proxy_set_header X-Forwarded-Host $host;
-
X-Forwarded-Port- defines the original port requested by the client:proxy_set_header X-Forwarded-Port $server_port;
-
If you want to read about custom headers, take a look at Why we need to deprecate x prefix for HTTP headers? and this great answer by BalusC.
🔖 Set and pass Host header only with $host variable - Reverse Proxy - P2
The Host header tells the webserver which virtual host to use (if set up). You can even have the same virtual host using several aliases (= domains and wildcard-domains). This why the host header exists. The host header specifies which website or web application should process an incoming HTTP request.
In NGINX, $host equals $http_host, lowercase and without the port number (if present), except when HTTP_HOST is absent or is an empty value. In that case, $host equals the value of the server_name directive of the server which processed the request
For example, if you set Host: MASTER:8080, $host will be "master" (while $http_host will be MASTER:8080 as it just reflects the whole header).
🔖 Don't use X-Forwarded-Proto with $scheme behind reverse proxy - Reverse Proxy - P1
This header is very important because it prevent a redirect loop. When used inside HTTPS server block each HTTP response from the proxied server will be rewritten to HTTPS. Look at the following example:
- Client sends the HTTP request to the Proxy
- Proxy sends the HTTP request to the Server
- Server sees that the URL is
http:https:// - Server sends back 3xx redirect response telling the Client to connect to
https:// - Client sends an HTTPS request to the Proxy
- Proxy decrypts the HTTPS traffic and sets the
X-Forwarded-Proto: https - Proxy sends the HTTP request to the Server
- Server sees that the URL is
http:https://but also sees thatX-Forwarded-Protois https and trusts that the request is HTTPS - Server sends back the requested web page or data
This explanation comes from Purpose of the X-Forwarded-Proto HTTP Header.
In step 6 above, the Proxy is setting the HTTP header X-Forwarded-Proto: https to specify that the traffic it received is HTTPS. In step 8, the Server then uses the X-Forwarded-Proto to determine if the request was HTTP or HTTPS.
You can read about how to set it up correctly here:
- Set correct scheme passed in X-Forwarded-Proto
- Don't use X-Forwarded-Proto with $scheme behind reverse proxy
🔖 Set properly values of the X-Forwarded-For header - Reverse Proxy - P1
I think, we should just maybe stop for a second. X-Forwarded-For is a one of the most important header that has the security implications.
Where a connection passes through a chain of proxy servers, X-Forwarded-For can give a comma-separated list of IP addresses with the first being the furthest downstream (that is, the user).
X-Forwarded-For should not be used for any Access Control List (ACL) checks because it can be spoofed by attackers. Use the real IP address for this type of restrictions. HTTP request headers such as X-Forwarded-For, True-Client-IP, and X-Real-IP are not a robust foundation on which to build any security measures, such as access controls.
Set properly values of the X-Forwarded-For header (from this handbook) - see this for more detailed information on how to set properly values of the X-Forwarded-For header.
But that's not all. Behind a reverse proxy, the user IP we get is often the reverse proxy IP itself. If you use other HTTP server working between proxy and app server you should also set the correct mechanism for interpreting values of this header.
I recommend to read this amazing explanation by Nick M.
-
Pass headers from proxy to the backend layer
-
NGINX - modify the
set_real_ip_fromandreal_ip_headerdirectives:For this, the
http_realip_modulemust be installed (--with-http_realip_module).First of all, you should add the following lines to the configuration:
# Add these to the set_real_ip.conf, there are the real IPs where your traffic is coming from (front proxy/lb):
set_real_ip_from    192.168.20.10; # IP address of master
set_real_ip_from    192.168.20.11; # IP address of slave

# You can also add an entire subnet:
set_real_ip_from    192.168.40.0/24;

# Defines a request header field used to send the address for a replacement, in this case We use X-Forwarded-For:
real_ip_header      X-Forwarded-For;

# The real IP from your client address that matches one of the trusted addresses is replaced by the last non-trusted address sent in the request header field:
real_ip_recursive   on;

# Include it to the appropriate context:
server {

  include /etc/nginx/set_real_ip.conf;

  ...

}
-
NGINX - add/modify and set log format:
log_format combined-1 '$remote_addr forwarded for $http_x_real_ip - $remote_user [$time_local]  '
                      '"$request" $status $body_bytes_sent '
                      '"$http_referer" "$http_user_agent"';

# or:
log_format combined-2 '$remote_addr - $remote_user [$time_local] "$request" '
                      '$status $body_bytes_sent "$http_referer" '
                      '"$http_user_agent" "$http_x_forwarded_for"';

access_log /var/log/nginx/example.com/access.log combined-1;
This way, e.g. the
$_SERVER['REMOTE_ADDR']will be correctly filled up in PHP fastcgi. You can test it with the following script:# tls_check.php <?php echo '<pre>'; print_r($_SERVER); echo '</pre>'; exit; ?>
And send request to it:
curl -H Cache-Control: no-cache -ks https://example.com/tls-check.php?${RANDOM} | grep "HTTP_X_FORWARDED_FOR\|HTTP_X_REAL_IP\|SERVER_ADDR\|REMOTE_ADDR"
[HTTP_X_FORWARDED_FOR] => 172.217.20.206
[HTTP_X_REAL_IP] => 172.217.20.206
[SERVER_ADDR] => 192.168.10.100
[REMOTE_ADDR] => 192.168.10.10
Since 2014, the IETF has approved a standard header definition for proxy, called Forwarded, documented here and here that should be use instead of X-Forwarded headers. This is the one you should use reliably to get originating IP in case your request is handled by a proxy. Official NGINX documentation also gives you how to Using the Forwarded header.
In general, the proxy headers (Forwarded or X-Forwarded-For) are the right way to get your client IP only when you are sure they come to you via a proxy. If there is no proxy header or no usable value in, you should default to the REMOTE_ADDR server variable.
Load Balancing is in principle a wonderful thing really. You can find out about it when you serve tens of thousands (or maybe more) of requests every second. Of course, load balancing is not the only reason - think also about maintenance tasks without downtime.
Generally load balancing is a technique used to distribute the workload across multiple computing resources and servers. I think you should always use this technique also if you have a simple app or whatever else what you're sharing with other.
The configuration is very simple. NGINX includes a ngx_http_upstream_module to define backends (groups of servers or multiple server instances). More specifically, the upstream directive is responsible for this.
upstreamonly provide a list of servers, some kind of weight, and other parameters related to the backend layer.
🔖 Tweak passive health checks - Load Balancing - P3
🔖 Don't disable backends by comments, use down parameter - Load Balancing - P4
Before we start talking about the load balancing techniques you should know something about server directive. It defines the address and other parameters of a backend servers.
This directive accepts the following options:
-
weight=<num>- sets the weight of the origin server, e.g.weight=10 -
max_conns=<num>- limits the maximum number of simultaneous active connections from the NGINX proxy server to an upstream server (default value:0= no limit), e.g.max_conns=8- if you set
max_conns=4the 5th will be rejected - if the server group does not reside in the shared memory (
zonedirective), the limitation works per each worker process
- if you set
-
max_fails=<num>- the number of unsuccessful attempts to communicate with the backend (default value:1,0disables the accounting of attempts), e.g.max_fails=3; -
fail_timeout=<time>- the time during which the specified number of unsuccessful attempts to communicate with the server should happen to consider the server unavailable (default value:10 seconds), e.g.fail_timeout=30s; -
zone <name> <size>- defines shared memory zone that keeps the group’s configuration and run-time state that are shared between worker processes, e.g.zone backend 32k; -
backup- if server is marked as a backup server it does not receive requests unless both of the other servers are unavailable -
down- marks the server as permanently unavailable
Setting up SSL termination on NGINX is also very simple using the SSL module. For this you need to use upstream module, and proxy module also. A very good case study is also given here.
For more information please read Securing HTTP Traffic to Upstream Servers from the official documentation.
It's the simpliest load balancing technique. Round Robin has the list of servers and forwards each request to each server from the list in order. Once it reaches the last server, the loop again jumps to the first server and start again.
upstream bck_testing_01 {

  # with default weight for all (weight=1)
  server 192.168.250.220:8080;
  server 192.168.250.221:8080;
  server 192.168.250.222:8080;

}

In Weighted Round Robin load balancing algorithm, each server is allocated with a weight based on its configuration and ability to process the request.
This method is similar to the Round Robin in a sense that the manner by which requests are assigned to the nodes is still cyclical, albeit with a twist. The node with the higher specs will be apportioned a greater number of requests.
upstream bck_testing_01 {

  server 192.168.250.220:8080   weight=3;
  server 192.168.250.221:8080;              # default weight=1
  server 192.168.250.222:8080;              # default weight=1

}

This method tells the load balancer to look at the connections going to each server and send the next connection to the server with the least amount of connections.
upstream bck_testing_01 {

  least_conn;

  # with default weight for all (weight=1)
  server 192.168.250.220:8080;
  server 192.168.250.221:8080;
  server 192.168.250.222:8080;

}
For example: if clients D10, D11 and D12 attempts to connect after A4, C2 and C8 have already disconnected but A1, B3, B5, B6, C7 and A9 are still connected, the load balancer will assign client D10 to server 2 instead of server 1 and server 3. After that, client D11 will be assign to server 1 and client D12 will be assign to server 2.

This is, in general, a very fair distribution method, as it uses the ratio of the number of connections and the weight of a server. The server in the cluster with the lowest ratio automatically receives the next request.
upstream bck_testing_01 {

  least_conn;

  server 192.168.250.220:8080   weight=3;
  server 192.168.250.221:8080;              # default weight=1
  server 192.168.250.222:8080;              # default weight=1

}
For example: if clients D10, D11 and D12 attempts to connect after A4, C2 and C8 have already disconnected but A1, B3, B5, B6, C7 and A9 are still connected, the load balancer will assign client D10 to server 2 or 3 (because they have a least active connections) instead of server 1. After that, client D11 and D12 will be assign to server 1 because it has the biggest weight parameter.

The IP Hash method uses the IP of the client to create a unique hash key and associates the hash with one of the servers. This ensures that a user is sent to the same server in future sessions (a basic kind of session persistence) except when this server is unavailable. If one of the servers needs to be temporarily removed, it should be marked with the down parameter in order to preserve the current hashing of client IP addresses.
This technique is especially helpful if actions between sessions has to be kept alive e.g. products put in the shopping cart or when the session state is of concern and not handled by shared memory of the application.
upstream bck_testing_01 {

  ip_hash;

  # with default weight for all (weight=1)
  server 192.168.250.220:8080;
  server 192.168.250.221:8080;
  server 192.168.250.222:8080;

}

This technique is very similar to the IP Hash but for each request the load balancer calculates a hash that is based on the combination of a text string, variable, or a combination you specify, and associates the hash with one of the servers.
upstream bck_testing_01 {

  hash $request_uri;

  # with default weight for all (weight=1)
  server 192.168.250.220:8080;
  server 192.168.250.221:8080;
  server 192.168.250.222:8080;

}
For example: load balancer calculate hash from the full original request URI (with arguments). Clients A4, C7, C8 and A9 sends requests to the /static location and will be assign to server 1. Similarly clients A1, C2, B6 which get /sitemap.xml resource they will be assign to server 2. Clients B3 and B5 sends requests to the /api/v4 and they will be assign to server 3.

It is similar to the Generic Hash method because you can also specify a unique hash identifier but the assignment to the appropriate server is under your control. I think it's a somewhat primitive method and I wouldn't say it is a full load balancing technique, but in some cases it is very useful.
Mainly this helps reducing the mess on the configuration made by a lot of
locationblocks with similar configurations.
First of all create a map:
map $request_uri $bck_testing_01 {

  default       "192.168.250.220:8080";

  /api/v4       "192.168.250.220:8080";
  /api/v3       "192.168.250.221:8080";
  /static       "192.168.250.222:8080";
  /sitemap.xml  "192.168.250.222:8080";

}
And add proxy_pass directive:
server {

  ...

  location / {

    proxy_pass    http:https://$bck_testing_01;

  }

  ...

}NGINX has a default module to setup rate limiting. For me, it's one of the most useful protect feature but sometimes really hard to understand.
I think, in case of doubt, you should read up on the following documents:
- Rate Limiting with NGINX and NGINX Plus
- NGINX rate-limiting in a nutshell
- NGINX Rate Limiting
- How to protect your web site from HTTP request flood, DoS and brute-force attacks
Rate limiting rules are useful for:
- traffic shaping
- traffic optimising
- slow down the rate of incoming requests
- protect http requests flood
- protect against slow http attacks
- prevent consume a lot of bandwidth
- mitigating ddos attacks
- protect brute-force attacks
NGINX has following variables (unique keys) that can be used in a rate limiting rules. For example:
| VARIABLE | DESCRIPTION |
|---|---|
$remote_addr |
client address |
$binary_remote_addr |
client address in a binary form, it is smaller and saves space then remote_addr |
$server_name |
name of the server which accepted a request |
$request_uri |
full original request URI (with arguments) |
$query_string |
arguments in the request line |
Please see official doc for more information about variables.
NGINX also provides following keys:
| KEY | DESCRIPTION |
|---|---|
limit_req_zone |
stores the current number of excessive requests |
limit_conn_zone |
stores the maximum allowed number of connections |
and directives:
| DIRECTIVE | DESCRIPTION |
|---|---|
limit_req |
in combination with a limit_conn_zone sets the shared memory zone and the maximum burst size of requests |
limit_conn |
in combination with a limit_req_zone sets the shared memory zone and the maximum allowed number of (simultaneous) connections to the server per a client IP |
Keys are used to store the state of each IP address and how often it has accessed a limited object. This information are stored in shared memory available from all NGINX worker processes.
Both keys also provides response status parameters indicating too many requests or connections with specific http code (default 503).
limit_req_status <value>limit_conn_status <value>
For example, if you want to set the desired logging level for cases when the server limits the number of connections:
# Add this to http context:
limit_req_status 429;

# Set your own error page for 429 http code:
error_page 429 /rate_limit.html;
location = /rate_limit.html {

  root /usr/share/www/http-error-pages/sites/other;
  internal;

}
And create this file:
cat > /usr/share/www/http-error-pages/sites/other/rate_limit.html << __EOF__
HTTP 429 Too Many Requests
__EOF__
Rate limiting rules also have zones that lets you define a shared space in which to count the incoming requests or connections.
All requests or connections coming into the same space will be counted in the same rate limit. This is what allows you to limit per URL, per IP, or anything else.
The zone has two required parts:
<name>- is the zone identifier<size>- is the zone size
Example:
<key> <variable> zone=<name>:<size>;
State information for about 16,000 IP addresses takes 1 megabyte. So 1 kilobyte zone has 16 IP addresses.
The range of zones is as follows:
-
http context
http { ... zone=<name>; -
server context
server { ... zone=<name>; -
location directive
location /api {

  ... zone=<name>;
All rate limiting rules (definitions) should be added to the NGINX
httpcontext.
limit_req_zone key lets you set rate parameter (optional) - it defines the rate limited URL(s).
For enable queue you should use limit_req or limit_conn directives (see above). limit_req also provides optional parameters:
| PARAMETER | DESCRIPTION |
|---|---|
burst=<num> |
sets the maximum number of excessive requests that await to be processed in a timely manner; maximum requests as rate * burst in burst seconds |
nodelay |
it imposes a rate limit without constraining the allowed spacing between requests; default NGINX would return 503 response and not handle excessive requests |
nodelayparameters are only useful when you also set aburst.
Without nodelay NGINX would wait (no 503 response) and handle excessive requests with some delay.
Documentation:
Documentation:
This module allows real-time queries against the Max Mind GeoIP database. It uses the old version of API, still very common on OS distributions. For using the new version of GeoIP API, see geoip2 module.
The Max Mind GeoIP database is a map of IP network address assignments to geographical locales that can be useful - though approximate - in identifying the physical location with which an IP host address is associated on a relatively granular level.
The GeoIP module sets multiple variables and by default NGINX parses and loads geoip data into memory once the config file only on (re)start or SIGHUP.
GeoIP lookups come from a distributed database rather than from a dynamic server, so unlike DNS, the worst-case performance hit is minimal. Additionally, from a performance point of view, you should not worry, as geoip database are stored in memory (at the reading configuration phase) and NGINX doing lookups very fast.
GeoIP module creates (and assigns values to) variables based on the IP address of the request client and one of Maxmind GeoIP databases. One of the common uses is to set the country of the end-user as a NGINX variable.
Variables in NGINX are evaluated only on demand. If $geoip_* variable was not used during the request processing, then geoip db was not lookuped. So, if you don't call the geoip variable on your app the geoip module wont be executed at all. The only inconvenience of using really large geobases is config reading time.
See Restricting access by geographical location from this handbook.