The "Eye of Horus" is a concept and symbol in ancient Egyptian religion that represents well-being, healing, and protection. The Eye of Horus symbol, a stylized eye with distinctive markings, was believed to have protective magical power and appeared frequently in ancient Egyptian art.
 Figure 1. A staff gage gives a quick estimate of gage height (stage) of a river. Photo by Water Science School on USGS.gov.
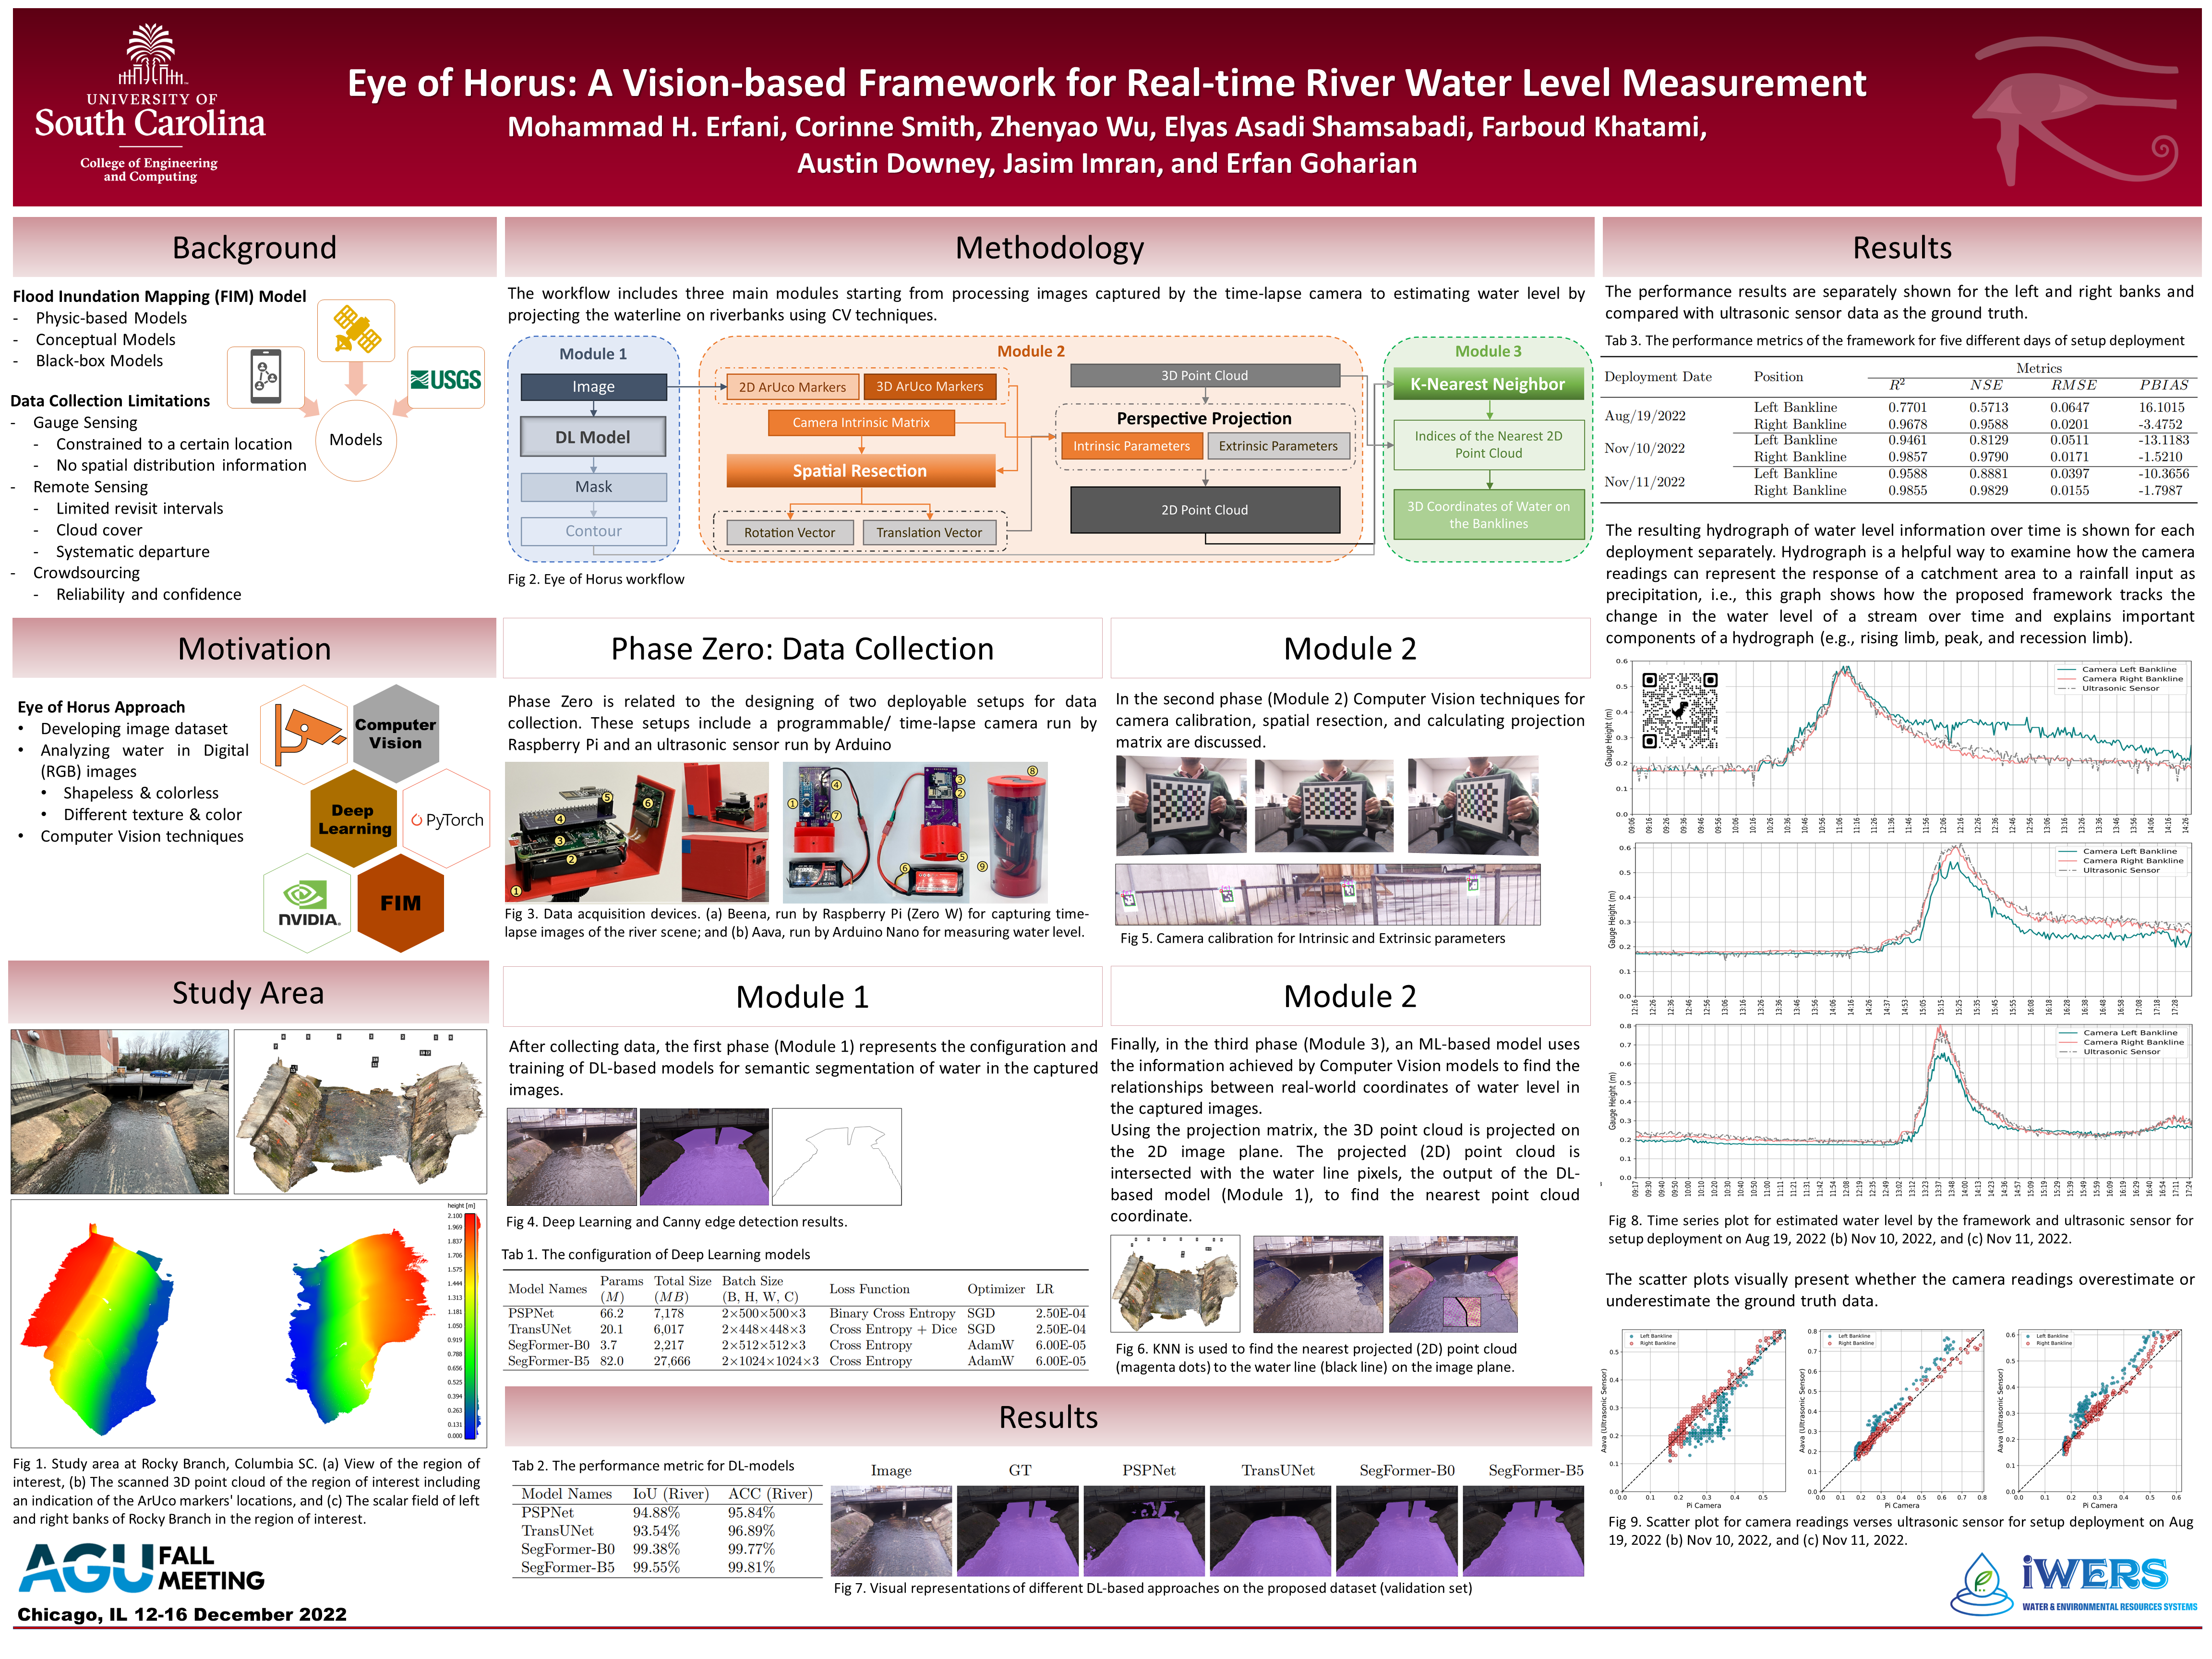
Inspired by the concept – in this project – "Eye of Horus" is a vision-based framework for measuring characteristics of streamflow like water level from time-lapse images. Follwoing animations are related to setup deployment on Aug 19, 2022, Nov 10, 2022 and Nov 11, 2022. The segmented stream flow, water level fluctuation at cross-section, and stage hydrographs are based on the captured images at one-minute intervals.

Figure 2. The AGU Fall Meeting 2022 Poster.

Figure 3. Setup deployment on Aug 19, 2022, time-lapse images captured by Raspberry Pi camera Module V2.

Figure 4. Setup deployment on Nov 10, 2022, time-lapse images captured by Raspberry Pi camera Module V2.

Figure 5. Setup deployment on Nov 11, 2022, time-lapse images captured by Raspberry Pi camera Module V2.
The process of estimating the parameters of a camera is called camera calibration.
This means we have all the information (parameters or coefficients) about the camera required to determine an accurate relationship between a 3D point in the real world and its corresponding 2D projection (pixel) in the image captured by that calibrated camera [1].
Typically this means recovering two kinds of parameters. First, internal parameters of the camera/lens system e.g., focal length, optical center, and radial distortion coefficients of the lens. Second, external parameters refering to the orientation (rotation and translation) of the camera with respect to some world coordinate system [1].
To generate clear and sharp images the diameter of the aperture (hole) of a pinhole camera should be as small as possible. If we increase the size of the aperture, we know that rays from multiple points of the object would be incident on the same part of the screen creating a blurred image. On the other hand, if we make the aperture size small, only a small number of photons hit the image sensor. As a result the image is dark and noisy [2].
So, smaller the aperture of the pinhole camera, more focused is the image but, at the same time, darker and noisier it is. While, with a larger aperture, the image sensor receives more photons (and hence more signal). This leads to a bright image with only a small amount of noise [2].
How do we get a sharp image but at the same time capture more light rays to make the image bright? We replace the pinhole by a lens thus increasing the size of the aperture through which light rays can pass. A lens allows larger number of rays to pass through the hole and because of its optical properties it can also focus them on the screen. This makes the image brighter. So we have bright and sharp, focused image using a lens [2]. By using a lens we get better quality images but the lens introduces some distortion effects. There are two major types of distortion effects :
-
Radial distortion: This type of distortion usually occur due unequal bending of light. The rays bend more near the edges of the lens than the rays near the centre of the lens. Due to radial distortion straight lines in real world appear to be curved in the image. The light ray gets displaced radially inward or outward from its ideal location before hitting the image sensor. There are two type of radial distortion effect
-
Barrel distortion effect, which corresponds to negative radial displacement.
-
Pincushion distortion effect, which corresponds to a positive radial displacement [2].
-
-
Tangential distortion: This usually occurs when image screen or sensor is at an angle with respect to the lens, i.e., lenses are not perfectly parallel to the imaging plane. Thus the image seem to be tilted and stretched [2].
Radial distortion can be represented as follows [3]:
xu = x(1 + k1r2 + k2r4 + k3r6)
yu = y(1 + k1r2 + k2r4 + k3r6)
Where, (xu, yu) represents pixel point coordinates on the corrected output image.
The amount of tangential distortion can be represented as below [3]:
xu = x + [2p1xy + p2(r2 + 2x2)]
yu = y + [p1(r2 + 2y2) + 2p2xy]
we need to find five parameters, known as distortion coefficients given by [3]:
Distortion Coefficients: (k1, k2, p1, p2, k3)
Intrinsic parameters are specific to a camera. They include information like focal length (fx, fy) and optical centers (cx, cy). The focal length and optical centers can be used to create a camera matrix, which can be used to remove distortion due to the lenses of a specific camera. The camera matrix is unique to a specific camera, so once calculated, it can be reused on other images taken by the same camera. It is expressed as a 3x3 matrix [3].
Extrinsic parameters correspond to rotation and translation vectors which translate the coordinates of a 3D point to a coordinate system [3].
[1] LearnOpenCV (2020, February 25). Camera Calibration using OpenCV. Retrieved (2022, Jan 13), from https://learnopencv.com/camera-calibration-using-opencv
[2] LearnOpenCV (2020, October 5). Understanding Lens Distortion. Retrieved (2022, Jan 13), from https://learnopencv.com/understanding-lens-distortion/
[3] OpenCV (2021, December 24). Camera Calibration. Retrieved (2022, Jan 13), from https://docs.opencv.org/3.4/dc/dbb/tutorial_py_calibration.html