本项目的面试题来源于 sudheerj/reactjs-interview-questions 这个项目。一时兴起就动起了翻译的念头,由于本人的 React 功力尚浅,翻译的内容难免有误或不妥的地方,望请各位见谅。如果你喜欢这个项目,请 Star,更感谢你的 Pull Request。
以下是现阶段本项目的短期计划:
- 完成前期的翻译工作
- 为 React 16 新特性,添加在线示例或完整的示例代码
这里再次感谢 liaoyongfu 的大力支持🌹!
-
React 是一个 开源前端 JavaScript 库,用于构建用户界面,尤其是单页应用程序。它用于处理网页和移动应用程序的视图层。React 是由 Facebook 的软件工程师 Jordan Walke 创建的。在 2011 年 React 应用首次被部署到 Facebook 的信息流中,之后于 2012 年被应用到 Instagram 上。
-
React 的主要特性有:
- 考虑到真实的 DOM 操作成本很高,它使用 VirtualDOM 而不是真实的 DOM
- 支持服务端渲染。
- 遵循单向数据流或数据绑定。
- 使用可重用/可组合的 UI 组件开发视图。
-
JSX 是 ECMAScript 一个类似 XML 的语法扩展。基本上,它只是为
React.createElement()函数提供语法糖,从而让在我们在 JavaScript 中,使用类 HTML 模板的语法,进行页面描述。在下面的示例中,
<h1>内的文本标签会作为 JavaScript 函数返回给渲染函数。class App extends React.Component { render() { return( <div> <h1>{'Welcome to React world!'}</h1> </div> ) } }
-
一个 Element 是一个简单的对象,它描述了你希望在屏幕上以DOM节点或其他组件的形式呈现的内容。Elements 在它们的属性中可以包含其他 Elements。创建一个 React 元素是很轻量的。一旦元素被创建后,它将不会被修改。
React Element 的对象表示如下:
const element = React.createElement(
  'div',
  {id: 'login-btn'},
  'Login'
)
上面的
React.createElement()函数会返回一个对象。{ type: 'div', props: { children: 'Login', id: 'login-btn' } }最后使用
ReactDOM.render()方法渲染到 DOM:<div id='login-btn'>Login</div>
而一个组件可以用多种不同方式声明。它可以是一个含有
render()方法的类。或者,在简单的情况中,它可以定义为函数。无论哪种情况,它都将 props 作为输入,并返回一个 JSX 树作为输出:const Button = ({ onLogin }) => <div id={'login-btn'} onClick={onLogin} />
然后 JSX 被转换成
React.createElement()函数:const Button = ({ onLogin }) => React.createElement( 'div', { id: 'login-btn', onClick: onLogin }, 'Login' )
-
有两种可行的方法来创建一个组件:
-
Function Components: 这是创建组件最简单的方式。这些是纯 JavaScript 函数,接受 props 对象作为第一个参数并返回 React 元素:
function Greeting({ message }) {
  return <h1>{`Hello, ${message}`}</h1>
}
-
Class Components: 你还可以使用 ES6 类来定义组件。上面的函数组件可以写成:
class Greeting extends React.Component {
  render() {
    return <h1>{`Hello, ${this.props.message}`}</h1>
  }
}
-
-
如果组件需要 状态或生命周期方法,那么使用类组件,否则使用函数组件。
-
React.PureComponent与React.Component完全相同,只是它为你处理了shouldComponentUpdate()方法。当属性或状态发生变化时,PureComponent 将对属性和状态进行浅比较。另一方面,Component 不会将当前的属性和状态与新的属性和状态进行比较。因此,在默认情况下,每当调用shouldComponentUpdate时,组件将重新渲染。 -
组件的状态是一个对象,它包含某些信息,这些信息可能在组件的生命周期中发生更改。我们应该尽量使状态尽可能简单,并尽量减少有状态组件的数量。让我们创建一个包含消息状态的 User 组件,
class User extends React.Component {
  constructor(props) {
    super(props)

    this.state = {
      message: 'Welcome to React world'
    }
  }

  render() {
    return (
      <div>
        <h1>{this.state.message}</h1>
      </div>
    )
  }
}
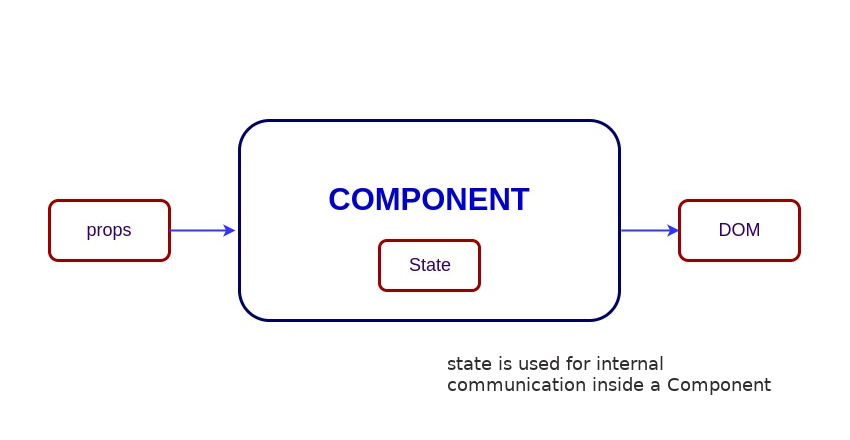
状态(State)与属性(Props)类似,但它是私有的,完全由组件控制。也就是说,除了它所属的组件外,任何组件都无法访问它。
-
Props 是组件的输入。它们是单个值或包含一组值的对象,这些值在创建时使用类似于 HTML 标记属性的命名约定传递给组件。它们是从父组件传递到子 组件的数据。
Props 的主要目的是提供以下组件功能:
- 将自定义数据传递到组件。
- 触发状态更改。
- 在组件的
render()方法中通过this.props.reactProp使用。
例如,让我们使用
reactProp属性创建一个元素:<Element reactProp={'1'} />
然后,
reactProp将成为附加到 React props 对象的属性,该对象最初已存在于使用 React 库创建的所有组件上。props.reactProp

props 和 state 都是普通的 JavaScript 对象。虽然它们都保存着影响渲染输出的信息,但它们在组件方面的功能不同。Props 以类似于函数参数的方式传递给组件,而状态则类似于在函数内声明变量并对它进行管理。
-
如果你尝试直接更新状态,则不会重新渲染组件?
//Wrong
this.state.message = 'Hello world'
而是使用
setState()方法。它调度组件状态对象的更新。当状态更改时,组件通过重新渲染来响应。//Correct this.setState({ message: 'Hello World' })
注意: 你可以在 constructor 中或使用最新的 JavaScript 类属性声明语法直接设置状态对象。
-
当 setState 完成和组件渲染后,回调函数将会被调用。由于
setState()是异步的,回调函数用于任何后续的操作。注意: 建议使用生命周期方法而不是此回调函数。
setState({ name: 'John' }, () => console.log('The name has updated and component re-rendered'))
-
- 在 HTML 中事件名必须小写:
<button onclick='activateLasers()'>
而在 React 中它遵循 camelCase (驼峰) 惯例:
<button onClick={activateLasers}>
- 在 HTML 中你可以返回
false以阻止默认的行为:
<a href='#' onclick='console.log("The link was clicked."); return false;' />
而在 React 中你必须地明确地调用
preventDefault():function handleClick(event) { event.preventDefault() console.log('The link was clicked.') }
-
实现这一点有三种可能的方法:
- Binding in Constructor: 在 JavaScript 类中,方法默认不被绑定。这也适用于定义为类方法的 React 事件处理程序。通常我们在构造函数中绑定它们。
class Component extends React.Componenet {
  constructor(props) {
    super(props)
    this.handleClick = this.handleClick.bind(this)
  }

  handleClick() {
    // ...
  }
}
- Public class fields syntax: 如果你不喜欢 bind 方案,则可以使用 public class fields syntax 正确绑定回调。
handleClick = () => {
  console.log('this is:', this)
}
<button onClick={this.handleClick}>
  {'Click me'}
</button>
- Arrow functions in callbacks: 你可以在回调函数中直接使用 arrow functions。
<button onClick={(event) => this.handleClick(event)}>
  {'Click me'}
</button>
注意: 如果回调函数作为属性传给子组件,那么这些组件可能触发一个额外的重新渲染。在这些情况下,考虑到性能,最好使用
.bind()或 public class fields syntax 方案。 -
你可以使用箭头函数来包装事件处理器并传递参数:
<button onClick={() => this.handleClick(id)} />
这相当于调用
.bind:<button onClick={this.handleClick.bind(this, id)} />
-
SyntheticEvent是对浏览器原生事件的跨浏览器包装。它的 API 与浏览器的原生事件相同,包括stopPropagation()和preventDefault(),除了事件在所有浏览器中的工作方式相同。 -
在 JS 中你可以使用 if statements 或 ternary expressions ,来实现条件判断。除了这些方法之外,你还可以在 JSX 中嵌入任何表达式,方法是将它们用大括号括起来,然后再加上 JS 逻辑运算符
&&。<h1>Hello!</h1> { messages.length > 0 && !isLogin ? <h2> You have {messages.length} unread messages. </h2> : <h2> You don't have unread messages. </h2> }
-
key是一个特殊的字符串属性,你在创建元素数组时需要包含它。Keys 帮助 React 识别哪些项已更改、添加或删除。我们通常使用数据中的 IDs 作为 keys:
const todoItems = todos.map((todo) =>
  <li key={todo.id}>
    {todo.text}
  </li>
)
在渲染列表项时,如果你没有稳定的 IDs,你可能会使用 index 作为 key:
const todoItems = todos.map((todo, index) =>
  <li key={index}>
    {todo.text}
  </li>
)
注意:
- 由于列表项的顺序可能发生改变,因此并不推荐使用 indexes 作为 keys。这可能会对性能产生负面影响,并可能导致组件状态出现问题。
- 如果将列表项提取为单独的组件,则在列表组件上应用 keys 而不是
li标签。 - 如果在列表项中没有设置
key属性,在控制台会显示警告消息。
-
ref 用于返回对元素的引用。但在大多数情况下,应该避免使用它们。当你需要直接访问 DOM 元素或组件的实例时,它们可能非常有用。
-
这里有两种方案
- 这是最近增加的一种方案。Refs 是使用
React.createRef()方法创建的,并通过ref属性添加到 React 元素上。为了在整个组件中使用refs,只需将 ref 分配给构造函数中的实例属性。
class MyComponent extends React.Component {
  constructor(props) {
    super(props)
    this.myRef = React.createRef()
  }
  render() {
    return <div ref={this.myRef} />
  }
}
- 你也可以使用 ref 回调函数的方案,而不用考虑 React 版本。例如,访问搜索栏组件中的
input元素如下:
class SearchBar extends Component {
   constructor(props) {
      super(props);
      this.txtSearch = null;
      this.state = { term: '' };
      this.setInputSearchRef = e => {
         this.txtSearch = e;
      }
   }

   onInputChange(event) {
      this.setState({ term: this.txtSearch.value });
   }

   render() {
      return (
         <input
            value={this.state.term}
            onChange={this.onInputChange.bind(this)}
            ref={this.setInputSearchRef} />
      );
   }
}
你也可以在使用 closures 的函数组件中使用 refs。
注意: 你也可以使用内联引用回调,尽管这不是推荐的方法。
- 这是最近增加的一种方案。Refs 是使用
-
Ref forwarding 是一个特性,它允许一些组件获取接收到 ref 对象并将它进一步传递给子组件。
const ButtonElement = React.forwardRef((props, ref) => (
  <button ref={ref} className="CustomButton">
    {props.children}
  </button>
));

// Create ref to the DOM button:
const ref = React.createRef();
<ButtonElement ref={ref}>{'Forward Ref'}</ButtonElement>
-
最好是使用 callback refs 而不是
findDOMNode()API。因为findDOMNode()阻碍了将来对 React 的某些改进。使用
findDOMNode已弃用的方案:class MyComponent extends Component { componentDidMount() { findDOMNode(this).scrollIntoView() } render() { return <div /> } }
推荐的方案是:
class MyComponent extends Component {
  componentDidMount() {
    this.node.scrollIntoView()
  }

  render() {
    return <div ref={node => this.node = node} />
  }
}
-
如果你以前使用过 React,你可能会熟悉旧的 API,其中的
ref属性是字符串,如ref={'textInput'},并且 DOM 节点的访问方式为this.refs.textInput。我们建议不要这样做,因为字符串引用有以下问题,并且被认为是遗留问题。字符串 refs 在 React v16 版本中被移除。-
它们强制 React 跟踪当前执行的组件。这是有问题的,因为它使 React 模块有状态,这会导致在 bundle 中复制 React 模块时会导致奇怪的错误。
-
它们是不可组合的 - 如果一个库把一个 ref 传给子元素,则用户无法对其设置另一个引用。
-
它们不能与静态分析工具一起使用,如 Flow。Flow 无法猜测出
this.refs上的字符串引用的作用及其类型。Callback refs 对静态分析更友好。 -
使用 "render callback" 模式(比如: ),它无法像大多数人预期的那样工作。
class MyComponent extends Component {
  renderRow = (index) => {
    // This won't work. Ref will get attached to DataTable rather than MyComponent:
    return <input ref={'input-' + index} />;

    // This would work though! Callback refs are awesome.
    return <input ref={input => this['input-' + index] = input} />;
  }

  render() {
    return <DataTable data={this.props.data} renderRow={this.renderRow} />
  }
}
-
-
Virtual DOM (VDOM) 是 Real DOM 的内存表示形式。UI 的展示形式被保存在内存中并与真实的 DOM 同步。这是在调用的渲染函数和在屏幕上显示元素之间发生的一个步骤。整个过程被称为 reconciliation。
-
Virtual DOM 分为三个简单的步骤。
-
每当任何底层数据发生更改时,整个 UI 都将以 Virtual DOM 的形式重新渲染。

-
然后计算先前 Virtual DOM 对象和新的 Virtual DOM 对象之间的差异。

-
一旦计算完成,真实的 DOM 将只更新实际更改的内容。

-
-
Shadow DOM 是一种浏览器技术,它解决了构建网络应用的脆弱性问题。Shadow DOM 修复了 CSS 和 DOM。它在网络平台中引入作用域样式。 无需工具或命名约定,你即可使用原生 JavaScript 捆绑 CSS 和标记、隐藏实现详情以及编写独立的组件。Virtual DOM 是一个由 JavaScript 库在浏览器 API 之上实现的概念。
-
Fiber 是 React v16 中新的 reconciliation 引擎,或核心算法的重新实现。React Fiber 的目标是提高对动画,布局,手势,暂停,中止或者重用任务的能力及为不同类型的更新分配优先级,及新的并发原语等领域的适用性。
-
React Fiber 的目标是提高其在动画、布局和手势等领域的适用性。它的主要特性是 incremental rendering: 将渲染任务拆分为小的任务块并将任务分配到多个帧上的能力。
-
在随后的用户输入中,能够控制表单中输入元素的组件被称为受控组件,即每个状态更改都有一个相关联的处理程序。
例如,我们使用下面的 handleChange 函数将输入框的值转换成大写:
handleChange(event) {
  this.setState({value: event.target.value.toUpperCase()})
}
-
非受控组件是在内部存储其自身状态的组件,当需要时,可以使用 ref 查询 DOM 并查找其当前值。这有点像传统的 HTML。
在下面的 UserProfile 组件中,我们通过 ref 引用
name输入框:class UserProfile extends React.Component { constructor(props) { super(props) this.handleSubmit = this.handleSubmit.bind(this) this.input = React.createRef() } handleSubmit(event) { alert('A name was submitted: ' + this.input.current.value) event.preventDefault() } render() { return ( <form onSubmit={this.handleSubmit}> <label> {'Name:'} <input type="text" ref={this.input} /> </label> <input type="submit" value="Submit" /> </form> ); } }
在大多数情况下,建议使用受控组件来实现表单。
-
JSX 元素将被转换为
React.createElement()函数来创建 React 元素,这些对象将用于表示 UI 对象。而cloneElement用于克隆元素并传递新的属性。 -
当多个组件需要共享相同的更改数据时,建议将共享状态提升到最接近的共同祖先。这意味着,如果两个子组件共享来自其父组件的相同数据,则将状态移动到父组件,而不是在两个子组件中维护局部状态。
-
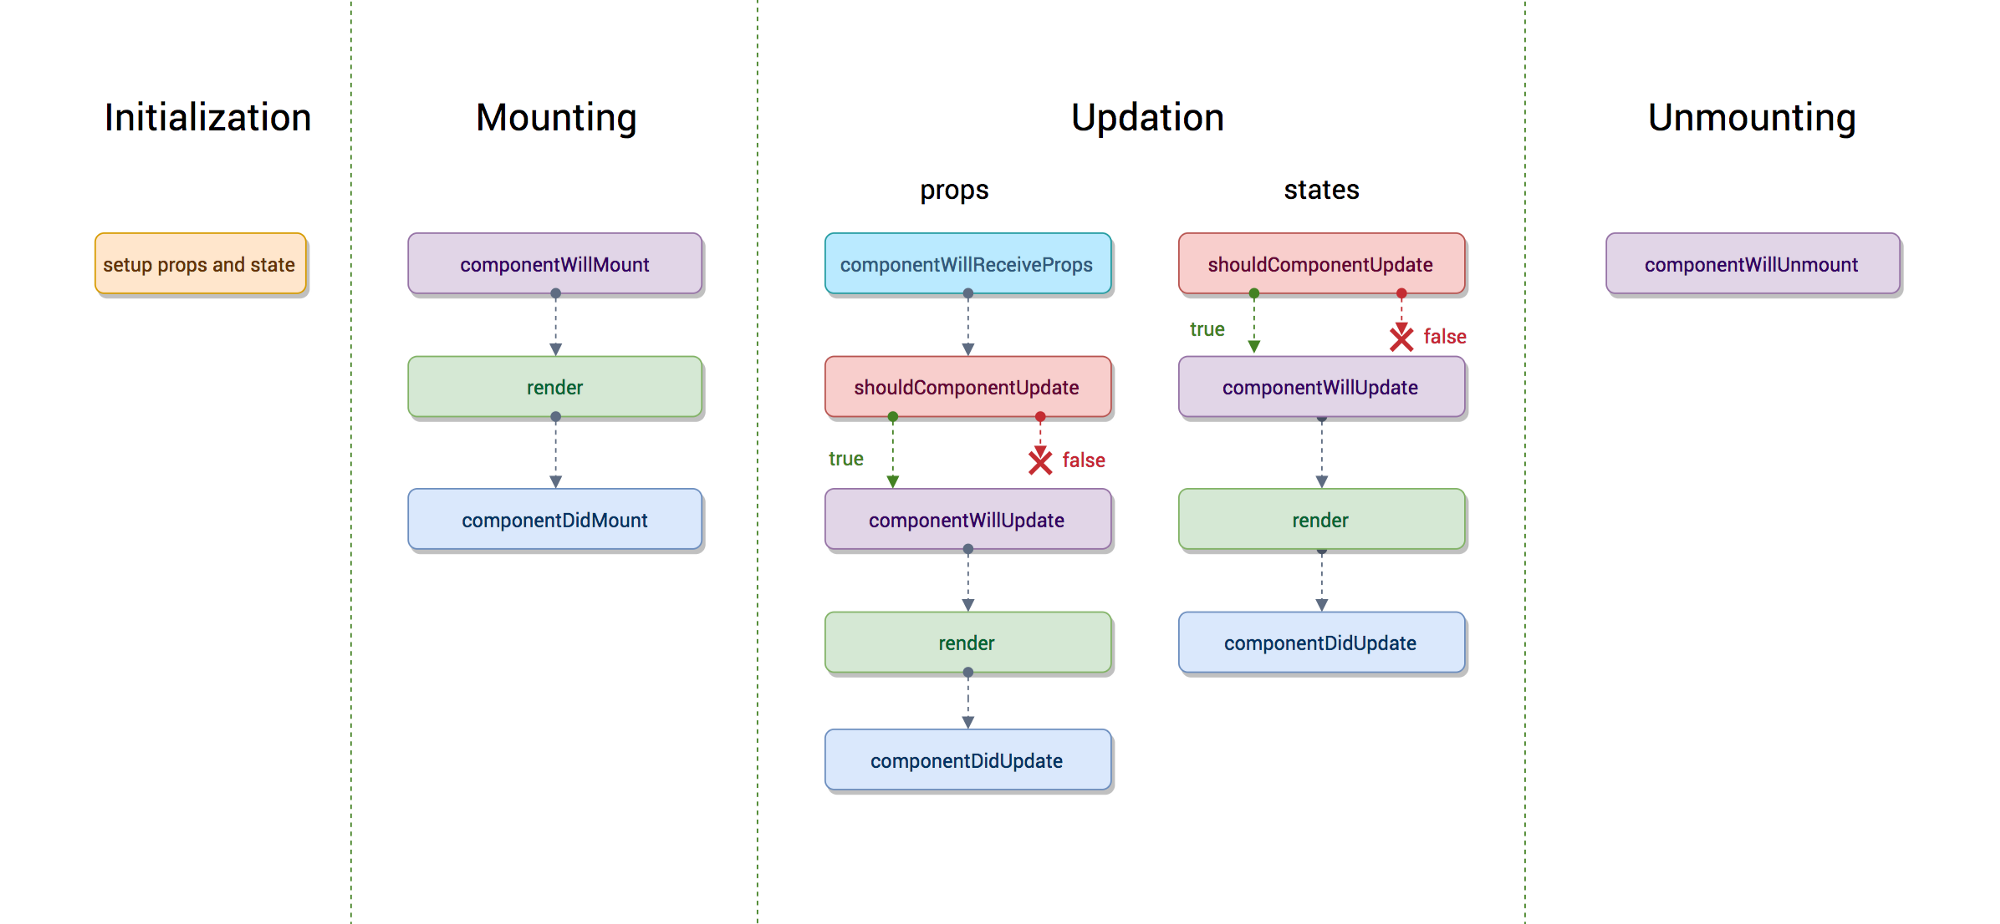
组件生命周期有三个不同的生命周期阶段:
-
Mounting: 组件已准备好挂载到浏览器的 DOM 中. 此阶段包含来自
constructor(),getDerivedStateFromProps(),render(), 和componentDidMount()生命周期方法中的初始化过程。 -
Updating: 在此阶段,组件以两种方式更新,发送新的属性并使用
setState()或forceUpdate()方法更新状态. 此阶段包含getDerivedStateFromProps(),shouldComponentUpdate(),render(),getSnapshotBeforeUpdate()和componentDidUpdate()生命周期方法。 -
Unmounting: 在这个最后阶段,不需要组件,它将从浏览器 DOM 中卸载。这个阶段包含
componentWillUnmount()生命周期方法。
值得一提的是,在将更改应用到 DOM 时,React 内部也有阶段概念。它们按如下方式分隔开:
-
Render 组件将会进行无副作用渲染。这适用于纯组件(Pure Component),在此阶段,React 可以暂停,中止或重新渲染。
-
Pre-commit 在组件实际将更改应用于 DOM 之前,有一个时刻允许 React 通过
getSnapshotBeforeUpdate()捕获一些 DOM 信息(例如滚动位置)。 -
Commit React 操作 DOM 并分别执行最后的生命周期:
componentDidMount()在 DOM 渲染完成后调用,componentDidUpdate()在组件更新时调用,componentWillUnmount()在组件卸载时调用。 React 16.3+ 阶段 (也可以看交互式版本)

React 16.3 之前
-
-
React 16.3+
- getDerivedStateFromProps: 在调用
render()之前调用,并在 每次 渲染时调用。 需要使用派生状态的情况是很罕见得。值得阅读 如果你需要派生状态. - componentDidMount: 首次渲染后调用,所有得 Ajax 请求、DOM 或状态更新、设置事件监听器都应该在此处发生。
- shouldComponentUpdate: 确定组件是否应该更新。 默认情况下,它返回
true。 如果你确定在更新状态或属性后不需要渲染组件,则可以返回false值。 它是一个提高性能的好地方,因为它允许你在组件接收新属性时阻止重新渲染。 - getSnapshotBeforeUpdate: 在最新的渲染输出提交给 DOM 前将会立即调用,这对于从 DOM 捕获信息(比如:滚动位置)很有用。
- componentDidUpdate: 它主要用于更新 DOM 以响应 prop 或 state 更改。 如果
shouldComponentUpdate()返回false,则不会触发。 - componentWillUnmount 当一个组件被从 DOM 中移除时,该方法被调用,取消网络请求或者移除与该组件相关的事件监听程序等应该在这里进行。
Before 16.3
- componentWillMount: 在组件
render()前执行,用于根组件中的应用程序级别配置。应该避免在该方法中引入任何的副作用或订阅。 - componentDidMount: 首次渲染后调用,所有得 Ajax 请求、DOM 或状态更新、设置事件监听器都应该在此处发生。
- componentWillReceiveProps: 在组件接收到新属性前调用,若你需要更新状态响应属性改变(例如,重置它),你可能需对比
this.props和nextProps并在该方法中使用this.setState()处理状态改变。 - shouldComponentUpdate: 确定组件是否应该更新。 默认情况下,它返回
true。 如果你确定在更新状态或属性后不需要渲染组件,则可以返回false值。 它是一个提高性能的好地方,因为它允许你在组件接收新属性时阻止重新渲染。 - componentWillUpdate: 当
shouldComponentUpdate返回true后重新渲染组件之前执行,注意你不能在这调用this.setState() - componentDidUpdate: 它主要用于更新 DOM 以响应 prop 或 state 更改。 如果
shouldComponentUpdate()返回false,则不会触发。 - componentWillUnmount: 当一个组件被从 DOM 中移除时,该方法被调用,取消网络请求或者移除与该组件相关的事件监听程序等应该在这里进行。
- getDerivedStateFromProps: 在调用
-
高阶组件(HOC) 就是一个函数,且该函数接受一个组件作为参数,并返回一个新的组件,它只是一种模式,这种模式是由
react自身的组合性质必然产生的。我们将它们称为纯组件,因为它们可以接受任何动态提供的子组件,但它们不会修改或复制其输入组件中的任何行为。
const EnhancedComponent = higherOrderComponent(WrappedComponent)
HOC 有很多用例:
- 代码复用,逻辑抽象化
- 渲染劫持
- 抽象化和操作状态(
state) - 操作属性(
props)
译注:更详细用法请参考高阶组件的使用
-
你可以使用属性代理模式向输入组件增加或编辑属性(props):
function HOC(WrappedComponent) {
  return class Test extends Component {
    render() {
      const newProps = {
        title: 'New Header',
        footer: false,
        showFeatureX: false,
        showFeatureY: true
      };

      return <WrappedComponent {...this.props} {...newProps} />
    }
  }
}
-
Context 通过组件树提供了一个传递数据的方法,从而避免了在每一个层级手动的传递
props。比如,需要在应用中许多组件需要访问登录用户信息、地区偏好、UI主题等。// 创建一个 theme Context, 默认 theme 的值为 light const ThemeContext = React.createContext('light'); function ThemedButton(props) { // ThemedButton 组件从 context 接收 theme return ( <ThemeContext.Consumer> {theme => <Button {...props} theme={theme} />} </ThemeContext.Consumer> ); } // 中间组件 function Toolbar(props) { return ( <div> <ThemedButton /> </div> ); } class App extends React.Component { render() { return ( <ThemeContext.Provider value="dark"> <Toolbar /> </ThemeContext.Provider> ); } }
-
Children 是一个属性(
this.props.chldren),它允许你将组件作为数据传递给其他组件,就像你使用的任何其他组件一样。在组件的开始和结束标记之间放置的组件树将作为children属性传递给该组件。React API 中有许多方法中提供了这个不透明数据结构的方法,包括:
React.Children.map、React.Children.forEach、React.Children.count、React.Children.only、React.Children.toArray。const MyDiv = React.createClass({ render: function() { return <div>{this.props.children}</div> } }) ReactDOM.render( <MyDiv> <span>{'Hello'}</span> <span>{'World'}</span> </MyDiv>, node )
-
React/JSX 中的注释类似于 JavaScript 的多行注释,但是是用大括号括起来。
单行注释:
<div>
  {/* 单行注释(在原生 JavaScript 中,单行注释用双斜杠(//)表示) */}
  {`Welcome ${user}, let's play React`}
</div>
多行注释:
<div>
  {/* 多行注释超过
   一行 */}
  {`Welcome ${user}, let's play React`}
</div>
-
在调用
super()方法之前,子类构造函数不能使用this引用。这同样适用于ES6子类。将props参数传递给super()的主要原因是为了在子构造函数中访问this.props。带 props 参数:
class MyComponent extends React.Component {
  constructor(props) {
    super(props)

    console.log(this.props) // prints { name: 'John', age: 42 }
  }
}
不带 props 参数:
class MyComponent extends React.Component {
  constructor(props) {
    super()

    console.log(this.props) // prints undefined

    // but props parameter is still available
    console.log(props) // prints { name: 'John', age: 42 }
  }

  render() {
    // no difference outside constructor
    console.log(this.props) // prints { name: 'John', age: 42 }
  }
}
上面的代码片段显示
this.props仅在构造函数中有所不同。 它在构造函数之外是相同的。 -
当组件的
props或state发生更改时,React 通过将新返回的元素与先前呈现的元素进行比较来确定是否需要实际的 DOM 更新。当它们不相等时,React 将更新 DOM 。此过程称为reconciliation。 -
如果你使用 ES6 或 Babel 转换器来转换你的 JSX 代码,那么你可以使用计算属性名称来完成此操作。
handleInputChange(event) {
  this.setState({ [event.target.id]: event.target.value })
}
-
你需要确保在将函数作为参数传递时未调用该函数。
render() {
  // Wrong: handleClick is called instead of passed as a reference!
  return <button onClick={this.handleClick()}>{'Click Me'}</button>
}
相反地,传递函数本身应该没有括号:
render() {
  // Correct: handleClick is passed as a reference!
  return <button onClick={this.handleClick}>{'Click Me'}</button>
}
-
这是必要的,因为组件不是 DOM 元素,它们是构造函数。 此外,在 JSX 中,小写标记名称是指 HTML 元素,而不是组件。
-
class是 JavaScript 中的关键字,而 JSX 是 JavaScript 的扩展。这就是为什么 React 使用className而不是class的主要原因。传递一个字符串作为className属性。render() { return <span className={'menu navigation-menu'}>{'Menu'}</span> }
-
它是 React 中的常见模式,用于组件返回多个元素。Fragments 可以让你聚合一个子元素列表,而无需向 DOM 添加额外节点。
render() {
  return (
    <React.Fragment>
      <ChildA />
      <ChildB />
      <ChildC />
    </React.Fragment>
  )
}
以下是简介语法,但是在一些工具中还不支持:
render() {
  return (
    <>
      <ChildA />
      <ChildB />
      <ChildC />
    </>
  )
}
译注:
React 16以前,render函数的返回必须有一个根节点,否则报错。 -
- 通过不创建额外的 DOM 节点,Fragments 更快并且使用更少的内存。这在非常大而深的节点树时很有好处。
- 一些 CSS 机制如Flexbox和CSS Grid具有特殊的父子关系,如果在中间添加 div 将使得很难保持所需的结构。
- 在 DOM 审查器中不会那么的杂乱
-
Portal 提供了一种很好的将子节点渲染到父组件以外的 DOM 节点的方式。
ReactDOM.createPortal(child, container)
第一个参数是任何可渲染的 React 子节点,例如元素,字符串或片段。第二个参数是 DOM 元素。
-
如果行为独立于其状态,则它可以是无状态组件。你可以使用函数或类来创建无状态组件。但除非你需要在组件中使用生命周期钩子,否则你应该选择函数组件。无状态组件有很多好处: 它们易于编写,理解和测试,速度更快,而且你可以完全避免使用
this关键字。 -
如果组件的行为依赖于组件的state,那么它可以被称为有状态组件。这些有状态组件总是类组件,并且具有在
constructor中初始化的状态。class App extends Component { constructor(props) { super(props) this.state = { count: 0 } } render() { // ... } }
-
When the application is running in development mode, React will automatically check all props that we set on components to make sure they have correct type. If the type is incorrect, React will generate warning messages in the console. It's disabled in production mode due performance impact. The mandatory props are defined with
isRequired.The set of predefined prop types:
PropTypes.numberPropTypes.stringPropTypes.arrayPropTypes.objectPropTypes.funcPropTypes.nodePropTypes.elementPropTypes.boolPropTypes.symbolPropTypes.any
We can define
propTypesforUsercomponent as below:import React from 'react' import PropTypes from 'prop-types' class User extends React.Component { static propTypes = { name: PropTypes.string.isRequired, age: PropTypes.number.isRequired } render() { return ( <> <h1>{`Welcome, ${this.props.name}`}</h1> <h2>{`Age, ${this.props.age}`}</h2> </> ) } }
Note: In React v15.5 PropTypes were moved from
React.PropTypestoprop-typeslibrary. -
- Increases the application's performance with Virtual DOM.
- JSX makes code easy to read and write.
- It renders both on client and server side (SSR).
- Easy to integrate with frameworks (Angular, Backbone) since it is only a view library.
- Easy to write unit and integration tests with tools such as Jest.
-
- React is just a view library, not a full framework.
- There is a learning curve for beginners who are new to web development.
- Integrating React into a traditional MVC framework requires some additional configuration.
- The code complexity increases with inline templating and JSX.
- Too many smaller components leading to over engineering or boilerplate.
-
Error boundaries are components that catch JavaScript errors anywhere in their child component tree, log those errors, and display a fallback UI instead of the component tree that crashed.
A class component becomes an error boundary if it defines a new lifecycle method called
componentDidCatch(error, info)orstatic getDerivedStateFromError():class ErrorBoundary extends React.Component { constructor(props) { super(props) this.state = { hasError: false } } componentDidCatch(error, info) { // You can also log the error to an error reporting service logErrorToMyService(error, info) } static getDerivedStateFromError(error) { // Update state so the next render will show the fallback UI. return { hasError: true }; } render() { if (this.state.hasError) { // You can render any custom fallback UI return <h1>{'Something went wrong.'}</h1> } return this.props.children } }
After that use it as a regular component:
<ErrorBoundary>
  <MyWidget />
</ErrorBoundary>
-
React v15 provided very basic support for error boundaries using
unstable_handleErrormethod. It has been renamed tocomponentDidCatchin React v16. -
Normally we use PropTypes library (
React.PropTypesmoved to aprop-typespackage since React v15.5) for type checking in the React applications. For large code bases, it is recommended to use static type checkers such as Flow or TypeScript, that perform type checking at compile time and provide auto-completion features. -
The
react-dompackage provides DOM-specific methods that can be used at the top level of your app. Most of the components are not required to use this module. Some of the methods of this package are:render()hydrate()unmountComponentAtNode()findDOMNode()createPortal()
-
This method is used to render a React element into the DOM in the supplied container and return a reference to the component. If the React element was previously rendered into container, it will perform an update on it and only mutate the DOM as necessary to reflect the latest changes.
ReactDOM.render(element, container[, callback])If the optional callback is provided, it will be executed after the component is rendered or updated.
-
The
ReactDOMServerobject enables you to render components to static markup (typically used on node server). This object is mainly used for server-side rendering (SSR). The following methods can be used in both the server and browser environments:renderToString()renderToStaticMarkup()
For example, you generally run a Node-based web server like Express, Hapi, or Koa, and you call
renderToStringto render your root component to a string, which you then send as response.// using Express import { renderToString } from 'react-dom/server' import MyPage from './MyPage' app.get('/', (req, res) => { res.write('<!DOCTYPE html><html><head><title>My Page</title></head><body>') res.write('<div id="content">') res.write(renderToString(<MyPage/>)) res.write('</div></body></html>') res.end() })
-
dangerouslySetInnerHTML属性是 React 用来替代在浏览器 DOM 中使用innerHTML。与innerHTML一样,考虑到跨站脚本攻击(XSS),使用此属性也是有风险的。使用时,你只需传递以__html作为键,而 HTML 文本作为对应值的对象。在本示例中 MyComponent 组件使用
dangerouslySetInnerHTML属性来设置 HTML 标记:function createMarkup() { return { __html: 'First · Second' } } function MyComponent() { return <div dangerouslySetInnerHTML={createMarkup()} /> }
-
style属性接受含有 camelCased(驼峰)属性的 JavaScript 对象,而不是 CSS 字符串。这与 DOM 样式中的 JavaScript 属性一致,效率更高,并且可以防止 XSS 安全漏洞。const divStyle = { color: 'blue', backgroundImage: 'url(' + imgUrl + ')' }; function HelloWorldComponent() { return <div style={divStyle}>Hello World!</div> }
为了与在 JavaScript 中访问 DOM 节点上的属性保持一致,样式键采用了 camelcased(例如
node.style.backgroundImage)。 -
处理 React 元素中的事件有一些语法差异:
- React 事件处理程序是采用驼峰而不是小写来命名的。
- 使用 JSX,你将传递一个函数作为事件处理程序,而不是字符串。
-
当你使用
setState()时,除了设置状态对象之外,React 还会重新渲染组件及其所有的子组件。你会得到这样的错误:Can only update a mounted or mounting component.。因此我们需要在构造函数中使用this.state初始化状态。 -
Keys 应该是稳定的,可预测的和唯一的,这样 React 就能够跟踪元素。
在下面的代码片段中,每个元素的键将基于列表项的顺序,而不是绑定到即将展示的数据上。这将限制 React 能够实现的优化。
{todos.map((todo, index) =>
  <Todo
    {...todo}
    key={index}
  />
)}
假设
todo.id对此列表是唯一且稳定的,如果将此数据作为唯一键,那么 React 将能够对元素进行重新排序,而无需重新创建它们。{todos.map((todo) => <Todo {...todo} key={todo.id} /> )}
-
建议避免在
componentWillMount()生命周期方法中执行异步初始化。在 mounting 发生之前会立即调用componentWillMount(),且它在render()之前被调用,因此在此方法中更新状态将不会触发重新渲染。应避免在此方法中引入任何副作用或订阅操作。我们需要确保对组件初始化的异步调用发生在componentDidMount()中,而不是在componentWillMount()中。componentDidMount() { axios.get(`api/todos`) .then((result) => { this.setState({ messages: [...result.data] }) }) }
-
如果在不刷新组件的情况下更改组件上的属性,则不会显示新的属性值,因为构造函数函数永远不会更新组件的当前状态。只有在首次创建组件时才会用 props 属性初始化状态。
以下组件将不显示更新的输入值:
class MyComponent extends React.Component {
  constructor(props) {
    super(props)

    this.state = {
      records: [],
      inputValue: this.props.inputValue
    };
  }

  render() {
    return <div>{this.state.inputValue}</div>
  }
}
在 render 方法使用使用 props 将会显示更新的值:
class MyComponent extends React.Component {
  constructor(props) {
    super(props)

    this.state = {
      record: []
    }
  }

  render() {
    return <div>{this.props.inputValue}</div>
  }
}
-
在某些情况下,你希望根据某些状态渲染不同的组件。 JSX 不会渲染
false或undefined,因此你可以使用&&运算符,在某个条件为 true 时,渲染组件中指定的内容。const MyComponent = ({ name, address }) => ( <div> <h2>{name}</h2> {address && <p>{address}</p> } </div> )
如果你需要一个
if-else条件,那么使用三元运算符:const MyComponent = ({ name, address }) => ( <div> <h2>{name}</h2> {address ? <p>{address}</p> : <p>{'Address is not available'}</p> } </div> )
-
当我们展开属性时,我们会遇到添加未知 HTML 属性的风险,这是一种不好的做法。相反,我们可以使用属性解构和
...rest运算符,因此它只添加所需的 props 属性。例如,const ComponentA = () => <ComponentB isDisplay={true} className={'componentStyle'} /> const ComponentB = ({ isDisplay, ...domProps }) => <div {...domProps}>{'ComponentB'}</div>
-
你可以装饰你的类组件,这与将组件传递到函数中是一样的。 装饰器是修改组件功能灵活且易读的方式。
@setTitle('Profile')
class Profile extends React.Component {
    //....
}

/*
  title is a string that will be set as a document title
  WrappedComponent is what our decorator will receive when
  put directly above a component class as seen in the example above
*/
const setTitle = (title) => (WrappedComponent) => {
  return class extends React.Component {
    componentDidMount() {
      document.title = title
    }

    render() {
      return <WrappedComponent {...this.props} />
    }
  }
}
-
有可用于函数组件的 memoize 库。例如
moize库可以将组件存储在另一个组件中。import moize from 'moize' import Component from './components/Component' // this module exports a non-memoized component const MemoizedFoo = moize.react(Component) const Consumer = () => { <div> {'I will memoize the following entry:'} <MemoizedFoo/> </div> }
-
React 已经配备了用于处理 Node 服务器上页面渲染的功能。你可以使用特殊版本的 DOM 渲染器,它遵循与客户端相同的模式。
import ReactDOMServer from 'react-dom/server'
import App from './App'

ReactDOMServer.renderToString(<App />)
此方法将以字符串形式输出常规 HTML,然后将其作为服务器响应的一部分放在页面正文中。在客户端,React 检测预渲染的内容并无缝地衔接。
-
你应该使用 Webpack 的
DefinePlugin方法将NODE_ENV设置为production,通过它你可以去除 propType 验证和额外警告等内容。除此之外,如果你压缩代码,如使用 Uglify 的死代码消除,以去掉用于开发的代码和注释,它将大大减少包的大小。 -
create-react-appCLI 工具允许你无需配置步骤,快速创建和运行 React 应用。让我们使用 CRA 来创建 Todo 应用:
# Installation
$ npm install -g create-react-app

# Create new project
$ create-react-app todo-app
$ cd todo-app

# Build, test and run
$ npm run build
$ npm run test
$ npm start
它包含了构建 React 应用程序所需的一切:
- React, JSX, ES6, 和 Flow 语法支持。
- ES6 之外的语言附加功能,比如对象扩展运算符。
- Autoprefixed CSS,因此你不在需要 -webkit- 或其他前缀。
- 一个快速的交互式单元测试运行程序,内置了对覆盖率报告的支持。
- 一个实时开发服务器,用于警告常见错误。
- 一个构建脚本,用于打包用于生产中包含 hashes 和 sourcemaps 的 JS、CSS 和 Images 文件。
-
在创建组件的实例并将其插入到 DOM 中时,将按以下顺序调用生命周期方法。
constructor()static getDerivedStateFromProps()render()componentDidMount()
-
以下生命周期方法将成为不安全的编码实践,并且在异步渲染方面会更有问题。
componentWillMount()componentWillReceiveProps()componentWillUpdate()
从 React v16.3 开始,这些方法使用
UNSAFE_前缀作为别名,未加前缀的版本将在 React v17 中被移除。 -
新的静态
getDerivedStateFromProps()生命周期方法在实例化组件之后以及重新渲染组件之前调用。它可以返回一个对象用于更新状态,或者返回null指示新的属性不需要任何状态更新。class MyComponent extends React.Component { static getDerivedStateFromProps(props, state) { // ... } }
此生命周期方法与
componentDidUpdate()一起涵盖了componentWillReceiveProps()的所有用例。 -
新的
getSnapshotBeforeUpdate()生命周期方法在 DOM 更新之前被调用。此方法的返回值将作为第三个参数传递给componentDidUpdate()。class MyComponent extends React.Component { getSnapshotBeforeUpdate(prevProps, prevState) { // ... } }
此生命周期方法与
componentDidUpdate()一起涵盖了componentWillUpdate()的所有用例。 -
JSX 元素将被转换为
React.createElement()函数来创建 React 元素,这些对象将用于表示 UI 对象。而cloneElement用于克隆元素并传递新的属性。 -
建议通过引用命名组件,而不是使用
displayName。使用
displayName命名组件:export default React.createClass({ displayName: 'TodoApp', // ... })
推荐的方式:
export default class TodoApp extends React.Component {
  // ...
}
-
从 mounting 到 render stage 阶段推荐的方法顺序:
static方法constructor()getChildContext()componentWillMount()componentDidMount()componentWillReceiveProps()shouldComponentUpdate()componentWillUpdate()componentDidUpdate()componentWillUnmount()- 点击处理程序或事件处理程序,如
onClickSubmit()或onChangeDescription() - 用于渲染的getter方法,如
getSelectReason()或getFooterContent() - 可选的渲染方法,如
renderNavigation()或renderProfilePicture() render()
-
switching 组件是渲染多个组件之一的组件。我们需要使用对象将 prop 映射到组件中。
例如,以下的 switching 组件将基于
page属性显示不同的页面:import HomePage from './HomePage' import AboutPage from './AboutPage' import ServicesPage from './ServicesPage' import ContactPage from './ContactPage' const PAGES = { home: HomePage, about: AboutPage, services: ServicesPage, contact: ContactPage } const Page = (props) => { const Handler = PAGES[props.page] || ContactPage return <Handler {...props} /> } // The keys of the PAGES object can be used in the prop types to catch dev-time errors. Page.propTypes = { page: PropTypes.oneOf(Object.keys(PAGES)).isRequired }
-
这背后的原因是
setState()是一个异步操作。出于性能原因,React 会对状态更改进行批处理,因此在调用setState()方法之后,状态可能不会立即更改。这意味着当你调用setState()方法时,你不应该依赖当前状态,因为你不能确定当前状态应该是什么。这个问题的解决方案是将一个函数传递给setState(),该函数会以上一个状态作为参数。通过这样做,你可以避免由于setState()的异步性质而导致用户在访问时获取旧状态值的问题。假设初始计数值为零。在连续三次增加操作之后,该值将只增加一个。
// assuming this.state.count === 0
this.setState({ count: this.state.count + 1 })
this.setState({ count: this.state.count + 1 })
this.setState({ count: this.state.count + 1 })
// this.state.count === 1, not 3
如果将函数传递给
setState(),则 count 将正确递增。this.setState((prevState, props) => ({ count: prevState.count + props.increment })) // this.state.count === 3 as expected
-
React.StrictModeis an useful component for highlighting potential problems in an application. Just like<Fragment>,<StrictMode>does not render any extra DOM elements. It activates additional checks and warnings for its descendants. These checks apply for development mode only.import React from 'react' function ExampleApplication() { return ( <div> <Header /> <React.StrictMode> <div> <ComponentOne /> <ComponentTwo /> </div> </React.StrictMode> <Footer /> </div> ) }
In the example above, the strict mode checks apply to
<ComponentOne>and<ComponentTwo>components only. -
Mixins are a way to totally separate components to have a common functionality. Mixins are should not be used and can be replaced with higher-order components or decorators.
One of the most commonly used mixins is
PureRenderMixin. You might be using it in some components to prevent unnecessary re-renders when the props and state are shallowly equal to the previous props and state:const PureRenderMixin = require('react-addons-pure-render-mixin') const Button = React.createClass({ mixins: [PureRenderMixin], // ... })
-
The primary use case for
isMounted()is to avoid callingsetState()after a component has been unmounted, because it will emit a warning.if (this.isMounted()) { this.setState({...}) }
Checking
isMounted()before callingsetState()does eliminate the warning, but it also defeats the purpose of the warning. UsingisMounted()is a code smell because the only reason you would check is because you think you might be holding a reference after the component has unmounted.An optimal solution would be to find places where
setState()might be called after a component has unmounted, and fix them. Such situations most commonly occur due to callbacks, when a component is waiting for some data and gets unmounted before the data arrives. Ideally, any callbacks should be canceled incomponentWillUnmount(), prior to unmounting. -
Pointer Events provide a unified way of handling all input events. In the olden days we have a mouse and respective event listeners to handle them but nowadays we have many devices which don't correlate to having a mouse, like phones with touch surface or pens. We need to remember that these events will only work in browsers that support the Pointer Events specification.
The following event types are now available in React DOM:
onPointerDownonPointerMoveonPointerUponPointerCancelonGotPointerCaptureonLostPointerCapturonPointerEnteronPointerLeaveonPointerOveronPointerOut
-
If you are rendering your component using JSX, the name of that component has to begin with a capital letter otherwise React will throw an error as unrecognized tag. This convention is because only HTML elements and SVG tags can begin with a lowercase letter.
You can define component class which name starts with lowercase letter, but when it's imported it should have capital letter. Here lowercase is fine:
class myComponent extends Component {
  render() {
    return <div />
  }
}

export default myComponent
While when imported in another file it should start with capital letter:
import MyComponent from './MyComponent'
-
是的,在过去 React 会忽略未知的 DOM 属性。如果你编写的 JSX 属性 React 无法识别,那么 React 将跳过它。例如:
<div mycustomattribute={'something'} />
在 React 15 中将在 DOM 中渲染一个空的 div:
<div />
在 React 16 中,任何未知的属性都将会在 DOM 显示:
<div mycustomattribute='something' />
这对于应用特定于浏览器的非标准属性,尝试新的 DOM APIs 与集成第三方库来说非常有用。
-
当使用 ES6 类时,你应该在构造函数中初始化状态,而当你使用
React.createClass()时,就需要使用getInitialState()方法。使用 ES6 类:
class MyComponent extends React.Component {
  constructor(props) {
    super(props)
    this.state = { /* initial state */ }
  }
}
使用
React.createClass():const MyComponent = React.createClass({ getInitialState() { return { /* initial state */ } } })
注意: 在 React v16 中
React.createClass()已被弃用和删除,请改用普通的 JavaScript 类。 -
默认情况下,当组件的状态或属性改变时,组件将重新渲染。如果你的
render()方法依赖于其他数据,你可以通过调用forceUpdate()来告诉 React,当前组件需要重新渲染。component.forceUpdate(callback)
建议避免使用
forceUpdate(),并且只在render()方法中读取this.props和this.state。 -
当你想要在
constructor()函数中访问this.props,你需要将 props 传递给super()方法。使用
super(props):class MyComponent extends React.Component { constructor(props) { super(props) console.log(this.props) // { name: 'John', ... } } }
使用
super():class MyComponent extends React.Component { constructor(props) { super() console.log(this.props) // undefined } }
在
constructor()函数之外,访问this.props属性会显示相同的值。 -
你只需使用带有 ES6 箭头函数语法的
Array.prototype.map即可。例如,items对象数组将会被映射成一个组件数组:<tbody> {items.map(item => <SomeComponent key={item.id} name={item.name} />)} </tbody>
你不能使用
for循环进行迭代:<tbody> for (let i = 0; i < items.length; i++) { <SomeComponent key={items[i].id} name={items[i].name} /> } </tbody>
这是因为 JSX 标签会被转换成函数调用,并且你不能在表达式中使用语句。但这可能会由于
do表达式而改变,它们是第一阶段提案。 -
React (或 JSX) 不支持属性值内的变量插值。下面的形式将不起作用:
<img className='image' src='images/{this.props.image}' />
但你可以将 JS 表达式作为属性值放在大括号内。所以下面的表达式是有效的:
<img className='image' src={'images/' + this.props.image} />
使用模板字符串也是可以的:
<img className='image' src={`images/${this.props.image}`} />
-
如果要将对象数组传递给具有特定形状的组件,请使用
React.PropTypes.shape()作为React.PropTypes.arrayOf()的参数。ReactComponent.propTypes = { arrayWithShape: React.PropTypes.arrayOf(React.PropTypes.shape({ color: React.PropTypes.string.isRequired, fontSize: React.PropTypes.number.isRequired })).isRequired }
-
你不应该在引号内使用大括号,因为它将被计算为字符串。
<div className="btn-panel {this.props.visible ? 'show' : 'hidden'}">
相反,你需要将大括号移到外部(不要忘记在类名之间添加空格):
<div className={'btn-panel ' + (this.props.visible ? 'show' : 'hidden')}>
模板字符串也可以工作:
<div className={`btn-panel ${this.props.visible ? 'show' : 'hidden'}`}>
-
react包中包含React.createElement(),React.Component,React.Children,以及与元素和组件类相关的其他帮助程序。你可以将这些视为构建组件所需的同构或通用帮助程序。react-dom包中包含了ReactDOM.render(),在react-dom/server包中有支持服务端渲染的ReactDOMServer.renderToString()和ReactDOMServer.renderToStaticMarkup()方法。 -
React 团队致力于将所有的与 DOM 相关的特性抽取到一个名为 ReactDOM 的独立库中。React v0.14 是第一个拆分后的版本。通过查看一些软件包,
react-native,react-art,react-canvas,和react-three,很明显,React 的优雅和本质与浏览器或 DOM 无关。为了构建更多 React 能应用的环境,React 团队计划将主要的 React 包拆分成两个:react和react-dom。这为编写可以在 React 和 React Native 的Web 版本之间共享的组件铺平了道路。 -
如果你尝试使用标准的
for属性将<label>元素绑定到文本输入框,那么在控制台将会打印缺少 HTML 属性的警告消息。<label for={'user'}>{'User'}</label> <input type={'text'} id={'user'} />
因为
for是 JavaScript 的保留字,请使用htmlFor来替代。<label htmlFor={'user'}>{'User'}</label> <input type={'text'} id={'user'} />
-
在 React 中,你可以使用扩展运算符:
<button style={{...styles.panel.button, ...styles.panel.submitButton}}>{'Submit'}</button>
如果你使用的是 React Native,则可以使用数组表示法:
<button style={[styles.panel.button, styles.panel.submitButton]}>{'Submit'}</button>
-
你可以在
componentDidMount()中监听resize事件,然后更新尺寸(width和height)。你应该在componentWillUnmount()方法中移除监听。class WindowDimensions extends React.Component { componentWillMount() { this.updateDimensions() } componentDidMount() { window.addEventListener('resize', this.updateDimensions) } componentWillUnmount() { window.removeEventListener('resize', this.updateDimensions) } updateDimensions() { this.setState({width: $(window).width(), height: $(window).height()}) } render() { return <span>{this.state.width} x {this.state.height}</span> } }
-
当你使用
setState()时,当前和先前的状态将被合并。replaceState()会抛出当前状态,并仅用你提供的内容替换它。通常使用setState(),除非你出于某种原因确实需要删除所有以前的键。你还可以在setState()中将状态设置为false/null,而不是使用replaceState()。 -
当状态更改时将调用以下生命周期方法。你可以将提供的状态和属性值与当前状态和属性值进行比较,以确定是否发生了有意义的改变。
componentWillUpdate(object nextProps, object nextState) componentDidUpdate(object prevProps, object prevState) -
更好的方法是使用
Array.prototype.filter()方法。例如,让我们创建用于更新状态的
removeItem()方法。removeItem(index) { this.setState({ data: this.state.data.filter((item, i) => i !== index) }) }
-
可以使用最新的版本 (>=16.2),以下是可能的选项:
render() {
  return false
}
render() {
  return null
}
render() {
  return []
}
render() {
  return <React.Fragment></React.Fragment>
}
render() {
  return <></>
}
返回
undefined是无效的。 -
我们可以使用
<pre>标签,以便保留JSON.stringify()的格式:const data = { name: 'John', age: 42 } class User extends React.Component { render() { return ( <pre> {JSON.stringify(data, null, 2)} </pre> ) } } React.render(<User />, document.getElementById('container'))
-
React 的哲学是 props 应该是 immutable 和 top-down。这意味着父级可以向子级发送任何属性值,但子级不能修改接收到的属性。
-
你可以为
input元素创建一个ref,然后在componentDidMount()方法中使用它:class App extends React.Component{ componentDidMount() { this.nameInput.focus() } render() { return ( <div> <input defaultValue={'Won\'t focus'} /> <input ref={(input) => this.nameInput = input} defaultValue={'Will focus'} /> </div> ) } } ReactDOM.render(<App />, document.getElementById('app'))
-
-
用一个对象调用
setState()来与状态合并:-
使用
Object.assign()创建对象的副本:const user = Object.assign({}, this.state.user, { age: 42 }) this.setState({ user })
-
使用扩展运算符:
const user = { ...this.state.user, age: 42 }
this.setState({ user })
-
-
使用一个函数调用
setState():this.setState(prevState => ({ user: { ...prevState.user, age: 42 } }))
-
-
React may batch multiple
setState()calls into a single update for performance. Becausethis.propsandthis.statemay be updated asynchronously, you should not rely on their values for calculating the next state. 出于性能考虑,React 可能将多个setState()调用合并成单个更新。这是因为我们可以异步更新this.props和this.state,所以不应该依赖它们的值来计算下一个状态。以下的 counter 示例将无法按预期更新:
// Wrong
this.setState({
  counter: this.state.counter + this.props.increment,
})
首选方法是使用函数而不是对象调用
setState()。该函数将前一个状态作为第一个参数,当前时刻的 props 作为第二个参数。// Correct this.setState((prevState, props) => ({ counter: prevState.counter + props.increment }))
-
你可以使用
React.version来获取版本:const REACT_VERSION = React.version ReactDOM.render( <div>{`React version: ${REACT_VERSION}`}</div>, document.getElementById('app') )
-
-
从
core-js中手动导入:创建一个名为
polyfills.js文件,并在根目录下的index.js文件中导入它。运行npm install core-js或yarn add core-js并导入你所需的功能特性:import 'core-js/fn/array/find' import 'core-js/fn/array/includes' import 'core-js/fn/number/is-nan'
-
使用 Polyfill 服务:
通过将以下内容添加到
index.html中来获取自定义的特定于浏览器的 polyfill:<script src='https://cdn.polyfill.io/v2/polyfill.min.js?features=default,Array.prototype.includes'></script>
在上面的脚本中,我们必须显式地请求
Array.prototype.includes特性,因为它没有被包含在默认的特性集中。
-
-
你只需要使用
HTTPS=true配置。你可以编辑package.json中的 scripts 部分:"scripts": { "start": "set HTTPS=true && react-scripts start" }
或直接运行
set HTTPS=true && npm start -
在项目的根目录中创建一个名为
.env的文件,并写入导入路径:NODE_PATH=src/app然后重新启动开发服务器。现在,你应该能够在没有相对路径的情况下导入
src/app内的任何内容。 -
在
history对象上添加一个监听器以记录每个页面的访问:history.listen(function (location) { window.ga('set', 'page', location.pathname + location.search) window.ga('send', 'pageview', location.pathname + location.search) })
-
你需要使用
setInterval()来触发更改,但也需要在组件卸载时清除计时器,以防止错误和内存泄漏。componentDidMount() { this.interval = setInterval(() => this.setState({ time: Date.now() }), 1000) } componentWillUnmount() { clearInterval(this.interval) }
-
React不会自动应用 vendor prefixes,你需要手动添加 vendor prefixes。
<div style={{
  transform: 'rotate(90deg)',
  WebkitTransform: 'rotate(90deg)', // note the capital 'W' here
  msTransform: 'rotate(90deg)' // 'ms' is the only lowercase vendor prefix
}} />
-
导出组件时,你应该使用默认导出:
import React from 'react'
import User from 'user'

export default class MyProfile extends React.Component {
  render(){
    return (
      <User type="customer">
        //...
      </User>
    )
  }
}
使用 export 说明符,MyProfile 将成为成员并导出到此模块,此外在其他组件中你无需指定名称就可以导入相同的内容。
-
在 JSX 中,小写标签被认为是 HTML 标签。但是,含有
.的大写和小写标签名却不是。<component />将被转换为React.createElement('component')(i.e, HTML 标签)<obj.component />将被转换为React.createElement(obj.component)<Component />将被转换为React.createElement(Component)
-
React 协调算法假设如果自定义组件出现在后续渲染的相同位置,则它与之前的组件相同,因此重用前一个实例而不是创建新实例。
-
你可以使用 ES7 的
static来定义常量。class MyComponent extends React.Component { static DEFAULT_PAGINATION = 10 }
-
你可以使用 ref 属性通过回调函数获取对底层的
HTMLinputeElement对象的引用,并将该引用存储为类属性,之后你就可以利用该引用在事件回调函数中, 使用HTMLElement.click方法触发一个点击事件。这可以分为两个步骤:-
在 render 方法创建一个 ref:
<input ref={input => this.inputElement = input} />
-
在事件处理器中触发点击事件
this.inputElement.click()
-
-
如果要在 React 中使用
async/await,则需要 Babel 和 transform-async-to-generator 插件。 -
React 项目文件结构有两种常见的实践。
-
按功能或路由分组:
构建项目的一种常见方法是将 CSS,JS 和测试用例放在一起,按功能或路由分组。
common/ ├─ Avatar.js ├─ Avatar.css ├─ APIUtils.js └─ APIUtils.test.js feed/ ├─ index.js ├─ Feed.js ├─ Feed.css ├─ FeedStory.js ├─ FeedStory.test.js └─ FeedAPI.js profile/ ├─ index.js ├─ Profile.js ├─ ProfileHeader.js ├─ ProfileHeader.css └─ ProfileAPI.js -
按文件类型分组:
另一种流行的项目结构组织方法是将类似的文件组合在一起。
api/
├─ APIUtils.js
├─ APIUtils.test.js
├─ ProfileAPI.js
└─ UserAPI.js
components/
├─ Avatar.js
├─ Avatar.css
├─ Feed.js
├─ Feed.css
├─ FeedStory.js
├─ FeedStory.test.js
├─ Profile.js
├─ ProfileHeader.js
└─ ProfileHeader.css
-
-
React Transition Group 和 React Motion 是React生态系统中流行的动画包。
-
建议避免在组件中对样式值进行硬编码。任何可能在不同的 UI 组件之间使用的值都应该提取到它们自己的模块中。
例如,可以将这些样式提取到单独的组件中:
export const colors = {
  white,
  black,
  blue
}

export const space = [
  0,
  8,
  16,
  32,
  64
]
然后在其他组件中单独导入:
import { space, colors } from './styles'
-
ESLint 是一个流行的 JavaScript linter。有一些插件可以分析特定的代码样式。在 React 中最常见的一个是名为
eslint-plugin-reactnpm 包。默认情况下,它将使用规则检查许多最佳实践,检查内容从迭代器中的键到一组完整的 prop 类型。另一个流行的插件是eslint-plugin-jsx-a11y,它将帮助修复可访问性的常见问题。由于 JSX 提供的语法与常规 HTML 略有不同,因此常规插件无法获取alt文本和tabindex的问题。 -
你可以使用 AJAX 库,如 Axios,jQuery AJAX 和浏览器内置的
fetchAPI。你应该在componentDidMount()生命周期方法中获取数据。这样当获取到数据的时候,你就可以使用setState()方法来更新你的组件。例如,从 API 中获取员工列表并设置本地状态:
class MyComponent extends React.Component {
  constructor(props) {
    super(props)
    this.state = {
      employees: [],
      error: null
    }
  }

  componentDidMount() {
    fetch('https://api.example.com/items')
      .then(res => res.json())
      .then(
        (result) => {
          this.setState({
            employees: result.employees
          })
        },
        (error) => {
          this.setState({ error })
        }
      )
  }

  render() {
    const { error, employees } = this.state
    if (error) {
      return <div>Error: {error.message}</div>;
    } else {
      return (
        <ul>
          {employees.map(item => (
            <li key={employee.name}>
              {employee.name}-{employees.experience}
            </li>
          ))}
        </ul>
      )
    }
  }
}
-
Render Props 是一种简单的技术,用于使用值为函数的 prop 属性在组件之间共享代码。下面的组件使用返回 React 元素的 render 属性:
<DataProvider render={data => (
  <h1>{`Hello ${data.target}`}</h1>
)}/>
像 React Router 和 DownShift 这样的库使用了这种模式。


-
React Router 是一个基于 React 的强大的路由库,可以帮助您快速地向应用添加新的屏幕和流,同时保持 URL 与页面上显示的内容同步。
-
React Router 是
history库的包装器,它处理浏览器的window.history与浏览器和哈希历史的交互。它还提供了内存历史记录,这对于没有全局历史记录的环境非常有用,例如移动应用程序开发(React Native)和使用 Node 进行单元测试。 -
React Router v4 提供了以下三种类型的
<Router>组件:<BrowserRouter><HashRouter><MemoryRouter>
以上组件将创建browser,hash和memory的 history 实例。React Router v4 通过
router对象中的上下文使与您的路由器关联的history实例的属性和方法可用。 -
一个 history 实例有两种导航方法:
push()replace()
如果您将 history 视为一个访问位置的数组,则
push()将向数组添加一个新位置,replace()将用新的位置替换数组中的当前位置。 -
在组件中实现操作路由/导航有三种不同的方法。
-
使用
withRouter()高阶函数:withRouter()高阶函数将注入 history 对象作为组件的 prop。该对象提供了push()和replace()方法,以避免使用上下文。import { withRouter } from 'react-router-dom' // this also works with 'react-router-native' const Button = withRouter(({ history }) => ( <button type='button' onClick={() => { history.push('/new-location') }} > {'Click Me!'} </button> ))
-
使用
<Route>组件和渲染属性模式:<Route>组件传递与withRouter()相同的属性,因此您将能够通过 history 属性访问到操作历史记录的方法。import { Route } from 'react-router-dom' const Button = () => ( <Route render={({ history }) => ( <button type='button' onClick={() => { history.push('/new-location') }} > {'Click Me!'} </button> )} /> )
-
使用上下文:
建议不要使用此选项,并将其视为不稳定的API。
const Button = (props, context) => (
  <button
    type='button'
    onClick={() => {
      context.history.push('/new-location')
    }}
  >
    {'Click Me!'}
  </button>
)

Button.contextTypes = {
  history: React.PropTypes.shape({
    push: React.PropTypes.func.isRequired
  })
}
-
-
在 React Router v4 中并没有内置解析查询字符串的能力,因为多年来一直有用户希望支持不同的实现。因此,使用者可以选择他们喜欢的实现方式。建议的方法是使用 query-string 库。
const queryString = require('query-string');
const parsed = queryString.parse(props.location.search);
如果你想要使用原生 API 的话,你也可以使用
URLSearchParams:const params = new URLSearchParams(props.location.search) const foo = params.get('name')
如果使用
URLSearchParams的话您应该为 IE11 使用polyfill。 -
此警告的意思是
Router组件下仅能包含一个子节点。你必须将你的 Route 包装在
<Switch>块中,因为<Switch>是唯一的,它只提供一个路由。首先,您需要在导入中添加
Switch:import { Switch, Router, Route } from 'react-router'
然后在
<Switch>块中定义路由:<Router> <Switch> <Route {/* ... */} /> <Route {/* ... */} /> </Switch> </Router>
-
在导航时,您可以将 props 传递给
history对象:this.props.history.push({ pathname: '/template', search: '?name=sudheer', state: { detail: response.data } })
search属性用于在push()方法中传递查询参数。 -
<Switch>呈现匹配的第一个孩子<Route>。 没有路径的<Route>总是匹配。所以你只需要简单地删除 path 属性,如下所示:<Switch> <Route exact path="/" component={Home}/> <Route path="/user" component={User}/> <Route component={NotFound} /> </Switch>
-
-
创建一个导出
history对象的模块,并在整个项目中导入该模块。例如, 创建
history.js文件:import { createBrowserHistory } from 'history' export default createBrowserHistory({ /* pass a configuration object here if needed */ })
-
您应该使用
<Router>组件而不是内置路由器。在index.js文件中导入上面的history.js:import { Router } from 'react-router-dom' import history from './history' import App from './App' ReactDOM.render(( <Router history={history}> <App /> </Router> ), holder)
-
您还可以使用类似于内置历史对象的
history对象的push方法:// some-other-file.js import history from './history' history.push('/go-here')
-
-
react-router包在 React Router 中提供了<Redirect>组件。渲染<Redirect>将导航到新位置。与服务器端重定向一样,新位置将覆盖历史堆栈中的当前位置。import React, { Component } from 'react' import { Redirect } from 'react-router' export default class LoginComponent extends Component { render() { if (this.state.isLoggedIn === true) { return <Redirect to="/your/redirect/page" /> } else { return <div>{'Login Please'}</div> } } }
-
React Intl库使 React 中的内部化变得简单,使用现成的组件和 API ,可以处理从格式化字符串,日期和数字到复数的所有功能。React Intl 是FormatJS的一部分,它通过其组件和 API 提供与 React 的绑定。
-
- 用分隔符显示数字
- 正确显示日期和时间
- 显示相对于“现在”的日期
- 将标签转换为字符串
- 支持 150 多种语言
- 支持在浏览器和 Node 中运行
- 建立在标准之上
-
该库提供了两种格式化字符串,数字和日期的方法:React 组件或 API。
<FormattedMessage
  id={'account'}
  defaultMessage={'The amount is less than minimum balance.'}
/>
const messages = defineMessages({
  accountMessage: {
    id: 'account',
    defaultMessage: 'The amount is less than minimum balance.',
  }
})

formatMessage(messages.accountMessage)
-
react-intl的<Formatted ... />组件返回元素,而不是纯文本,因此它们不能用于占位符,替代文本等。在这种情况下,您应该使用较低级别的 APIformatMessage()。您可以使用injectIntl()高阶函数将intl对象注入到组件中,然后使用该对象上使用formatMessage()格式化消息。import React from 'react' import { injectIntl, intlShape } from 'react-intl' const MyComponent = ({ intl }) => { const placeholder = intl.formatMessage({id: 'messageId'}) return <input placeholder={placeholder} /> } MyComponent.propTypes = { intl: intlShape.isRequired } export default injectIntl(MyComponent)
-
您可以在应用的任何组件中使用
injectIntl()获取的当前语言环境:import { injectIntl, intlShape } from 'react-intl' const MyComponent = ({ intl }) => ( <div>{`The current locale is ${intl.locale}`}</div> ) MyComponent.propTypes = { intl: intlShape.isRequired } export default injectIntl(MyComponent)
-
injectIntl()高阶组件将允许您通过组件中的 props 访问formatDate()方法。 该方法由FormattedDate实例在内部使用,它返回格式化日期的字符串表示。import { injectIntl, intlShape } from 'react-intl' const stringDate = this.props.intl.formatDate(date, { year: 'numeric', month: 'numeric', day: 'numeric' }) const MyComponent = ({intl}) => ( <div>{`The formatted date is ${stringDate}`}</div> ) MyComponent.propTypes = { intl: intlShape.isRequired } export default injectIntl(MyComponent)
-
浅层渲染对于在 React 中编写单元测试用例很有用。它允许您渲染一个一级深的组件并断言其渲染方法返回的内容,而不必担心子组件未实例化或渲染。
例如,如果您有以下组件:
function MyComponent() {
  return (
    <div>
      <span className={'heading'}>{'Title'}</span>
      <span className={'description'}>{'Description'}</span>
    </div>
  )
}
然后你可以如下断言:
import ShallowRenderer from 'react-test-renderer/shallow'

// in your test
const renderer = new ShallowRenderer()
renderer.render(<MyComponent />)

const result = renderer.getRenderOutput()

expect(result.type).toBe('div')
expect(result.props.children).toEqual([
  <span className={'heading'}>{'Title'}</span>,
  <span className={'description'}>{'Description'}</span>
])
-
此包提供了一个渲染器,可用于将组件渲染为纯 JavaScript 对象,而不依赖于 DOM 或原生移动环境。该包可以轻松获取由 ReactDOM 或 React Native 平台所渲染的视图层次结构(类似于DOM树)的快照,而无需使用浏览器或
jsdom。import TestRenderer from 'react-test-renderer' const Link = ({page, children}) => <a href={page}>{children}</a> const testRenderer = TestRenderer.create( <Link page={'https://www.facebook.com/'}>{'Facebook'}</Link> ) console.log(testRenderer.toJSON()) // { // type: 'a', // props: { href: 'https://www.facebook.com/' }, // children: [ 'Facebook' ] // }
-
ReactTestUtils由
with-addons包提供,允许您对模拟 DOM 执行操作以进行单元测试。 -
Jest是一个由 Facebook 基于 Jasmine 创建的 JavaScript 单元测试框架,提供自动模拟创建和
jsdom环境。它通常用于测试组件。 -
与 Jasmine 相比,有几个优点:
- 自动查找在源代码中要执行测试。
- 在运行测试时自动模拟依赖项。
- 允许您同步测试异步代码。
- 使用假的 DOM 实现(通过
jsdom)运行测试,以便可以在命令行上运行测试。 - 在并行流程中运行测试,以便更快完成。
-
让我们为
sum.js文件中添加两个数字的函数编写一个测试:const sum = (a, b) => a + b export default sum
创建一个名为
sum.test.js的文件,其中包含实际测试:import sum from './sum' test('adds 1 + 2 to equal 3', () => { expect(sum(1, 2)).toBe(3) })
然后将以下部分添加到
package.json:{ "scripts": { "test": "jest" } }最后,运行
yarn test或npm test,Jest 将打印结果:$ yarn test PASS ./sum.test.js ✓ adds 1 + 2 to equal 3 (2ms)
-
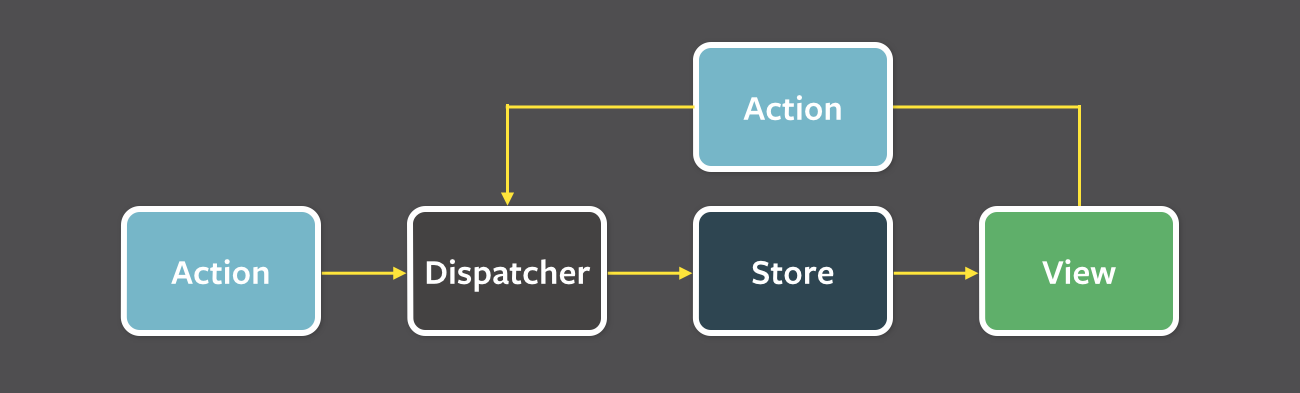
Flux是应用程序设计范例,用于替代更传统的 MVC 模式。它不是一个框架或库,而是一种新的体系结构,它补充了 React 和单向数据流的概念。在使用 React 时,Facebook 会在内部使用此模式。
在 dispatcher,stores 和视图组件具有如下不同的输入和输出:
-
Redux是基于Flux设计模式的 JavaScript 应用程序的可预测状态容器。Redux 可以与 React 一起使用,也可以与任何其他视图库一起使用。它很小(约2kB)并且没有依赖性。
-
Redux 遵循三个基本原则:
- 单一数据来源: 整个应用程序的状态存储在单个对象树中。单状态树可以更容易地跟踪随时间的变化并调试或检查应用程序。
- 状态是只读的: 改变状态的唯一方法是发出一个动作,一个描述发生的事情的对象。这可以确保视图和网络请求都不会直接写入状态。
- 使用纯函数进行更改: 要指定状态树如何通过操作进行转换,您可以编写reducers。Reducers 只是纯函数,它将先前的状态和操作作为参数,并返回下一个状态。
-
我们应该说使用 Redux 而不是 Flux 几乎没有任何缺点。这些如下:
- 您将需要学会避免突变: Flux 对变异数据毫不吝啬,但 Redux 不喜欢突变,许多与 Redux 互补的包假设您从不改变状态。您可以使用 dev-only 软件包强制执行此操作,例如
redux-immutable-state-invariant,Immutable.js,或指示您的团队编写非变异代码。 - 您将不得不仔细选择您的软件包: 虽然 Flux 明确没有尝试解决诸如撤消/重做,持久性或表单之类的问题,但 Redux 有扩展点,例如中间件和存储增强器,以及它催生了丰富的生态系统。
- 还没有很好的 Flow 集成: Flux 目前可以让你做一些非常令人印象深刻的静态类型检查,Redux 还不支持。
- 您将需要学会避免突变: Flux 对变异数据毫不吝啬,但 Redux 不喜欢突变,许多与 Redux 互补的包假设您从不改变状态。您可以使用 dev-only 软件包强制执行此操作,例如
-
mapStateToProps()是一个实用方法,它可以帮助您的组件获得最新的状态(由其他一些组件更新):const mapStateToProps = (state) => { return { todos: getVisibleTodos(state.todos, state.visibilityFilter) } }
mapDispatchToProps()是一个实用方法,它可以帮助你的组件触发一个动作事件(可能导致应用程序状态改变的调度动作):const mapDispatchToProps = (dispatch) => { return { onTodoClick: (id) => { dispatch(toggleTodo(id)) } } }
-
在 reducer 中触发 Action 是反模式。您的 reducer 应该没有副作用,只是接收 Action 并返回一个新的状态对象。在 reducer 中添加侦听器和调度操作可能会导致链接的 Action 和其他副作用。
-
是的,您只需要使用
createStore()从它创建的模块中导出存储。此外,它不应污染全局窗口对象。store = createStore(myReducer) export default store
-
- DOM 操作非常昂贵,导致应用程序行为缓慢且效率低下。
- 由于循环依赖性,围绕模型和视图创建了复杂的模型。
- 协作型应用程序(如Google Docs)会发生大量数据更改。
- 无需添加太多额外代码就无法轻松撤消(及时回退)。
-
这些库的目的是不同的,但是存在一些模糊的相似之处。
Redux 是一个在整个应用程序中管理状态的工具。它通常用作 UI 的体系结构。可以将其视为(一半)Angular 的替代品。 RxJS 是一个反应式编程库。它通常用作在 JavaScript 中完成异步任务的工具。把它想象成 Promise 的替代品。 Redux 使用 Reactive 范例,因为Store是被动的。Store 检测到 Action,并自行改变。RxJS也使用 Reactive 范例,但它不是一个体系结构,它为您提供了基本构建块 Observables 来完成这种模式。
-
您可以在
componentDidMount()方法中触发 Action,然后在render()方法中可以验证数据。class App extends Component { componentDidMount() { this.props.fetchData() } render() { return this.props.isLoaded ? <div>{'Loaded'}</div> : <div>{'Not Loaded'}</div> } } const mapStateToProps = (state) => ({ isLoaded: state.isLoaded }) const mapDispatchToProps = { fetchData } export default connect(mapStateToProps, mapDispatchToProps)(App)
-
您需要按照两个步骤在容器中使用您的 Store:
-
使用
mapStateToProps(): 它将 Store 中的状态变量映射到您指定的属性。 -
将上述属性连接到容器:
mapStateToProps函数返回的对象连接到容器。你可以从react-redux导入connect()。import React from 'react' import { connect } from 'react-redux' class App extends React.Component { render() { return <div>{this.props.containerData}</div> } } function mapStateToProps(state) { return { containerData: state.data } } export default connect(mapStateToProps)(App)
-
-
你需要在你的应用程序中编写一个root reducer,它将处理动作委托给
combineReducers()生成的 reducer。例如,让我们在
USER_LOGOUT动作之后让rootReducer()返回初始状态。我们知道,无论 Action 怎么样,当使用undefined作为第一个参数调用它们时,reducers 应该返回初始状态。const appReducer = combineReducers({ /* your app's top-level reducers */ }) const rootReducer = (state, action) => { if (action.type === 'USER_LOGOUT') { state = undefined } return appReducer(state, action) }
如果使用
redux-persist,您可能还需要清理存储空间。redux-persist在 storage 引擎中保存您的状态副本。首先,您需要导入适当的 storage 引擎,然后在将其设置为undefined之前解析状态并清理每个存储状态键。const appReducer = combineReducers({ /* your app's top-level reducers */ }) const rootReducer = (state, action) => { if (action.type === 'USER_LOGOUT') { Object.keys(state).forEach(key => { storage.removeItem(`persist:${key}`) }) state = undefined } return appReducer(state, action) }
-
**@**符号实际上是用于表示装饰器的 JavaScript 表达式。装饰器可以在设计时注释和修改类和属性。
让我们举个例子,在没有装饰器的情况下设置 Redux 。
-
未使用装饰器:
import React from 'react'
import * as actionCreators from './actionCreators'
import { bindActionCreators } from 'redux'
import { connect } from 'react-redux'

function mapStateToProps(state) {
  return { todos: state.todos }
}

function mapDispatchToProps(dispatch) {
  return { actions: bindActionCreators(actionCreators, dispatch) }
}

class MyApp extends React.Component {
  // ...define your main app here
}

export default connect(mapStateToProps, mapDispatchToProps)(MyApp)
-
使用装饰器:
import React from 'react'
import * as actionCreators from './actionCreators'
import { bindActionCreators } from 'redux'
import { connect } from 'react-redux'

function mapStateToProps(state) {
  return { todos: state.todos }
}

function mapDispatchToProps(dispatch) {
  return { actions: bindActionCreators(actionCreators, dispatch) }
}

@connect(mapStateToProps, mapDispatchToProps)
export default class MyApp extends React.Component {
  // ...define your main app here
}
除了装饰器的使用外,上面的例子几乎相似。装饰器语法尚未构建到任何 JavaScript 运行时中,并且仍然是实验性的并且可能会发生变化。您可以使用
babel来获得装饰器支持。 -
-
您可以直接在应用程序中使用Context,这对于将数据传递给深度嵌套的组件非常有用。而Redux功能更强大,它还提供了 Context API 无法提供的大量功能。此外,React Redux 在内部使用上下文,但它不会在公共 API 中有所体现。
-
Reducers 总是返回状态的累积(基于所有先前状态和当前 Action)。因此,它们充当了状态的 Reducer。每次调用 Redux reducer 时,状态和 Action 都将作为参数传递。然后基于该 Action 减少(或累积)该状态,然后返回下一状态。您可以reduce一组操作和一个初始状态(Store),在该状态下执行这些操作以获得最终的最终状态。
-
您可以使用
redux-thunk中间件,它允许您定义异步操作。让我们举个例子,使用fetch API将特定帐户作为 AJAX 调用获取:
export function fetchAccount(id) {
  return dispatch => {
    dispatch(setLoadingAccountState()) // Show a loading spinner
    fetch(`/account/${id}`, (response) => {
      dispatch(doneFetchingAccount()) // Hide loading spinner
      if (response.status === 200) {
        dispatch(setAccount(response.json)) // Use a normal function to set the received state
      } else {
        dispatch(someError)
      }
    })
  }
}

function setAccount(data) {
 return { type: 'SET_Account', data: data }
}
-
将数据保存在 Redux 存储中,并在组件内部保持 UI 相关状态。
-
在组件中访问 Store 的最佳方法是使用
connect()函数,该函数创建一个包裹现有组件的新组件。此模式称为高阶组件,通常是在 React 中扩展组件功能的首选方式。这允许您将状态和 Action 创建者映射到组件,并在 Store 更新时自动传递它们。我们来看一个使用 connect 的
<FilterLink>组件的例子:import { connect } from 'react-redux' import { setVisibilityFilter } from '../actions' import Link from '../components/Link' const mapStateToProps = (state, ownProps) => ({ active: ownProps.filter === state.visibilityFilter }) const mapDispatchToProps = (dispatch, ownProps) => ({ onClick: () => dispatch(setVisibilityFilter(ownProps.filter)) }) const FilterLink = connect( mapStateToProps, mapDispatchToProps )(Link) export default FilterLink
由于它具有相当多的性能优化并且通常不太可能导致错误,因此 Redux 开发人员几乎总是建议使用
connect()直接访问 Store(使用上下文API)。class MyComponent { someMethod() { doSomethingWith(this.context.store) } }
-
展示组件是一个类或功能组件,用于描述应用程序的展示部分。
容器组件是连接到 Redux Store的组件的非正式术语。容器组件订阅 Redux 状态更新和dispatch操作,它们通常不呈现 DOM 元素; 他们将渲染委托给展示性的子组件。
-
Constants allows you to easily find all usages of that specific functionality across the project when you use an IDE. It also prevents you from introducing silly bugs caused by typos – in which case, you will get a
ReferenceErrorimmediately.Normally we will save them in a single file (
constants.jsoractionTypes.js).export const ADD_TODO = 'ADD_TODO' export const DELETE_TODO = 'DELETE_TODO' export const EDIT_TODO = 'EDIT_TODO' export const COMPLETE_TODO = 'COMPLETE_TODO' export const COMPLETE_ALL = 'COMPLETE_ALL' export const CLEAR_COMPLETED = 'CLEAR_COMPLETED'
In Redux you use them in two places:
-
During action creation:
Let's take
actions.js:import { ADD_TODO } from './actionTypes'; export function addTodo(text) { return { type: ADD_TODO, text } }
-
In reducers:
Let's create
reducer.js:import { ADD_TODO } from './actionTypes' export default (state = [], action) => { switch (action.type) { case ADD_TODO: return [ ...state, { text: action.text, completed: false } ]; default: return state } }
-
-
There are a few ways of binding action creators to
dispatch()inmapDispatchToProps(). Below are the possible options:const mapDispatchToProps = (dispatch) => ({ action: () => dispatch(action()) })
const mapDispatchToProps = (dispatch) => ({
 action: bindActionCreators(action, dispatch)
})
const mapDispatchToProps = { action }
The third option is just a shorthand for the first one.
-
If the
ownPropsparameter is specified, React Redux will pass the props that were passed to the component into your connect functions. So, if you use a connected component:import ConnectedComponent from './containers/ConnectedComponent'; <ConnectedComponent user={'john'} />
The
ownPropsinside yourmapStateToProps()andmapDispatchToProps()functions will be an object:{ user: 'john' }
You can use this object to decide what to return from those functions.
-
Most of the applications has several top-level directories as below:
- Components: Used for dumb components unaware of Redux.
- Containers: Used for smart components connected to Redux.
- Actions: Used for all action creators, where file names correspond to part of the app.
- Reducers: Used for all reducers, where files name correspond to state key.
- Store: Used for store initialization.
This structure works well for small and medium size apps.
-
redux-sagais a library that aims to make side effects (asynchronous things like data fetching and impure things like accessing the browser cache) in React/Redux applications easier and better.It is available in NPM:
$ npm install --save redux-saga -
Saga is like a separate thread in your application, that's solely responsible for side effects.
redux-sagais a redux middleware, which means this thread can be started, paused and cancelled from the main application with normal Redux actions, it has access to the full Redux application state and it can dispatch Redux actions as well. -
Both
call()andput()are effect creator functions.call()function is used to create effect description, which instructs middleware to call the promise.put()function creates an effect, which instructs middleware to dispatch an action to the store.Let's take example of how these effects work for fetching particular user data.
function* fetchUserSaga(action) {
  // `call` function accepts rest arguments, which will be passed to `api.fetchUser` function.
  // Instructing middleware to call promise, it resolved value will be assigned to `userData` variable
  const userData = yield call(api.fetchUser, action.userId)

  // Instructing middleware to dispatch corresponding action.
  yield put({
    type: 'FETCH_USER_SUCCESS',
    userData
  })
}
-
Redux Thunk middleware allows you to write action creators that return a function instead of an action. The thunk can be used to delay the dispatch of an action, or to dispatch only if a certain condition is met. The inner function receives the store methods
dispatch()andgetState()as parameters. -
Both Redux Thunk and Redux Saga take care of dealing with side effects. In most of the scenarios, Thunk uses Promises to deal with them, whereas Saga uses Generators. Thunk is simple to use and Promises are familiar to many developers, Sagas/Generators are more powerful but you will need to learn them. But both middleware can coexist, so you can start with Thunks and introduce Sagas when/if you need them.
-
Redux DevTools is a live-editing time travel environment for Redux with hot reloading, action replay, and customizable UI. If you don't want to bother with installing Redux DevTools and integrating it into your project, consider using Redux DevTools Extension for Chrome and Firefox.
-
- Lets you inspect every state and action payload.
- Lets you go back in time by cancelling actions.
- If you change the reducer code, each staged action will be re-evaluated.
- If the reducers throw, you will see during which action this happened, and what the error was.
- With
persistState()store enhancer, you can persist debug sessions across page reloads.
-
Selectors are functions that take Redux state as an argument and return some data to pass to the component.
For example, to get user details from the state:
const getUserData = state => state.user.data
-
Redux Form works with React and Redux to enable a form in React to use Redux to store all of its state. Redux Form can be used with raw HTML5 inputs, but it also works very well with common UI frameworks like Material UI, React Widgets and React Bootstrap.
-
- Field values persistence via Redux store.
- Validation (sync/async) and submission.
- Formatting, parsing and normalization of field values.
-
You can use
applyMiddleware().For example, you can add
redux-thunkandloggerpassing them as arguments toapplyMiddleware():import { createStore, applyMiddleware } from 'redux' const createStoreWithMiddleware = applyMiddleware(ReduxThunk, logger)(createStore)
-
You need to pass initial state as second argument to createStore:
const rootReducer = combineReducers({
  todos: todos,
  visibilityFilter: visibilityFilter
})

const initialState = {
  todos: [{ id: 123, name: 'example', completed: false }]
}

const store = createStore(
  rootReducer,
  initialState
)
-
Relay is similar to Redux in that they both use a single store. The main difference is that relay only manages state originated from the server, and all access to the state is used via GraphQL queries (for reading data) and mutations (for changing data). Relay caches the data for you and optimizes data fetching for you, by fetching only changed data and nothing more.

-
React is a JavaScript library, supporting both front end web and being run on the server, for building user interfaces and web applications.
React Native is a mobile framework that compiles to native app components, allowing you to build native mobile applications (iOS, Android, and Windows) in JavaScript that allows you to use React to build your components, and implements React under the hood.
-
React Native can be tested only in mobile simulators like iOS and Android. You can run the app in your mobile using expo app (https://expo.io) Where it syncs using QR code, your mobile and computer should be in same wireless network.
-
You can use
console.log,console.warn, etc. As of React Native v0.29 you can simply run the following to see logs in the console:$ react-native log-ios $ react-native log-android -
Follow the below steps to debug React Native app:
- Run your application in the iOS simulator.
- Press
Command + Dand a webpage should open up athttps://localhost:8081/debugger-ui. - Enable Pause On Caught Exceptions for a better debugging experience.
- Press
Command + Option + Ito open the Chrome Developer tools, or open it viaView->Developer->Developer Tools. - You should now be able to debug as you normally would.
-
Reselect is a selector library (for Redux) which uses memoization concept. It was originally written to compute derived data from Redux-like applications state, but it can't be tied to any architecture or library.
Reselect keeps a copy of the last inputs/outputs of the last call, and recomputes the result only if one of the inputs changes. If the the same inputs are provided twice in a row, Reselect returns the cached output. It's memoization and cache are fully customizable.
-
Flow is a static type checker designed to find type errors in JavaScript. Flow types can express much more fine-grained distinctions than traditional type systems. For example, Flow helps you catch errors involving
null, unlike most type systems. -
Flow is a static analysis tool (static checker) which uses a superset of the language, allowing you to add type annotations to all of your code and catch an entire class of bugs at compile time. PropTypes is a basic type checker (runtime checker) which has been patched onto React. It can't check anything other than the types of the props being passed to a given component. If you want more flexible typechecking for your entire project Flow/TypeScript are appropriate choices.
-
The below steps followed to include Font Awesome in React:
- Install
font-awesome:
$ npm install --save font-awesome- Import
font-awesomein yourindex.jsfile:
import 'font-awesome/css/font-awesome.min.css'
- Add Font Awesome classes in
className:
render() {
  return <div><i className={'fa fa-spinner'} /></div>
}
- Install
-
React Developer Tools let you inspect the component hierarchy, including component props and state. It exists both as a browser extension (for Chrome and Firefox), and as a standalone app (works with other environments including Safari, IE, and React Native).
The official extensions available for different browsers or environments.
- Chrome extension
- Firefox extension
- Standalone app (Safari, React Native, etc)
-
If you opened a local HTML file in your browser (
file:https://...) then you must first open Chrome Extensions and checkAllow access to file URLs. -
-
Create a Polymer element:
<link rel='import' href='../../bower_components/polymer/polymer.html' />
Polymer({
  is: 'calender-element',
  ready: function() {
    this.textContent = 'I am a calender'
  }
})
-
Create the Polymer component HTML tag by importing it in a HTML document, e.g. import it in the
index.htmlof your React application:<link rel='import' href='./src/polymer-components/calender-element.html'>
- Use that element in the JSX file:
import React from 'react'

class MyComponent extends React.Component {
  render() {
    return (
      <calender-element />
    )
  }
}

export default MyComponent
-
-
React has the following advantages over Vue.js:
- Gives more flexibility in large apps developing.
- Easier to test.
- Suitable for mobile apps creating.
- More information and solutions available.
-
React Angular React is a library and has only the View layer Angular is a framework and has complete MVC functionality React handles rendering on the server side AngularJS renders only on the client side but Angular 2 and above renders on the server side React uses JSX that looks like HTML in JS which can be confusing Angular follows the template approach for HTML, which makes code shorter and easy to understand React Native, which is a React type to build mobile applications are faster and more stable Ionic, Angular's mobile native app is relatively less stable and slower In React, data flows only in one way and hence debugging is easy In Angular, data flows both way i.e it has two-way data binding between children and parent and hence debugging is often difficult -
When the page loads, React DevTools sets a global named
__REACT_DEVTOOLS_GLOBAL_HOOK__, then React communicates with that hook during initialization. If the website is not using React or if React fails to communicate with DevTools then it won't show up the tab. -
styled-componentsis a JavaScript library for styling React applications. It removes the mapping between styles and components, and lets you write actual CSS augmented with JavaScript. -
Lets create
<Title>and<Wrapper>components with specific styles for each.import React from 'react' import styled from 'styled-components' // Create a <Title> component that renders an <h1> which is centered, red and sized at 1.5em const Title = styled.h1` font-size: 1.5em; text-align: center; color: palevioletred; ` // Create a <Wrapper> component that renders a <section> with some padding and a papayawhip background const Wrapper = styled.section` padding: 4em; background: papayawhip; `
These two variables,
TitleandWrapper, are now components that you can render just like any other react component.<Wrapper> <Title>{'Lets start first styled component!'}</Title> </Wrapper>
-
Relay is a JavaScript framework for providing a data layer and client-server communication to web applications using the React view layer.
-
When you create a new project supply
--scripts-versionoption asreact-scripts-ts.react-scripts-tsis a set of adjustments to take the standardcreate-react-appproject pipeline and bring TypeScript into the mix.Now the project layout should look like the following:
my-app/
├─ .gitignore
├─ images.d.ts
├─ node_modules/
├─ public/
├─ src/
│  └─ ...
├─ package.json
├─ tsconfig.json
├─ tsconfig.prod.json
├─ tsconfig.test.json
└─ tslint.json
-
- Selectors can compute derived data, allowing Redux to store the minimal possible state.
- Selectors are efficient. A selector is not recomputed unless one of its arguments changes.
- Selectors are composable. They can be used as input to other selectors.
-
Let's take calculations and different amounts of a shipment order with the simplified usage of Reselect:
import { createSelector } from 'reselect'

const shopItemsSelector = state => state.shop.items
const taxPercentSelector = state => state.shop.taxPercent

const subtotalSelector = createSelector(
  shopItemsSelector,
  items => items.reduce((acc, item) => acc + item.value, 0)
)

const taxSelector = createSelector(
  subtotalSelector,
  taxPercentSelector,
  (subtotal, taxPercent) => subtotal * (taxPercent / 100)
)

export const totalSelector = createSelector(
  subtotalSelector,
  taxSelector,
  (subtotal, tax) => ({ total: subtotal + tax })
)

let exampleState = {
  shop: {
    taxPercent: 8,
    items: [
      { name: 'apple', value: 1.20 },
      { name: 'orange', value: 0.95 },
    ]
  }
}

console.log(subtotalSelector(exampleState)) // 2.15
console.log(taxSelector(exampleState))      // 0.172
console.log(totalSelector(exampleState))    // { total: 2.322 }
-
Actions are plain JavaScript objects or payloads of information that send data from your application to your store. They are the only source of information for the store. Actions must have a type property that indicates the type of action being performed.
For example an example action which represents adding a new todo item:
{ type: ADD_TODO, text: 'Add todo item' } -
不行,
statics仅适用于React.createClass():someComponent= React.createClass({ statics: { someMethod: function() { // .. } } })
但是你可以在 ES6+ 的类中编写静态代码,如下所示:
class Component extends React.Component {
  static propTypes = {
    // ...
  }

  static someMethod() {
    // ...
  }
}
-
Redux 可以用做任何 UI 层的数据存储。最常见的应用场景是 React 和 React Native,但也有一些 bindings 可用于 AngularJS,Angular 2,Vue,Mithril 等项目。Redux 只提供了一种订阅机制,任何其他代码都可以使用它。
-
Redux is originally written in ES6 and transpiled for production into ES5 with Webpack and Babel. You should be able to use it regardless of your JavaScript build process. Redux also offers a UMD build that can be used directly without any build process at all.
-
You need to add
enableReinitialize : truesetting.const InitializeFromStateForm = reduxForm({ form: 'initializeFromState', enableReinitialize : true })(UserEdit)
If your
initialValuesprop gets updated, your form will update too. -
你可以使用
PropTypes中的oneOfType()方法。例如,如下所示 size 的属性值可以是
string或number类型。Component.PropTypes = { size: PropTypes.oneOfType([ PropTypes.string, PropTypes.number ]) }
-
你可以直接将 SVG 作为组件导入,而不是将其作为文件加载。此功能仅在
[email protected]及更高版本中可用。import { ReactComponent as Logo } from './logo.svg' const App = () => ( <div> {/* Logo is an actual react component */} <Logo /> </div> )
Note: Don't forget about the curly braces in the import.
-
如果将 ref 回调定义为内联函数,则在更新期间它将会被调用两次。首先使用 null 值,然后再使用 DOM 元素。这是因为每次渲染的时候都会创建一个新的函数实例,因此 React 必须清除旧的 ref 并设置新的 ref。
class UserForm extends Component {
  handleSubmit = () => {
    console.log("Input Value is: ", this.input.value)
  }
render () { return (
<input type='text' ref={(input) => this.input = input} /> // Access DOM input in handle submit Submit ) } }但我们期望的是当组件挂载时,ref 回调只会被调用一次。一个快速修复的方法是使用 ES7 类属性语法定义函数。 ```jsx class UserForm extends Component { handleSubmit = () => { console.log("Input Value is: ", this.input.value) } setSearchInput = (input) => { this.input = input } render () { return ( <form onSubmit={this.handleSubmit}> <input type='text' ref={this.setSearchInput} /> // Access DOM input in handle submit <button type='submit'>Submit</button> </form> ) } } -
渲染劫持的概念是控制一个组件将从另一个组件输出什么的能力。实际上,这意味着你可以通过将组件包装成高阶组件来装饰组件。通过包装,你可以注入额外的属性或产生其他变化,这可能会导致渲染逻辑的更改。实际上它不支持劫持,但通过使用 HOC,你可以使组件以不同的方式工作。
-
There are two main ways of implementing HOCs in React. 1. Props Proxy (PP) and 2. Inheritance Inversion (II). They follow different approaches for manipulating the WrappedComponent. Props Proxy
In this approach, the render method of the HOC returns a React Element of the type of the WrappedComponent. We also pass through the props that the HOC receives, hence the name Props Proxy.
function ppHOC(WrappedComponent) {
 return class PP extends React.Component {
   render() {
     return <WrappedComponent {...this.props}/>
   }
 }
}
Inheritance Inversion In this approach, the returned HOC class (Enhancer) extends the WrappedComponent. It is called Inheritance Inversion because instead of the WrappedComponent extending some Enhancer class, it is passively extended by the Enhancer. In this way the relationship between them seems inverse.
function iiHOC(WrappedComponent) {
 return class Enhancer extends WrappedComponent {
   render() {
     return super.render()
   }
 }
}
-
传递数字时你应该使用
{},而传递字符串时还需要使用引号:React.render(<User age={30} department={"IT"} />, document.getElementById('container'));
-
It is up to developer decision. i.e, It is developer job to determine what kinds of state make up your application, and where each piece of state should liveSome users prefer to keep every single piece of data in Redux, to maintain a fully serializable and controlled version of their application at all times. Others prefer to keep non-critical or UI state, such as “is this dropdown currently open”, inside a component's internal state.
Below are the thumb rules to determine what kind of data should be put into Redux
- Do other parts of the application care about this data?
- Do you need to be able to create further derived data based on this original data?
- Is the same data being used to drive multiple components?
- Is there value to you in being able to restore this state to a given point in time (ie, time travel debugging)?
- Do you want to cache the data (ie, use what's in state if it's already there instead of re-requesting it)?
-
默认情况下,React 会为你创建一个没有任何配置的 service worker。Service worker 是一个 Web API,它帮助你缓存资源和其他文件,以便当用户离线或在弱网络时,他/她仍然可以在屏幕上看到结果,因此,它可以帮助你建立更好的用户体验,这是你目前应该了解的关于 Service worker 的内容。
   import React from 'react';
   import ReactDOM from 'react-dom';
   import App from './App';
   import registerServiceWorker from './registerServiceWorker';

   ReactDOM.render(<App />, document.getElementById('root'));
   registerServiceWorker();
-
当类组件的输入属性相同时,可以使用 pureComponent 或 shouldComponentUpdate 来避免组件的渲染。现在,你可以通过把函数组件包装在 React.memo 中来实现相同的功能。
const MyComponent = React.memo(function MyComponent(props) {
 /* only rerenders if props change */
});
-
使用 React.lazy 函数允许你将动态导入的组件作为常规组件进行渲染。当组件开始渲染时,它会自动加载包含 OtherComponent 的包。它必须返回一个 Promise,该 Promise 解析后为一个带有默认导出 React 组件的模块。
const OtherComponent = React.lazy(() => import('./OtherComponent'));

function MyComponent() {
 return (
   <div>
     <OtherComponent />
   </div>
 );
}
注意: React.lazy 和 Suspense 还不能用于服务端渲染。如果要在服务端渲染的应用程序中进行代码拆分,我们仍然建议使用 React Loadable。
-
你可以把状态的当前值与已有的值进行比较,并决定是否重新渲染页面。如果没有更改,你需要返回
null以阻止渲染,否则返回最新的状态值。例如,用户配置信息组件将按以下方式实现条件渲染:getUserProfile = user => { const latestAddress = user.address; this.setState(state => { if (state.address === latestAddress) { return null; } else { return { title: latestAddress }; } }); };
-
Arrays: 与旧版本不同的是,在 React 16 中你不需要确保 render 方法必须返回单个元素。通过返回数组,你可以返回多个没有包装元素的同级元素。例如,让我们看看下面的开发人员列表:
const ReactJSDevs = () => {
  return [
    <li key="1">John</li>,
    <li key="2">Jackie</li>,
    <li key="3">Jordan</li>
  ];
}
你还可以将此数组项合并到另一个数组组件中:
const JSDevs = () => {
  return (
    <ul>
      <li>Brad</li>
      <li>Brodge</li>
      <ReactJSDevs/>
      <li>Brandon</li>
    </ul>
  );
}
Strings and Numbers: 在 render 方法中,你也可以返回字符串和数值类型:
// String
render() {
 return 'Welcome to ReactJS questions';
}
// Number
render() {
 return 2018;
}
-
使用类字段声明可以使 React 类组件更加简洁。你可以在不使用构造函数的情况下初始化本地状态,并通过使用箭头函数声明类方法,而无需额外对它们进行绑定。让我们以一个 counter 示例来演示类字段声明,即不使用构造函数初始化状态且不进行方法绑定:
class Counter extends Component {
  state = { value: 0 };

  handleIncrement = () => {
    this.setState(prevState => ({
      value: prevState.value + 1
    }));
  };

  handleDecrement = () => {
    this.setState(prevState => ({
      value: prevState.value - 1
    }));
  };

  render() {
    return (
      <div>
        {this.state.value}

        <button onClick={this.handleIncrement}>+</button>
        <button onClick={this.handleDecrement}>-</button>
      </div>
    )
  }
}
-
Hooks 是一个新的草案,它允许你在不编写类的情况下使用状态和其他 React 特性。让我们来看一个 useState 钩子示例:
import { useState } from 'react';

function Example() {
  // Declare a new state variable, which we'll call "count"
  const [count, setCount] = useState(0);

  return (
    <div>
      <p>You clicked {count} times</p>
      <button onClick={() => setCount(count + 1)}>
        Click me
      </button>
    </div>
  );
}
-
为了使用 hooks,你需要遵守两个规则:
- 仅在顶层的 React 函数调用 hooks。也就是说,你不能在循环、条件或内嵌函数中调用 hooks。这将确保每次组件渲染时都以相同的顺序调用 hooks,并且它会在多个 useState 和 useEffect 调用之间保留 hooks 的状态。
- 仅在 React 函数中调用 hooks。例如,你不能在常规的 JavaScript 函数中调用 hooks。
-
React team released an ESLint plugin called eslint-plugin-react-hooks that enforces these two rules. You can add this plugin to your project using the below command,
npm install eslint-plugin-react-hooks@next
And apply the below config in your ESLint config file,
// Your ESLint configuration
{
  "plugins": [
    // ...
    "react-hooks"
  ],
  "rules": {
    // ...
    "react-hooks/rules-of-hooks": "error"
  }
}
Note: This plugin is intended to use in Create React App by default.
-
Below are the major differences between Flux and Redux
Flux Redux State is mutable State is immutable The Store contains both state and change logic The Store and change logic are separate There are multiple stores exist There is only one store exist All the stores are disconnected and flat Single store with hierarchical reducers It has a singleton dispatcher There is no concept of dispatcher React components subscribe to the store Container components uses connect function -
Below are the main benefits of React Router V4 module,
- In React Router v4(version 4), the API is completely about components. A router can be visualized as a single component() which wraps specific child router components().
- You don't need to manually set history. The router module will take care history by wrapping routes with component.
- The application size is reduced by adding only the specific router module(Web, core, or native)
-
The componentDidCatch lifecycle method is invoked after an error has been thrown by a descendant component. The method receives two parameters,
- error: - The error object which was thrown
- info: - An object with a componentStack key contains the information about which component threw the error.
The method structure would be as follows
componentDidCatch(error, info)
-
以下是错误边界不起作用的情况:
- 在事件处理器内
- setTimeout 或 requestAnimationFrame 回调中的异步代码
- 在服务端渲染期间
- 错误边界代码本身中引发错误时
-
错误边界不会捕获事件处理程序中的错误。与 render 方法或生命周期方法不同,在渲染期间事件处理器不会被执行或调用。
如果仍然需要在事件处理程序中捕获错误,请使用下面的常规 JavaScript
try/catch语句:class MyComponent extends React.Component { constructor(props) { super(props); this.state = { error: null }; } handleClick = () => { try { // Do something that could throw } catch (error) { this.setState({ error }); } } render() { if (this.state.error) { return <h1>Caught an error.</h1> } return <div onClick={this.handleClick}>Click Me</div> } }
上面的代码使用普通的 JavaScript try/catch 块而不是错误边界来捕获错误。
-
Try catch 块使用命令式代码,而错误边界则是使用在屏幕上呈现声明性代码。
例如,以下是使用声明式代码的 try/catch 块:
try {
  showButton();
} catch (error) {
  // ...
}
而错误边界包装的声明式代码如下:
<ErrorBoundary>
  <MyComponent />
</ErrorBoundary>
因此,如果在组件树深处某个位置组件的 componentDidUpdate 方法中,发生了由 setState 引发的错误,它仍然会正确地冒泡到最近的错误边界。
-
在 React 16 中,未被任何错误边界捕获的错误将导致整个 React 组件树的卸载。这一决定背后的原因是,与其显示已损坏的界面,不如完全移除它。例如,对于支付应用程序来说,显示错误的金额比什么都不提供更糟糕。
-
错误边界使用的粒度由开发人员根据项目需要决定。你可以遵循这些方法中的任何一种:
- 可以包装顶层路由组件以显示整个应用程序中常见的错误消息。
- 你还可以将单个组件包装在错误边界中,以防止它们奔溃时影响到应用程序的其余部分。
-
除了错误消息和 JavaScript 堆栈,React 16 将使用错误边界的概念显示带有文件名和行号的组件堆栈。例如,BuggyCounter 组件显示组件堆栈信息:

-
在类组件中 render() 方法是唯一需要的方法。也就是说,对于类组件,除了 render() 方法之外的所有方法都是可选的。
-
以下列表是 render 方法返回的类型:
- React elements: 用于告诉 React 如何渲染 DOM 节点。它包括 HTML 元素,如
<div />和用户定义的元素。 - Arrays and fragments: 以数组的形式返回多个元素和包装多个元素的片段。
- Portals: 将子元素渲染到不同的 DOM 子树中。
- String and numbers: 在 DOM 中将字符串和数字都作为文本节点进行呈现。
- Booleans or null: 不会渲染任何内容,但这些类型用于有条件地渲染内容。
- React elements: 用于告诉 React 如何渲染 DOM 节点。它包括 HTML 元素,如
-
使用构造函数主要有两个目的:
- 通过将对象分配给 this.state 来初始化本地状态。
- 用于为组件实例绑定事件处理方法。
例如,下面的代码涵盖了上述两种情况:
constructor(props) {
  super(props);
  // Don't call this.setState() here!
  this.state = { counter: 0 };
  this.handleClick = this.handleClick.bind(this);
}
-
不,这不是强制的。也就是说,如果你不需要初始化状态且不需要绑定方法,则你不需要为 React 组件实现一个构造函数。
-
defaultProps 被定义为组件类上的属性,用于设置组件类默认的属性值。它只适用于 undefined 的属性,而不适用于 null 属性。例如,让我们为按钮组件创建默认的 color 属性:
class MyButton extends React.Component {
  // ...
}

MyButton.defaultProps = {
  color: 'red'
};
如果未设置 props.color,则会使用默认值
red。 也就是说,每当你试图访问 color 属性时,它都使用默认值。render() { return <MyButton /> ; // props.color will be set to red }
注意: 如果你提供的是 null 值,它会仍然保留 null 值。
-
不应在 componentWillUnmount() 中调用 setState(),因为一旦卸载了组件实例,就永远不会再次装载它。
-
在子代组件抛出异常后会调用此生命周期方法。它以抛出的异常对象作为参数,并返回一个值用于更新状态。该生命周期方法的签名如下:
static getDerivedStateFromError(error)
让我们举一个包含上述生命周期方法的错误边界示例,来说明 getDerivedStateFromError 的目的:
class ErrorBoundary extends React.Component {
  constructor(props) {
    super(props);
    this.state = { hasError: false };
  }

  static getDerivedStateFromError(error) {
    // Update state so the next render will show the fallback UI.
    return { hasError: true };
  }

  render() {
    if (this.state.hasError) {
      // You can render any custom fallback UI
      return <h1>Something went wrong.</h1>;
    }

    return this.props.children;
  }
}
-
更新可能由属性或状态的更改引起。在重新渲染组件时,会按以下顺序调用下列方法。
- static getDerivedStateFromProps()
- shouldComponentUpdate()
- render()
- getSnapshotBeforeUpdate()
- componentDidUpdate()
-
在渲染期间,生命周期方法内或任何子组件的构造函数中出现错误时,将会调用以下方法:
- static getDerivedStateFromError()
- componentDidCatch()
-
displayName 被用于调试信息。通常,你不需要显式设置它,因为它是从定义组件的函数或类的名称推断出来的。如果出于调试目的或在创建高阶组件时显示不同的名称,可能需要显式设置它。
例如,若要简化调试,请选择一个显示名称,以表明它是 withSubscription HOC 的结果。
function withSubscription(WrappedComponent) {
  class WithSubscription extends React.Component {/* ... */}
  WithSubscription.displayName = `WithSubscription(${getDisplayName(WrappedComponent)})`;
  return WithSubscription;
}

function getDisplayName(WrappedComponent) {
  return WrappedComponent.displayName || WrappedComponent.name || 'Component';
}
-
React 支持所有流行的浏览器,包括 Internet Explorer 9 和更高版本,但旧版本的浏览器(如IE 9 和 IE 10)需要一些 polyfill。如果你使用 es5-shim and es5-sham polyfill,那么它甚至支持不支持 ES5 方法的旧浏览器。
-
此方法可从 react-dom 包中获得,它从 DOM 中移除已装载的 React 组件,并清除其事件处理程序和状态。如果容器中没有装载任何组件,则调用此函数将不起任何作用。如果组件已卸载,则返回 true;如果没有要卸载的组件,则返回 false。该方法的签名如下:
ReactDOM.unmountComponentAtNode(container)
-
Code-Splitting 是 Webpack 和 Browserify 等打包工具所支持的一项功能,它可以创建多个 bundles,并可以在运行时动态加载。React 项目支持通过 dynamic import() 特性进行代码拆分。例如,在下面的代码片段中,它将使 moduleA.js 及其所有唯一依赖项作为单独的块,仅当用户点击 'Load' 按钮后才加载。
moduleA.js
const moduleA = 'Hello';

export { moduleA };
App.js
import React, { Component } from 'react';

class App extends Component {
  handleClick = () => {
    import('./moduleA')
      .then(({ moduleA }) => {
        // Use moduleA
      })
      .catch(err => {
        // Handle failure
      });
  };

  render() {
    return (
      <div>
        <button onClick={this.handleClick}>Load</button>
      </div>
    );
  }
}

export default App;
-
在下面的情况下, 将有所帮助:
- 使用 unsafe lifecycle methods 标识组件。
- 有关 legacy string ref API 用法发出警告。
- 检测无法预测的 side effects。
- 检测 legacy context API。
- 有关已弃用的 findDOMNode 用法的警告。
-
The Fragments declared with the explicit <React.Fragment> syntax may have keys. The general usecase is mapping a collection to an array of fragments as below,
function Glossary(props) {
  return (
    <dl>
      {props.items.map(item => (
        // Without the `key`, React will fire a key warning
        <React.Fragment key={item.id}>
          <dt>{item.term}</dt>
          <dd>{item.description}</dd>
        </React.Fragment>
      ))}
    </dl>
  );
}
Note: key is the only attribute that can be passed to Fragment. In the future, there might be a support for additional attributes, such as event handlers.
-
从 React 16 开始,完全支持标准或自定义 DOM 属性。由于 React 组件通常同时使用自定义和与 DOM 相关的属性,因此 React 与 DOM API 一样都使用 camelCase 约定。让我们对标准 HTML 属性采取一些措施:
<div tabIndex="-1" />      // Just like node.tabIndex DOM API
<div className="Button" /> // Just like node.className DOM API
<input readOnly={true} />  // Just like node.readOnly DOM API
除了特殊情况外,这些属性的工作方式与相应的 HTML 属性类似。它还支持所有 SVG 属性。
-
Higher-order components come with a few caveats apart from its benefits. Below are the few listed in an order
-
Don’t Use HOCs Inside the render Method: It is not recommended to apply a HOC to a component within the render method of a component.
render() {
  // A new version of EnhancedComponent is created on every render
  // EnhancedComponent1 !== EnhancedComponent2
  const EnhancedComponent = enhance(MyComponent);
  // That causes the entire subtree to unmount/remount each time!
  return <EnhancedComponent />;
}
The above code impact performance by remounting a component that causes the state of that component and all of its children to be lost. Instead, apply HOCs outside the component definition so that the resulting component is created only once
-
Static Methods Must Be Copied Over: When you apply a HOC to a component the new component does not have any of the static methods of the original component
// Define a static method
WrappedComponent.staticMethod = function() {/*...*/}
// Now apply a HOC
const EnhancedComponent = enhance(WrappedComponent);

// The enhanced component has no static method
typeof EnhancedComponent.staticMethod === 'undefined' // true
You can overcome this by copying the methods onto the container before returning it
function enhance(WrappedComponent) {
  class Enhance extends React.Component {/*...*/}
  // Must know exactly which method(s) to copy :(
  Enhance.staticMethod = WrappedComponent.staticMethod;
  return Enhance;
}
-
Refs Aren’t Passed Through: For HOCs you need to pass through all props to the wrapped component but this does not work for refs. This is because ref is not really a prop similar to key. In this case you need to use the React.forwardRef API
-
-
React.forwardRef accepts a render function as parameter and DevTools uses this function to determine what to display for the ref forwarding component. For example, If you don't name the render function or not using displayName property then it will appear as ”ForwardRef” in the DevTools,
const WrappedComponent = React.forwardRef((props, ref) => {
  return <LogProps {...props} forwardedRef={ref} />;
});
But If you name the render function then it will appear as ”ForwardRef(myFunction)”
const WrappedComponent = React.forwardRef(
  function myFunction(props, ref) {
    return <LogProps {...props} forwardedRef={ref} />;
  }
);
As an alternative, You can also set displayName property for forwardRef function,
function logProps(Component) {
  class LogProps extends React.Component {
    // ...
  }

  function forwardRef(props, ref) {
    return <LogProps {...props} forwardedRef={ref} />;
  }

  // Give this component a more helpful display name in DevTools.
  // e.g. "ForwardRef(logProps(MyComponent))"
  const name = Component.displayName || Component.name;
  forwardRef.displayName = `logProps(${name})`;

  return React.forwardRef(forwardRef);
}
-
如果没有传递属性值,则默认为 true。此行为可用,以便与 HTML 的行为匹配。例如,下面的表达式是等价的:
<MyInput autocomplete />

<MyInput autocomplete={true} />
注意: 不建议使用此方法,因为它可能与 ES6 对象 shorthand 混淆(例如,{name},它是{ name:name } 的缩写)
-
Next.js 是一个流行的轻量级框架,用于使用 React 构建静态和服务端渲染应用程序。它还提供样式和路由解决方案。以下是 NextJS 提供的主要功能:
- 默认服务端渲染
- 自动代码拆分以加快页面加载速度
- 简单的客户端路由 (基于页面)
- 基于 Webpack 的开发环境支持 (HMR)
- 能够使用 Express 或任何其他 Node.js HTTP 服务器
- 可自定义你自己的 Babel 和 Webpack 配置
-
可以将事件处理程序和其他函数作为属性传递给子组件。它可以在子组件中使用,如下所示:
<button onClick={this.handleClick}> -
是的,你可以用。它通常是向回调函数传递参数的最简单方法。但在使用时需要优化性能。
class Foo extends Component {
  handleClick() {
    console.log('Click happened');
  }
  render() {
    return <button onClick={() => this.handleClick()}>Click Me</button>;
  }
}
注意: 组件每次渲染时,在 render 方法中的箭头函数都会创建一个新的函数,这可能会影响性能。
-
如果你使用一个事件处理程序,如 onClick or onScroll 并希望防止回调被过快地触发,那么你可以限制回调的执行速度。这可以通过以下可能的方式实现:
- Throttling: 基于时间的频率进行更改。例如,它可以使用 lodash 的 _.throttle 函数。
- Debouncing: 在一段时间不活动后发布更改。例如,可以使用 lodash 的 _.debounce 函数。
- RequestAnimationFrame throttling: 基于 requestAnimationFrame 的更改。例如,可以使用 raf-schd。
注意:_.debounce , _.throttle 和 raf-schd 都提供了一个 cancel 方法来取消延迟回调。所以需要调用 componentWillUnmount,或者对代码进行检查来保证在延迟函数有效期间内组件始终挂载。
-
React DOM escapes any values embedded in JSX before rendering them. Thus it ensures that you can never inject anything that’s not explicitly written in your application. Everything is converted to a string before being rendered. For example, you can embed user input as below, React DOM 会在渲染 JSX 中嵌入的任何值之前对其进行转义。因此,它确保你永远不能注入任何未在应用程序中显式写入的内容。
const name = response.potentiallyMaliciousInput;
const element = <h1>{name}</h1>;
This way you can prevent XSS(Cross-site-scripting) attacks in the application.
-
通过将新创建的元素传递给 ReactDOM 的 render 方法,可以实现 UI 更新。例如,让我们举一个滴答时钟的例子,它通过多次调用 render 方法来更新时间:
function tick() { const element = ( <div> <h1>Hello, world!</h1> <h2>It is {new Date().toLocaleTimeString()}.</h2> </div> ); ReactDOM.render(element, document.getElementById('root')); } setInterval(tick, 1000);
-
当你将组件声明为函数或类时,它决不能修改自己的属性。让我们来实现一个 capital 的函数:
function capital(amount, interest) { return amount + interest; }
上面的函数称为 "pure" 函数,因为它不会尝试更改输入,并总是为相同的输入返回相同的结果。因此,React 有一条规则,即"所有 React 组件的行为都必须像纯函数一样。"
-
When you call setState() in the component, React merges the object you provide into the current state. For example, let us take a facebook user with posts and comments details as state variables, 当你在组件中调用 setState() 方法时,React 会将提供的对象合并到当前状态。例如,让我们以一个使用帖子和评论详细信息的作为状态变量的 Facebook 用户为例:
constructor(props) { super(props); this.state = { posts: [], comments: [] }; }
现在,你可以独立调用 setState() 方法,单独更新状态变量:
componentDidMount() { fetchPosts().then(response => { this.setState({ posts: response.posts }); }); fetchComments().then(response => { this.setState({ comments: response.comments }); }); }
如上面的代码段所示,
this.setState({comments})只会更新 comments 变量,而不会修改或替换 posts 变量。 -
在迭代或循环期间,向事件处理程序传递额外的参数是很常见的。这可以通过箭头函数或绑定方法实现。让我们以网格中更新的用户详细信息为例:
<button onClick={(e) => this.updateUser(userId, e)}>Update User details</button> <button onClick={this.updateUser.bind(this, userId)}>Update User details</button>
在这两种方法中,合成参数 e 作为第二个参数传递。你需要在箭头函数中显式传递它,并使用 bind 方法自动转发它。
-
你可以基于特定的条件通过返回 null 值来阻止组件的渲染。这样它就可以有条件地渲染组件。
function Greeting(props) { if (!props.loggedIn) { return null; } return ( <div className="greeting"> welcome, {props.name} </div> ); }
class User extends React.Component { constructor(props) { super(props); this.state = {loggedIn: false, name: 'John'}; } render() { return ( <div> //Prevent component render if it is not loggedIn <Greeting loggedIn={this.state.loggedIn} /> <UserDetails name={this.state.name}> </div> ); }
在上面的示例中,greeting 组件通过应用条件并返回空值跳过其渲染部分。
-
有三个条件可以确保,使用索引作为键是安全的:
- 列表项是静态的,它们不会被计算,也不会更改。
- 列表中的列表项没有 ids 属性。
- 列表不会被重新排序或筛选。
-
数组中使用的键在其同级中应该是唯一的,但它们不需要是全局唯一的。也就是说,你可以在两个不同的数组中使用相同的键。例如,下面的 book 组件在不同的组件中使用相同的数组:
function Book(props) { const index = ( <ul> {props.pages.map((page) => <li key={page.id}> {page.title} </li> )} </ul> ); const content = props.pages.map((page) => <div key={page.id}> <h3>{page.title}</h3> <p>{page.content}</p> <p>{page.pageNumber}</p> </div> ); return ( <div> {index} <hr /> {content} </div> ); }
-
Formik 是一个用于 React 的表单库,它提供验证、跟踪访问字段和处理表单提交等解决方案。具体来说,你可以按以下方式对它们进行分类:
- 获取表单状态输入和输出的值。
- 表单验证和错误消息。
- 处理表单提交。
它用于创建一个具有最小 API 的可伸缩、性能良好的表单助手,以解决令人讨厌的问题。
-
下面是建议使用 formik 而不是 redux 表单库的主要原因:
- 表单状态本质上是短期的和局部的,因此不需要在 redux(或任何类型的flux库)中跟踪它。
- 每次按一个键,Redux-Form 都会多次调用整个顶级 Redux Reducer。这样就增加了大型应用程序的输入延迟。
- 经过 gzip 压缩过的 Redux-Form 为 22.5 kB,而 Formik 只有 12.7 kB
-
在 React 中,建议使用组合而不是继承来重用组件之间的代码。Props 和 composition 都为你提供了以一种明确和安全的方式自定义组件外观和行为所需的灵活性。但是,如果你希望在组件之间复用非 UI 功能,建议将其提取到单独的 JavaScript 模块中。之后的组件导入它并使用该函数、对象或类,而不需扩展它。
-
是的,你可以在 React 应用程序中使用 Web Components。尽管许多开发人员不会使用这种组合方式,但如果你使用的是使用 Web Components 编写的第三方 UI 组件,则可能需要这种组合。例如,让我们使用 Vaadin 提供的 Web Components 日期选择器组件:
import React, { Component } from 'react'; import './App.css'; import '@vaadin/vaadin-date-picker'; class App extends Component { render() { return ( <div className="App"> <vaadin-date-picker label="When were you born?"></vaadin-date-picker> </div> ); } } export default App;
-
dynamic import() 语法是 ECMAScript 提案,目前不属于语言标准的一部分。它有望在不久的将来被采纳。在你的应用程序中,你可以使用 dynamic import() 来实现代码拆分。让我们举一个加法的例子:
- Normal Import
import { add } from './math'; console.log(add(10, 20));
- Dynamic Import
import("./math").then(math => { console.log(math.add(10, 20)); });
-
如果你想要在服务端渲染的应用程序中实现代码拆分,建议使用 Loadable 组件,因为 React.lazy 和 Suspense 还不可用于服务器端渲染。Loadable 允许你将动态导入的组件作为常规的组件进行渲染。让我们举一个例子:
import loadable from '@loadable/component' const OtherComponent = loadable(() => import('./OtherComponent')) function MyComponent() { return ( <div> <OtherComponent /> </div> ) }
现在,其他组件将以单独的包进行加载。
-
如果父组件在渲染时包含 dynamic import 的模块尚未加载完成,在此加载过程中,你必须使用一个 loading 指示器显示后备内容。这可以使用 Suspense 组件来实现。例如,下面的代码使用 Suspense 组件:
const OtherComponent = React.lazy(() => import('./OtherComponent')); function MyComponent() { return ( <div> <Suspense fallback={<div>Loading...</div>}> <OtherComponent /> </Suspense> </div> ); }
正如上面的代码中所展示的,懒加载的组件被包装在 Suspense 组件中。
-
进行代码拆分的最佳位置之一是路由。整个页面将立即重新渲染,因此用户不太可能同时与页面中的其他元素进行交互。因此,用户体验不会受到干扰。让我们以基于路由的网站为例,使用像 React Router 和 React.lazy 这样的库:
import { BrowserRouter as Router, Route, Switch } from 'react-router-dom'; import React, { Suspense, lazy } from 'react'; const Home = lazy(() => import('./routes/Home')); const About = lazy(() => import('./routes/About')); const App = () => ( <Router> <Suspense fallback={<div>Loading...</div>}> <Switch> <Route exact path="/" component={Home}/> <Route path="/about" component={About}/> </Switch> </Suspense> </Router> );
在上面的代码中,代码拆分将发生在每个路由层级。
-
Context 旨在共享可被视为全局的数据,用于 React 组件树。例如,在下面的代码中,允许手动通过一个 theme 属性来设置按钮组件的样式。
//Lets create a context with a default theme value "luna" const ThemeContext = React.createContext('luna'); // Create App component where it uses provider to pass theme value in the tree class App extends React.Component { render() { return ( <ThemeContext.Provider value="nova"> <Toolbar /> </ThemeContext.Provider> ); } } // A middle component where you don't need to pass theme prop anymore function Toolbar(props) { return ( <div> <ThemedButton /> </div> ); } // Lets read theme value in the button component to use class ThemedButton extends React.Component { static contextType = ThemeContext; render() { return <Button theme={this.context} />; } }
-
当在组件树中的组件没有匹配到在其上方的 Provider 时,才会使用 defaultValue 参数。这有助于在不包装组件的情况下单独测试组件。下面的代码段提供了默认的主题值 Luna。
const defaultTheme = "Luna"; const MyContext = React.createContext(defaultTheme);
-
ContextType 用于消费 context 对象。ContextType 属性可以通过两种方式使用:
- contextType as property of class:
可以为类的 contextType 属性分配通过 React.createContext() 创建的 context 对象。之后,你可以在任何生命周期方法和 render 函数中使用
this.context引用该上下文类型最近的当前值。
让我们在 MyClass 上按如下方式设置 contextType 属性:
class MyClass extends React.Component { componentDidMount() { let value = this.context; /* perform a side-effect at mount using the value of MyContext */ } componentDidUpdate() { let value = this.context; /* ... */ } componentWillUnmount() { let value = this.context; /* ... */ } render() { let value = this.context; /* render something based on the value of MyContext */ } } MyClass.contextType = MyContext;
- Static field 你可以使用静态类属性来初始化 contextType 属性:
class MyClass extends React.Component { static contextType = MyContext; render() { let value = this.context; /* render something based on the value */ } }
- contextType as property of class:
可以为类的 contextType 属性分配通过 React.createContext() 创建的 context 对象。之后,你可以在任何生命周期方法和 render 函数中使用
-
Consumer 是一个订阅上下文更改的 React 组件。它需要一个函数作为子元素,该函数接收当前上下文的值作为参数,并返回一个 React 元素。传递给函数 value 参数的参数值将等于在组件树中当前组件最近的 Provider 元素的 value 属性值。举个简单的例子:
<MyContext.Consumer> {value => /* render something based on the context value */} </MyContext.Consumer>
-
Context 使用引用标识来确定何时重新渲染,当 Provider 的父元素重新渲染时,会有一些问题即可能会在 Consumers 中触发无任何意图的渲染。 例如,下面的代码将在每次 Provider 重新渲染时,重新渲染所有的 Consumers,这是因为渲染 Provider 时,始终会为 value 属性创建一个新的对象:
class App extends React.Component { render() { return ( <Provider value={{something: 'something'}}> <Toolbar /> </Provider> ); } }
可以通过把 value 的值提升到父状态中来解决这个问题:
class App extends React.Component { constructor(props) { super(props); this.state = { value: {something: 'something'}, }; } render() { return ( <Provider value={this.state.value}> <Toolbar /> </Provider> ); } }
-
因为 ref 不是一个属性,所以 Refs 不会被传递。就像 key 一样,React 会以不同的方式处理它。如果你将 ref 添加到 HOC,则该 ref 将引用最外层的容器组件,而不是包装的组件。在这种情况下,你可以使用 Forward Ref API。例如,你可以使用 React.forwardRef API 显式地将 refs 转发的内部的 FancyButton 组件。
以下的 HOC 会记录所有的 props 变化:
function logProps(Component) { class LogProps extends React.Component { componentDidUpdate(prevProps) { console.log('old props:', prevProps); console.log('new props:', this.props); } render() { const {forwardedRef, ...rest} = this.props; // Assign the custom prop "forwardedRef" as a ref return <Component ref={forwardedRef} {...rest} />; } } return React.forwardRef((props, ref) => { return <LogProps {...props} forwardedRef={ref} />; }); }
让我们使用这个 HOC 来记录所有传递到我们 “fancy button” 组件的属性:
class FancyButton extends React.Component { focus() { // ... } // ... } export default logProps(FancyButton);
现在让我们创建一个 ref 并将其传递给 FancyButton 组件。在这种情况下,你可以聚焦到 button 元素上。
import FancyButton from './FancyButton'; const ref = React.createRef(); ref.current.focus(); <FancyButton label="Click Me" handleClick={handleClick} ref={ref} />;
-
常规函数或类组件不会接收到 ref 参数,并且 ref 在 props 中也不可用。只有在使用 React.forwardRef 定义组件时,才存在第二个 ref 参数。
-
当你开始在组件库中使用 forwardRef 时,你应该将其视为一个破坏性的更改,并为库发布一个新的主要版本。这是因为你的库可能具有不同的行为,如已分配了哪些引用,以及导出哪些类型。这些更改可能会破坏依赖于旧行为的应用程序和其他库。
-
如果你不使用 ES6,那么你可能需要使用 create-react-class 模块。对于默认属性,你需要在传递对象上定义 getDefaultProps() 函数。而对于初始状态,必须提供返回初始状态的单独 getInitialState 方法。
var Greeting = createReactClass({ getDefaultProps: function() { return { name: 'Jhohn' }; }, getInitialState: function() { return {message: this.props.message}; }, handleClick: function() { console.log(this.state.message); }, render: function() { return <h1>Hello, {this.props.name}</h1>; } });
注意: 如果使用 createReactClass,则所有方法都会自动绑定。也就是说,你不需要在事件处理程序的构造函数中使用 .bind(this)。
-
是的,使用 React 不强制使用 JSX。实际上,当你不想在构建环境中配置编译环境时,这是很方便的。每个 JSX 元素只是调用 React.createElement(component, props, ...children) 的语法糖。例如,让我们来看一下使用 JSX 的 greeting 示例:
class Greeting extends React.Component { render() { return <div>Hello {this.props.message}</div>; } } ReactDOM.render( <Greeting message="World" />, document.getElementById('root') );
你可以在没有 JSX 的情况下编写相同的功能,如下所示:
class Greeting extends React.Component { render() { return React.createElement('div', null, `Hello ${this.props.message}`); } } ReactDOM.render( React.createElement(Greeting, {message: 'World'}, null), document.getElementById('root') );
-
React 需要使用算法来了解如何有效地更新 UI 以匹配最新的树。差异算法将生成将一棵树转换为另一棵树的最小操作次数。然而,算法具有 O(n3) 的复杂度,其中 n 是树中元素的数量。在这种情况下,对于显示 1000 个元素将需要大约 10 亿个比较。这太昂贵了。相反,React 基于两个假设实现了一个复杂度为 O(n) 的算法:
- 两种不同类型的元素会产生不同的树结构。
- 开发者可以通过一个 key 属性,标识哪些子元素可以在不同渲染中保持稳定。
-
When diffing two trees, React first compares the two root elements. The behavior is different depending on the types of the root elements. It covers the below rules during reconsilation algorithm,
-
Elements Of Different Types: Whenever the root elements have different types, React will tear down the old tree and build the new tree from scratch. For example, elements to
to of different types lead a full rebuild., or from
-
DOM Elements Of The Same Type: When comparing two React DOM elements of the same type, React looks at the attributes of both, keeps the same underlying DOM node, and only updates the changed attributes. Lets take an example with same DOM eleemnts except className attribute,
<div className="show" title="ReactJS" /> <div className="hide" title="ReactJS" />
-
Component Elements Of The Same Type:
When a component updates, the instance stays the same, so that state is maintained across renders. React updates the props of the underlying component instance to match the new element, and calls componentWillReceiveProps() and componentWillUpdate() on the underlying instance. After that, the render() method is called and the diff algorithm recurses on the previous result and the new result.
-
Recursing On Children: when recursing on the children of a DOM node, React just iterates over both lists of children at the same time and generates a mutation whenever there’s a difference. For example, when adding an element at the end of the children, converting between these two trees works well.
<ul> <li>first</li> <li>second</li> </ul> <ul> <li>first</li> <li>second</li> <li>third</li> </ul>
-
Handling keys:
React supports a key attribute. When children have keys, React uses the key to match children in the original tree with children in the subsequent tree. For example, adding a key can make the tree conversion efficient,
<ul> <li key="2015">Duke</li> <li key="2016">Villanova</li> </ul> <ul> <li key="2014">Connecticut</li> <li key="2015">Duke</li> <li key="2016">Villanova</li> </ul>
-
-
这里是 refs 的一些使用场景:
- 管理聚焦、文本选择或媒体播放。
- 触发命令式动画。
- 与第三方 DOM 库集成。
-
即使模式名为
render props,你也不必使用名为 render 的属性名来使用此模式。也就是说,组件用于知道即将渲染内容的任何函数属性,在技术上都是一个render props。让我们举一个名为 children 渲染属性的示例:<Mouse children={mouse => ( <p>The mouse position is {mouse.x}, {mouse.y}</p> )}/>
实际上,以上的 children 属性不一定需要在 JSX 元素的
attributes列表中命名。反之,你可以将它直接放在元素内部:<Mouse> {mouse => ( <p>The mouse position is {mouse.x}, {mouse.y}</p> )} </Mouse>
当使用上述的技术,需要在 propTypes 中明确声明 children 必须为函数类型:
Mouse.propTypes = { children: PropTypes.func.isRequired };
-
如果在渲染方法中创建函数,则会否定纯组件的用途。因为浅属性比较对于新属性总是返回 false,在这种情况下,每次渲染都将为渲染属性生成一个新值。你可以通过将渲染函数定义为实例方法来解决这个问题。
-
可以使用带有渲染属性的常规组件实现大多数高阶组件(HOC)。例如,如果希望使用 withMouse HOC 而不是 组件,则你可以使用带有渲染属性的常规 组件轻松创建一个 HOC 组件。
function withMouse(Component) { return class extends React.Component { render() { return ( <Mouse render={mouse => ( <Component {...this.props} mouse={mouse} /> )}/> ); } } }
-
Windowing 是一种技术,它在任何给定时间只呈现一小部分行,并且可以显著减少重新呈现组件所需的时间以及创建的 DOM 节点的数量。如果应用程序呈现长的数据列表,则建议使用此技术。react-window 和 react-virtualized 都是常用的 windowing 库,它提供了几个可重用的组件,用于显示列表、网格和表格数据。
-
Falsy 值比如 false,null,undefined 是有效的子元素,但它们不会呈现任何内容。如果仍要显示它们,则需要将其转换为字符串。我们来举一个如何转换为字符串的例子:
<div> My JavaScript variable is {String(myVariable)}. </div>
-
当父组件拥有
overflow: hidden或含有影响堆叠上下文的属性(z-index、position、opacity 等样式),且需要脱离它的容器进行展示时,React portal 就非常有用。例如,对话框、全局消息通知、悬停卡和工具提示。 -
在 React 中,表单元素的属性值将覆盖其 DOM 中的值。对于非受控组件,你可能希望能够指定其初始值,但不会控制后续的更新。要处理这种情形,你可以指定一个 defaultValue 属性来取代 value 属性。
render() { return ( <form onSubmit={this.handleSubmit}> <label> User Name: <input defaultValue="John" type="text" ref={this.input} /> </label> <input type="submit" value="Submit" /> </form> ); }
The same applies for
selectandtextAreainputs. But you need to use defaultChecked forcheckboxandradioinputs. -
尽管技术栈因开发人员而异,但最流行的技术栈用于 React boilerplate 项目代码中。它主要使用 redux 和 redux saga 进行状态管理和具有副作用的异步操作,使用 react-router 进行路由管理,使用 styled-components 库开发 React 组件,使用 axios 调用 REST api,以及其他支持的技术栈,如 webpack、reseselect、esnext、babel 等。
你可以克隆 https://github.com/react-boilerplate/react-boilerplate 并开始开发任何新的 React 项目。
-
以下是Real DOM和Virtual DOM之间的主要区别:
Real DOM Virtual DOM 更新速度慢 更新速度快 DOM 操作非常昂贵 DOM 操作非常简单 可以直接更新 HTML 你不能直接更新 HTML 造成太多内存浪费 更少的内存消耗 如果元素更新了,创建新的 DOM 节点 如果元素更新,则更新 JSX 元素 -
Bootstrap 可以通过三种可能的方式添加到 React 应用程序中:
- 使用 Bootstrap CDN: 这是添加 bootstrap 最简单的方式。在 head 标签中添加 bootstrap 相应的 CSS 和 JS 资源。
- 把 Bootstrap 作为依赖项:
如果你使用的是构建工具或模块绑定器(如Webpack),那么这是向 React 应用程序添加 bootstrap 的首选选项。
npm install bootstrap `` - 使用 React Bootstrap 包:
在这种情况下,你可以将 Bootstrap 添加到我们的 React 应用程序中,方法是使用一个以 React 组件形式对 Bootstrap 组件进行包装后包。下面的包在此类别中很流行:
- react-bootstrap
- reactstrap
-
以下是使用 React 作为前端框架的前 10 个网站:
- Uber
- Khan Academy
- Airbnb
- Dropbox
- Netflix
- PayPal
-
React 对如何定义样式没有任何意见,但如果你是初学者,那么好的起点是像往常一样在单独的 *.css 文件中定义样式,并使用类名引用它们。此功能不是 React 的一部分,而是来自第三方库。但是如果你想尝试不同的方法(JS中的CSS),那么 styled-components 库是一个不错的选择。
