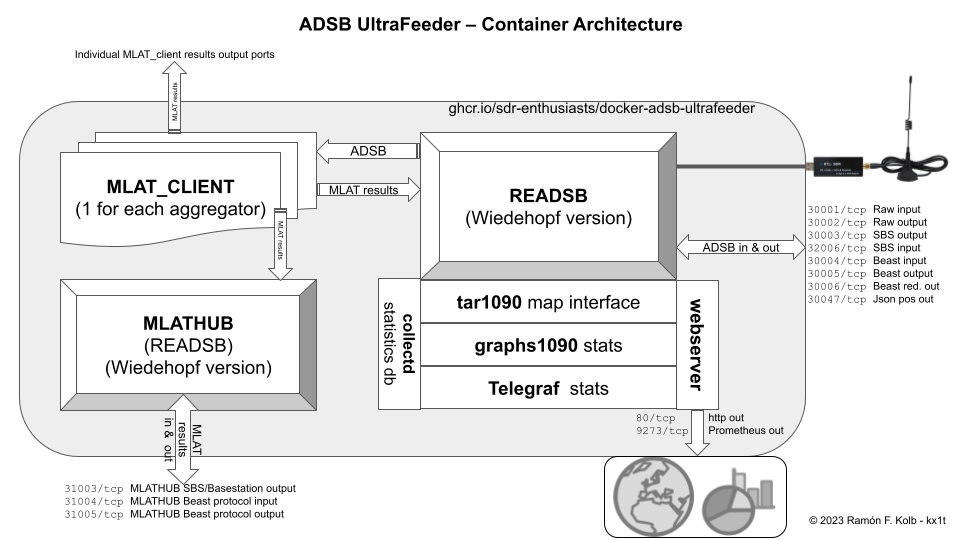
adsb-ultrafeeder is a ADS-B data collector container that can be used to:
- retrieve ADS-B data from your SDR or other device
- display it on a local map, including options to show tracks, heatmaps, and system performance graphs
- forward the data to one or more aggregators using BEAST/BEAST-REDUCE/BEAST-REDUCE-PLUS format
- send MLAT data to these aggregators
- receive and consolidate MLAT results data (built-in
mlathub) - Interface with external visualization tools such as Grafana using statistics data available in InfluxDB and Prometheus format
In order to accomplish this, the container makes use of the following underlying technologies:
- SDR-Enthusiasts Docker Base-Image
- Wiedehopf's branch of
readsb - Wiedehopf's tar1090 graphical interface
- Wiedehopf's graphs1090
- MLAT Client
It builds and runs on linux/amd64, linux/arm/v7 (linux/armhf) and linux/arm64 architectures.
- An example
docker-compose.ymlfile can be found in this repository. - The accompanying environment variable values are defined in the
.envfile in this repository
Once you have installed Docker, you can follow these lines of code to get up and running in very little time:
sudo mkdir -p -m 777 /opt/adsb
cd /opt/adsb
wget https://raw.githubusercontent.com/sdr-enthusiasts/docker-adsb-ultrafeeder/main/docker-compose.yml
wget https://raw.githubusercontent.com/sdr-enthusiasts/docker-adsb-ultrafeeder/main/.env
Then edit the docker-compose.yml and .env files and make any changes as needed. Please configure ALL variables in .env:
nano docker-compose.yml
nano .env
Finally, bring up the stack. This may take a minute as it will automatically download the container and start it up:
docker compose up -dSome common ports are as follows (which may or may not be in use depending on your configuration):
| Port | Details |
|---|---|
30001/tcp |
Raw protocol input |
30002/tcp |
Raw protocol output |
30003/tcp |
SBS/Basestation protocol output |
32006/tcp |
SBS/Basestation protocol input |
30004/tcp |
Beast protocol input |
30005/tcp |
Beast protocol output |
30006/tcp |
Beast reduce protocol output |
30047/tcp |
Json position output |
31003/tcp |
MLATHUB SBS/Basestation protocol output |
31004/tcp |
MLATHUB Beast protocol input |
31005/tcp |
MLATHUB Beast protocol output |
The container's web interface is rendered to port 80 in the container. This can me mapped to a port on the host using the docker-compose ports directive. In the example above, the container's website is made available at port 8078 on the host system.
Json position output:
- outputs an aircraft object for every new position received for an aircraft if the --json-trace-interval has elapsed for that aircraft
- to make it output every received position, set READSB_JSON_TRACE_INTERVAL to 0.1
- each json object will be on a new line
- https://github.com/wiedehopf/readsb/blob/dev/README-json.md
Aircraft.json:
- https://github.com/wiedehopf/readsb/blob/dev/README-json.md
- available on the same port as the web interface, example:
http:https://192.168.x.yy:8087/data/aircraft.json
The sections below describe how to configure each part of the container functionality. Each section describes what's needed to come up with a minimally viable configuration, followed by additional / optional parameters that can also be set.
The following parameters must be set (mandatory) for the container to function:
| Environment Variable | Purpose | Default |
|---|---|---|
LAT or READSB_LAT |
The latitude of your antenna | |
LONG or READSB_LON |
The longitude of your antenna | |
ALT or READSB_ALT |
The altitude of your antenna over ground level. For example, 15m or 45ft |
|
TZ |
Your local timezone in TZ-database-name format |
| Variable | Description | Controls which readsb option |
Default |
|---|---|---|---|
ENABLE_TIMELAPSE1090 |
Optional / Legacy. Set to any value to enable timelapse1090. Once enabled, can be accessed via http:https://dockerhost:port/timelapse/. | Unset | |
READSB_EXTRA_ARGS |
Optional, allows to specify extra parameters for readsb | Unset | |
READSB_DEBUG |
Optional, used to set debug mode. n: network, P: CPR, S: speed check |
Unset | |
S6_SERVICES_GRACETIME |
Optional, set to 30000 when saving traces / globe_history | 3000 |
|
READSB_MAX_RANGE |
Optional. Maximum range (in nautical miles). | 300 |
|
READSB_ENABLE_BIASTEE |
Set to any value to enable bias tee on supporting interfaces | Unset | |
READSB_RX_LOCATION_ACCURACY |
Accuracy of receiver location in metadata: 0=no location, 1=approximate, 2=exact | --rx-location-accuracy=<n> |
2 |
READSB_HEATMAP_INTERVAL |
Per plane interval for heatmap and replay (if you want to lower this, also lower json-trace-interval to this or a lower value) | --heatmap=<sec> |
15 |
READSB_MAX_RANGE |
Absolute maximum range for position decoding (in nm) | --max-range=<dist> |
300 |
READSB_STATS_EVERY |
Number of seconds between showing and resetting stats. | --stats-every=<sec> |
Unset |
READSB_STATS_RANGE |
Set this to any value to collect range statistics for polar plot. | --stats-range |
Unset |
READSB_RANGE_OUTLINE_HOURS |
Change which past timeframe the range outline is based on | --range-outline-hours |
24 |
READSB_EXTRA_ARGS |
Optional, allows to specify extra parameters for readsb | Unset | |
S6_SERVICES_GRACETIME |
Optional, set to 30000 when saving traces / globe_history | 3000 |
|
LOGLEVEL |
verbose (all messages), error (errors only), none (minimal) |
verbose |
READSB_EXTRA_ARGS just passes arguments to the commandline, you can check this file for more options for wiedehofp's readsb fork: https://github.com/wiedehopf/readsb/blob/dev/help.h
There are two ways to provide ADSB data to the Ultrafeeder:
- provide the container with access to a SDR or other hardware device that collects ADSB data
- allow the container to connect to a ADSB data source in Beast, Raw, or SBS format
These methods are not mutually exclusive - you can use both at the same time if you want.
If you want to connect your SDR to the container, here's how to do that:
| Variable | Description | Controls which readsb option |
Default |
|---|---|---|---|
READSB_DEVICE_TYPE |
If using an SDR, set this to rtlsdr, modesbeast, gnshulc depending on the model of your SDR. If not using an SDR, leave un-set. |
--device-type=<type> |
Unset |
READSB_RTLSDR_DEVICE |
Select device by serial number. | --device=<serial> |
Unset |
READSB_BEAST_SERIAL |
only when type modesbeast or gnshulc is used: Path to Beast serial device. |
--beast-serial=<path> |
/dev/ttyUSB0 |
| Variable | Description | Controls which readsb option |
Default |
|---|---|---|---|
READSB_GAIN |
Set gain (in dB). Use autogain to have the container determine an appropriate gain, more on this below. |
--gain=<db> |
Max gain |
READSB_RTLSDR_PPM |
Set oscillator frequency correction in PPM. See Estimating PPM | --ppm=<correction> |
Unset |
If you have set READSB_GAIN=autogain, then the system will take signal strength measurements to determine the optimal gain. The AutoGain functionality is based on a (slightly) modified version of Wiedehopf's AutoGain. AutoGain will only work with rtlsdr style receivers.
There are 2 distinct periods in which the container will attempt to figure out the gain:
- The initial period of 2 hours, in which an adjustment is done every 5 minutes
- The subsequent period, in which an adjustment is done once every day
Please note that in order for the initial period to complete, the container must run for 90 minutes without restarting.
When taking measurements, if the percentage of "strong signals" (i.e., ADSB messages with RSSI > 3 dB) is larger than 6%, AutoGain will reduce the receiver's gain by 1 setting. Similarly, if the percentage of strong signals is smaller than 2.5%, AutoGain will increment the receiver's gain by 1 setting. When AutoGain changes the gain value, the readsb component of the container will restart. This may show as a disconnect / reconnected in container logs.
We recommend running the initial period during times when there are a lot of planes overhead, so the system will get a good initial view of what signals look like when traffic is at its peak for your location. If you forgot to do this for any reason, feel free to give the AutoGain reset command (see below) during flights busy hour.
Although not recommended, you can change the measurement intervals and low/high cutoffs with these parameters:
| Environment Variable | Purpose | Default |
|---|---|---|
READSB_AUTOGAIN_INITIAL_TIMEPERIOD |
How long the Initial Time Period should last (in seconds) | 7200 |
READSB_AUTOGAIN_INITIAL_INTERVAL |
The measurement interval to optimize gain during the initial period of 90 minutes (in seconds) | 300 |
READSB_AUTOGAIN_SUBSEQUENT_INTERVAL |
The measurement interval to optimize gain during the subsequent period (in seconds) | 86400 |
READSB_AUTOGAIN_LOW_PCT |
If the percentage of "strong signals" (stronger than 3dBFS RSSI) is below this number, gain will be increased | 2.5 |
READSB_AUTOGAIN_HIGH_PCT |
If the percentage of "strong signals" (stronger than 3dBFS RSSI) is above this number, gain will be decreased | 6.0 |
If you need to reset AutoGain and start over determining the gain, you can do so with this command:
docker exec -it ultrafeeder /usr/local/bin/autogain1090 resetIn addition to (or instead of) connecting to a SDR or hardware device to get ADSB data, the container also supports ingesting data from a TCP port. Here are some parameters that you need to configure if you want to make this happen:
| Environment Variable | Purpose | Default |
|---|---|---|
BEASTHOST |
IP/Hostname of a Mode-S/Beast provider (dump1090/readsb) |
|
BEASTPORT |
TCP port number of Mode-S/Beast provider (dump1090/readsb) |
30005 |
MLATHOST |
Legacy parameter. IP/Hostname of an MLAT provider (mlat-client). Note - using this parameter will not make the MLAT data part of the consolidated mlathub. The preferred way of ingesting MLAT results is using the mlathub functionality of the container, see below for details |
|
MLATPORT |
Legacy parameter used with MLATHOST. TCP port number of an MLAT provider (mlat-client) |
30105 |
Instead of (or in addition to) using BEASTHOST, you can also define ADSB data ingests using the READSB_NET_CONNECTOR parameter. This is the preferred way if you have multiple sources or destinations for your ADSB data. This variable allows you to configure incoming and outgoing connections. The variable takes a semicolon (;) separated list of host,port,protocol[,uuid=XXXXXXXX-XXXX-XXXX-XXXX-XXXXXXXXXXXX], where:
hostis an IP address. Specify an IP/hostname/containername for incoming or outgoing connections.portis a TCP port numberprotocolcan be one of the following:beast_reduce_out: Beast-format output with lower data throughput (saves bandwidth and CPU)beast_reduce_plus_out: Beast-format output with extra data (UUID). This is the preferred format when feeding the "new" aggregator servicesbeast_out: Beast-format outputbeast_in: Beast-format inputraw_out: Raw outputraw_in: Raw inputsbs_out: SBS-format outputvrs_out: SBS-format output
uuid=XXXXXXXX-XXXX-XXXX-XXXX-XXXXXXXXXXXXis an optional parameter that sets the UUID for this specific instance. It will override the globalUUIDparameter. This is only needed when you want to send different UUIDs to different aggregators.
NOTE: If you have a UAT dongle and use dump978 to decode this, you should use READSB_NET_CONNECTOR to ingest UAT data from dump978. See example below
    environment:
    ...
      - READSB_NET_CONNECTOR=dump978,37981,raw_in;another-data-aggregator.com,30005,beast_reduce_plus_out
...There are many optional parameters relating to the ingestion of data and the general networking functioning of the readsb program that implements this functionality.
| Variable | Description | Controls which readsb option |
Default |
|---|---|---|---|
READSB_NET_API_PORT |
https://github.com/wiedehopf/readsb/blob/dev/README-json.md#--net-api-port-query-formats | --net-api-port=<ports> |
30152 |
READSB_NET_BEAST_REDUCE_INTERVAL |
BeastReduce position update interval, longer means less data (valid range: 0.000 - 14.999) |
--net-beast-reduce-interval=<seconds> |
0.125 |
READSB_NET_BEAST_REDUCE_FILTER_DIST |
Restrict beast-reduce output to aircraft in a radius of X nmi | --net-beast-reduce-filter-dist=<nmi> |
Unset |
READSB_NET_BEAST_REDUCE_FILTER_ALT |
Restrict beast-reduce output to aircraft below X ft | --net-beast-reduce-filter-alt=<ft> |
Unset |
READSB_NET_BEAST_REDUCE_OUT_PORT |
TCP BeastReduce output listen ports (comma separated) | --net-beast-reduce-out-port=<ports> |
Unset |
READSB_NET_BEAST_INPUT_PORT |
TCP Beast input listen ports | --net-bi-port=<ports> |
30004,30104 |
READSB_NET_BEAST_OUTPUT_PORT |
TCP Beast output listen ports | --net-bo-port=<ports> |
30005 |
READSB_NET_BUFFER |
TCP buffer size 64Kb * (2^n) | --net-buffer=<n> |
2 (256Kb) |
READSB_NET_RAW_OUTPUT_INTERVAL |
TCP output flush interval in seconds (maximum interval between two network writes of accumulated data). | --net-ro-interval=<rate> |
0.05 |
READSB_NET_RAW_OUTPUT_SIZE |
TCP output flush size (maximum amount of internally buffered data before writing to network). | --net-ro-size=<size> |
1200 |
READSB_NET_CONNECTOR_DELAY |
Outbound re-connection delay. | --net-connector-delay=<seconds> |
30 |
READSB_NET_HEARTBEAT |
TCP heartbeat rate in seconds (0 to disable). | --net-heartbeat=<rate> |
60 |
READSB_NET_RAW_INPUT_PORT |
TCP raw input listen ports. | --net-ri-port=<ports> |
30001 |
READSB_NET_RAW_OUTPUT_PORT |
TCP raw output listen ports. | --net-ro-port=<ports> |
30002 |
READSB_NET_SBS_INPUT_PORT |
TCP BaseStation input listen ports. | --net-sbs-in-port=<ports> |
Unset |
READSB_NET_SBS_OUTPUT_PORT |
TCP BaseStation output listen ports. | --net-sbs-port=<ports> |
30003 |
REASSB_NET_VERBATIM |
Set this to any value to forward messages unchanged. | --net-verbatim |
Unset |
READSB_NET_VRS_PORT |
TCP VRS JSON output listen ports. | --net-vrs-port=<ports> |
Unset |
READSB_WRITE_STATE_ONLY_ON_EXIT |
if set to anything, it will only write the status range outlines, etc. upon termination of readsb |
--write-state-only-on-exit |
Unset |
READSB_JSON_INTERVAL |
Update interval for the webinterface in seconds / interval between aircraft.json writes | --write-json-every=<sec> |
1.0 |
READSB_JSON_TRACE_INTERVAL |
Per plane interval for json position output and trace interval for globe history | --json-trace-interval=<sec> |
15 |
The Container creates an interactive web interface displaying the aircraft, based on Wiedehopf's widely used tar1090 software.
The web interface is rendered to port 80 in the container. This can me mapped to a port on the host using the docker-compose ports directive.
All of the variables below are optional.
Note - due to design limitations of readsb, the tar1090 graphical interface will by default ONLY show MLAT results from the aggregators/MLAT sources that were defined with the MLAT_NET_CONNECTOR parameter. If you want to show any additional MLAT results (for example, those from piaware), you should add a separate READSB_NET_CONNECTOR for them.
| Environment Variable | Purpose | Default |
|---|---|---|
READSB_JSON_INTERVAL |
Update data update interval for the webinterface in seconds | 1.0 |
UPDATE_TAR1090 |
At startup update tar1090 and tar1090db to the latest versions | true |
INTERVAL |
Interval at which the track history is saved | 8 |
HISTORY_SIZE |
How many points in time are stored in the track history | 450 |
ENABLE_978 |
Change to yes to enable UAT/978 display in tar1090. This will also enable UAT-specific graphs in graphs1090 |
no |
URL_978 |
The URL needs to point at where you would normally find the skyview978 webinterface, for example http:https://192.168.0.29/skyaware978. Note -- do not use localhost or `127.0.0.1 |
|
GZIP_LVL |
1-9 are valid, lower lvl: less CPU usage, higher level: less network bandwidth used when loading the page |
3 |
PTRACKS |
Shows the last $PTRACKS hours of traces you have seen at the ?pTracks URL |
8 |
TAR1090_FLIGHTAWARELINKS |
Set to any value to enable FlightAware links in the web interface | null |
TAR1090_ENABLE_AC_DB |
Set to true to enable extra information, such as aircraft type and registration, to be included in in aircraft.json output. Will use more memory; use caution on older Pis or similar devices. |
false |
HEYWHATSTHAT_PANORAMA_ID |
Your heywhatsthat.com panorama ID. See https://github.com/wiedehopf/tar1090#heywhatsthatcom-range-outline |
|
HEYWHATSTHAT_ALTS |
Comma separated altitudes for multiple outlines. Use no units or ft for feet, m for meters, or km for kilometers. Only integer numbers are accepted, no decimals please |
12192m (=40000 ft) |
HTTP_ACCESS_LOG |
Optional. Set to true to display HTTP server access logs. |
false |
HTTP_ERROR_LOG |
Optional. Set to false to hide HTTP server error logs. |
true |
- For documentation on the aircraft.json format see this page: https://github.com/wiedehopf/readsb/blob/dev/README-json.md
- TAR1090_ENABLE_AC_DB causes readsb to load the tar1090 database as a csv file from this repository: https://github.com/wiedehopf/tar1090-db/tree/csv
| Environment Variable | Purpose | Default |
|---|---|---|
TAR1090_PAGETITLE |
Set the tar1090 web page title | tar1090 |
TAR1090_PLANECOUNTINTITLE |
Show number of aircraft in the page title | false |
TAR1090_MESSAGERATEINTITLE |
Show number of messages per second in the page title | false |
| Environment Variable | Purpose | Default |
|---|---|---|
TAR1090_DISPLAYUNITS |
The DisplayUnits setting controls whether nautical (ft, NM, knots), metric (m, km, km/h) or imperial (ft, mi, mph) units are used in the plane table and in the detailed plane info. Valid values are "nautical", "metric", or "imperial". |
nautical |
| Environment Variable | Purpose | Default |
|---|---|---|
TAR1090_BINGMAPSAPIKEY |
Provide a Bing Maps API key to enable the Bing imagery layer. You can obtain a free key (with usage limits) at https://www.bingmapsportal.com/ (you need a "basic key"). | null |
TAR1090_DEFAULTCENTERLAT |
Default center (latitude) of the map. This setting is overridden by any position information provided by dump1090/readsb. All positions are in decimal degrees. | 45.0 |
TAR1090_DEFAULTCENTERLON |
Default center (longitude) of the map. This setting is overridden by any position information provided by dump1090/readsb. All positions are in decimal degrees. | 9.0 |
TAR1090_DEFAULTZOOMLVL |
The google maps zoom level, 0 - 16, lower is further out. |
7 |
TAR1090_SITESHOW |
Center marker. If dump1090 provides a receiver location, that location is used and these settings are ignored. Set to true to show a center marker. |
false |
TAR1090_SITELAT |
Center marker. If dump1090 provides a receiver location, that location is used and these settings are ignored. Position of the marker (latitude). | 45.0 |
TAR1090_SITELON |
Center marker. If dump1090 provides a receiver location, that location is used and these settings are ignored. Position of the marker (longitude). | 9.0 |
TAR1090_SITENAME |
The tooltip of the center marker. | My Radar Site |
TAR1090_RANGE_OUTLINE_COLOR |
Colour for the range outline. | #0000DD |
TAR1090_RANGE_OUTLINE_WIDTH |
Width for the range outline. | 1.7 |
TAR1090_RANGE_OUTLINE_COLORED_BY_ALTITUDE |
Range outline is coloured by altitude. | false |
TAR1090_RANGE_OUTLINE_DASH |
Range outline dashing. Syntax [L, S] where L is the pixel length of the line, and S is the pixel length of the space. |
Unset |
TAR1090_ACTUAL_RANGE_OUTLINE_COLOR |
Colour for the actual range outline | #00596b |
TAR1090_ACTUAL_RANGE_OUTLINE_WIDTH |
Width of the actual range outline | 1.7 |
TAR1090_ACTUAL_RANGE_OUTLINE_DASH |
Dashed style for the actual range outline. Unset for solid line. [5,5] for a dashed line with 5 pixel lines and spaces in between |
Unset |
TAR1090_MAPTYPE_TAR1090 |
Which map is displayed to new visitors. Valid values for this setting are osm, esri, carto_light_all, carto_light_nolabels, carto_dark_all, carto_dark_nolabels, gibs, osm_adsbx, chartbundle_sec, chartbundle_tac, chartbundle_hel, chartbundle_enrl, chartbundle_enra, chartbundle_enrh, and only with bing key bing_aerial, bing_roads. |
carto_light_all |
TAR1090_MAPDIM |
Default map dim state, true or false. | true |
TAR1090_MAPDIMPERCENTAGE |
The percentage amount of dimming used if the map is dimmed, 0-1 |
0.45 |
TAR1090_MAPCONTRASTPERCENTAGE |
The percentage amount of contrast used if the map is dimmed, 0-1 |
0 |
TAR1090_DWDLAYERS |
Various map layers provided by the DWD geoserver can be added here. Preview and available layers. Multiple layers are also possible. Syntax: dwd:layer1,dwd:layer2,dwd:layer3 |
dwd:RX-Produkt |
TAR1090_LABELZOOM |
Displays aircraft labels only until this zoom level, 1-15 (values >15 don't really make sense) |
|
TAR1090_LABELZOOMGROUND |
Displays ground traffic labels only until this zoom level, 1-15 (values >15 don't really make sense) |
| Environment Variable | Purpose | Default |
|---|---|---|
TAR1090_RANGERINGS |
false to hide range rings |
true |
TAR1090_RANGERINGSDISTANCES |
Distances to display range rings, in miles, nautical miles, or km (depending settings value 'TAR1090_DISPLAYUNITS'). Accepts a comma separated list of numbers (no spaces, no quotes). |
100,150,200,250 |
TAR1090_RANGERINGSCOLORS |
Colours for each of the range rings specified in TAR1090_RANGERINGSDISTANCES. Accepts a comma separated list of hex colour values, each enclosed in single quotes (eg TAR1090_RANGERINGSCOLORS='#FFFFF','#00000'). No spaces. |
Blank |
| Variable | Description | Default |
|---|---|---|
GRAPHS1090_DARKMODE |
If set to any value, graphs1090 will be rendered in "dark mode". |
Unset |
GRAPHS1090_RRD_STEP |
Interval in seconds to feed data into RRD files. | 60 |
GRAPHS1090_SIZE |
Set graph size, possible values: small, default, large, huge, custom. |
default |
GRAPHS1090_ALL_LARGE |
Make the small graphs as large as the big ones by setting to yes. |
no |
GRAPHS1090_FONT_SIZE |
Font size (relative to graph size). | 10.0 |
GRAPHS1090_MAX_MESSAGES_LINE |
Set to any value to draw a reference line at the maximum message rate. | Unset |
GRAPHS1090_LARGE_WIDTH |
Defines the width of the larger graphs. | 1096 |
GRAPHS1090_LARGE_HEIGHT |
Defines the height of the larger graphs. | 235 |
GRAPHS1090_SMALL_WIDTH |
Defines the width of the smaller graphs. | 619 |
GRAPHS1090_SMALL_HEIGHT |
Defines the height of the smaller graphs. | 324 |
GRAPHS1090_DISK_DEVICE |
Defines which disk device (mmc0, sda, sdc, etc) is shown. Leave empty for default device |
Unset |
GRAPHS1090_ETHERNET_DEVICE |
Defines which (wired) ethernet device (eth0, enp0s, etc) is shown. Leave empty for default device |
Unset |
GRAPHS1090_WIFI_DEVICE |
Defines which (wireless) WiFi device (wlan0, wlp3s0, etc) is shown. Leave empty for default device |
Unset |
GRAPHS1090_DISABLE |
Set to any value to disable the GRAPHS1090 web page and data collection | Unset |
ENABLE_AIRSPY |
Optional, set to any non-empty value if you want to enable the special AirSpy graphs. See below for additional configuration requirements | Unset |
ADS-B over UAT data is transmitted in the 978 MHz band, and this is used in the USA only. To display the corresponding graphs, you should:
- Set the following environment parameters:
  - ENABLE_978=yes
- URL_978=http:https://dump978/skyaware978- Install the
docker-dump978container. Note - only containers downloaded/deployed on/after Feb 8, 2023 will work.
Note that you must configure URL_978 to point at a working skyaware978 website with aircraft.json data feed. This means that the URL http:https://dump978/skyaware978/data/aircraft.json must return valid JSON data to this tar1090 container.
Users of AirSpy devices can enable extra graphs1090 graphs by configuring the following:
- Set the following environment parameter:
- ENABLE_AIRSPY=yes- To provide the container access to the AirSpy statistics, map a volume in your
docker-compose.ymlfile as follows:
    volumes:
      - /run/airspy_adsb:/run/airspy_adsb
...To allow the container access to the Disk IO data, you should map the following volume:
    volumes:
      - /proc/diskstats:/proc/diskstats:ro
...By default, the system will use the temperature available at Thermal Zone 0. This generally works well on Raspberry Pi devices, and no additional changes are needed.
On different devices, the Core Temperature is mapped to a different Thermal Zone. To ensure the Core Temperature graph works, follow these steps
First check out which Thermal Zone contains the temperature you want to monitor. On your host system, do this:
for i in /sys/class/thermal/thermal_zone* ; do echo "$i - $(cat ${i}/type) - $(cat ${i}/temp 2>/dev/null)"; doneSomething similar to this will be show:
/sys/class/thermal/thermal_zone0 - acpitz - 25000
/sys/class/thermal/thermal_zone1 - INT3400 Thermal - 20000
/sys/class/thermal/thermal_zone2 - TSKN - 43050
/sys/class/thermal/thermal_zone3 - NGFF - 32050
/sys/class/thermal/thermal_zone4 - TMEM - 39050
/sys/class/thermal/thermal_zone5 - pch_skylake - 40500
/sys/class/thermal/thermal_zone6 - B0D4 - 54050
/sys/class/thermal/thermal_zone7 - iwlwifi_1 -
/sys/class/thermal/thermal_zone8 - x86_pkg_temp - 57000
Repeat this a few times to ensure that the temperature varies and isn't hardcoded to a value. In our case, either Thermal Zone 5 (pch_skylake is the Intel Core name) or Thermal Zone 8 (the temp of the entire SOC package) can be used. Once you have determined which Thermal Zone number you want to use, map it to a volume like this. Make sure that the part to the left of the first : reflects your Thermal Zone directory; the part to the right of the first : should always be /sys/class/thermal/thermal_zone0:ro.
Note that you will have to add - privileged: true capabilities to the container. This is less than ideal as it will give the container access to all of your system devices and processes. Make sure you feel comfortable with this before you do this.
    privileged: true
    volumes:
      - /sys/class/thermal/thermal_zone8:/sys/class/thermal/thermal_zone0:ro
      ...
Note - on some systems (DietPi comes to mind), /sys/class/thermal/ may not be available.
Legacy: We recommend AGAINST enabling this feature as it has been replaced with http:https://dockerhost:port/?replay. timelapse1090 writes a lot of data to disk, which could shorten the lifespan of your Raspiberry Pi SD card. The replacement functionality is better and doesn't cause any additional disk writes.
| Environment Variable | Purpose | Default |
|---|---|---|
ENABLE_TIMELAPSE1090 |
Optional / Legacy. Set to any value to enable timelapse1090. Once enabled, can be accessed via http:https://dockerhost:port/timelapse/ | Unset |
TIMELAPSE1090_INTERVAL |
Snapshot interval in seconds | 10 |
TIMELAPSE1090_HISTORY |
Time saved in hours | 24 |
If you have configured the container as described above, you should be able to browse to the following web pages: You should now be able to browse to:
- http:https://dockerhost/ to access the tar1090 web interface.
- http:https://dockerhost/?replay to see a replay of past data
- http:https://dockerhost/?heatmap to see the heatmap for the past 24 hours
- http:https://dockerhost/?heatmap&realHeat to see a different heatmap for the past 24 hours
- http:https://dockerhost/?pTracks to see the tracks of all planes for the past 24 hours
- http:https://dockerhost/graphs1090/ to see performance graphs
No paths need to be mapped through to persistent storage. However, if you don't want to lose your range outline and aircraft tracks/history and heatmap / replay data on container restart, you can optionally map these paths:
| Path | Purpose |
|---|---|
/opt/adsb/ultrafeeder/globe_history:/var/globe_history |
Holds range outline data, heatmap / replay data and traces if enabled. |
| Note: this data won't be automatically deleted, you will need to delete it eventually if you map this path. | |
/opt/adsb/ultrafeeder/timelapse1090:/var/timelapse1090 |
Holds timelapse1090 data if enabled. (We recommend against enabling this feature, see above) |
/opt/adsb/ultrafeeder/collectd:/var/lib/collectd |
Holds graphs1090 & performance data |
/proc/diskstats:/proc/diskstats:ro |
Makes disk statistics available to graphs1090 |
/sys/class/thermal/thermal_zone8:/sys/class/thermal/thermal_zone0:ro |
Only needed on some systems to display the CPU temperature in graphs1090, see here |
An "MLAT Hub" is an aggregator of MLAT results from several sources. Since the container is capable of sending MLAT data to multiple ADSB aggregators (like adsb.lol/fi/one, etc), we built in a capability to:
- collect the MLAT results from all of these services
- ingest MLAT results from other containers (FlightAware, Radarbox, etc.)
- make the consolidated MLAT results available on a port in Beast or SBS (BaseStation) format
- create outbound connections using any supported format to send your Beast data wherever you want
Note - due to design limitations of readsb, the tar1090 graphical interface will by default ONLY show MLAT results from the aggregators/MLAT sources that were defined with the MLAT_NET_CONNECTOR parameter. If you want to show any additional MLAT results (for example, those from piaware), you should add a separate READSB_NET_CONNECTOR for them. Adding these sources only to MLATHUB_NET_CONNECTOR will make the data available on the MLATHUB, but won't display them on your tar1090 map.
Generally, there is little to configure, but there are a few parameters that you can set or change:
| Variable | Description | Default if omitted |
|---|---|---|
MLATHUB_SBS_OUT_PORT |
TCP port where the consolidated MLAT results will be available in SBS (BaseStation) format | 31003 |
MLATHUB_BEAST_IN_PORT |
TCP port you where you can send additional MLAT results to, in Beast format | 31004 |
MLATHUB_BEAST_OUT_PORT |
TCP port where consolidated MLAT results will be available in Beast format | 31005 |
MLATHUB_NET_CONNECTOR |
List of semi-colon separated IP or host, port, and protocols where MLATHUB will connect to ingest or send MLAT data. It follows the same syntax as described in the READSB_NET_CONNECTOR syntax section above. |
Unset |
MLATHUB_ENABLE_ADSB_INGEST |
If set to any non-empty value, the MLATHUB will ingest the ADSB data from the readsb component and make it available on its output port. This is useful if you want to connect to external applications that want both ADSB and MLAT result data (for example, Planefence). Note -- do not use this option to feed external aggregators as they generally do not want to receive processed MLAT data. | Unset |
This image contains Telegraf, which will be used to capture metrics from readsb if an output is enabled.
In order for Telegraf to output metrics to an InfluxDBv2 time-series database, the following environment variables can be used:
| Variable | Description |
|---|---|
INFLUXDBV2_URL |
The URL of the InfluxDB instance |
INFLUXDBV2_TOKEN |
The token for authentication |
INFLUXDBV2_BUCKET |
Destination bucket to write into |
In order for Telegraf to serve a Prometheus endpoint, the following environment variables can be used:
| Variable | Description |
|---|---|
PROMETHEUS_ENABLE |
Set to true for a Prometheus endpoint on http:https://0.0.0.0:9273/metrics |
You can look at individual messages and what information they contain, either for all or for an individual aircraft by hex:
# only for hex 3D3ED0
docker exec -it ultrafeeder /usr/local/bin/viewadsb --show-only 3D3ED0

# for all aircraft
docker exec -it ultrafeeder /usr/local/bin/viewadsb --no-interactive

# show position / CPR debugging for hex 3D3ED0
docker exec -it ultrafeeder /usr/local/bin/viewadsb --cpr-focus 3D3ED0All logs are to the container's stdout and can be viewed with docker logs -t [-f] container.
Please feel free to open an issue on the project's GitHub.
We also have a Discord channel, feel free to join and converse.