Configure, build and test a CMake project right from within Sublime Text 3.
Run the command
Package Control: Install Package
and look for CMakeBuilder.
Version 2.0 has major differences, because we'll utilize the cmake server for version 2. It is currently in an alpha state. You can make Package Control download the alpha version by opening the User settings of Package Control and adding the following JSON list at the top-level JSON dictionary:
  "install_prereleases":
  [
    "CMakeBuilder"
  ],
The alpha version should work out-of-the-box for OSX and Linux, but is not recommended for Windows users at this point. I would appreciate it if you report any issues that you may find.
Version 2 of CMakeBuilder has cmake-server functionality. There are some major changes in how you specify your cmake dict in your project settings. Please read the documentation for version 2.0.
Version 2.0 has server functionality. You need at least CMake 3.7 for this. What follows is the documentation for version 2.0.0 and higher.
-
Open a
.sublime-project. -
Add this to the project file in your
"settings":"cmake": { "schemes": [ { "name": "Debug", // this assumes your project file is at the root of your project // folder. If it's not, try using ${folder} instead of ${project_path} "build_folder": "${project_path}/build" } ] }
-
Save your project, and open it if you haven't already. So, from the command-line you would do
subl path/to/projectfile.sublime-projectto open your project. -
You will be presented with a quick-panel that asks you to select the CMake generator. Choose one.
-
CMakeBuilder will start configuring your CMake project. Look at Sublime's status bar to see its progress going from 0% to 100%.
-
Once the project is configured, select the CMakeBuilder build system in Tools -> Build Systems -> CMakeBuilder.
-
Press CTRL+B to build.
By "CMake dictionary" we mean the JSON dictionary that you define in your
"settings" of your sublime project file with key "cmake". The CMake
dictionary accepts the following keys:
-
schemes[required]A JSON-list of JSON-dictionaries that define your possible schemes. A scheme is our way to organize Debug/Release/MinSizeRel builds etc.
Each scheme is required to be a JSON-dictionary. It's possible keys are:
-
name[required]A string that represents this scheme. For instance, "Debug" or "Release".
-
build_folder[required]A string pointing to the directory where you want to build the project. A good first choice is
${project_path}/build. -
command_line_overrides[optional]A dictionary where each value is either a string or a boolean. The key-value pairs are passed to the CMake invocation when you run
cmake_configureas-Doptions. For example, if you have the key-value pair"MY_VAR": "BLOB"in the dictionary, the CMake invocation will contain-DMY_VAR=BLOB. Boolean values are converted toONorOFF. For instance, if you have the key-value pair"BUILD_SHARED_LIBS": truein the dictionary, the CMake invocation will contain-DBUILD_SHARED_LIBS=ON.
Here is an example Sublime project to get you started.
{
    "folders":
    [
        {
            "path": "."
        }
    ],
    "settings":
    {
        "cmake":
        {
            "schemes":
            [
                {
                    "name": "Debug",
                    "build_folder": "${project_path}/build/debug",
                    "command_line_overrides":
                    {
                        "BUILD_SHARED_LIBS": true,
                        "CMAKE_BUILD_TYPE": "Debug",
                        "CMAKE_EXPORT_COMPILE_COMMANDS": true
                    }
                }
            ]
        }
    }
}
Version 1.0.1 and lower do not have server functionality. What follows is the documentation for version 1.0.1 and lower.
-
Open a
.sublime-project. -
Add this to the project file in your
"settings":"cmake": { "build_folder": "${project_path}/build" }
-
Save your project. This will trigger CMakeBuilder to configure your project. If nothing happens, you can also run the command "CMakeBuilder: Configure" from the command palette.
-
Check out your new build system in your
.sublime-project. If no new build system was created, you can also run the command "CMakeBuilder: Write Build Targets to Sublime Project File" from the command palette. -
Press CTRL + B or ⌘ + B.
-
Hit F4 to jump to errors and/or warnings. Now you're programming with CMakeBuilder 🕺.
By "CMake dictionary" we mean the JSON dictionary that you define in your
"settings" of your sublime project file with key "cmake". The CMake
dictionary accepts the following keys:
-
build_folder[required]A string pointing to the directory where you want to build the project. A good first choice is
${project_path}/build. -
command_line_overrides[optional]A dictionary where each value is either a string or a boolean. The key-value pairs are passed to the CMake invocation when you run
cmake_configureas-Doptions. For example, if you have the key-value pair"MY_VAR": "BLOB"in the dictionary, the CMake invocation will contain-DMY_VAR=BLOB. Boolean values are converted toONorOFF. For instance, if you have the key-value pair"BUILD_SHARED_LIBS": truein the dictionary, the CMake invocation will contain-DBUILD_SHARED_LIBS=ON. -
filter_targets[optional]A JSON list consisting of strings. Each build target is tested against all of the items in this list. If any of the strings in this list is in the string representation of the target, the target will be added to the sublime build system.
-
generator[optional]A JSON string specifying the CMake generator.
-
Available generators for osx: "Ninja" and "Unix Makefiles".
If no generator is specified on osx, "Unix Makefiles" is the default generator. For "Ninja", you must have ninja installed. Install it with brew.
-
Available generators for linux: "Ninja" and "Unix Makefiles".
If no generator is specified on osx, "Unix Makefiles" is the default generator. For "Ninja", you must have ninja installed. Install it with apt.
-
Available generators for windows: "Ninja", "NMake Makefiles" and "Visual Studio".
If no generator is specified on windows, "Visual Studio" is the default generator. For both "Visual Studio" and "NMake Makefiles", you need Microsoft Visual Studio C++. The latest version of Visual Studio is searched for.
Note: If you find that the output of the NMake generator is garbled with color escape codes, you can try to use
"CMAKE_COLOR_MAKEFILE": falsein yourcommand_line_overridesdictionary.
-
-
root_folder[optional]The directory where the root CMakeLists.txt file resides. If this key is not present, the directory where the sublime project file is located is assumed to have the root CMakeLists.txt file.
-
env[optional]This is a dict of key-value pairs of strings. Place your environment variables at configure time in here. For example, to select clang as your compiler if you have gcc set as default, you can use
"env": { "CC": "clang", "CXX": "clang++" } -
configurations[optional] [ONLY FOR WINDOWS]This key is only relevant for the Visual Studio generator (see
generator). This shall be a JSON list of strings defining the desired configurations. For instance,"Debug"and"Release". If omitted, the default target is built, which would be Debug. -
target_architecture[optional] [ONLY FOR WINDOWS]This must be a string with any one of these three values:
"x86","amd64"or"arm". What this does is it will call thevcvarsall.batfile in the correct places. What this means in practise is that if you want to build 64 bit binaries, you have to set this value to"amd64". For 32 bit binaries, you can omit this key altogether. Note for advanced users: CMakeBuilder will automatically translate the given argument to the correct argument forvcvarsall.bat. Note: If you're using the "NMake Makefiles" generator, you're out of luck. This generator refuses to build for anything other than x86 it seems. Consider switching to Ninja if you want a fast bare-bones build system. -
visual_studio_versions[optional] [ONLY FOR WINDOWS]This must be a list of numbers specifying the preferred versions of Visual Studio to look for. For instance, setting this to
[ 15, 14 ], CMakeBuilder will first look for Visual Studio 15 2017, and if that can't be found, it will look for Visual Studio 14 2015. Obviously, this is only applicable when your generator is equal to"Visual Studio".
Any key may be overridden by a platform-specific override. The platform keys
are one of "linux", "osx" or "windows". For an example on how this works,
see below.
Here is an example Sublime project to get you started.
{
    "folders":
    [
        {
            "path": "."
        }
    ],
    "settings":
    {
        "cmake":
        {
            "build_folder": "${project_path}/build",
            "command_line_overrides":
            {
                "BUILD_SHARED_LIBS": true,
                "CMAKE_BUILD_TYPE": "Debug",
                "CMAKE_EXPORT_COMPILE_COMMANDS": true
            },
            "generator": "Unix Makefiles",
            "windows":
            {
                "generator": "Visual Studio",
                "configurations":
                [
                    "Debug"
                ]
            }
        }
    }
}cmake_clear_cache, arguments:{ with_confirmation : bool }.cmake_configure, arguments:None.cmake_diagnose, arguments:None.cmake_open_build_folder, arguments:None.cmake_run_ctest, arguments:{ test_framework : str }cmake_write_build_targets, arguments:None.cmake_new_project, arguments:None.
CMakeBuilder: Browse Build Folder...CMakeBuilder: Clear CacheCMakeBuilder: ConfigureCMakeBuilder: Diagnose (What Should I Do?)CMakeBuilder: Run CTestCMakeBuilder: Write Build Targets To Sublime Project FileCMakeBuilder: New Project
All commands are accessible via both the command palette as well as the tools menu at the top of the window.
-
configure_on_save: JSON boolIf true, will run the
cmake_configurecommand whenever you save a CMakeLists.txt file or CMakeCache.txt file. -
write_build_targets_after_successful_configure: JSON boolIf true, will run the command
cmake_write_build_targetsafter the commandcmake_configurefinishes with exit status 0. -
silence_developer_warnings: JSON boolIf true, will add the option
-Wno-devto the CMake invocation of thecmake_configurecommand. -
always_clear_cache_before_configure: JSON boolIf true, always clears the CMake cache before the
cmake_configurecommand is run. -
ctest_command_line_args: JSON stringCommand line arguments passed to the CTest invocation when you run
cmake_run_ctest. -
generated_name_for_build_system: JSON stringThe name for the generated build system when you run
cmake_write_build_targets. Can have arbitrary snippet-like variables.
By default, the name of the generated build system is the name of your project, followed by the platform in parentheses. Thus, multiple build systems may coexist in a single project file.
There are no default keybindings. You can create them yourself. The relevant commands are
cmake_configure,cmake_write_build_targetsandcmake_run_ctest.
You can run the command
CMakeBuilder: New Project
from the tools menu or from the command palette to create a new template project.
To force CMake files re-generation run
CMakeBuilder: Clear Cache
and then run
CMakeBuilder: Configure
or you can do both in one go with
CMakeBuilder: Clear Cache and Configure
but be aware that this does not ask for confirmation for the deletion of the cache files.
If you get stuck and don't know what to do, try running
CMakeBuilder: Diagnose (What Should I Do?)
All commands are also visible in the Tools menu under "CMakeBuilder".

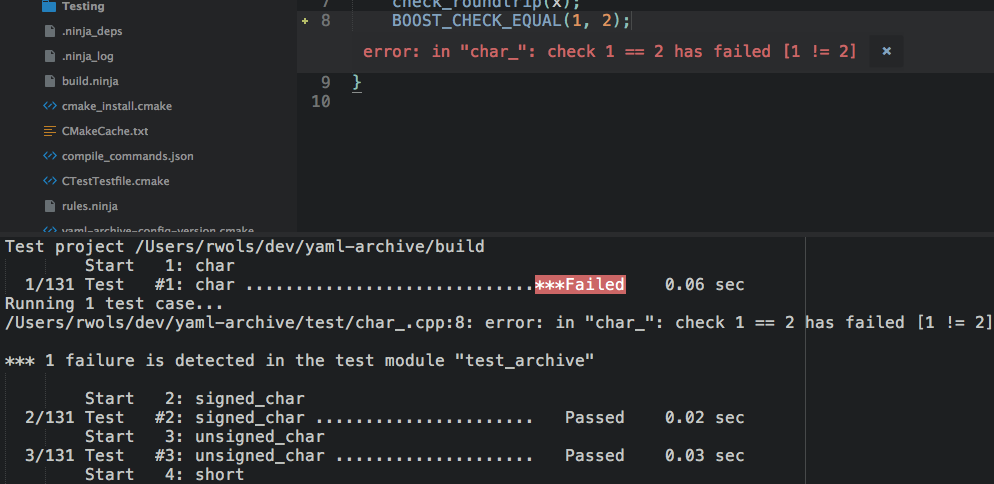
If you have unit tests configured with the add_test function of CMake, then you can run those with the command
CMakeBuilder: Run CTest
By default, this command will not output what your unit test outputs, unless the test fails. This gives you a clean overview of what runs correctly and what is failing and why.
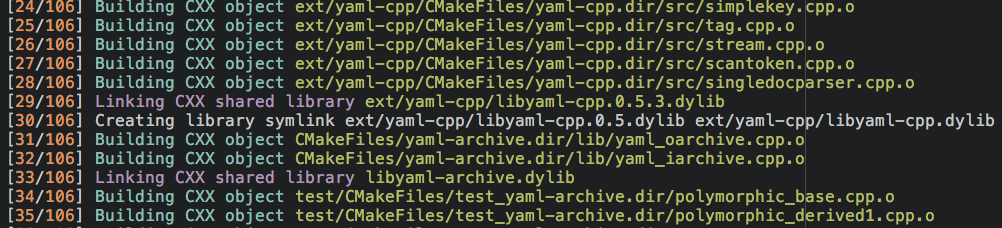
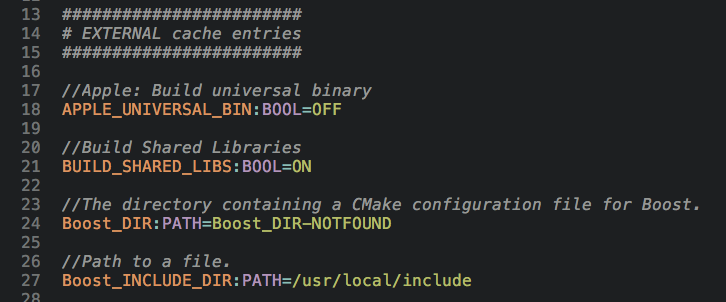
There is syntax highlighting for the CMakeCache.txt file, for the configure step, and for the CTest output. You can press F4 to go to the error message in the configuration step and the CTest output. Goto error in the CTest output only works if you're using something that outputs error messages in the form of the boost unit test framework.
This is a reference list for the valid variable substitutions for your
.sublime-project file.
- packages
- platform
- file
- file_path
- file_name
- file_base_name
- file_extension
- folder
- project
- project_path
- project_name
- project_base_name
- project_extension
See CONTRIBUTING.md