These simple examples demonstrate how to easily expand hardware of a Raspberry Pi board using one dollar STM32 microcontroller and some wires.
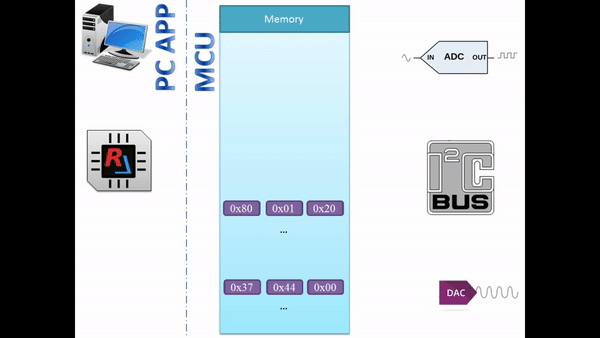
The C++ applications and Python scripts ran Raspberry will gain access to internal STM32F103 peripheral modules like DAC, ADC, DMA, GPIO and others as if these peripherals were a part of Raspberry chip. Without a microcontroller firmware development and a kernel driver just with help REMCU Library.
There are also Jupyter Notebook scripts for running on PC(MacOS, Linux, Windows)
To interact with a microcontroller hardware from our PC we use the driver functions of Standard Peripheral Library for STM32F10x line of STMicroelectronics company. It is a vendor software development kit provided by STMicroelectronics company for a firmware development of STM32 MCU. Our application calls these driver functions, just like calls them for hardware operations from firmware code.
The code controlling MCU peripheral module have been taken from example of Standard Peripheral Library for STM32F10X
A video tutorial on how to build and run these examples on Raspberry Pi computer:
- A Raspberry Pi 1/2/3/4 board
- A board with the STM32F103 high-density device. There are demonstration on Port103R board.
- 4 wires to connect Pi with MCU
- An oscilloscope to display analog signals. It is optional.
- A specify image of Raspberry containing these examples, prebuild OpenOCD utility and REMCU library
or install/download these components to your Raspbian filesystem manually. Instructions
Download the image and unpack the archive. Write the image to your SD card using the official Raspberry Pi documentation.
Insert the card into the board and switch Raspberry Pi on. Connect a keyboard and monitor or connect using SSH. By default, the system has a zeroconf mDNS server(Avahi), you can connect Raspbery Pi using remcu.local name

putty (click here to see)

If you plug Raspberry Pi into laptop/PC directly without a DHCP service, the Rpi will has a static IP address 192.168.0.10 (255.255.255.0 mask and 192.168.0.1 gateway).
The default login is ‘pi’ and the default password is ‘raspberry’. Home directory has everything necessary to build and run the examples.
This image has a community version of the REMCU lib which works through debug interface and requires an OpenOCD utility. Connect this Raspberry GPIO pins to debug port of the MCU using scheme below.
scheme (click here)


Run the “openocd.sh” scripts:
OpenOCD result (click here)

Navigate to ‘examples’ directory and run ‘make’ command. Several applications were created.
"make" result (click here)

That requires next:
- Download prebuild OpenOCD from here to your Raspbian RootFS. The build have been tested on Raspberry Pi and we recommend it.
git clone https://github.com/remotemcu/Raspbian_packages.gitConnect this Raspberry's GPIO pins to debug port of the MCU using scheme above 1, 2/3/4 and run the OpenOCD script:
cd Raspbian_packages/
./openocd.sh
Another way you can install OpenOCD(version 0.10 or higher) from Raspbian's repo:
sudo apt-get install openocdIn this case, run OpenOCD utility this way:
- For Raspberry 1, use this scheme (SWDIO -> GPIO25 and SWCLK -> GPIO11) and run OpenOCD with the arguments below:
sudo openocd -f interface/raspberrypi-native.cfg -c "transport select swd" -f target/stm32f1x.cfg- For Raspberry 2 or 3:
sudo openocd -f interface/raspberrypi2-native.cfg -c "transport select swd" -f target/stm32f1x.cfg- For Raspberry 4, please use sysfsgpio interface:
sudo openocd -f interface/sysfsgpio-raspberrypi.cfg -c "transport select swd" -f target/stm32f1x.cfgor try to use our prebuilt OpenOCD package with the openocd.sh script
More information about Rpi connection with MCU using OpenOCD can be found here: https://learn.adafruit.com/programming-microcontrollers-using-openocd-on-raspberry-pi or https://iosoft.blog/2019/01/28/raspberry-pi-openocd/
- Download these examples to Raspberry RootFS and go to STM32F103RCT6 directory
 git clone https://github.com/remotemcu/remcu_examples/
cd STM32F103RCT6/- Download the example. Download the necessary version of REMCU Lib from repo or build the library yourself using the sdk collection repo
Copy the lib files and remcu_include folder to this folder.
$pwd
../STM32F103RCT6/- The TriangleWave app is the slightly modified TwoChannels_TriangleWave sample of Standard Peripheral Library which generates a triangle signal using DAC and built-in generator. You can specify the signal period in cycles using the startup arguments.
Connect the probe to the PA4 pin. The Oscilloscope shows a triangle wave.
wave (click here)

Try to change the period. The signal frequency also has changed!
wave (click here)

- The second app is DAC_DMA_Escalator that generates an escalator signal. The DAC module of STM32 MCU doesn’t have this signal generator. But the wave can be created by using both DAC and DMA.
A DMA enables buffering received and transmitted data from peripherals to the MCU's memory. And the REMCU library can load and store to the microcontroller memory.
In this way, you can upload signal data to the MCU chip memory and control DAC using DMA.
The code of this application was taken from the OneChannelDMA_Escalator sample of SPL. You can specify the signal period in cycles using the startup arguments.
Run the app! The oscilloscope shows an escalator wave.

wave (click here)

wave (click here)

- A small application ADC_line receives the ADC data and builds a horizontal bar chart based on this value. Plug a variable resistor into the PC4 pin and run the application.
show (click here)


Rotate the shaft and you will get the voltage versus time chart.
show(click here)

- There are two examples to work with CAN bus, CAN_send and CAN_receiver. These examples work on 125 kBps. For other baud rates and this clock configuration(see system_stm32f10x.c), the CAN Initialization code (Prescaler value) should be amended accordingly:
  //CAN_InitStructure.CAN_Prescaler = 4*16; //Prescaler for 62.5 kBps
  CAN_InitStructure.CAN_Prescaler = 4*8; //Prescaler for 125 kBps
  //CAN_InitStructure.CAN_Prescaler = 4*4; //Prescaler for 250 kBps
  //CAN_InitStructure.CAN_Prescaler = 4*2; //Prescaler for 500 kBps
  //CAN_InitStructure.CAN_Prescaler = 4*1; //Prescaler for 1 MBps
Build CAN network like this:
show(click here)


- The CAN_receiver is a simple app that captures all CAN bus messages on the bus. Just run CAN_receiver app and look at the results:
show(click here)

- The CAN_send is a simple app that send one message obtained through the program arguments. Example of using:
show(click here)

Note that we didn’t develop the MCU firmware. Our Linux program directly works with ADC, DAC, DMA, CAN and RAM modules using a remote procedure execution of the Standard Peripheral Library.
show(click here)

You can use the ReMCU library not only in the C/C++ program on the Raspberry Pi board. Alternatively, you can call ReMCU library functions using other programming languages. As Python is an official recommended programming language of Raspberry, let’s see some Python examples. To make working with them less troublesome, we provide language wrappers(STM32F10X_HD_StdPeriph_Lib.py). With these wrappers it becomes easy to work with hardware as it is using C or C++.
Examples: Python and C/C++(click here)

- gpio .py script toggles the PB12 MCU pin. Just execute it:
Show (click here)

python gpio.py- ADC_line.py script builds a horizontal bar chart of the ADC value versus time like the C ADC_line application.
show(click here)
The ReMCU library can be ported to any version of the Raspberry Pi board and also on far less powerful and much more powerful embedded platforms

- A board with the STM32F103 high-density device. There are demonstration on Port103R board.
- A debugger like st-link or jlink
- Debug server. It can be an OpenOCD(We recommend this prebuild package)
Other OpenOCD versions can have an incompatibility with this REMCU Library version. For instance, v0.10.0-13 version has another TCL server API and you can not use remcu_connect2OpenOCD function in REMCU Library for connecting to OpenOCD TCL server(default 6666 port). Only remcu_connect2GDB function for connecting OpenOCD GDB server (default 3333 port). or st-link GDB server from Atollic TrueStudio or Jlink GDB server (if you use jlink instead of st-link)
- Anaconda Distribution, we recommend Python 2 version
Download the example. Download the necessary version of REMCU Lib from repo or build the library yourself using the sdk collection repo
Copy the lib files and remcu_include folder to this folder.
Build examples, just make command:
show (click here)

Connect the STM32 board with debugger to PC:

Run OpenOCD with arguments above:
- st-link debugger
./openocd -f interface/stlink-v2.cfg -f target/stm32f1x.cfgSuccess result for openocd (click here)

There are the same programs and python scripts as above in the Raspberry part. You can see their description there.
If you ever wish to conduct a quick experiment with any chip peripheral module or explore it, then REMCU is the right tool for that. It can be easily integrated in Jupyter Notebook with an Interactive C++ interpreter . This IDE is free and it lets you run and execute C or C++ code on the go. This way you can call the functions of a driver directly and control MCU or SoC in real time.
It saves a lot of time that is usually spent on the development of experimental MCU firmware. An interact work with MCU/SoC peripherals helps us to explore new peripheral blocks of MCU/SoC quicker.
And furthermore, the application code written in the C programming language using REMCU is backwards-portable, meaning it can be transferred from a desktop program to the MCU program and vice-versa. The code will work just as fine on MCU as it works on PC. That's why code written on desktop with ReMCU can be used to develop stand-alone firmware for MCU.
REMCU tutorial can help you run these notebooks.
- Cpp_Examples.ipynb is a C++ script for Jupyter Notebook.
Install Anaconda Distribution. Run Anaconda Navigator and install xeus-cling and xplot packages.
Installed packages (click here)


ADC graph(click here)

Unfortunately, C++ Cling interpreter is only available for Unix-like system (MacOS and Linux).
But there is possible to use the REMCU with high level languages like Python, Java, C# and others.
Python_Examples.ipynb sample demonstrates work with REMCU lib in Windows using Python interpreter.
REMCU tutorial can help you run these notebooks.
- A board with the STM32F103 high-density device. There are demonstration on Port103R board.
- A debugger like st-link or jlink
- Debug server. It can be an OpenOCD(We recommend this prebuild package)
Other OpenOCD versions can have an incompatibility with this REMCU Library version. For instance, v0.10.0-13 version has another TCL server API and you can not use remcu_connect2OpenOCD function in REMCU Library for connecting to OpenOCD TCL server(default 6666 port). Only remcu_connect2GDB function for connecting OpenOCD GDB server (default 3333 port). or st-link GDB server from Atollic TrueStudio or Jlink GDB server (if you use jlink instead of st-link)
- Anaconda Distribution, we recommend Python 2 version
Download the example. Download the necessary version of REMCU Lib from repo or build the library yourself using the sdk collection repo
Copy the lib files and remcu_include folder to this folder.
Connect the STM32 board with debugger to PC:
diagram (click here)
- st-link debugger
openocd.exe -f interface/stlink-v2.cfg -f target/stm32f1x.cfg
Install the Anaconda Distribution and ipywidgets package. We encourage you use Python 2 version. We can not guarantee the work of the script with Python 3.
Run Jupyter Notebook and open the Python_Examples.ipynb file in it.
The script contains detailed comments for work. You just do step by step code of the script and observe the results.
