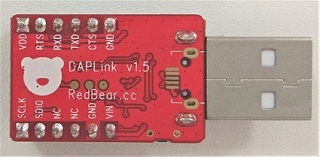
The DAPLink V1.5 User Guide can be found here:
For V1.5version of the DAPLink USB dongle, you can update it to the latest interface firmware called DAPLink which is supported and developed by ARM mbed.
Latest interface firmware (DAPLink) for nRF52832
Pressing and holding the button and then connecting the board to PC USB, the drive "MAINTENANCE" will appeare. Drag & drop the interface firmware (.bin file) into the drive, re-connected the board to PC USB.
ARM mbed has changed the interface firmware from CMSIS-DAP to DAPLink, it has all features as the CMSIS-DAP. Note that for the DAPLINK, the drag-and-drop drive is called DAPLINK instead of MBED.
For V1.0 version of the DAPLink USB dongle, you can update it to the latest interface firmware called DAPLink which is supported and developed by ARM mbed.
Latest interface firmware (DAPLink) for nRF51822
For V1.0 version of the MK20 USB dongle, you can update it to the latest interface firmware called DAPLink which is supported and developed by ARM mbed.
Latest interface firmware (DAPLink) for nRF51822
Latest interface firmware (DAPLink) for nRF52832
For V1.5, you can only use the CMSIS-DAP firmware.
Latest interface firmware (CMSIS) for nRF51822
In case you have changed the USB interface firmware inside the MK20/DAPLink chip and want to restore to the default one or upgrade to the lastest version, follow the steps below:
-
Press and hold the reset button on your USB dongle board
-
Connect it to an USB port of your PC
-
Release the button and the LED will keep flashing (slowly)
4.1 For Windows, just drag the firmware (.bin) to the MSD drive (e.g. E:), labelled 'BOOTLOADER' (for MK20) or 'MAINTENANCE' (for F103 DAPLink)
4.2 For Linux or Mac OSX (10.9.x), use the follow command from the Terminal:
For MK20 USB:
Usage:
dd if=src_firmware.bin of=/Volumes/BOOTLOADER/dst_firmware.bin conv=notrunc

Example:
dd if=DAPLink_MK20_BLENano.bin of=/Volumes/BOOTLOADER/DAPLink_MK20_BLENano.bin conv=notrunc
For F103 DAPLink:
Usage:
dd if=src_firmware.bin of=/Volumes/MAINTENANCE/dst_firmware.bin conv=notrunc

Example:
dd if=DAPLink_F103_BLENano.bin of=/Volumes/MAINTENANCE/DAPLink_F103_BLENano.bin conv=notrunc
4.3 For Mac OSX (10.10.x / 10.11.x):
For MK20 USB:
sudo mount -u -w -o sync /Volumes/BOOTLOADER; cp -X ~/Desktop/DAPLink_MK20_BLENano.bin /Volumes/BOOTLOADER/
For F103 DAPLink:
sudo mount -u -w -o sync /Volumes/MAINTENANCE; cp -X ~/Desktop/DAPLink_F103_BLENano.bin /Volumes/MAINTENANCE/
-
Wait for 10 seconds and remove the board from the USB port
-
Reconnect it to the USB port, your OS will show a drive labelled 'DAPLink' (for DAPLink firmware) or 'MBED' (for CMSIS-DAP firmware)
The interface chip used on the RBL_nRF51822 board is Freescale MK20 and it provides an USB port for uploading host firmware to the target chip (i.e. the nRF51822 SoC).
Latest interface firmware (DAPLink)
In case you have changed the USB interface firmware inside the MK20 interface chip and want to restore to default one or upgrade to lastest version, follow the steps below:
-
Press and hold the reset button on your nRF51822 board
-
Connect it to an USB port of your PC
-
Release the button and the LED will keep flashing (slowly)
-
Follow the following to update the firmware
4.1 For Windows, just drag the firmware (DAPLink_MK20_RBL_nRF51822.bin) to the MSD drive (e.g. E:), labelled 'BOOTLOADER'
4.2 For Linux or Mac OSX (10.9.x), use the follow command from the Terminal:
 Usage:
 $ dd if=src_firmware.bin of=/Volumes/BOOTLOADER/dst_firmware.bin conv=notrunc

 Example:
 $ dd if=DAPLink_MK20_RBL_nRF51822.bin of=/Volumes/BOOTLOADER/DAPLink_MK20_RBL_nRF51822.bin conv=notrunc
4.3 For Mac OSX (10.10.x / 10.11.x or above):
sudo mount -u -w -o sync /Volumes/BOOTLOADER; cp -X ~/Desktop/DAPLink_MK20_RBL_nRF51822.bin /Volumes/BOOTLOADER/ -
After that, the LED should keep flashing (very fast this time)
-
Remove the board from the USB port
-
Reconnect it to the USB port, your OS will show a drive labelled 'DAPLINK'
-
Now, you can drag the test firmware to the DAPLink drive to test.
-
Note that the DAPLink will not reset the target chip by default, press the
RESETbutton to allow the target to run the uploaded firmware, you can change this by sending MSD commands to the DAPLink drive, for the details about the DAPLink automation, please refer to the MSD Commands.

