[](https://paperswithcode.com/sota/3d-point-cloud-classification-on-scanobjectnn?p=revisiting-point-cloud-classification-with-a)[](https://paperswithcode.com/sota/3d-point-cloud-classification-on-modelnet40?p=revisiting-point-cloud-classification-with-a)
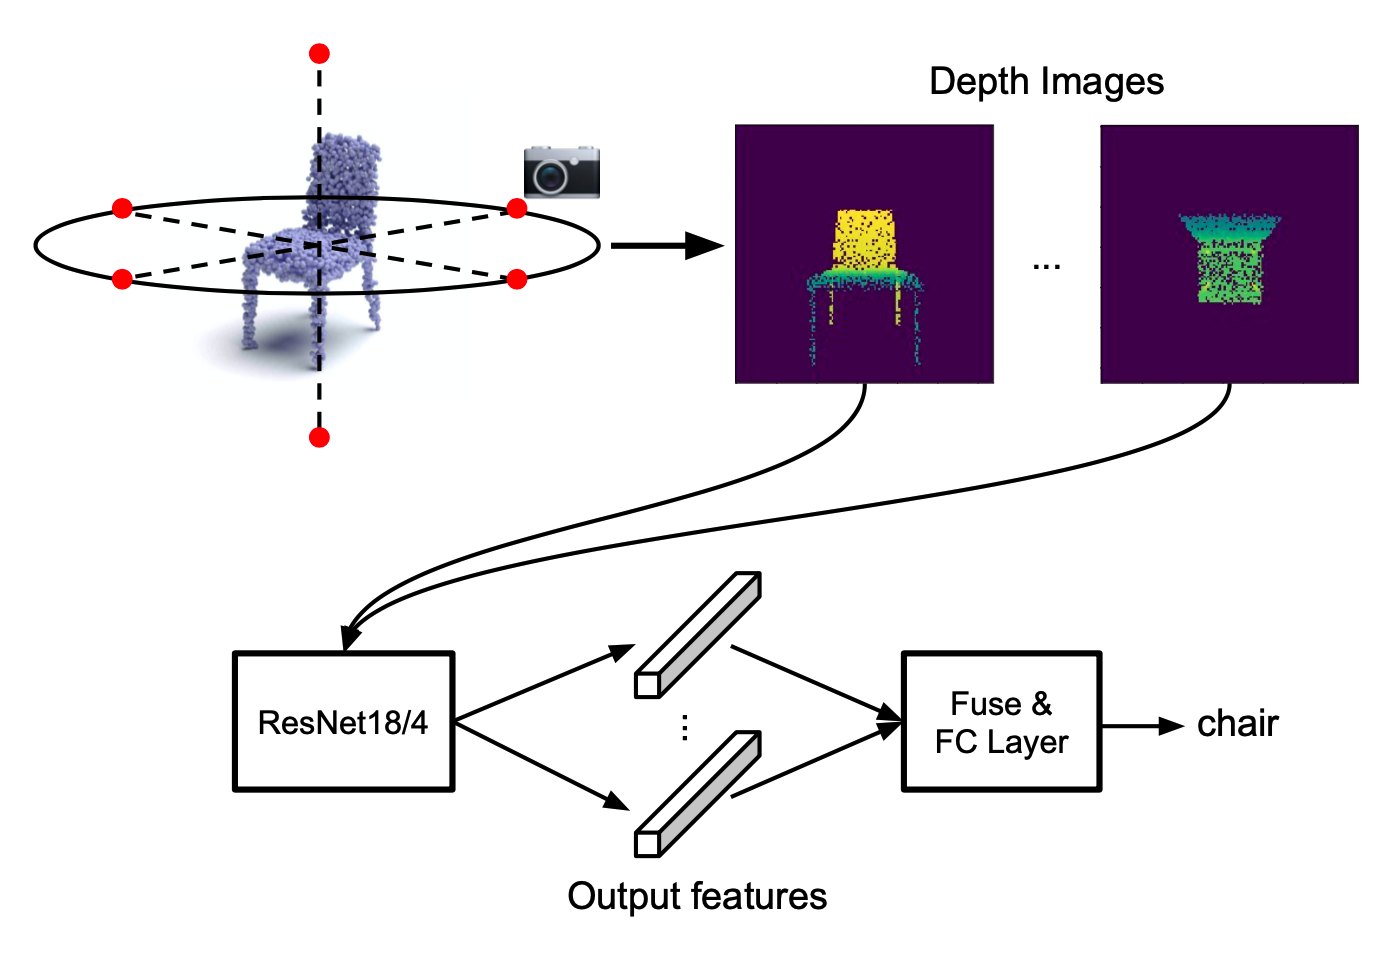 [**Revisiting Point Cloud Shape Classification with a Simple and Effective Baseline**](https://arxiv.org/pdf/2106.05304v1.pdf)
[Ankit Goyal](http://imankgoyal.github.io), [Hei Law](https://heilaw.github.io/), Bowei Liu, [Alejandro Newell](https://www.alejandronewell.com/), [Jia Deng](https://www.cs.princeton.edu/~jiadeng/)
***International Conference on Machine Learning (ICML), 2021***
If you find our work useful in your research, please consider citing:
```
@article{goyal2021revisiting,
title={Revisiting Point Cloud Shape Classification with a Simple and Effective Baseline},
author={Goyal, Ankit and Law, Hei and Liu, Bowei and Newell, Alejandro and Deng, Jia},
journal={International Conference on Machine Learning},
year={2021}
}
```
## Getting Started
First clone the repository. We would refer to the directory containing the code as `SimpleView`.
```
git clone git@github.com:princeton-vl/SimpleView.git
```
#### Requirements
The code is tested on Linux OS with Python version **3.7.5**, CUDA version **10.0**, CuDNN version **7.6** and GCC version **5.4**. We recommend using these versions especially for installing [pointnet++ custom CUDA modules](https://github.com/erikwijmans/Pointnet2_PyTorch/tree/22e8cf527b696b63b66f3873d80ae5f93744bdef).
#### Install Libraries
We recommend you first install [Anaconda](https://anaconda.org/) and create a virtual environment.
```
conda create --name simpleview python=3.7.5
```
Activate the virtual environment and install the libraries. Make sure you are in `SimpleView`.
```
conda activate simpleview
pip install -r requirements.txt
conda install sed # for downloading data and pretrained models
```
For PointNet++, we need to install custom CUDA modules. Make sure you have access to a GPU during this step. You might need to set the appropriate `TORCH_CUDA_ARCH_LIST` environment variable depending on your GPU model. The following command should work for most cases `export TORCH_CUDA_ARCH_LIST="6.0;6.1;6.2;7.0;7.5"`. However, if the install fails, check if `TORCH_CUDA_ARCH_LIST` is correctly set. More details could be found [here](https://en.wikipedia.org/wiki/CUDA#GPUs_supported).
```
cd pointnet2_pyt && pip install -e . && cd ..
```
#### Download Datasets and Pre-trained Models
Make sure you are in `SimpleView`. `download.sh` script can be used for downloading all the data and the pretrained models. It also places them at the correct locations. First, use the following command to provide execute permission to the `download.sh` script.
```
chmod +x download.sh
```
To download ModelNet40 execute the following command. This will download the ModelNet40 point cloud dataset released with pointnet++ as well as the validation splits used in our work.
```
./download.sh modelnet40
```
To download the pretrained models, execute the following command.
```
./download.sh pretrained
```
## Code Organization
- `SimpleView/models`: Code for various models in PyTorch.
- `SimpleView/configs`: Configuration files for various models.
- `SimpleView/main.py`: Training and testing any models.
- `SimpleView/configs.py`: Hyperparameters for different models and dataloader.
- `SimpleView/dataloader.py`: Code for different variants of the dataloader.
- `SimpleView/*_utils.py`: Code for various utility functions.
## ScanObjectNN
The code for our experiments on `ScanObjectNN` can be found in `ScanObjectNN/SimpleView` of this repo. Please refer to `README.md` in `ScanObjectNN/SimpleView` for more details.
## Running Experiments
#### Training and Config files
To train or test any model, we use the `main.py` script. The format for running this script is as follows.
```
python main.py --exp-config
```
The config files are named as `_<_extra>_run_.yaml` (` ∈ [dgcnn, pointnet2, rscnn]`; ` ∈ [dgcnn, pointnet2, rscnn, pointnet, simpleview]`; `<_extra> ∈ ['',valid,0.5,0.25]` ). For example, the config file to run an experiment for PointNet++ in DGCNN protocol with seed 1 `dgcnn_pointnet2_run_1.yaml`. To run a new experiment with a different seed, you need to change the `SEED` parameter in the config file. For all our experiments (including on the validation set) we do 4 runs with different seeds.
As discussed in the paper for the PointNet++ and SimpleView protocols, we need to first run an experiment to tune the number of epochs on the validation set. This could be done by first running the experiment `__valid_run_.yaml` and then running the experiment `__run_.yaml`. Based on the number of epochs achieving the best performance on the validation set, one could use the model trained on the complete training set to get the final test performance.
To train models on the partial training set (Table 7), use the configs named as `dgcnn__valid_<0.25/0.5>_run_.yaml` and `__<0.25/0.5>_run_.yaml`.
***Even with the same SEED the results could vary slightly because of the randomization introduced for faster cuDNN operations. More details could be found [here](https://pytorch.org/docs/stable/notes/randomness.html)***
##### SimpleView Protocol
To run an experiment in the SimpleView protocol, there are two stages.
- First tune the number of epochs on the validation set. This is done using configs `dgcnn__valid_run_.yaml`. Find the best number of epochs on the validation set, evaluated at every 25th epoch.
- Train the model on the complete training set using configs `dgcnn__run_.yaml`. Use the performance on the test set at the fine-tuned number of epochs as the final performance.
#### Evaluate a pretrained model
We provide pretrained models. They can be downloaded using the `./download pretrained` command and are stored in the `SimpleView/pretrained` folder. To test a pretrained model, the command is of the following format.
```
python main.py --entry --model-path pretrained//.pth --exp-config configs/.yaml
```
We list the evaluation commands in the `eval_models.sh` script. For example to evaluate models on the SimpleView protocol, use the commands [here](eval_models.sh#L2-L6). Note that for the SimpleView and the Pointnet2 protocols, the model path has names in the format `model_.pth`. Here `epoch_id` represents the number of epochs tuned on the validation set.
#### Performance of the released pretrained models on ModelNet40
| Protocol → | DGCNN - Smooth | DCGNN - CE. | RSCNN - No Vote | PointNet - No Vote | SimpleView |
|-------- |:--------------:|:--------------:|:---------------:|:------------------:|:--------------:|
| Method↓ |(Tab. 2, Col. 7)|(Tab. 2, Col. 6)| (Tab. 2, Col. 5)| (Tab. 2, Col. 2) | (Tab. 4, Col. 2)|
|SimpleView|93.9|93.2|92.7|90.8|93.3|
|PointNet++|93.0|92.8|92.6|89.7|92.6|
|DGCNN|92.6|91.8|92.2|89.5|92.0|
|RSCNN|92.3|92.0|92.2|89.4|91.6|
|PointNet|90.7|90.0|89.7| 88.8|90.1|
## Acknowlegements
We would like to thank the authors of the following reposities for sharing their code.
- PointNet: Deep Learning on Point Sets for 3D Classification and Segmentation: [1](https://github.com/charlesq34/pointnet), [2](https://github.com/fxia22/pointnet.pytorch)
- PointNet++: Deep Hierarchical Feature Learning on Point Sets in a Metric Space: [1](https://github.com/charlesq34/pointnet2), [2](https://github.com/erikwijmans/Pointnet2_PyTorch)
- Relation-Shape Convolutional Neural Network for Point Cloud Analysis: [1](https://github.com/Yochengliu/Relation-Shape-CNN)
- Dynamic Graph CNN for Learning on Point Clouds: [1](https://github.com/WangYueFt/dgcnn)