example-codeplug walkthough
- Windows 10
- Github.com Account [Sign-up]
- Github Desktop Client
- LibreOffice
The walkthrough will show screenshots of these tools, however the concepts are applicable to excel, linux, or git command line.
Fork example-codeplug
"Fork" means to make a linked copy of the example-codeplug that you can edit without affecting the original.
Go to https://github.com/mycodeplug/example-codeplug. Click "Fork" (not the number next to it)
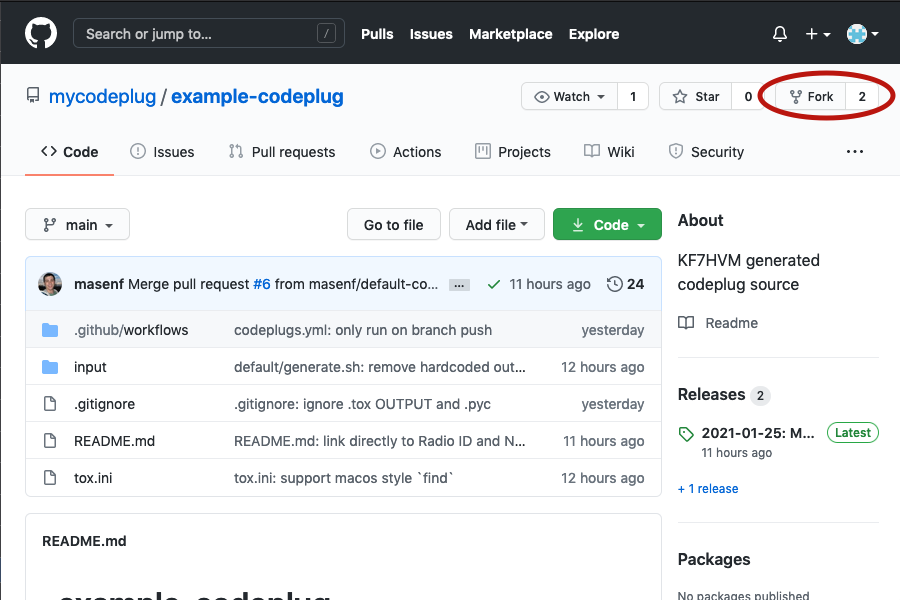
Your new fork is a "git repository" containing the files needed to generate your customized codeplug. You only need to make a fork once.
Sometimes Settings is hidden behind the three dots menu.


Click Rename.
Click Actions tab.

Click "I understand my workflows, go ahead and enable them"
To customize the codeplug, you need to download ("clone") the repository
to your computer. Modify the files in the input directory. Make a "commit"
describing your change. And finally upload ("push") the repository back to
Github to generate the codeplug.
Start Github Desktop and sign in with your Github Account.

From the list of repositories, select your new fork ("shiney-new-codeplug" in this example), and click "Clone youruser/your-codeplug".
Next, choose where to download the repository, or keep the defaults.

Click Clone.
Wait patiently until asked "How are you planning to use this fork?", then select "For my own purposes".

Click Continue.
From the repository main screen in Github Desktop, click "Show in Explorer" to view the files

When the explorer window opens, double click "input" then "default" to view the example code plug source files.

The .json and .sh files are plain text and can be opened with
notepad for editing.
Double click example-md-uv380.json, click the "More Apps ꜜ" link
and choose Notepad from the list.

From Edit > Find... search for "RadioID.

Replace "1234567" with your DMR number.
Scroll down a bit and replace "AA1AA" with your callsign

Close Notepad and save the file.
Open the "k7abd" directory and load "Talkgroups__Hotspot.csv" into Libreoffice (or Excel).
Add the new talkgroup, BC on brandmeister, 30271.

It may be convenient to keep your CSV files sorted alphabetically or otherwise,
however dzcb will re-order combined zones and expanded talkgroups according to
order.json (see below).
Save the file. Use Text CSV Format!
Load "Digital-Repeaters__Hotspot.csv". Uncheck the "Semicolon" box when loading!
The example file already includes 2 zones for a duplex hotspot. To create a zone for a simplex hotspot, add a new row based on the existing rows. You can also rename the existing zones and modify the RX / TX frequencies instead of creating a new row.
To the right of "Color Code" the remaining column headers correspond to talkgroup names. Going across the row, a "-", "1", or "2" indicates whether to create a channel in the zone on the given frequency and timeslot.

Next scroll to the far right and add a new column corresponding to the "BC" talkgroup that was added in the previous section.
Enter a "-", "1", or "2" in each cell of the BC column indicating whether the zone should create a channel for the talkgroup on timeslot 1 or timeslot 2.

Save the file. Use Text CSV Format!
The newly added zone can be placed at the top of the zone list
by editing order.json and adding a line matching the
new zone name.
Any zones not in the list will follow in alphabetical order.
The first list, "default", orders zones based on the CSV file name and is used for radios that do NOT expand static talkgroups into channels (Radioddity OpenGD77).
The second list, "expanded", orders zones based on the zone name inside the CSV file and affects the zone order on Anytone and TYT radios.
Add a line to the top of the "expanded" list for the "New Hotspot". (if you used a different name in the previous step, use that same name here).

Close Notepad and save the file.
Switch back to Github Desktop and review the changes that were made.
In the lower left, describe the change and click "Commit to main"

A "push" uploads your changes to github.com and starts the codeplug generation.

Click "Push origin"
Click "View on Github"

When the browser opens, click the "Actions" tab. You should see the codeplug being built.

After a minute or two, the codeplug should be ready. From the build summary, scroll down to the "Artifacts" section to download codeplugs.zip with the generated codeplug!

Import the files into your preferred CPS and check that the new zone and channel is added.
The prox.csv file in the input directory identifies points
of interest used to download repeater information from repeaterbook.com.
Back in the "input\default" directory, open prox.csv.
Add new zones by providing coordinates, distance, and band id (14 - 2 meter, 4 - 70 centimeter). Follow the existing examples for guidance.
XXX: image below shows the old format! Follow the format in the
example-codeplug's prox.csv file.

Save the file. Use Text CSV Format!
Go back to Github Desktop, make a new commit, and Push to origin as seen in a previous step.
Github Actions will build your changed codeplug.
After checking that the codeplug meets expectations and is functional, go back to the Code tab of your forked repo and select "Releases" in the right column.


Click Draft a new release.
For the "Tag version" box, enter the date in ISO format: 2021-01-26
"Release title" and "Describe this release" are optional and can be edited later.

Click Publish release.
This will trigger another Github Actions rebuild of your codeplug.
Wait a few minutes and then refresh the page.

When the codeplug has been generated, you will see codeplugs.zip
under the "Assets" section of the release.
Github will host your codeplug indefinitely, you may right click
codeplugs.zip and "Copy link location" to share the generated codeplug
with others.