NOTE: This guide expects you to have followed Before Install! If you haven't, go do it!
You will need the Debian installation ISO to follow this guide. This guide follows the Debian 10.06.0 install process, however differences should be minimal.
Connect your USB install drive and open Rufus. Configure Rufus like below:

Select your Debian ISO by clicking the CD Drive icon on the right under Format Options.
Ensure (triple check!) you have the correct device selected, because selecting the wrong device could wipe out another device with your data on it!
Click start. You will be asked what mode you wish to use:

Choose ISO mode and click OK.

READ!! and accept the warning.
Now we need to make a modification to the boot menu of the installer. Open file explorer and navigate to the USB:

Navigate to /boot/grub:

Open grub.cfg in your editor:

On line 27, you can see the default boot entry:
menuentry --hotkey=g 'Graphical install' {
    set background_color=black
    linux    /install.amd/vmlinuz vga=788 --- quiet
    initrd   /install.amd/gtk/initrd.gz
}
Add a new entry above it, and configure it like so:
menuentry --hotkey=g 'Serial Console install' {
    set background_color=black
    linux    /install.amd/vmlinuz vga=off --- console=ttyS1,115200n8
    initrd   /install.amd/gtk/initrd.gz
}
At the top of the config on line 10, set terminal_output to gfxterm console
Your config will now look like so:

Ensure no hard disks are in the 4 bays of the DX4000.
Into USB port 1 plug your empty USB onto which we will install Debian.
Into USB port 2, plug in your USB hub. Plug your USB keyboard and your Debian install USB into the hub.
Plug in power on power port 1 and network on network port 1.
With PuTTY open, press the power button. Spam the DEL key on the USB keyboard (NOT on your PuTTY window using your normal keyboard) You will be presented with the BIOS:

Go to Save & Exit and select Restore Defaults

Select Save Changes and Exit:

Spam DEL again to enter the BIOS.
Go to Advanced and ensure the settings at the top are configured like so:

Under Advanced select IDE Configuration and modify the settings to match below:

Hit ESC once to go back to the Advanced menu, select Serial Port Console Redirection and modify the settings to match below:

Now select Console Redirection Settings and modify the settings to match below:

Hit ESC twice to go back to the Advanced menu.
Scroll to Boot and modify the settings to match below:
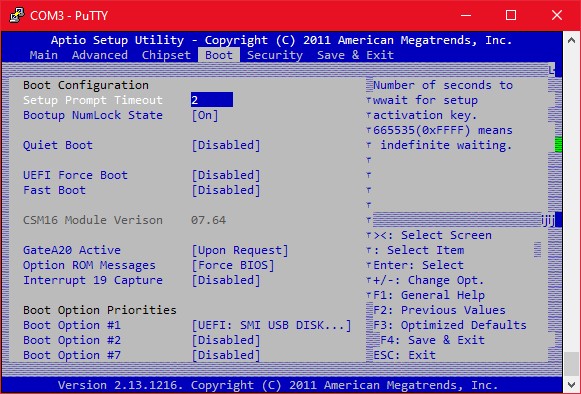
Please note that Boot Option #1 must be configured to the UEFI mode of your Debian installer USB! All other boot options must be disabled.
Go to Save & Exit and select Save Changes and Exit:
When your NAS reboots, you will be presented with the Debian Installer GRUB menu:

Place your USB keyboard aside (don't unplug). We are now going to use your normal keyboard with PuTTY.
Press enter on the Serial Console install option.
Select your language, in my case English, and press enter:

Select your location:

Select your keyboard layout:

Choose the first option for network:

Configure a hostname:

You can leave domain name blank:

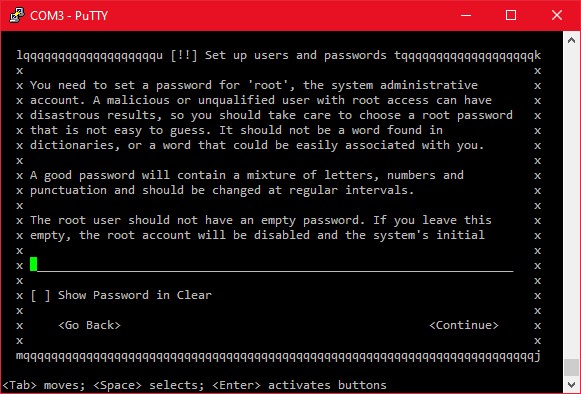
Configure a root password:
Confirm the root password:

Configure a personal account full name:

Configure a personal account username:

Configure a personal account password:

Confirm the personal account password:

You may be asked if you want to force UEFI installation. Choose YES:

When asked how you wish to use the disk, select Guided - use entire disk:

From the disk selection menu, select the disk you wish to install onto. This is the one placed into USB port 1:

For partitioning, select All files in one partition:

Confirm writing the partition table:

Say Yes to writing changes to the disk:

The installer will now proceed to spend a while installing everything. Once this has been completed you will be presented with the package management configuration. Choose a suitable server location for where you live:

Choose a suitable server in your location:

Leave the HTTP proxy empty (unless you know what you need to input) and press enter:

Choose whether you wish to participate in package popularity data collection:

Configure which packages you want to install by default. Use the up and down arrows to navigate and the space bar to enable and disable items. I disabled Debian desktop environment as we have no video out, print server because I hate printers, I enabled SSH server as I don't want to be forced to use the serial console and kept standard system utilities enabled as they're handy:


Now you'll need to wait a while whilst the installer finishes installing packages and configures the GRUB bootloader.
Once the installation has finished, you will be presented with the completion screen:

Unplug the installation USB and press enter, then switch back to the USB keyboard and spam DEL once the system restarts to enter the BIOS once again.
You'll notice the BIOS looks much nicer due to the configuration changes we made earlier:

Go to Boot and configure the boot order to match below:

Go to Save & Exit and select Save Changes and Exit:

You will now boot into Debian! You will be presented with a console which you need to control with PuTTY and your normal keyboard.
You can log in and get your DX4000's IP for SSH with the ip a command like so:

As you can see my DX4000's IP is 10.0.10.10 on my local network! Lets SSH to that (root SSH is disabled, see SSHd config to enable that):

For the sake of it, you can use the command shutdown -h now to shut your DX4000 down, then turn it back on yourself and see it spring to life with no intervention! One Debian server for you to run whatever you want!
Please return to README for links to other guides, such as setting up 4 hard drives with the 4 bays in the NAS!