


When implementing a mobile application you want to provide the users all of the functionality you can without them needing to sign up. After all, Every Step Costs You 20% of Users.
Sign up may very well be the step where most of your potential users are lost.
Now imagine you could get a unique identifier that worked accross all of the devices of the user. You could even have in app purchases that are shared across devices without asking your users to sign-up.
This library aims to provide all of this in the simplest way possible:
- For ios it uses the record name of CloudKit so it uniquely identifies an ios user. It's difficult to imagine an apple user that does not have an iCloud account configured in each of their devices.
- For android it presents to the user a list of all the accounts configured in the device to choose from.
The most common use case is to present the list of google accounts configured since it's one of the first steps of configuring an android device nowadays.
1. Install the library using either Yarn or npm
yarn add react-native-user-identity
or:
npm install react-native-user-identity --save
2. Link the library
react-native link react-native-user-identity
3. Install and link react-native-swift
This configures your iOS project to use the module correctly since the library contains swift code (see react-native-swift documentation)
yarn add react-native-swift
or:
npm install react-native-swift --save
and then:
react-native link react-native-swift
4. If you are using cocoapods:
- Make sure that your podfile contains the following line:
pod 'react-native-user-identity', :path => '../node_modules/react-native-user-identity'
Since the library has swift code (and obviously react as a dependency) we need to use modular headers:
- Make sure you are using CocoaPods >= 1.5
- Set modular_headers to true for the React and the react-native-user-identity pod:
target 'example' do
	pod 'React', :path => '../node_modules/react-native', :modular_headers => true, :subspecs => [

	(...)

	pod 'react-native-user-identity', :path => '../node_modules react-native-user-identity', :modular_headers => true
end
You can see a complete podfile in the repository example
5. Build the project
You should be able to build the project now. If there were errors in the linking process link the library manually:
Manually link the library on iOS
-
Enable swift in the project:
Because the iOS module uses Swift, if you are using a standard react-native application you need to add support for Swift in the project. This can be easily done by adding a swift file to the Xcode project – could be called dummy.swift and saying yes when prompted if you’d like to generate a bridging header.
Manually link the library on Android
- Open up
android/app/src/main/java/[...]/MainActivity.java
- Add
import com.github.juliandramirez.rn.useridentity.RNUserIdentityPackage;to the imports at the top of the file - Add
new RNUserIdentityPackage()to the list returned by thegetPackages()method
- Append the following lines to
android/settings.gradle:include ':react-native-user-identity' project(':react-native-user-identity').projectDir = new File(rootProject.projectDir, '../node_modules/react-native-user-identity/android') - Insert the following lines inside the dependencies block in
android/app/build.gradle:compile project(':react-native-user-identity')
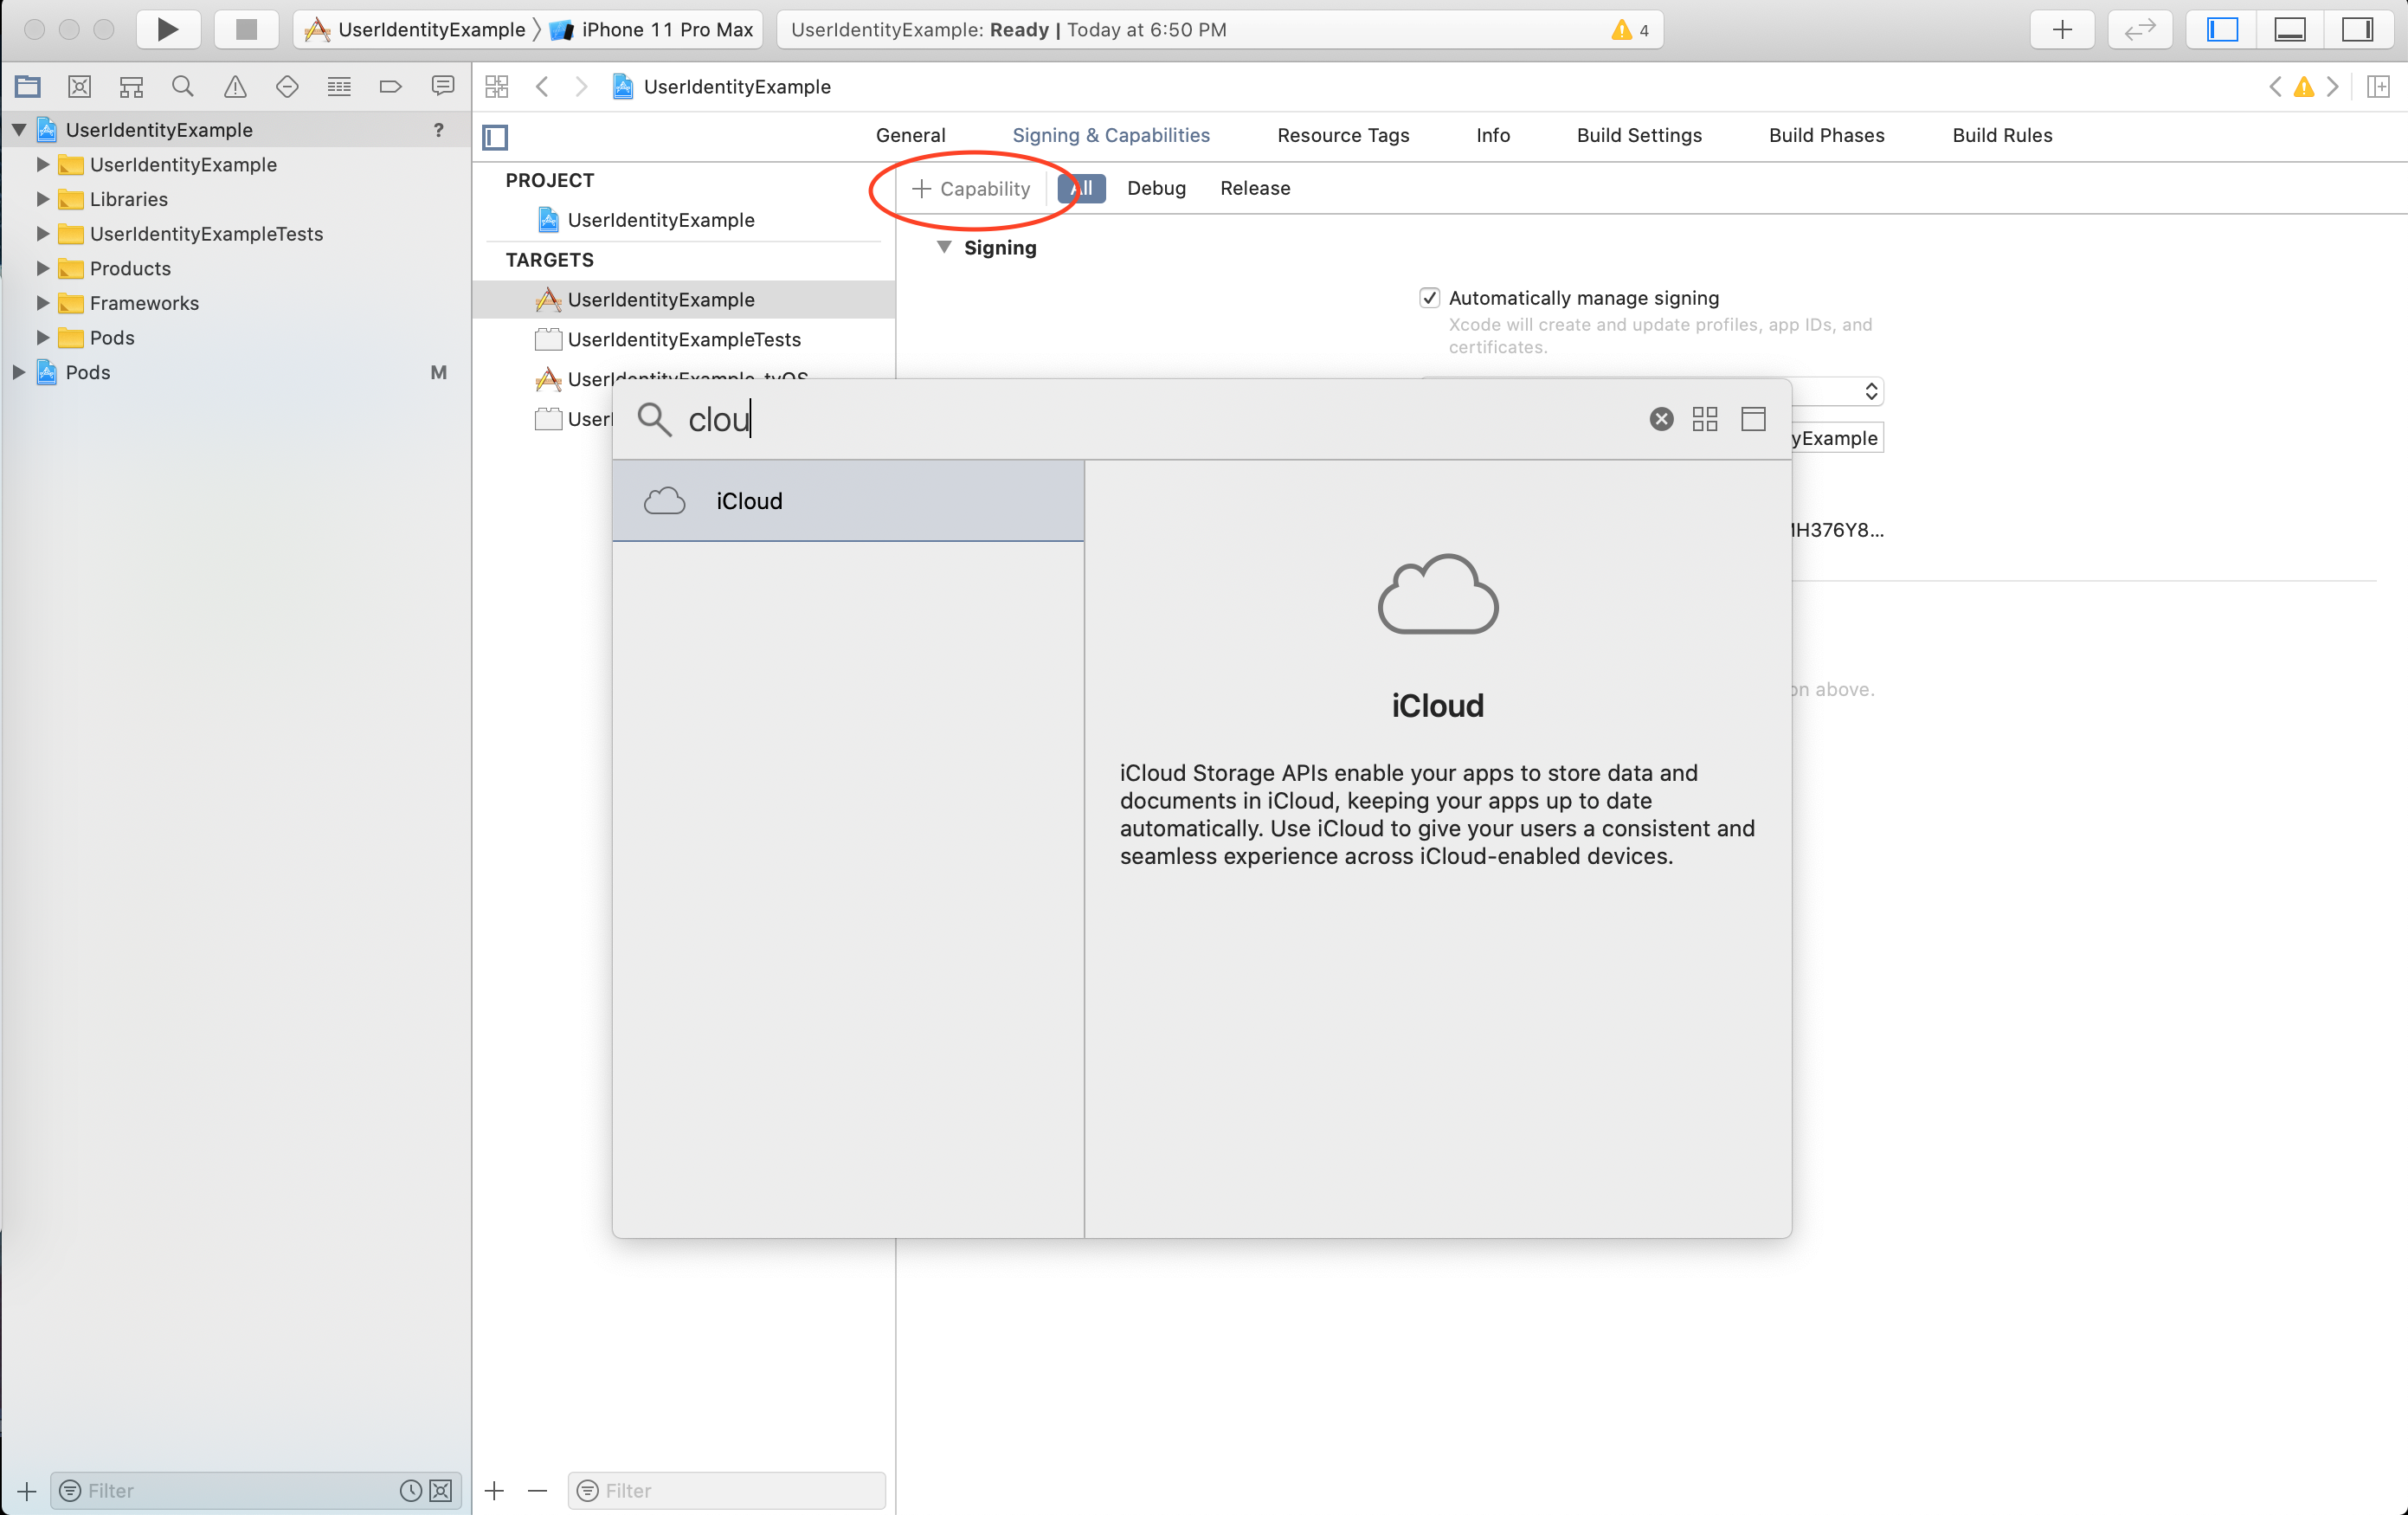
Enable the CloudKit capability in the XCode project:
- Open up
android/app/src/main/java/[...]/MainActivity.java - Add the following lines to the class:
package com.github.juliandramirez.rn.useridentity.example;

import com.facebook.react.ReactActivity;
+ import android.content.Intent;
+ import com.github.juliandramirez.rn.useridentity.RNUserIdentityModule;


public class MainActivity extends ReactActivity {

    @Override
    protected String getMainComponentName() {
        return "UserIdentityExample";
    }

+   @Override
+   public void onActivityResult(final int requestCode, final int resultCode, final Intent data) {
+       super.onActivityResult(requestCode, resultCode, data);
+
+       if(requestCode == RNUserIdentityModule.INTENT_REQUEST_CODE) {
+           RNUserIdentityModule module =
+               this.getReactInstanceManager().getCurrentReactContext().getNativeModule(RNUserIdentityModule.class);
+           module.onActivityResult(resultCode, data);
+       }
+   }
}
Note: If you have other UI fragments that you want to trigger the account selection dialog from, add the same lines to their activities
- There is only one public function available called getUserId
- The function is marked as async
- On ios the resolved value is null when there is no icloud account configured
- On android the resolved value is null when the user dismisses the account selection dialog
import RNUserIdentity from 'react-native-user-identity'

fetchUserIdentity = async () => {
	const result = await RNUserIdentity.getUserId()

	if (result === null) {
		if (Platform.OS === 'ios') {
			alert('Please set up an iCloud account in settings')
		} else if (Platform.OS === 'android') {
			alert('Please select an existing account or create a new one')
		}
	}
}There are two optional parameters you can send:
-
androidAccountSelectionMessage: The text to display in the account chooser modal in android. By default there is no message configured.
-
androidAccountType: The type of account you want to list in the chooser. By default there is no filter set and all of the accounts configured in the device are presented.
Android documentation states the following:
Android devices can store multiple accounts from many different providers. When you query AccountManager for account names, you can choose to filter by account type. The account type is a string that uniquely identifies the entity that issued the account. For instance, Google accounts have type "com.google," while Twitter uses "com.twitter.android.auth.login."
The following code:
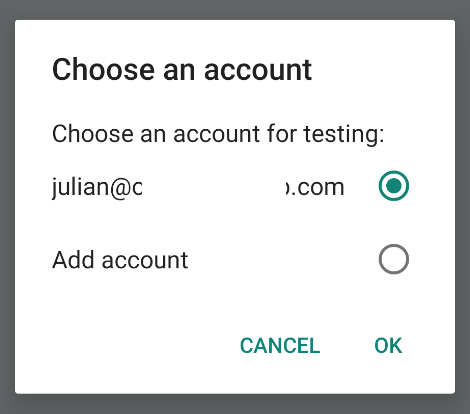
RNUserIdentity.getUserId({
		androidAccountSelectionMessage: 'Choose an account for testing:',
		androidAccountType: 'com.google'
})
Presents this modal (the modal styles are OS dependant):
Use yarn to install the dependencies. Npm installs local dependencies using symbolic links and the react native packager does not support this.
The CloudKit framework prevents applications from accesing the user email for privacy purposes.
You could use the same principle behind Firebase anonymous authentication but most likely you will run into the same limitations: Identities are associated to app installations (or devices in the best case scenario).