-
The iOS or iPadOS device must always have its screen on during the hotspot, with only the iSH app open.
-
This requires a lot of setup for each client. It is not plug and play.
-
You will have slower internet, but the SSL method should be the faster alternative.
iOS and iPadOS; SSH method.
The client has to make its own hotspot for the iOS/iPadOS device to connect to. Here’s the instructions for each OS:
-
Open Terminal.
-
ssh-keygen -t ed25519; chmod -R 700 $HOME/.ssh-
When prompted for a "file in which to save the key", keep pressing Return until completed.
-
-
cat ~/.ssh/id_ed25519.pub | base64 | base64 -d > ~/publickey.txt | pbcopy-
This will copy the result to the clipboard; the clipboard is synced between Apple devices.
-
-
On the iPhone or iPad:
nano ~/.ssh/authorized_keys, then paste the clipboard, and save the file. -
sudo — zsh -c "networksetup -createnetworkservice Loopback lo0; networksetup -setmanual Loopback 127.0.0.1 255.255.255.255; networksetup -createnetworkservice AdHoc lo0; networksetup -setmanual AdHoc 10.0.4.1 255.255.255.0; pfctl -e" -
Open Settings.
-
Make sure to disable all Filters & Proxies already inside of Network → VPN.

-

-
Move Loopback to the bottom, and put AdHoc right above Loopback.

-
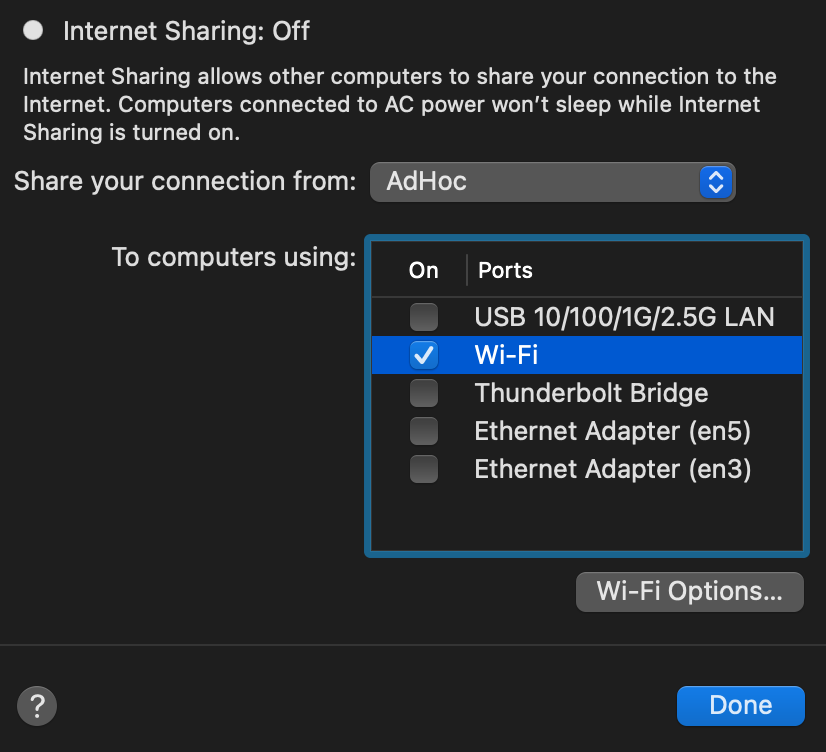
Click the (i) icon for Internet Sharing.

-
Copy these settings, then click "Wi-Fi Options…" and allow the permissions when prompted.


-
Ensure that this icon shows up, if it doesn’t, disable Wi-Fi and AirDrop then enable Internet Sharing:

-
Replace wpa_supplicant (Ubuntu and Fedora both use it) with iwd, otherwise the iOS/iPadOS device cannot connect to the Linux hotspot.
-
ssh-keygen -t ed25519-
When prompted for a "file in which to save the key", keep pressing Return until completed.
-
-
cat ~/.ssh/id_ed25519.pub | base64 | base64 -d > ~/publickey.txt | pbcopy
-
-
LocalSend is so you can send files to macOS or other OSes; AirDrop will not work on macOS while hosting Wi-Fi.
-
-
Install LocalSend onto the device you are sharing a hotspot to.
-
Open iSH, then run
sh install_ssh.sh-
When prompted for a "file in which to save the key", keep pressing Return until completed.
-
-
Now connect to the Wi-Fi hotspot made on your client, and ensure mobile data is used through the following steps:
-
Open Settings, go to Wi-Fi.
-
Press the Info (i) icon for the Wi-Fi hotspot.
-
Note the IP Address and Subnet Mask, remember these both, it is important.
-
Configure IP → Change to "Manual", then put in the same IP Address and Subnet Mask, but leave Router empty, then save. NOTE: Every single time you reconnect to this Wi-Fi hotspot, you must set it back to "Automatic" to get back on the Wi-Fi, then change to "Manual" to make the Mobile Data work.
-
Run the SSH tunnel on the iOS/iPadOS device:
-
/usr/sbin/sshd -d-
After done testing, remove -d (debug mode), as it’ll close
sshdeverytime a client disconnects.
-
-
pip3 install --upgrade pip; pip3 install rsp
|
💡
|
If you get a warning that Python is not added to the path, do similar to the following: Open ~/.zprofileAdd: export PATH=$PATH:~/Library/Python/3.9/binThen "refresh" the current Terminal: source .zprofile
|
-
rsp-trust '192.168.2.2' 4318 -
rsp -L root '192.168.2.2' 4318
iOS and iPadOS; SSL method.
-
-
LocalSend is so you can send files to macOS or other OSes; AirDrop will not work on macOS while hosting Wi-Fi.
-
-
Install LocalSend onto the device you are sharing a hotspot to.
-
Open iSH, then run:
sh install_ssl.sh-
When prompted for a Country Name, keep pressing Return until completed.
-
-
brew install stunnel -
openssl s_client -showcerts -servername server -connect 192.168.2.2:9080 > RootCACert.pem -
Open Keychain Access.
-
Drag the Root CA certificate into Keychain Access, and fully trust it.
foreground = yes
pid = /tmp/stunnel4.pid
client = yes
debug = 6

[hotspot client]
client = yes
accept = localhost:9080
connect = 192.168.2.2:4540
PSKsecrets = psk.txt