This project will help you start working with GitHub.
🚀 If you're new to Git, this handbook is a great intro.
- Create your GitHub account.
- Download and install Git (use the install defaults).
- Download and install VS Code (use the install defaults).
- Open a command prompt and enter the following two commands:
git config --global user.name "Your Name"
git config --global user.email "[email protected]"
# Once you're done, you can close this command promptTo work with GitHub, you need a local copy of the repository (or project) on your computer.
- Open VS Code.
- Press the
F1key and typeGit: Clone. - Enter the repository URL:
https://github.com/dtf-ein/hello.git. You can also get this from GitHub:
- Select the folder on your computer where you'll put the files.
- Select
Openwhen the clone is finished.

Now you have a local copy of the repository that matches the remote repository on GitHub.
We use the GitHub flow to make changes, so the first step to making a change is creating a new branch.
- Go to the
Source Controlview of VS Code in the vertical left menu, click the...link and selectCheckout to...:
- Select
Create new branch...from the menu. - Enter the branch name and click
Enter.

You're now working on a new branch of the repository. All Git repositories have a main branch called master. When you make changes in a new branch, it keeps your changes separate from the master branch until they're finished.
- Go back to the
Explorerview of VS Code from the vertical left menu. - Open the
HELLO.mdmarkdown file. - Add your name to the file and
Save. - If you want to see how it will look, press
F1and typeMarkdown: Open preview. - Go back to the
Source Controlview. You should now seeHELLO.mdin the list of changed files. - Select
HELLO.mdto see that change you made. - If you're happy with the change, click the
+that appears when you hoverHELLO.mdto stage the change. This tells Git you are planning to save the change to your branch (with a commit). - Enter a message and press
CTRL + Enterto commit the change: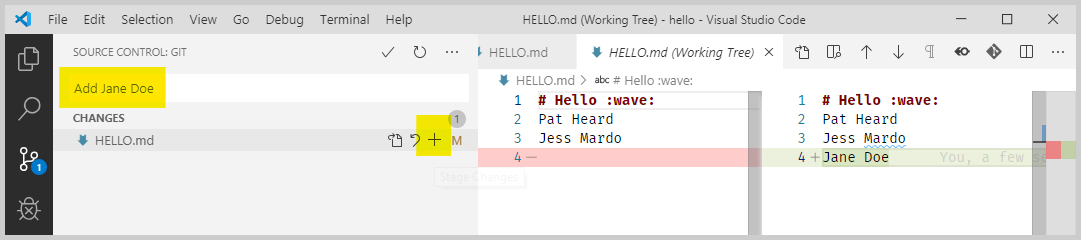

You've just created a commit! This is where Git shines. It keeps a complete history of all changes (commits) made to a repository that you can browse whenever you want.
Now that you've made a change in your branch, it's time to move that change into the master branch of the repository so everyone can see it. In Git, this is called merging your branch with master and GitHub uses Pull Requests to do this.
- Go back to the
Source Controlview, click the same...link you used to create a branch and selectPush. - Select
OKto publish the branch. This copies it from your local repository to the remote repository on GitHub. - Open a browser and go to the repository on GitHub.
- Click the green
Compare & pull requestbutton. - Update the pull request title and description to explain the change. This lets other people know what you've done.
- Click
Create pull request.
The pull request can now be reviewed by other team members, and if everything looks good, it will get merged into master.
The final piece needed to make your change available to everyone working on the repository is to merge your pull request.
- Go to the pull requests page of this repository and select your pull request.
- Click the arrow next to the
Merge pull requestbutton and selectRebase and merge. - Click the
Rebase and mergebutton and confirm the merge.
Your changes are now part of master! You can also delete your branch. In Git, it's a good idea to merge smaller changes more frequently, so it's normal to create a branch, make a single change and then delete the branch.
As you're working on a repository, you'll also want to get other people's changes so you stay in sync with their work.
- In the
Source Controlview of VS Code, click the...link and selectPull.
You're now ready to start working in Git. If you have any problems following this guide, let us know with an issue or, even better, suggest a change with a pull request 😉