
This document describes in details how to turn a Nordic nRF52840 board into a working FIDO2 security key.
You will need one the following supported boards:
- Nordic nRF52840-DK development kit. This board is more convenient for development and debug scenarios as the JTAG probe is already on the board.
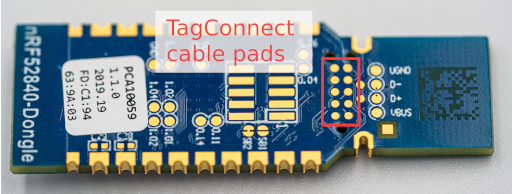
- Nordic nRF52840 Dongle to have a more practical form factor.
- Makerdiary nRF52840-MDK USB dongle.
In the case of the Nordic USB dongle, you may also need the following extra hardware:
- a Segger J-Link JTAG probe.
- a TC2050 Tag-Connect programming cable.
- a Tag-Connect TC2050 ARM2010 adaptor
- optionally a Tag-Connect TC2050 retainer clip to keep the spring loaded connector pressed to the PCB.
Additionnaly, OpenSK supports other ways to flash your board:
- OpenOCD.
- Segger J-Link (default method).
- pyOCD.
- nrfutil for the USB dongle boards that supports it, which allows you to directly flash a working board over USB without additional hardware.
This guide does not cover how to setup the JTAG probe and their related tools on your system.
In order to compile and flash a working OpenSK firmware, you will need the following:
- rustup (can be installed with Rustup)
- python3 and pip (can be installed with the
python3-pippackage on Debian) - the OpenSSL command line tool (can be installed with the
libssl-devpackage on Debian)
The scripts provided in this project have been tested under Linux and OS X. We haven't tested them on Windows and other platforms.
If you just cloned this repository, you need to run the following script (output may differ):
$ ./setup.sh
[-] Applying patch "01-persistent-storage.patch"... DONE.
[-] Applying patch "02-usb.patch"... DONE.
[-] Applying patch "03-app-memory.patch"... DONE.
[-] Applying patch "04-rtt.patch"... DONE.
[-] Applying patch "01-linked_list_allocator.patch"... DONE.
[-] Applying patch "02-panic_console.patch"... DONE.
[-] Applying patch "03-timer.patch"... DONE.
[-] Applying patch "04-public_syscalls.patch"... DONE.
[-] Applying patch "05-bigger_heap.patch"... DONE.
[-] Applying patch "06-no_spin_allocator.patch"... DONE.
Signature ok
subject=CN = Google OpenSK CA
Getting Private key
Signature ok
subject=CN = Google OpenSK Hacker Edition
Getting CA Private Key
info: syncing channel updates for 'nightly-2020-02-03-x86_64-unknown-linux-gnu'

  nightly-2020-02-03-x86_64-unknown-linux-gnu unchanged - rustc 1.42.0-nightly (f43c34a13 2020-02-02)

Requirement already up-to-date: tockloader in /usr/lib/python3/dist-packages/tockloader-1.4.0.dev0-py3.7.egg (1.4.0.dev0)
Requirement already satisfied, skipping upgrade: argcomplete>=1.8.2 in /usr/lib/python3/dist-packages (from tockloader) (1.10.0)
Requirement already satisfied, skipping upgrade: colorama>=0.3.7 in /usr/lib/python3/dist-packages (from tockloader) (0.3.7)
Requirement already satisfied, skipping upgrade: crcmod>=1.7 in /usr/lib/python3/dist-packages (from tockloader) (1.7)
Requirement already satisfied, skipping upgrade: pyserial>=3.0.1 in /usr/lib/python3/dist-packages (from tockloader) (3.4)
Requirement already satisfied, skipping upgrade: pytoml>=0.1.11 in /usr/lib/python3/dist-packages (from tockloader) (0.1.21)
info: component 'rust-std' for target 'thumbv7em-none-eabi' is up to date
    Updating crates.io index
     Ignored package `elf2tab v0.4.0` is already installed, use --force to override
The script performs the following steps:
-
Make sure that the git submodules are checked out
-
Apply our patches that haven't yet been merged upstream to both Tock and libtock-rs
-
Generate a self-signed certificate authority as well as a private key and a corresponding certificate for your OpenSK key signed by this CA. You will be able to replace them with your own certificate and private key.
-
Ensure that your Rust toolchain is using the same version that we tested OpenSK with.
-
Install tockloader.
-
Ensure that the Rust toolchain can compile code for ARM devices.
All the generated certificates and private keys are stored in the directory
crypto_data/.
This is the expected content after running our setup.sh script:
| File | Purpose |
|---|---|
opensk_ca.csr |
Certificate sign request for the Root CA |
opensk_ca.key |
ECC secp256r1 private key used for the Root CA |
opensk_ca.pem |
PEM encoded certificate of the Root CA |
opensk_ca.srl |
File generated by OpenSSL |
opensk_cert.csr |
Certificate sign request for the attestation certificate |
opensk_cert.pem |
PEM encoded certificate used for the authenticator |
opensk.key |
ECC secp256r1 private key used for the autenticator |
If you want to use your own attestation certificate and private key, simply
replace opensk_cert.pem and opensk.key files.
Our build script build.rs is responsible for converting opensk_cert.pem and
opensk.key files into raw data that is then used by the Rust file:
src/ctap/key_material.rs.

-
Connect a micro USB cable to the JTAG USB port.
-
Run our script for compiling/flashing Tock OS and OpenSK on your device (output may differ):
$ ./deploy.py --board=nrf52840dk --opensk info: Updating rust toolchain to nightly-2020-02-03 info: syncing channel updates for 'nightly-2020-02-03-x86_64-unknown-linux-gnu' info: checking for self-updates info: component 'rust-std' for target 'thumbv7em-none-eabi' is up to date info: Rust toolchain up-to-date info: Building Tock OS for board nrf52840dk Compiling tock-registers v0.5.0 (./third_party/tock/libraries/tock-register-interface) Compiling tock-cells v0.1.0 (./third_party/tock/libraries/tock-cells) Compiling enum_primitive v0.1.0 (./third_party/tock/libraries/enum_primitive) Compiling tock_rt0 v0.1.0 (./third_party/tock/libraries/tock-rt0) Compiling nrf52840dk v0.1.0 (./third_party/tock/boards/nordic/nrf52840dk) Compiling kernel v0.1.0 (./third_party/tock/kernel) Compiling cortexm v0.1.0 (./third_party/tock/arch/cortex-m) Compiling nrf5x v0.1.0 (./third_party/tock/chips/nrf5x) Compiling capsules v0.1.0 (./third_party/tock/capsules) Compiling cortexm4 v0.1.0 (./third_party/tock/arch/cortex-m4) Compiling nrf52 v0.1.0 (./third_party/tock/chips/nrf52) Compiling nrf52840 v0.1.0 (./third_party/tock/chips/nrf52840) Compiling components v0.1.0 (./third_party/tock/boards/components) Compiling nrf52dk_base v0.1.0 (./third_party/tock/boards/nordic/nrf52dk_base) Finished release [optimized + debuginfo] target(s) in 13.15s info: Converting Tock OS file into a binary info: Building OpenSK application Finished release [optimized] target(s) in 0.02s info: Generating Tock TAB file for application/example ctap2 info: Erasing all installed applications All apps have been erased. info: Flashing file third_party/tock/boards/nordic/nrf52840dk/target/thumbv7em-none-eabi/release/nrf52840dk.bin. info: Flashing padding application info: Installing Tock application ctap2 info: You're all set! -
Connect a micro USB cable to the device USB port.
Note: Due to current limitations of our implementation and Tock, you may
have to press the BOOT/RESET button, located next to the device USB port on
the board in order to see your OpenSK device on your system.

-
The JTAG probe used for programming won't provide power to the board. Therefore you will need to use a USB-A extension cable to power the dongle through its USB port.
-
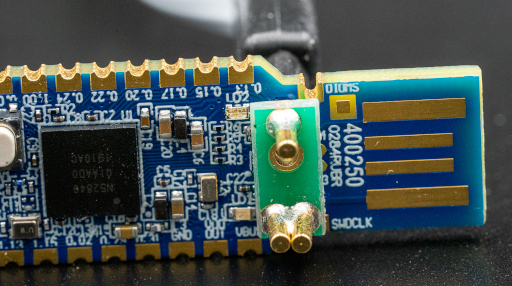
Connect the TC2050 cable to the pads below the PCB:
-
You can use the retainer clip if you have one to avoid maintaining pressure between the board and the cable:
-
Depending on the programmer you're using, you may have to adapt the next command line. Run our script for compiling/flashing Tock OS on your device (output may differ):
$ ./deploy.py os --board=nrf52840_dongle --programmer=jlink
info: Updating rust toolchain to nightly-2020-02-03
info: syncing channel updates for 'nightly-2020-02-03-x86_64-unknown-linux-gnu'
info: checking for self-updates
info: component 'rust-std' for target 'thumbv7em-none-eabi' is up to date
info: Rust toolchain up-to-date
info: Building Tock OS for board nrf52840_dongle
    Compiling tock-cells v0.1.0 (./third_party/tock/libraries/tock-cells)
    Compiling tock-registers v0.5.0 (./third_party/tock/libraries/tock-register-interface)
    Compiling enum_primitive v0.1.0 (./third_party/tock/libraries/enum_primitive)
    Compiling tock_rt0 v0.1.0 (./third_party/tock/libraries/tock-rt0)
    Compiling nrf52840_dongle v0.1.0 (./third_party/tock/boards/nordic/nrf52840_dongle)
    Compiling kernel v0.1.0 (./third_party/tock/kernel)
    Compiling cortexm v0.1.0 (./third_party/tock/arch/cortex-m)
    Compiling nrf5x v0.1.0 (./third_party/tock/chips/nrf5x)
    Compiling capsules v0.1.0 (./third_party/tock/capsules)
    Compiling cortexm4 v0.1.0 (./third_party/tock/arch/cortex-m4)
    Compiling nrf52 v0.1.0 (./third_party/tock/chips/nrf52)
    Compiling nrf52840 v0.1.0 (./third_party/tock/chips/nrf52840)
    Compiling components v0.1.0 (./third_party/tock/boards/components)
    Compiling nrf52dk_base v0.1.0 (./third_party/tock/boards/nordic/nrf52dk_base)
        Finished release [optimized + debuginfo] target(s) in 11.72s
info: Converting Tock OS file into a binary
info: Building OpenSK application
    Finished release [optimized] target(s) in 0.02s
info: Generating Tock TAB file for application/example ctap2
info: Erasing all installed applications
All apps have been erased.
info: Flashing file third_party/tock/boards/nordic/nrf52840_dongle/target/thumbv7em-none-eabi/release/nrf52840_dongle.bin.
info: Flashing padding application
info: Installing Tock application ctap2
info: You're all set!
-
Remove the programming cable and the USB-A extension cable.


Although flashing using a Segger JLink probe is the officially supported way,
our tool, deploy.py also supports other methods:
- OpenOCD:
./deploy.py --board=nrf52840_dongle --opensk --programmer=openocd - pyOCD:
./deploy.py --board=nrf52840_dongle --opensk --programmer=pyocd - Nordic DFU:
./deploy.py --board=nrf52840_dongle --opensk --programmer=nordicdfu - Custom:
./deploy.py --board=nrf52840_dongle --opensk --programmer=none. In this case, an IntelHex file will be created and how to program a board is left to the user.
If your board is already flashed with Tock OS, you may skip installing it:
./deploy.py --board=nrf52840dk --opensk --no-tockos
For more options, we invite you to read the help of our deploy.py script by
running ./deploy.py --help.
By default on Linux, a USB device will require root privilege in order interact
with it. As it is not recommended to run your web browser with such a high
privileged account, we made a udev rule file to allow regular users to
interact with OpenSK authenticators.
To install it, you need to execute the following commands:
sudo cp rules.d/55-opensk.rules /etc/udev/rules.d/
sudo udevadm control --reload
Then, you will need to unplug and replug the key for the rule to trigger.
To test whether the installation was successful, visit a demo website and try to register and login.
If you have issues with the demo website, the following commands should help you understand whether OpenSK was installed properly.
When plugging in the USB key, the following line should appear in lsusb.
$ lsusb
...
Bus XXX Device YYY: ID 1915:521f Nordic Semiconductor ASA OpenSK
You should also see lines similar to the following in dmesg.
$ dmesg
...
[XXX] usb A-BB: new full-speed USB device number 00 using xhci_hcd
[XXX] usb A-BB: New USB device found, idVendor=1915, idProduct=521f, bcdDevice= 0.01
[XXX] usb A-BB: New USB device strings: Mfr=1, Product=2, SerialNumber=3
[XXX] usb A-BB: Product: OpenSK
[XXX] usb A-BB: Manufacturer: Nordic Semiconductor ASA
[XXX] usb A-BB: SerialNumber: v0.1
[XXX] hid-generic 0000:0000:0000.0000: hiddev0,hidraw0: USB HID v1.10 Device [Nordic Semiconductor ASA OpenSK] on usb-0000:00:00.0-00/input0If you have issues with the demo website, the following commands should help you understand whether OpenSK was installed properly.
When plugging in the USB key, you should see a similar line by using the ioreg
tool:
$ ioreg -p IOUSB
+-o Root  <class IORegistryEntry, id 0x100000100, retain 21>
...
  +-o AppleUSBXHCI Root Hub Simulation@14000000  <class AppleUSBRootHubDevice, id 0x100000a00, registered, matched, active, busy 0 (0 ms), retain 9>
    +-o OpenSK@14400000  <class AppleUSBDevice, id 0x100003c04, registered, matched, active, busy 0 (0 ms), retain 13>