This training will start with some slides which are in the gh-pages branch and online at https://ufresearchcomputing.github.io/git-training/#/
After going over the slides, we'll come back to this.
There are many great git and github.com tutorials out there. Here are some that I particularly like and have relied on in developing this training.
| Source | Notes |
|---|---|
| Software Carpentry Version Control with Git | This is a popular module in the Software Carpentry curriculum. It is designed to be a 3-hour instructor-lead training module but can be worked through on your own as well. |
| GitHub Learning Lab | This site has many lessons that use github.com and automation to walk users through hands-on exercises to learn aspects of git and github.com using the tools. |
| try.github.io | More github tutorials |
| education.github.com | Information on educational discounts--plans change regularly, check for current benefits. |
| classroom.github.com | For instructors wanting to use git in the classroom. Manages individual and group assignments, great tool for the classroom! Also, stickers! |
| pages.github.com | Information on using github.com to host web sites. |
| bitbucket.org | Github is not the only host of git repositories. Bitbucket is another popular host. |
| gitlab.com | Another git hosting option |
The git_setup.md page has some basic git and github configuration information.
This exercise is adapted from the Software Carpentry Version Control with Git training.
This exercise tells the tail of Wolfman and Dracula who are investigating if it is possible to send a planetary lander to Mars.
 Werewolf vs dracula
by b-maze / Deviant Art.
Mars by European Space Agency /
CC-BY-SA 3.0 IGO.
Pluto /
Courtesy NASA/JPL-Caltech.
Mummy
© Gilad Fried / The Noun Project /
CC BY 3.0.
Moon
© Luc Viatour / https://lucnix.be /
CC BY-SA 3.0.
While we can start creating the repository from scratch, I typically find it easier to create the repo online, clone it to the local computer (or cluster), add the content and push the changes.
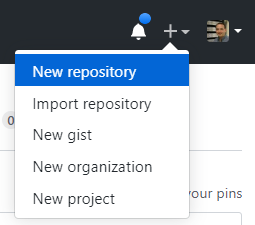
To create a new repo, on github.com, click the +-icon in the top right and select New repository:
Let's call this repo "planets" and leave the rest of the settings with the defaults and click "Create repository":
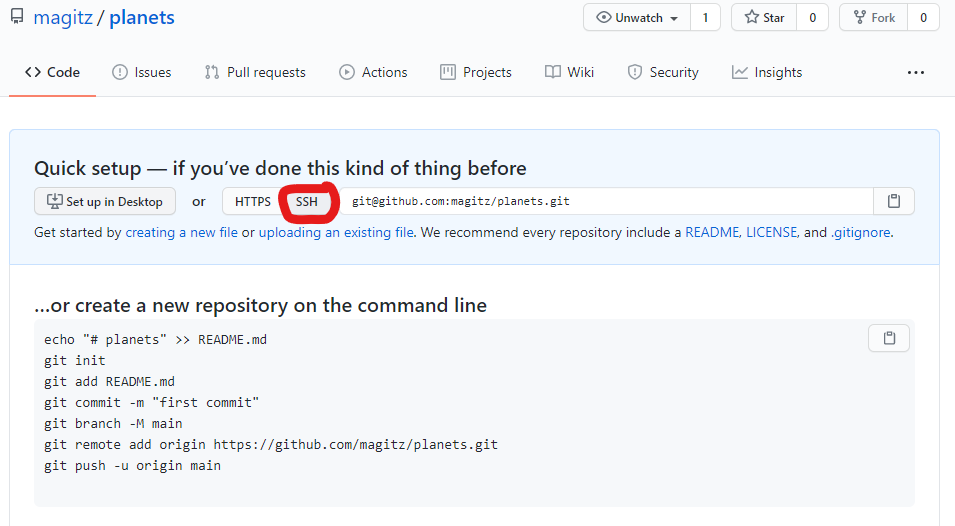
Note that I have my account setup for using SSH keys, so I clicked the "SSH" button circled in red below. If you have not setup SSH keys and two-factor authentication, you can leave the HTTPS button clicked.
To learn about setting up your github account to use ssh keys, check out the git setup page.
At this point, we have a repository, but there isn't anything in it. GitHub provides a number of options about what we can do from here. For this tutorial, I will use the "…or create a new repository on the command line" instructions.
I will do this in my account on HiPerGator, but you could do it on your computer (use the Terminal on Mac or Git Bash on Windows).
- Log into HiPerGator:
ssh [email protected](Replacinggatorlinkwith your GatorLink) - Make a directory for this repository:
mkdir planets- It is best if the directory name matches the repository name
- Change directories into this new folder:
cd planets - Copy the commands in the "…or create a new repository on the command line" box on the github.com page and then paste them into your terminal--Make sure you are in the
planetsdirectory:- These commands do a number of things:
echo "# planets" >> README.mdCreates the starts of the README.md document for the repo.git initTells git that this is a git repository and creates all the infrastructure to treat it as such.git add README.mdPlaces the README.md file in the staging area and tells git to track changes to this file.git commit -m "first commit"Commits the changes to the local repo. This records the changes and sets a point in history that can be recovered.git branch -M mainMakes sure that the main branch is calledmain. The default in some accounts is still the racially insensitive term 'master'.git remote add origin [email protected]:*magitz*/planets.gitThis connects the local repo to the one on GitHub that we made to start with. Note: My github username is magitz, you will need to use your github.com username. But that should be set when you copy/paste.git push -u origin mainThispushes our changes to GitHub.- If you have not setup SSH keys, you will be asked for your github.com username and password.
- These commands do a number of things:


