
** !!! Under Construction !!! **
The Nordic Semiconductor, Thingy:91 comes with an Bluetooth Low Energy interface, that allows to connect the Thingy:91 to a smartphone and send locally commands to the Thingy:91. That helps to analyze network situations even without valid cellular connectivity of your SIM card. |
 |
| The Circuit Dojo, nRF9160 feather v5 comes with a USB-C plug and if the smartphone is also equipped with USB-C, a simple USB-C to USB-C wire will do it. | 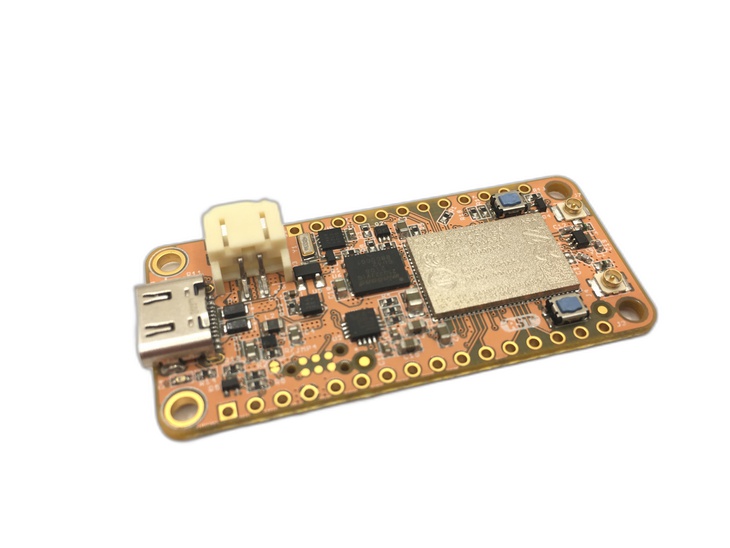 |
In the wild, the Bluetooth Low Energy interface is really very comfortable. If your device has only USB, that works also well, but is less comfortable. For some more sophisticated tests, e.g. adapting some lists on the SIM card, it may be easier to use a PC via a USB serial as well.
In order to enable this function, the uart-prj.conf must be used to build the app.
If you connect the Thingy:91 via USB to your PC, a "local USB drive" pops up.
 .
.
Edit the "Config.txt" file.
==========================================
  Nordic Thingy:91 Configuration options
==========================================
The parameters below can be changed at runtime.

NOTE: For changes to take effect,
safely disconnect (unmount) the drive and disconnect the USB cable.
==========================================
BLE_ENABLED=1
BLE_NAME=Thingy:91-2 UART
Enable BLE by changing the BLE_ENABLED=0 to BLE_ENABLED=1. Also consider to change the BLE_NAME=Thingy:91 UART to a rather unique name. Save your changes. When done, unmount the "local USB drive" and disconnect the USB cable.
In order to communication with the Thingy:91 via Bluetooth Low Energy you need a App which supports the Nordic BLE UART service.
{#android} For Android the "Serial Bluetooth Terminal 1.43" from Kai Morich works very well.
For iOS the "Bluefruit Connect" works.
If you want to use the USB serial, the "Serial USB Terminal 1.43" from Kai Morich works also very well for Android.
Install the App and connect the Thingy:91.
If you want to use a PC to communicate with the device via the USB serial interface, you will need a serial terminal to do so. For Microsoft Windows Tera Term works well, for Linux gtkterm is a good choice.
The most nRF9160 AT-commands are supported. Additionally some shortcuts and extra functions are available as custom commands. For simple usage, these custom commands uses simple characters and digits, instead of control characters as '+', '%' or '='. Type help and press the "send button"  :
:

(The screenshot shows only the list of commands in August 2023, the current list contains the current list of commands.)
If the smart phone App offers macros, add you favorite AT-commands or commands as macro.
Hopefully in the most areas the device should be able to connect to the network and to exchange data with the cloud. To test that, type send and press the "send button" :

If that doesn't work or if you want to see, which cellular networks are available at your location, then type scan and press the "send button"
The displayed list of networks will vary. As default, scan measure the currently already known channels. If you want to search for new channels, provide additional parameters. For such cases, a command comes also with a specific help. Type help scan and press the "send button" (see screenshot above).
To perform a scan with searching for new channels, use scan 5 <n> where n is the maximum expected number of networks. It will take a while. The provided parameters will become the new default. if you decide to use scan 5 6, the next execution of scan will also use these parameters.

In some case you may get aware, that your modem connects to a network with less signal strenght than other available networks. With the net command you see, to which provider (the PLMN) the device is connected and which technology is used, LTE-M or NB-IoT. If you want to test the communication with an other provider and/or switching the technology, use to con command. Also this command has a specific help.

To switch the network operator (e.g. 26202) and technology (m1 or nb), use con 26202 m1.

that requires some time. If the network operator rejects your SIM, you need to con to an other network operator again.
Sometimes it may be interesting to know the current location of the device. If the App doesn't use GPS, you still may be able to get a rough location using the base station as reference. There are several web-sites which offers a service for that. One service fro non-commercial usage is cellmapper.
You will need the PLMN and the tower code (Cell devided by 256), e.g. PLMN 24008 and Cell 28609803 resulting in 111757. Open the cellmapper and first set the PLMN using Menu -> Provider.

Then close the Provider Menu and open the Search Menu.

enter the calculated tower number and press <return>. I dialog will show up and, if the position of the tower is available, the entry of that tower will be shown.

Select the entry (eNB <tower number>) and a map will be opened showing the position of the base station.
If you have connected the device with the provider and technology you want to investigate, you may check with net, which functions are supported.
> net

I 60.855: Network: CAT-M1,roaming,Band 20,PLMN 26202,TAC 47490,Cell 52262913,EARFCN 6300
I 60.855: PDN: flolive.net,100.64.55.203
I 60.856: PSM: TAU 90000 [s], Act 0 [s], AS-RAI, Released: 2015 ms
I 60.856: !CE: down: 8, up: 1, RSRP: -108 dBm, CINR: -3 dB, SNR: -2 dB
I 60.865: Stat: tx 1 kB, rx 0 kB, max 748 B, avg 155 B
I 60.865: Cell updates 3, Network searchs 2 (8 s), PSM delays 0 (0 s), Restarts 0
I 60.865: Wakeups 1, 1 s, connected 11 s, asleep 0 s
OK
Each line may starts with a level ('E'rror, 'W'arning, 'I'nfo, or 'D'ebug), which is sometimes usefull for development. If the lines shows a 'b'usy, then the mode is currently executing a command and will reject further commands. After that level a relative time follows with seconds and milliseconds, e.g. "60.856".
That is followed by text, which explains itself a lot. E.g. CAT-M1, roaming, PLMN and so on.
For energy saving three function are available for cellular devices:
| Mode | Description | |
|---|---|---|
| RAI | Release Assistance Indication | Indicates to switch from RRC active to idle earlier than using a timeout |
| eDRX | Extended Discontinuous Reception | Used in RRC idle mode to reduce power consumption. Usually seconds to a couple of minutes |
| PSM | Power Saving Mode | Enables the device to go from idle into deep sleep. Usually hours or a couple of days |
The device usually tries to request RAI support. If not available, then the timeout is used. Therefore rai is always enabled and if supported, the net command shows that in the PSM information.
I 60.856: PSM: TAU 90000 [s], Act 0 [s], AS-RAI, Released: 2015 ms
In this case, AS-RAI (Access Stratum RAI) is supported from LTE-M network provider.
To disble RAI for tests, you may use
rai off
and with
rai on
RAI is requested again.
To request or disable eDRX, use the edrx command:
edrx 600
requests eDRX with about 600s. Only selected values are supported, the network will assign the next larger value, in this case 655s.
I 14.984: eDRX enable, 655.36 s
edrx off
disables eDRX again.
To request or disable PSM, the psm command is used.
I 78.096: > help psm:
I 78.096:   psm <act-time> <tau-time>[h] : request PSM times.
I 78.096:      <act-time>    : active time in s.
I 78.096:      <tau-time>    : tracking area update time in s.
I 78.096:      <tau-time>h   : tracking area update time in h.
I 78.096:   psm normal       : PSM handled by application.
psm 10 48h
requests psm with an active timeout of 10s and a tracking are update time of 48 hours or 2 days.
I 28.595: PSM enable, act: 10 s, tau: 50 h
...
I 29.265: PSM parameter update: TAU: 180000 s, Active time: 10 s
Also here, not all values are available and the next larger one is used.
psm normal
Switches the back to the application specific PSM parameters.
To update the application firmware, you classically have two options:
- using a Segger j-link
- using the McuBoot via USB serial
The downside of both options is, that you need to open the cover. For the McuBoot via USB serial you also need to start the device on the bootloader mode pressing and holding SW3 during switching on the power with SW1.
To simplify that process, that Cellular Explorer comes with an update command.
In order to use it, you need:
- the application binary (the
app_update.binin the<build>/zephyrfolder. The file is next to theapp_signed.hex, which is used for theNordic nRF Connect for Desktop / Programmer). - a serial terminal with XMODEM or XMODEM 1k support.
- If a
Thingy:91is used, please update the nRF52840 to versionthingy91_nrf52_connectivity_bridge_2023-03-02_8f26142b.hexor newer. Some older version show some instability which may break the file transfer. Caused by that, the transfers stucks and breaks the transmission from theThingy:91to your smartphone. You will even not see further messages from theThingy:91and a power on restart gets required. Thethingy91_nrf52_connectivity_bridgeis part of thePrecompiled application and modem firmwarepackage and can be downloaded from Nordic-Thingy-91/Download.
For Android both Serial Terminal 1.43 from Kai Morich are supporting XMODEM and may be used to update the firmware. That even works over Bluetooth Low Energy.
For Microsoft Windows Tera Term supports XMODEM, for Linux gtkterm and the unix sx shell command will do it.
The update is started using the update command.

This starts to erase the second flash slot to prepare that for the new application firmware. This takes about 10s and gives the time to start the XMODEM file transfer on the smartphone or PC.
For Serial Terminal 1.43 select the menu on the upper left, next to the trash can (see red rectangle in the screenshoot below) and then the "Upload File" submenu. The file dialog appears.

Select Xmodem 1k as protocol and the app_update.bin as file. Press OK and the file upload will start, when the 10 seconds are over.

Sometimes the 10 seconds are too short to select the file. Then just open the file dialog via the menu and "Upload File" submenu. Select the file at rest and choose the Xmodem 1k as protocol. Press OK and then CANCEL in the "Upload File" field, which appears at the top below the tools-line. That will set this values as default and the next time the file dialog is shown you may just press OK.
During the upload the Serial Terminal 1.43 shows some ^F indicating the progress. Finally, when all succeeds, the device reboots to apply the update. The reboot will take a while copying the firmware from the download slot to the active slot and the old firmware to that download slot. After that the device continues to start the new application firmware. To prevent the device from being bricked, the device verifies the application firmware with the first successful data exchange. If the device reboots again before that, the old firmware is actived again. For that, don't apply a firmware update with low network coverage.
Updating the firmware with linux is tricky. It requires two applications, gtkterm and the unix sx shell command. Both will access the serial device, e.g. "/dev/ttyACM0".
Connect the device via USB. Then start the gtkterm and open the "Configuration/Port" dialog.

Select the serial port the device is connected to and also 115200 as "Baud Rate". Close the dialog again. Then select "Configuration/Local Echo" and "Configuration/CR-LF-Automatic". Test the configuration with the command "at" ot "dev".

Then open a command shell on the linux PC. Prepare to start the xmodem application with:
sx -k build_nrf9160dk_nrf9160_ns/zephyr/app_update.bin < /dev/ttyACM0 > /dev/ttyACM0
-k enables to use blocks with 1024 bytes instead of 128 bytes. The path to the "app_update.bin" follows. To use the serial/USB connecion redirect stdout/stdin with < /dev/ttyACM0 > /dev/ttyACM0
Once sx executes, the gtkterm must not be used, because that may cause conflicts on the serial device. Therefore first start the update on the device in the gtkterm with update:

and then within the 10s the sx command on the linux command shell.
sx -k build_nrf9160dk_nrf9160_ns/zephyr/app_update.bin < /dev/ttyACM0 > /dev/ttyACM0
Sende build_nrf9160dk_nrf9160_ns/zephyr/app_update.bin, 2395 Blöcke:Starten Sie nun Ihr XMODEM-Empfangsprogramm.
Ymodem Sektoren/Kilobytes gesendet: 1928/241k
When the transfer starts, sx will report the progress and also when finished. And the device will report "ready" as well.

** !!! Under Construction !!! **