The THETAKey T101 JavaCard is built around the concept of secure input and display of critical security information. The protection of input and display of critical information is important as the smart card serves as a Trusted Cryptographic Device and in a conventional smart card, the PIN or password for accessing the cryptographic keys are entered via an untrusted computer's keyboard. A compromised smart card PIN or password could allow the surreptitious use of the PIN or password by lurking malware to access the smart card's cryptographic key operations without the card holder's suspicion.
An enhancement to the security model of a smart card would be to use a card reader with PINpad embedded onto the card reader. The advantage of such an enhancement would only be rather minimal as there are many techniques that an attacker may attempt to 'shim the card reader' with a low cost listening device sitting between the card and the card reader to intercept its communication and also to install overlay PINpads to capture PIN entry over the physical PINpad.
Displaying of critical security information is a critical aspect that many smart card system have failed to properly protect. An example is in the setting of a Blockchain transaction, the computer screen might display a transaction address but the transaction might have been corrupted with the transaction address swapped out for a malicious addres. The THETAKey T101 smart card could allow the actual transaction transmitted to the T101 smart card for signing to display the transaction address and transaction amount for approval which could be checked and confirmed against multiple sources independently before approving and digitally signing a transaction.
Most conventional PINpad with embedded screen would need to be fed with transaction information for display from a possibly compromised computer rather than from the smart card itself and a tampered PINpad could be made to display the wrong information.
The THETAKey T101 comes with an embedded keypad and E-Ink screen as additional pheripherals. Although the additional embedded keypad and E-Ink screen may prevent the stealing of PIN and password by allowing them to be entered from the embedded keypad and the embedded E-Ink screen opens up the possibility of having a secure display for critical information, such additional secure display and input protection would not be fully extended to possibly malicious applets installed on the card if unfettered access to the E-Ink screen and embedded touch capactive keypad were to be given.
A necessity for prevent both external threats and internals threats to secure display of information and secure input would require a strong Security Model with a Secure UI Session that implements the Security Model.
The Security Model for T101's Secure UI Session consists of a two stepped approach. The first step in the approach taken by T101 is to correctly display the origin of the UI Session. The correct display of the origin of the UI Session is critical for allowing end users to identify if certain messages displayed on the UI Window is from a genuine source. The second step of the approach is to isolate each UI Window call to their respective Security Context.
The restrictive nature of the UISession calls and the use of input and display restrictions (i.e. ASCII character restrictions) to certain areas of the screen aids in the creation of a Secure Display to allow rendering of security critical information that would be visible to users for security verification.
The native access to the keypad and screen are forbidden and in their place, a unified access model using UI Windowing types allow the careful arrangement and display of information. The keypad access is not directly given to any particular Security Context. Only the Key Manager has the direct and full access to the keypad and screen. The result of the UI Sessions are the only output that are passed back to the calling Security Context thus ensuring that there is no chance of a Security Context having the capability of intercepting keystroke inputs into the embedded T101 keypad or to hijack the screen session and to display whatever information an attacking applet might want.

The image below shows the different major components of a UI Window.

-
Security Session Indicator - Uses a single character to represent the origin of the Window rendering call. An Indicator set to
0indicates that the Session's Windowing call originates from the KeyManager itself. The KeyManager has the highest trust level in the UI Security Model. The first registered AOC client applet will be assigned1, the second applet will be2and subsequently numberd in an increasing order with a maximum of9thus there will only be a maximum space of 9 applets that can be registered if enabled to the maximum number.A special applet for managing Global users will be assigned
FwhichAtoFare reserved for special use applets. -
Title - A non-symbolic printable ASCII character set with a maximum of 9 characters to be used as the current window's title.
-
Secure Session Logo - The Secure Session Logo is a special logo that indicates that the windowing call's session will return an output that will be processed in a highly trusted environment (KeyManager). Windowing calls that return possibly sesnitive inputs back to the originating client applets instead of the KeyManager for processing of inputs will not be considered a Secure Session. A Secure Session requires the processing (i.e. PIN/Password entry) to be handled by the KeyManager and actions (i.e. PIN/Password checking) to be directly handled by the KeyManager instead of passing the output back to the calling applet for processing.
The reason is that the calling applet maybe malicious (i.e. spoofing a Windowing call) that may attempt to steal card holder credentials.
Card developers may want their users to ignore the Secure Session logo if they have reason to believe that their applets are trusted and have been hardened sufficiently against credential leakages.
-
Battery - Battery logo indicates its current power status. A battery logo with a lightning symbol would indicate a T101 card that is currently charging via the contact chip.
-
Content Pane - Content Pane is the area whereby windowing contents are displayed. Contents maybe filtered or structured according to the type of windowing calls being utilized.
-
Control Pane is a status bar where additional UI controlling mechanisms may be displayed. Some UI controlling mechanisms can have interactive purposes (i.e. virtual keypad's mode changing and editing controls). Content within the Control Pane is directly controlled by the KeyManager and displayed according to the caller's Windowing type.
The basic virtual keypad layout:

Below is a list of UI Windowing types:
-
UI_TYPE_TEXT screen control. A basic text display window that accepts either an OK or Cancel button touch via the
OKorCbuttons.If the Control Pane area displays a
[1\2]or[2\2], user may use the upwards and downwards button for scrolling between pages of the text windowing screen.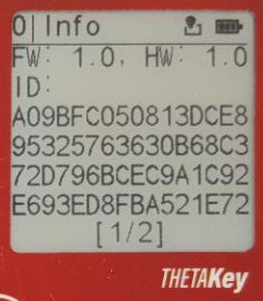
-
UI_TYPE_QR screen control. Displays a single QR code that accepts either an OK or Cancel button touch via the
OKorCbuttons. Page scrolling is not possible.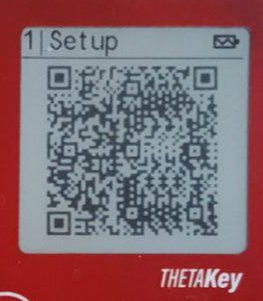
-
UI_TYPE_LIST screen control. Displays a list of options for single item selection. User may use the upwards and downwards button for scrolling between items and for selecting an option, touch the
OKbutton. For cancelling the session, touch theC(Cancel) button.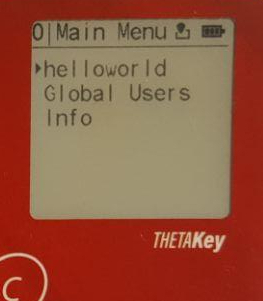
-
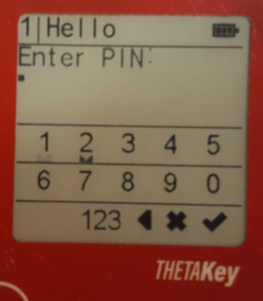
UI_TYPE_INPUT screen control. Displays a text input window. The upwards button jumps the keypad selection cursor between keypad 'segments' to allow faster typing. The downwards button moves the cursor incrementally instead for more precise keypad selection.
The
OKbutton is to select the cursor's virtual keypad input option while theC(Cancel) is used to enter and exit 'Preview' mode. Preview mode allows one to screen through all the entered data using the upwards and downwards button but no data can be entered while in 'Preview' mode.Exiting the 'Preview' mode requires pressing the
Cbutton again.-
PIN mode
-
Alphabet mode. For capital alphabets, the Control Pane would display
ABCand for small letters,abcwould be displayed on the Control Pane instead.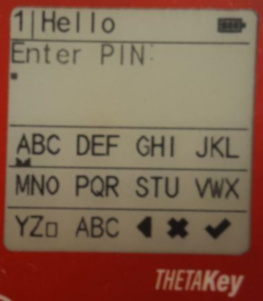
-
Hexadecimal mode. Allows the entry of ASCII-fied hexadecimal input. The Hexadecimal input mode would have a
HIR(Hex Input Error) status in the Control Pane if there is invalid hexadecimal inputs being chosen.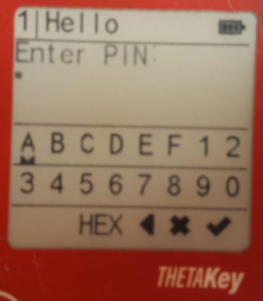
-
ASCII Symbols mode. Allows the entry of printable ASCII symbols.
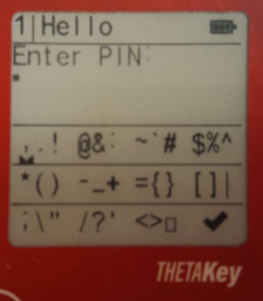
Note: The Symbol virtual keypad does not have the 'Mode Change', 'Backspace' and 'Cancel' virtual keys as it relies on other virtual keypad types to allow backspacing inputselecting 'Cancel' options and changing modes.
-
Preview mode. Preview mode can be entered from any keypad types when the
Ctouch button is activated. The Control Pane region will reflect either aTOP,REAorBOTstatus. TheTOPstatus indicates that the currently viewed text is at the topmost of the content and there are more data available for viewing.The
BOTstatus indicates that the currently viewed text is at the bottommost of the text with no more content available for viewing.The
REAstatus indicates that the currently viewed text is in the middle of the content and the user could choose to scroll up or down the text content.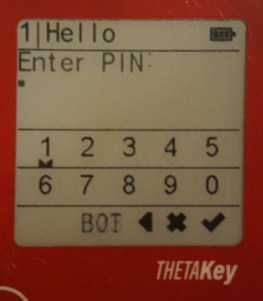
-


Keypad input mode switching utilizes a deterministic workflow as shown in the chart below.
Each mode has its own switching path with exception of the Hexadecimal input mode which cannot switch into other mode and can only be called explicitly.

There are 5 types of UISession modes as listed below.
-
UI_TYPE_T_USER_LIST - This UI window type shows a trusted User List originating from the Key Manager for selection of users.
-
UI_TYPE_TEXT - This UI window type allows the display of printable ASCII information with a capacity of up to 64 characters. It renders across two pages marked at the bottom of the screen with
[1/2]for the first page containing the first 32 characters and[2/2]for the last page containing the last 32 characters for display. -
UI_TYPE_QR - This UI window type allows a QR code to be displayed with a holding capacity of 128 bytes or 64 ASCII characters to be displayed dynamically within a QR code.
-
UI_TYPE_INPUT - This UI window type allows the render of an Input Window for accepting both sensitive and plain input types. Sensitive inputs (i.e. PIN codes) are obfuscated with
*characters. This UI window allows displaying a short 16 character printable ASCII message on the first line (i.e. prompting messages) for users to understand the context of data entry.The UI_TYPE_INPUT windowing mode allows the use of 5 types of keypad modes namely:
- KEYPAD_PIN_MODE (
0x01) - PIN entry or numerical digit entry - KEYPAD_ALPHA_MODE (
0x02) - Alphabet (captial letters) entry - KEYPAD_ALPHA_SMALL_MODE (
0x03) - Alphabet (small letters) entry - KEYPAD_HEX_MODE (
0x04) - Hexadecimal mode entry - KEYPAD_SYM_MODE (
0x05) - Printable ASCII characters entry
The UI_TYPE_INPUT windowing mode has a workflow that follows the progression of selection of the types of keypad modes.
The UI_TYPE_INPUT window is also capable of restricting switching between different types of keypad modes if necessary using the following restriction flags applied to the
uiSubMode2parameter when calling over theuiSessionmethod via the Open API.- KEYPAD_RESTRICT_PIN_ONLY - Restricts a keypad to only the PIN keypad (the starting keypad mode must be of KEYPAD_PIN_MODE)
- KEYPAD_RESTRICT_ALPHA_ONLY - Restricts a keypad to KEYPAD_ALPHA_MODE mode only with the starting keypad also in KEYPAD_ALPHA_MODE mode.
- KEYPAD_RESTRICT_SYM_ACCESS - Prevents reaching the KEYPAD_SYM_MODE keypad in certain circumstances when there is a requirement to prevent entry of ASCII symbols.
- KEYPAD_PIN_MODE (
-
UI_TYPE_LIST - This UI window allows the generation of an option list that allows looping of the selection cursor upon reaching the top or bottom of the list or the breaking of looping of the selection cursor when the cursor has reached the top most or bottom most of the list. Only a single option maybe seelcted using the cursor.
The list may display a maximum of 6 items and each item may contain a 15 character ASCII printable item.
A non-looping list can be used to create an illusion of a very long list with item count exceeding 6 items. This could be done by detecting that the cursor have reached the bottom of the list and then load another 6 new items to the list thus creating the illusion of a very long list of items for selection.
Registered applets provides an applet or a user controllable entry point into the world of the Secure UI via the use of uiSession method call from the T101 Open API.
The uiSession() method takes in 4 parameters namely the uiType parameters for specifying the type of UI Windowing session to be used followed by four parameters specific to different types of UI Windows namely uiSubMode, uiSubMode1, uiSubMode2 and uiSubMode3.
Global users may want to manage their credentials from the Front Panel via directly powering up the T101 card when it is not attached to a smart card reader.
The convenience of managing Global users directly from the Front Panel allows the Global user to more conveniently to perform limited credential management while on the move without reliance on a card reader and a host computer or smartphone.
The options available for Global users to manage their own credentials while on the move without relying on a smart card reader and a host computer or smartphone are listed below:
- Changing of Global user's userame.
- Managing Front Panel option - allows Global user to be de-listed from the Front Panel menu by disabling Front Panel management.
- Managing Authentication Secret (change PIN/Password).
- Inbox for showing any Applet Object Container invitation to join and become a member.
- Delete option to delete and destroy a Global user and all its accompanying associations in all available Applet Object Container instances including the Global user's own object store which will be zeroized and destroyed while on the move.
Outside of using the Front Panel of the T101 card in standalone mode (withouot a connected card reader and host device), the Global user will have access to a Global User Management applet AID: 4B4D314755) that will provide the ability to manage Global users and their object containers in a more wholistic manner.
An article for managing Global users via the Global User Management applet would be available.
The ability for Global users to be able to "become invisible" from Front Panel management gives the Global user the option to have increased privacy in the event that attempts are made to discover Global users.
One example of the usefulness of disabling Front Panel management for a Global user is a National Identity card with an administrator embedded into the card that the Card Issuer does not want the Card Holder to discover and to meddle with. The Card Administrator may have the Global user profile put into "Front Panel disabled" mode and then shared across multiple applets (i.e. Driver's License applet, Transit Ticketing applet and many more) while still enjoying the benefits of only needing a single Global user to administer all the different applets from participating "Reliance Parties" (i.e. Transit company or Government agencies).
Global users by themselves do not have direct access to the uiSession method and thus have no ability to generate their own arbitrary Secure UI Windowing sessions.
Front Panel management of an Applet Object Container is much more limited and simpler than a Global user's Front Panel management interface with the sole function of listing and deleting non-Administrative users on the fly.
Due to the Applet Object Container gaining access to a feature rich Open API, there is very little benefit for adding more features to the Applet Object Container's Front Panel Management Menu which could be easily execute from applet code execution calls.
Allowing Applet Object Containers with the ability to list and delete non-administrator users with an authorized administrator gives the Trusted Service Provider the ability to quickly manage users on the fly when the necessity arises as a secondary option.
Administrators that are "hidden" Global users (with their Front Panel managemnt disabled) may manually enter their username and authenticate themselves before administering to the Applet Object Containers on the fly.