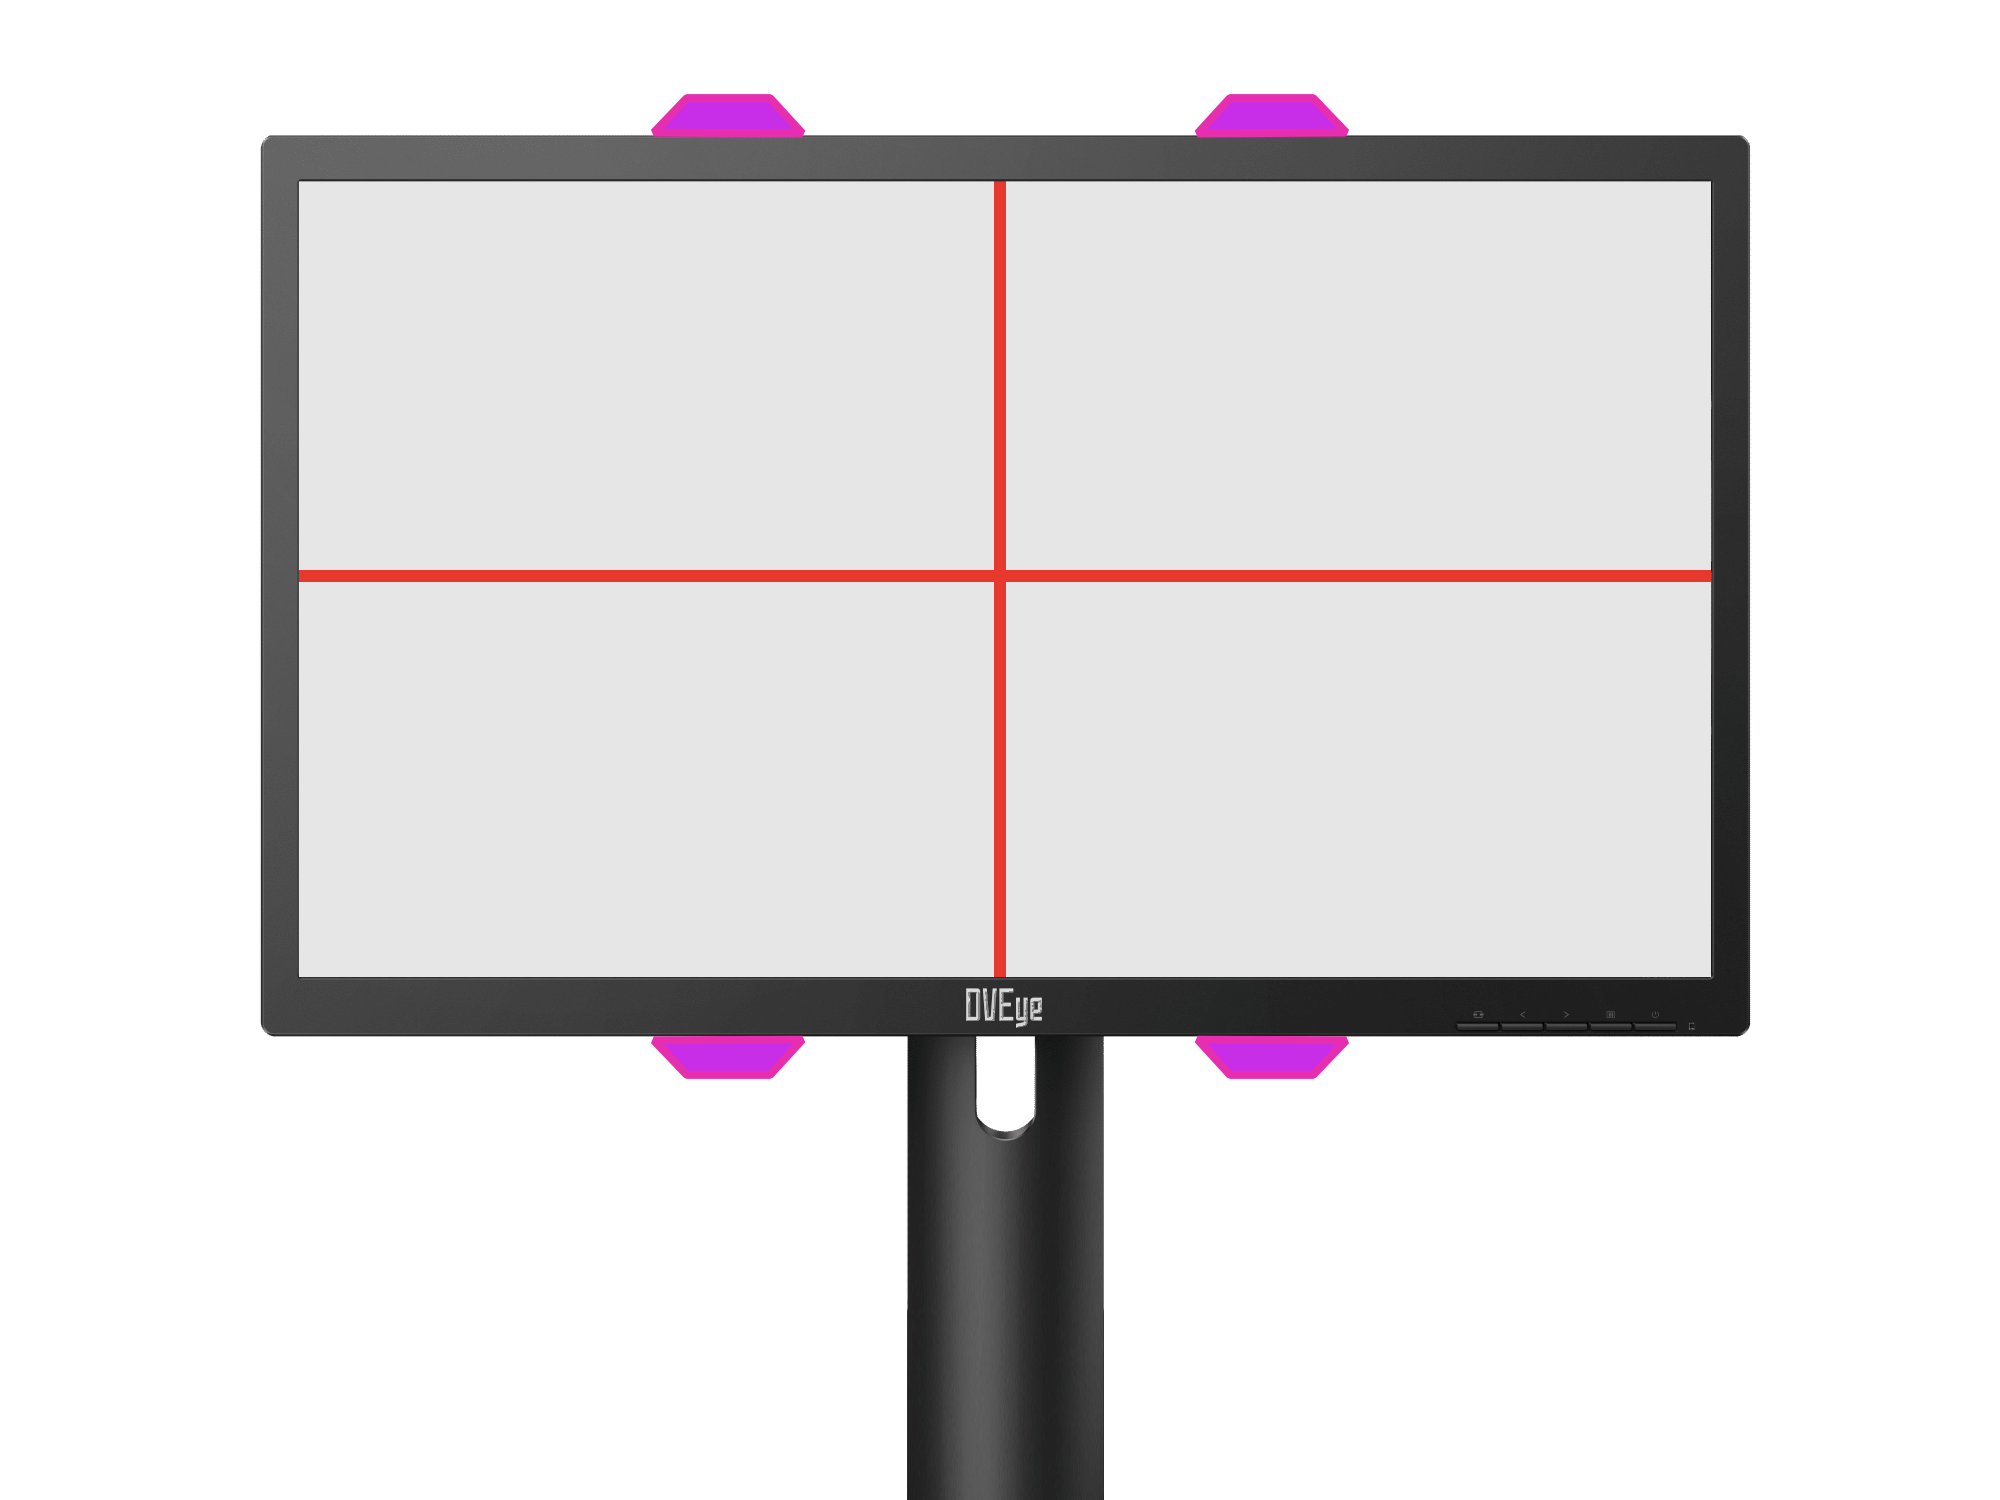
The IR emitters must be arranged with 2 emitters on opposite edges of your screen/monitor forming a rectangle or square. For example, if you're playing on a small PC monitor, you can use 2 Wii sensor bars; one on top of your screen and one below. However, if you're playing on a TV, you should consider building a set of high power black IR LEDs and arranging them like (larger) sensor bars at the top and bottom of the display.
For visual reference, the purple/pinkish trapezoids are how your emitters should be placed on the display:
Since v4.0 (L.G.A Force), the gun is configured through the companion GUN4ALL-GUI application. The gun must be plugged in prior to starting the application.
When the board's COM port is selected in the app, the gun will go into a Docked state - this is what allows for realtime configuration of pin mappings, settings, changing between and signaling calibration profiles, and testing button inputs and force feedback devices. The camera will be disabled while in this mode.
When flashing a new board with GUN4ALL v4.0 (L.G.A Force) or newer, or after clearing the EEPROM, the first time it's plugged in will prompt for the user to pull the trigger button to start initial calibration - see the How to Calibrate section for more information. If your build is using custom pins, or you would like to change any settings at this point, the gun can be docked to the G4A-GUI and configured prior to starting initial calibration.
The light gun operates as an absolute positioning mouse (like a stylus!) until the button/combination is pressed to enter pause mode. The Arduino serial monitor (or any serial terminal) can be used to see information while the gun is paused and during the calibration procedure.
Note that the buttons in pause mode (and to enter pause mode) activate when the last button of the combination releases. This is used to detect and differentiate button combinations vs a single button press.
- Note: At its peak, the mouse position updates at 209Hz, or roughly every ~4.8ms, so it is extremely responsive.
The gun has the following modes of operation:
- Normal - The mouse position updates from each frame from the IR positioning camera (no averaging)
- Averaging - The position is calculated from a 2 frame moving average (current + previous position)
- Averaging2 - The position is calculated from a weighted average of the current frame and 2 previous frames
- Processing - Test mode for use with the GUI (this mode is prevented from being assigned to a profile)
The averaging modes are subtle but do reduce the motion jitter a bit without adding much if any noticeable lag.
- Trigger: Left mouse button
- A: Right mouse button (In low buttons mode, Start if pressed offscreen)
- B: Middle mouse button (In low buttons mode, Select if pressed offscreen)
- C/Reload: Mouse button 4
- Pump Action (Cabela's or alike): Right mouse button
- Start: 1 key
- Select: 5 key
- Up/Down/Left/Right: Keyboard arrow keys
- Pedal: Mouse button 5
- C + Start: Esc key
Pause mode can be entered by either pressing C + Select by default, or holding the trigger plus the A Button with no IR points in sight if hold-to-pause is enabled (pointing the gun towards the ground is recommended).
- A, B, Start, Select: select a profile
- Start + Down: Normal gun mode (averaging disabled)
- Start + Up: Normal gun with averaging, switch between the 2 averaging modes (use serial monitor to see the setting)
- B + Down: Decrease IR camera sensitivity (use a serial monitor to see the setting)
- B + Up: Increase IR camera sensitivity (use a serial monitor to see the setting)
- C/Reload: Exit pause mode
- C/Reload + A: Toggle Offscreen Button Mode
- Left: Toggle Rumble (when no rumble switch is detected)
- Right: Toggle Solenoid (when no solenoid switch is detected)
- Trigger: Begin calibration
- Start + Select: save settings to non-volatile memory (EEPROM or Flash depending on the board configuration)
- A: Navigate Left
- B: Navigate Right
- Trigger: Select option
- C: Exit pause mode
- Holding A or B for half the duration of the hold-to-pause time (so ~2s by default) will also exit the simple pause menu. Available options in simple pause menu are as follows, from first option to last before rolling back:
- Calibrate current profile (always the initial option)
- Switch profiles (submenu)
- Select from profile 1-4 using the navigation buttons/trigger to select, or press C to back out.
- Save settings to non-volatile memory
- Toggle Rumble (when no rumble switch is detected)
- Toggle Solenoid (when no solenoid switch is detected)
- Send escape key signal to the PC
- Press the C Button/Reload (or hold Trigger + A while no IR points are in sight if hold-to-pause is enabled) to enter pause mode.
- In Hotkey mode, press a button to select a profile unless you want to calibrate the current profile.
- Pull the Trigger (or select "Calibrate current profile" in simple pause) to begin calibration.
- Shoot the pointer at center of the screen and press the trigger while keeping a steady aim.
- The mouse should lock to the vertical axis. Use the A/B buttons (can be held down) to adjust the mouse vertical range. A will increase and B will decrease. Track the pointer at the top and bottom edges of the screen while adjusting.
- If using a gun with only one button (i.e. a Sega Virtua Gun/Saturn Stunner), pressing A/the not-trigger button while the mouse is at the edge of the display will decrease the vertical range.
- Pull the Trigger for horizontal calibration. The mouse should lock to the horizontal axis. Use the A/B buttons (can be held down) to adjust the mouse horizontal range. A will increase and B will decrease. Track the pointer at the left and right edges of the screen while adjusting.
- Same logic for single-button guns applies here; pressing A while the pointer is at the edge of the screen will decrease the range.
- Pull the Trigger to finish and return to run mode. Values will apply to the currently selected profile in memory.
- After confirming the calibration is good, enter pause mode and press Start and Select to save the calibration to non-volatile memory. These will be saved, as well as the active profile, to be restored on replug/reboot.
Calibration can be cancelled during any step by pressing Button C/Reload or Start or Select. The gun will return to pause mode without saving if you cancel the calibration.
- During center calibration, press A to skip this step and proceed to the vertical calibration
- During vertical calibration, tap Up or Down to manually fine tune the vertical offset
- During horizontal calibration, tap Left or Right to manually fine tune the horizontal offset
The IR camera sensitivity can be adjusted. It is recommended to adjust the sensitivity as high as possible. If the IR sensitivity is too low then the pointer precision can suffer. However, too high of a sensitivity can cause the camera to pick up unwanted reflections that will cause the pointer to jump around. It is impossible to know which setting will work best since it is dependent on the specific setup. It depends on how bright the IR emitters are, the distance, camera lens, and if shiny surfaces may cause reflections.
A sign that the IR sensitivity is too low is if the pointer moves in noticeable coarse steps, as if it has a low resolution to it. If you have the sensitivity level set to max and you notice this then the IR emitters may not be bright enough.
A sign that the IR sensitivity is too high is if the pointer jumps around erratically. If this happens only while aiming at certain areas of the screen then this is a good indication a reflection is being detected by the camera. If the sensitivity is at max, step it down to high or minimum. Obviously the best solution is to eliminate the reflective surface. Test Mode can help daignose this problem since it will visually display the 4 IR points.
The sketch is configured with 4 profiles available (with up to 8 possible if desired, correlating to the d-pad). Each profile has its own calibration data, run mode, and IR camera sensitivity settings. Each profile can be selected from pause mode by pressing the associated button (A/B/Start/Select), or selecting them via the profiles submenu in simple pause menu.
Introduced since v1.3 (Serious Intensity) is the ability to toggle hardware features at runtime, even without hardware switches!
While in pause mode, the toggles are as follows (color indicating what the board's builtin LED lights up with):
- Button C/Reload + Button A: Offscreen Button Mode (White) - For older games that only activate a reload function with a button press, this enables offscreen shots to send a right mouse click instead of a left click. If a working motor is installed, it will pulse on and off when enabled.
- Button C/Reload + Button B: Rapid Fire Speed (Magenta) - Sets the speed of the rapid fire (when autofire is enabled) by cycling between three different levels. When toggled, the solenoid will fire five times with the selected setting.
- Left D-Pad: Rumble Toggle (Salmon) - Enables/disables the rumble functionality. When enabled, the motor will engage for a short period.
- Right D-Pad: Solenoid Toggle (Yellow) - Enables/disables the solenoid force feedback. When enabled, the solenoid will engage for a short period.
These settings are not saved in profiles stored in Non-Volatile Memory, but the default state of each function can be set in the sketch hardware options section.
The calibration data, profile settings, and extended gun options like custom pins mapping and rumble intensity, can be saved in non-volatile memory by pressing Start + Select (by default). The currently selected profile is saved as the default for when the light gun is plugged in - gun settings applies to all profiles.
For ItsyBitsy M0 and M4 boards, the external on-board SPI flash memory is used; for ATmega32U4 and RP2040, the EEPROM is used (in the 2040's case, a simulated EEPROM provided by the USB stack that actually writes to program flash space, but is considered EEPROM nonetheless).
The Test Mode is intended for use with GUN4ALL-GUI v1.1 (Inuwaka), which contains a reimplementation of the SAMCO Processing sketch. Test Mode lets you visually see the IR points as seen by the camera. This is very useful for aligning the camera when building your light gun, and for testing that the camera tracks all 4 points properly, as well as observing possible reflections.
Introduced in v2.0 (That Heart, That Power), when enabled, the gun will automatically hand off control to an instance of Mame Hooker that's connected once a start code has been detected! If available, the onboard LED will change to a mid-intensity white to signal serial handoff mode (unless any LED events trigger it to change, which will follow those thereafter).
If you aren't already familiar with Mame Hooker, you'll need compatible inis for each game you play and the gun's COM port should be set to match the player number (COM1 for P1, COM2 for P2, etc.)! COM port assignment can be done in Windows via the Device Manager, or Linux via settings in the Wine registry of the prefix your game/Mame Hooker is started in. Consult the wiki page on MAMEHOOKER for more information! For Linux users wanting to use their gun with native emulators' force feedback (currently MAME, Flycast, or their RetroArch ports), consider trying QMamehook.
Warning
Serial Handoff mode will cause INSTABILITY if GUN4ALL is built using an Arduino core without a patched TinyUSB - as of writing, upstream has a fatal bug where a large amount of serial data causes the board to unpredictably lock up, requiring physically unplugging from the PC. This has been fixed using a forked RP2040 core and is used in official binaries, but be mindful of this if you're deploying customized builds. For more information, see adafruit/Adafruit_TinyUSB_Arduino#293
If you intend to use multiple GUN4ALLs, you'll want to change what the board reports itself as.
These are known as the USB Implementer's Forum (USB-IF) identifiers, and if multiple devices share a common display name and/or Product/Vendor ID, apps like RetroArch and TeknoParrot that read individual mouse devices will get VERY confused.
Since v4.0 (L.G.A Force), these parameters can be saved to and loaded from EEPROM if a customized Device Product ID (PID) & Device Name are detected. These can be configured from the G4A-GUI.