In this section, we would configure a custom Identity Provider which has the users/employees to login to the SAP Business Technology Platform subaccount. Depending on your global account, you might see the default identity provider, which is configured automatically. This cannot be deleted, it can only be enabled or disabled.
Persona: Cloud Administrator
An SAML service provider interacts with an SAML 2.0 identity provider to authenticate users signing in by means of a single sign-on (SSO) mechanism. In this scenario, the SAP UAA service (User Account and Authentication Service) acts as a service provider representing a single subaccount. To establish trust between an identity provider and a subaccount, you must provide the SAML details for web-based authentication in the identity provider itself. Administrators must configure trust on both sides, in the subaccount of the service provider and in the SAML identity provider. Here we assume that the customer has purchased a tenant for SAP Cloud Identity Authentication service.
There are two ways to establish a trust between the IDP and your SAP BTP account:
-
Recommended option: Automatic trust using Open ID Connect (OIDC) --> see this guide.
-
Setup manual trust with SAML 2.0 --> see the following steps:
You can manage trust configurations for a global account only if you have created the global account or if you are an SCP Administrator of the account and you are an Administrator in your company's Identity and Authentication Tenant(SAP IAS).
-
Select your Subaccount.
-
Choose Security > Trust Configuration from left pane.
-
Choose SAML Metadata button and download the XML file.

-
Now, open your company's Identity and Authentication Tenant (SAP IAS) and login to the same.
-
Select Application & Resources > Applications from left pane.
-
Choose Create.

-
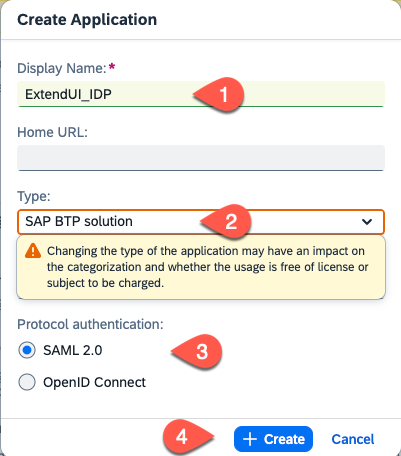
Enter the Display Name for example ExtendUI_IDP, choose SAP BTP solution as Type and the SAML 2.0 protocol. Select Create.
-
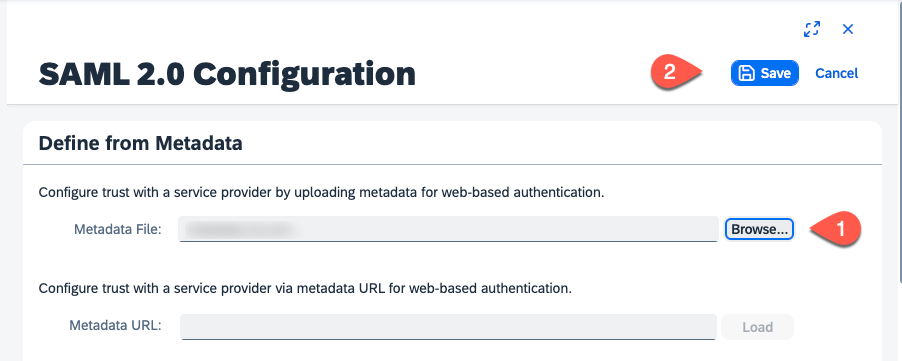
In the Trust section choose SAML 2.0 Configuration

-
Choose Browse to upload the Metadata file of your SAP BTP subaccount. Choose the metadata xml file downloaded from previous step number 3.
-
Choose Save button.
-
Choose Subject Name Identifier

-
Choose basic attribute as E-mail and Choose Save button.

-
Select Attributes. In the Self-defined Attributes section, select Add and add a new entry Groups with the source Identity Directory and value Groups. Save your settings.

-
In the Home view select User Groups

-
Create an Extension Developer group.
- Select Create
- Set Name = ExtensionDeveloper
- Set Display name = ExtensionDeveloper
- Enter a description
- Press Create

-
Create an Extension Administrator group. Same steps as before.
- Select Create
- Set Name = ExtensionAdministrator
- Set Display name = ExtensionAdministrator
- Enter a description
- Press Create
-
Map the group to a user which should have the UX extension developer role.
- Choose User Management
- Select the user you want to assign the developer role
- Choose User Groups
- Select Assign Groups

-
Check the ExtensionDeveloper group and choose Save.

Repeat the last 2 steps for all user that needs the extension developer privilege.
-
Repeat steps 18 and 19 by mapping the ExtensionAdministrator group to all users that should have the UX extension administrator role.


You have your company's SAML 2.0 identity provider, for example, SAP Cloud Identity Authentication service. This is where your business users are stored. You must establish a trust relationship with your custom SAML 2.0 identity provider in your subaccount in SAP BTP. The following procedure describes how you establish trust in the SAP Cloud Identity Authentication service.
-
Choose Application & Resources > Tenant settings.
-
Select SAML 2.0 Configuration.

-
Choose Download Metadata File button.

-
Now, login again to your CF subaccount and choose Security > Trust Configuration.
-
Choose New Trust Configuration button.

-
Choose Upload to upload metadata file. Choose the Tenant metadata file downloaded from previous step.
-
Enter Name. For eg., ExtendUI-Tenant

-
Choose Save.
-
Now assign the created Identity Provider groups with the role collections of your subaccount in SAP BTP by following the steps Map IDP Groups with Role Collection.


Check the official SAP Help documentation.