
Kubernetes is an open-source platform for automating the deployment, scaling, and management of containerized applications. It is a popular tool for container orchestration and provides a way to manage large numbers of containers as a single unit rather than having to manage each container individually.
Kubernetes has become an essential tool for managing and deploying modern applications, and its importance lies in its ability to provide a unified platform for automating and scaling the deployment, management, and scaling of applications. With Kubernetes, organizations can achieve increased efficiency and agility in their development and deployment processes, resulting in faster time to market and reduced operational costs. Kubernetes also provides a high degree of scalability, allowing organizations to scale their applications as their business grows and evolves easily.
Additionally, Kubernetes offers robust security features, ensuring that applications are protected against potential threats and vulnerabilities. With its active community and extensive ecosystem, Kubernetes provides organizations with access to a wealth of resources, tools, and services that can help them improve and enhance their applications continuously. Overall, the importance of using Kubernetes lies in its ability to provide a flexible, scalable, and secure platform for managing modern applications and enabling organizations to stay ahead in a rapidly evolving digital landscape.
To use Kubernetes, you need to set up a cluster, which is a set of machines that run the Kubernetes control plane and the containers. You can set up a cluster on your infrastructure or use a cloud provider such as Amazon Web Services (AWS), Google Cloud Platform (GCP), or Microsoft Azure.
To run your application on Kubernetes, you need to package it into one or more containers. A container is a standalone executable package that includes everything needed to run your application, including the code, runtime, system tools, libraries, and settings.
Kubernetes uses manifests, which are files that describe the desired state of your application, to manage the deployment and scaling of your containers. The manifests specify the number of replicas of each container, how they should be updated, and how they should communicate with each other.
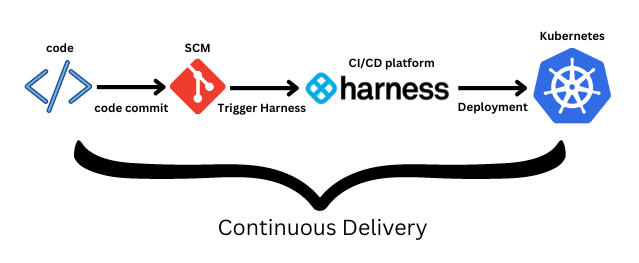
Push your application code to an SCM platform such as GitHub.
Use a specialised CI/CD platform such as Harness to automate the deployment of your application. Once you set it up, done; you can easily and often deploy your application code in chunks whenever a new code gets pushed to the project repository.
Once you deploy your application, you need to expose the application to the outside world by creating a Service with a type of LoadBalancer or ExternalName. This allows users to access the application through a stable IP address or hostname.
After your application is deployed, you can use the kubectl tool to monitor the status of your containers, make changes to the desired state, and scale your application up or down.
These are the general steps to deploy an application on Kubernetes. Depending on the application's complexity, additional steps may be required, such as configuring storage, network policies, or security. However, this should give you a good starting point for deploying your application on Kubernetes.
Today, we will see how to automate simple application deployment on Kubernetes using Harness.
-
Free Harness Cloud account
-
Download and install Node.js and npm
-
GitHub account, we will be using our sample notes application
-
Kubernetes cluster access, you can use Minikube or Kind to create a single-node cluster
We will use our sample application that is already in the GitHub repository. We will use a Kubernetes cluster to deploy our application. Next, we will use a CI/CD platform, Harness, in this tutorial to show how we can automate the software delivery process easily.
Fork and clone the sample notes application
Go to the application folder with the following command
cd notes-app-cicdInstall dependencies with the following command
npm installRun the application locally to see if the application works perfectly well
node app.jsYou can see the Dockerfile in the sample application repository.
FROM node:14-alpine

WORKDIR /app

COPY package*.json ./

RUN npm install

COPY . .

EXPOSE 3000

CMD [ "npm", "start" ]
Use the following command to build, tag and push the image to any container registry of your choice. We will push it to Docker Hub in this tutorial.
For Mac M1, use the following command
docker buildx build --platform=linux/arm64 --platform=linux/amd64 -t docker.io/$your docker hub user name/$image name:$tag name --push -f ./Dockerfile .For other than Mac M1, use the below commands to build and push the image,
docker build -t $your docker hub user name/$image name .docker push $your docker hub user name/$image name .Make sure to have access to a Kubernetes cluster from any cloud provider. You can even use Minikube or Kind to create a cluster. In this tutorial, we are going to make use of a Kubernetes cluster from Google Cloud (GCP)
I already have an account on Google Cloud, so creating a cluster will be easy.
You need deployment yaml and service yaml files to deploy and expose your application. Make sure both files are configured properly.
You can see that we have deployment.yaml and service.yaml file already present in the sample application repository.
Below is our deployment.yaml file.
apiVersion: apps/v1
kind: Deployment
metadata:
  name: notes-app-deployment
  labels:
    app: notes-app
spec:
  replicas: 2
  selector:
    matchLabels:
      app: notes-app
  template:
    metadata:
      labels:
        app: notes-app
    spec:
      containers:
      - name: notes-app-deployment
        image: pavansa/notes-app
        resources:
          requests:
            cpu: "100m"
        imagePullPolicy: IfNotPresent
        ports:
        - containerPort: 3000
Below is our service.yaml file
apiVersion: v1
# Indicates this as a service
kind: Service
metadata:
 # Service name
 name: notes-app-deployment
spec:
 selector:
   # Selector for Pods
   app: notes-app
 ports:
   # Port Map
 - port: 80
   targetPort: 3000
   protocol: TCP
 type: LoadBalancer
Apply the manifest files with the following commands. Starting with deployment and then service yaml file.
kubectl apply -f deployment.yamlkubectl apply -f service.yamlVerify the pods are running properly as expected after applying the kubectl apply commands.
kubectl get podsYou should see the pods and their status.

You need a CI/CD tool to automate your continuous integration and deployment process. Harness is known for its innovation and simplicity in the CI/CD space. Hence, we will use this platform to set up automated continuous deployment of our application.
Once you sign up and verify your account, you will be presented with a welcome message and project creation set-up. Proceed to create a project.
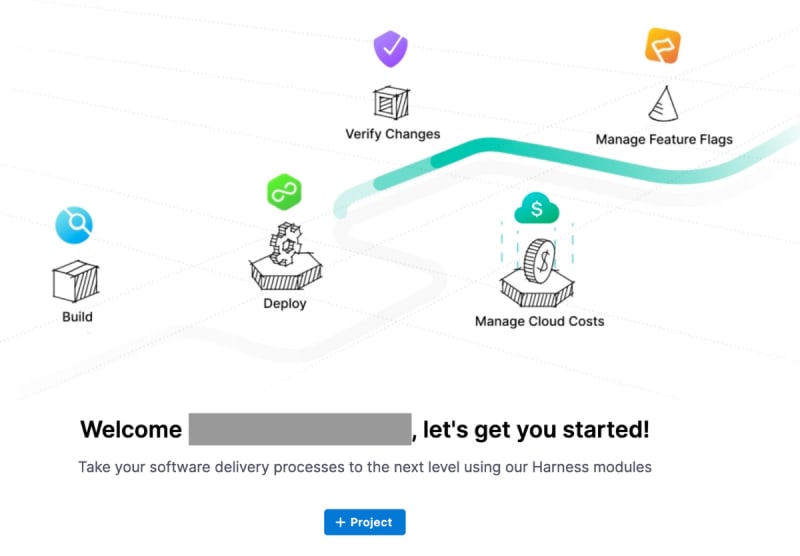
Add the name to the project, save and continue.

Select the ‘Continuous Delivery’ module and start your free plan.

Go to the module and start your deployment journey.
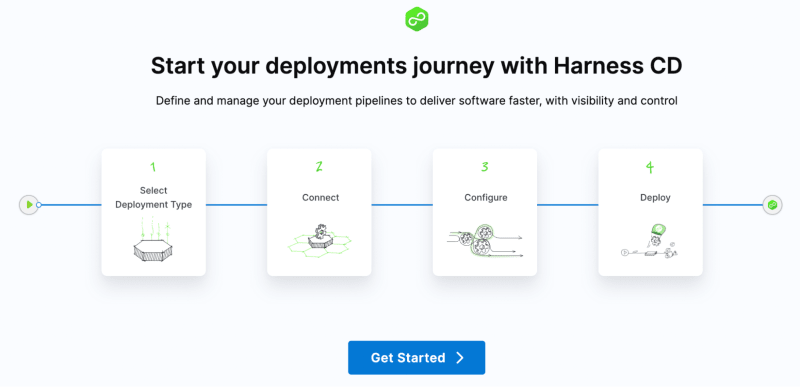
The set-up is very straightforward, as shown in the above image; you can deploy your application in just four simple steps.
Select your deployment type i, e Kubernetes and click ‘Connect to Environment’.

Connect to your Kubernetes environment with Delegate. A Delegate is a service that runs on your infrastructure to execute tasks on behalf of the Harness platform.
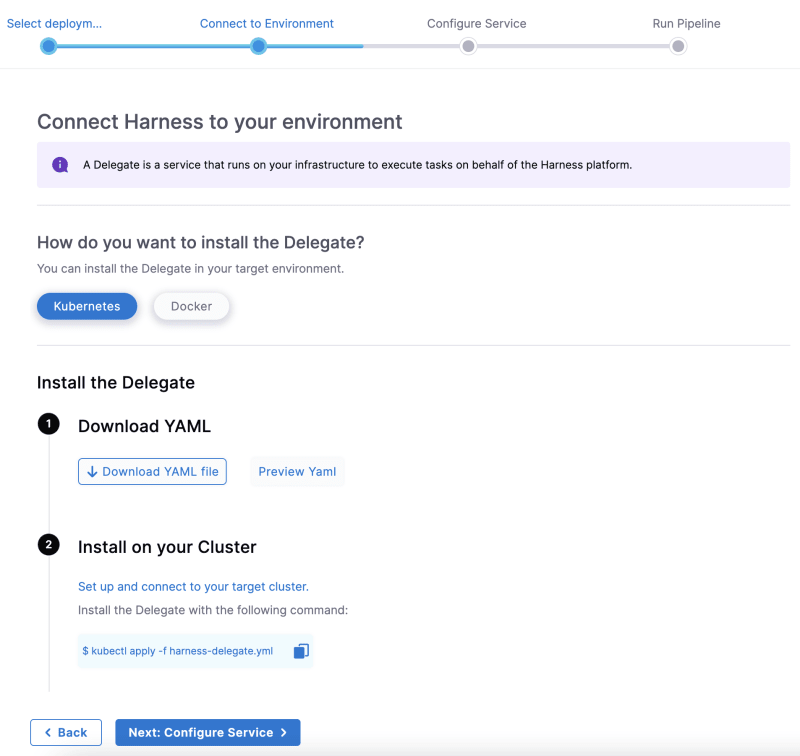
Download the Delegate YAML file and install it on your Kubernetes cluster by applying the kubectl apply command as stated in the above step.
Make sure to execute the command kubectl apply -f harness-delegate.yaml in the right path where you downloaded your delegate YAML file.
Ensure your Delegate installation is successful.
Next, configure the service and add the manifest details.

After adding all the details, click ‘Create a Pipeline’.
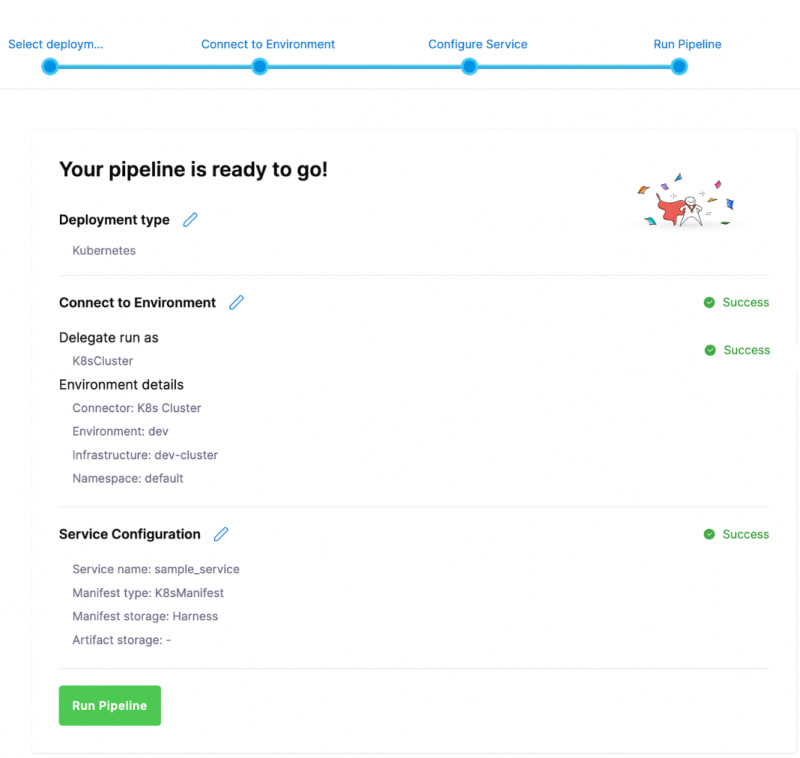
Check if all the connections are successful. Once everything looks fine, click on ‘Run Pipeline’.

Click on ‘Run Pipeline’ to see the successful deployment.
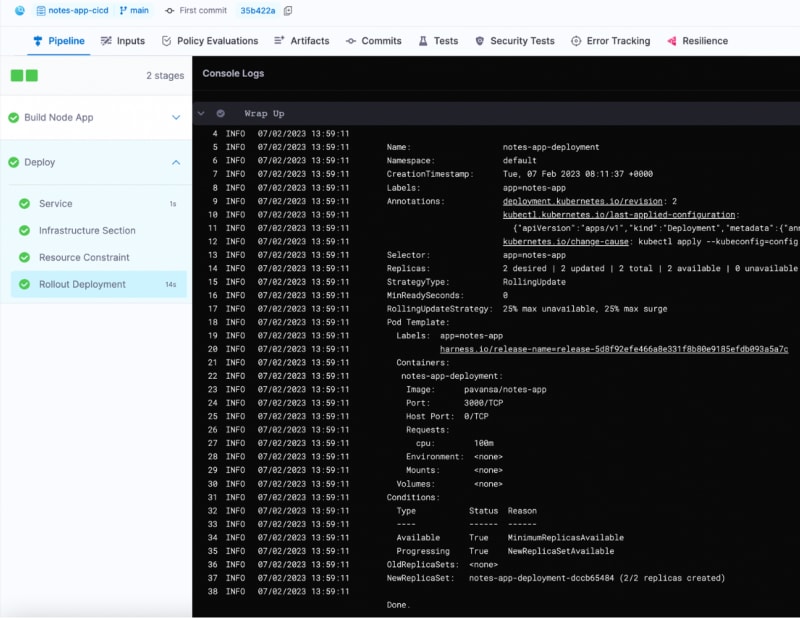
Congratulations! We successfully deployed our application successfully on Kubernetes using Harness. Now, we can easily automate the deployment using the Harness CD module.
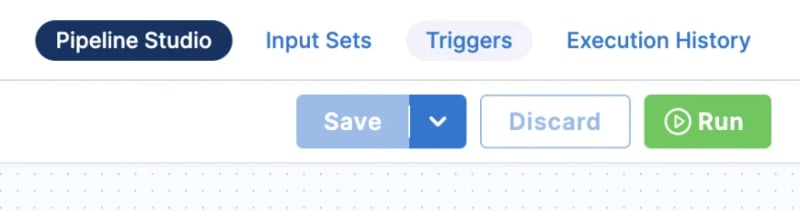
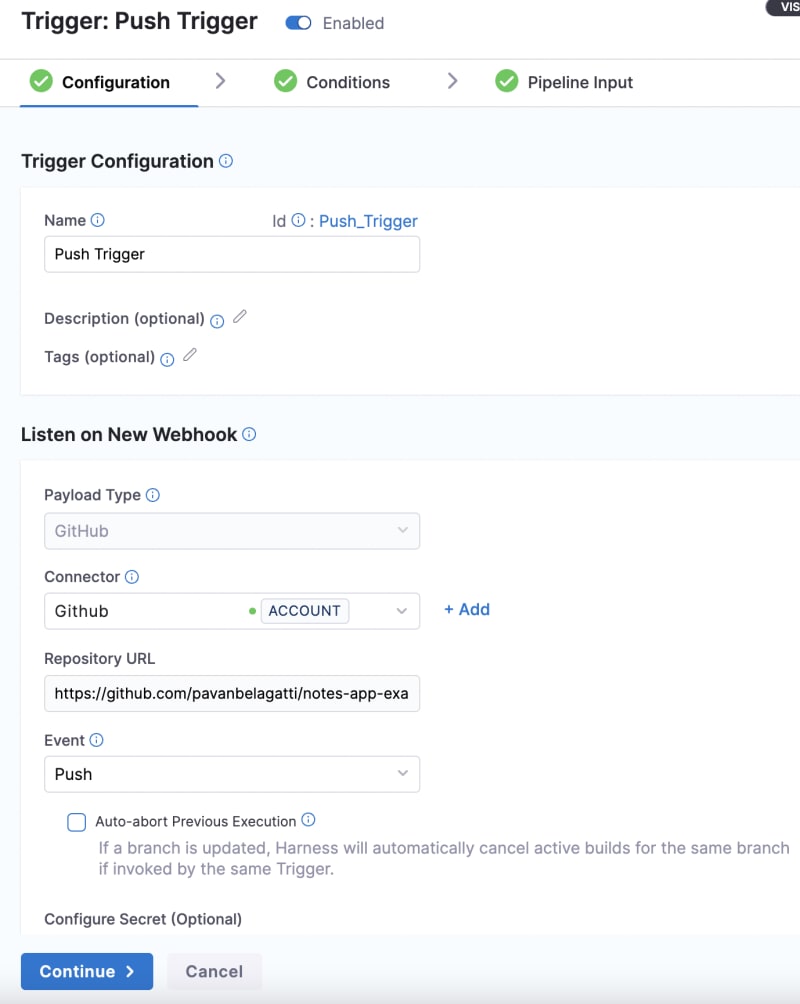
You can automate your CD process by adding Triggers. When any authorised person pushes any new code to your repository, your pipeline should get triggered and do CD. Let’s see how to do that.
In the pipeline studio, you can click the ‘Triggers’ tab and add your desired trigger.

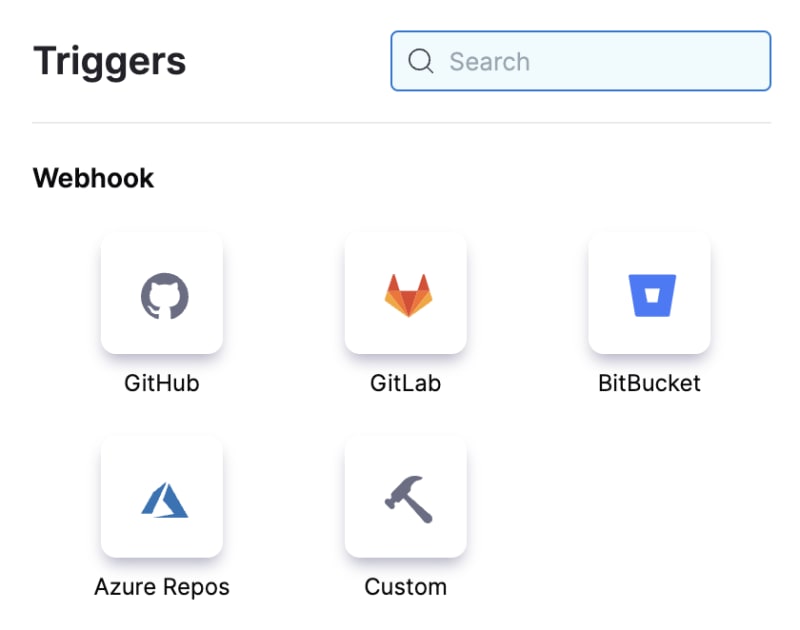
Click on ‘Add New Trigger’ and select ‘GitHub’.
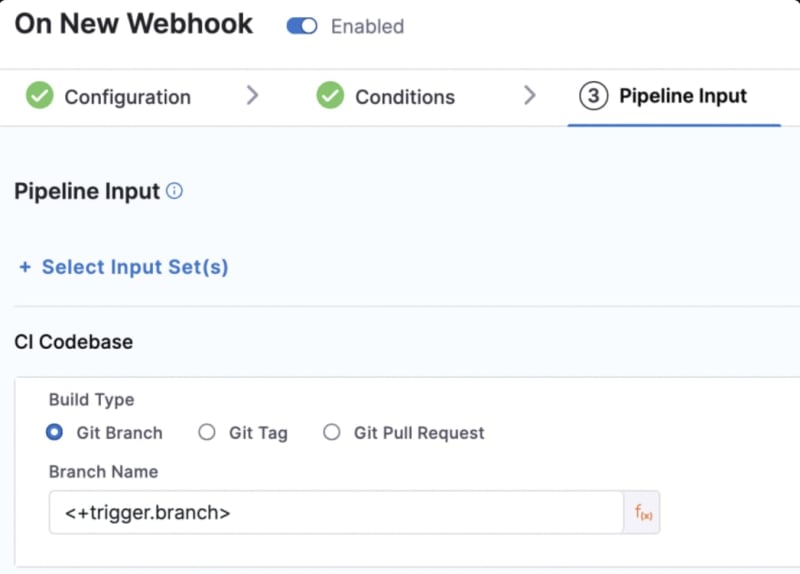
Add the required details and continue. As you can see, we are selecting ‘Push’ as our event. So whenever any authorised push happens to our repository, the pipeline should trigger and run.
You can see your newly created trigger in the ‘Triggers’ tab.

Now, whenever any authorised person pushes any code changes to your main/master repository, the pipeline automatically gets triggered.