| title | thumbnail | contributors |
|---|---|---|
10PRINT |
henrybass |
This tutorial is aimed at beginners, but it works best if you have a little prior programming experience.
"10PRINT" is one of the oldest and most well-known examples of generative art. It was originally created for the Commodore 64 in BASIC, and the code looked like this:
10 PRINT CHR$(205.5+RND(1)); : GOTO 10
From just that one line, the following intricate pattern is created:
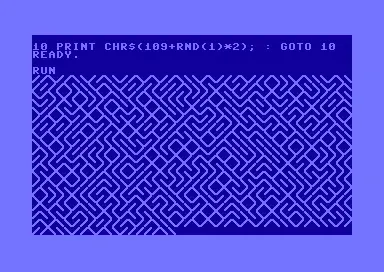
There's even a book named after this program: 10print.org! For this guide, let's try to replicate this artwork for Haxidraw. (This tutorial works fine if you don't have one!)
A Haxidraw is a small drawing robot that can be programed from a browser. You send it instructions through code, and it follows those instructions to create a drawing. By the end of this guide, you will have created some art that can be drawn by the machine!

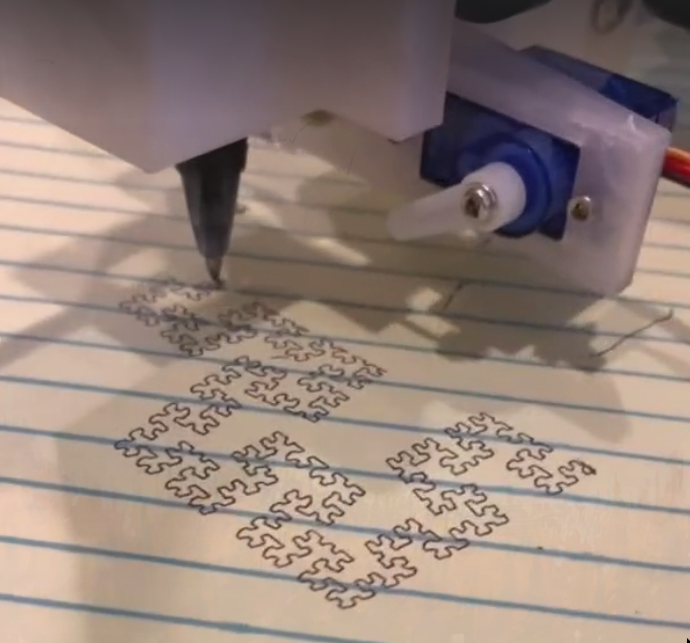
Here are some examples of art people have made with Haxidraw:


Now, let's take another look at the original 10PRINT artwork that we'll try to replicate.

The artwork seems to be a grid of slashes. Some slashes point to to the top-right, others point to the bottom-right. Overall, the distribution seems to be about 50/50. If you look closely, you might notice that the slashes are just plain text: "/" or "\". In fact, the Commodore program just prints a random sequence of characters to the screen, left to right. The challenge is, in the Haxidraw editor, you can't write symbols directly to the screen - we'll have to draw the slashes as lines.
On a high level, here's our strategy:
- Like a typewriter, move horizontally, drawing a forwards or backwards slash at each square randomly. Once we hit the end of a row, return to the start.
This looks like:

So, let's start making something! Boot up the editor at editor.haxidraw.hackclub.com. On the left side of the screen, you write code. On the other side, you can see a preview of what you're building. At any point, press "Run Code" at the top to see what you've made so far.
Let's start by defining a constant t: this will represent our turtle. The turtle is basically our pen - we can send it instructions like t.up() or t.goTo([x,y]) to move it around. For example, calling t.down() places the pen on the paper, and t.goTo([0, 0]) moves the pen to the position 0, 0.
const t = new Turtle();
Directly below that, write drawTurtles(t);. This function makes it so that we can see the turtle's path in the preview window as we add to it.
Now, we can declare two more constants, to represent the size and spacing of our grid. It'll be useful to have these things as constants, because then we can easily change them later in the code to tweak the final image. The gridSpacing constant just dictates how far apart each slash of our drawing should be. A lower gridSpacing value means the pattern is more detailed, but you can change this value to whatever you want. The gridSize represents how large the final image should be.
const gridSize = 10;
const gridSpacing = 0.5;
Now, we can get to building up the artwork. To be able to draw each line, we can create a draw function. This is a block of code that takes in 4 parameters: The x and y position to draw to, along with the width and height of the slash we're going to draw.
function draw(x, y, width, height) {
First, randomly choose whether to draw a forwards or backwards slash. This can be done in code by calling rand() - a function that returns a random number between 0 and 1. If it's greater than 0.5, (this will be true 50% of the time), we draw a backslash.
if(Math.random() >= 0.5) {
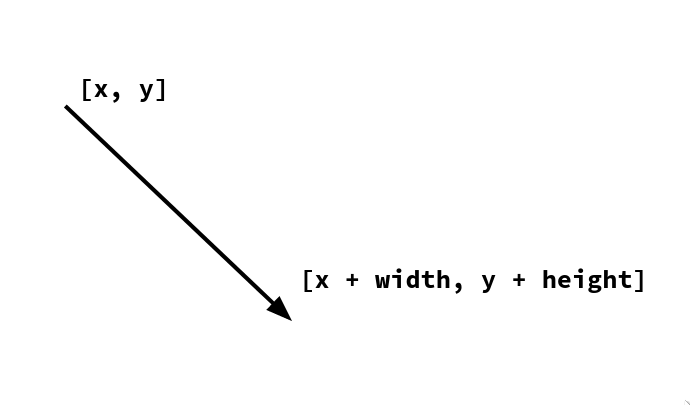
To actually draw the slash, we need to give the turtle a few instructions. Start by raising the pen with t.up(), then go to our start position at x, y. Lower the pen, and move to the bottom-right a little bit, by adding width and height to the turtle position.
    t.up();
    t.goTo([x, y]);
    t.down();
    t.goTo([x + width, y + height]);
If the random number was instead below 0.5, then we can draw a forward slash. This is done in an else statement:
} else {
Raise the pen, but this time, start out a bit to the right of x, y. Lower the pen, and then move down by height from x, y. That's a forward slash!
    t.up();
    t.goTo([x + width, y]);
    t.down();
    t.goTo([x, y + height]);
  }
}
Visually, this looks like:
We've finished the drawing function, but we still need to call it. To run some code repeatedly, we use a for loop. We move across each row, left to right. At each grid cell, we call the draw function to draw the random slash. Once we hit the end of a row, we return to the start.
If you need a refresher on how for loops work, the syntax is like this:
for (code to run at the start of the loop;
	keep looping as long as this code is true;
	do this every loop) {
	run this code every loop;
}
We'll want to loop through every row in the grid. By setting y to negative gridSize, we effectively shift the whole image down the screen. We do this to ensure that it's within range for the Haxidraw to draw. To move to the next row, we add gridSpacing to y every time we loop. We only break once y reaches zero, because that means it's traveled a total distance of gridSize, and we've drawn the image.
for (let y = -gridSize; y < 0; y += gridSpacing) {
Each time we're at a new row, start moving horizontally by increasing x. At every x position draw a slash there by calling our draw function at that point.
  for (let x = 0; x < gridSize; x += gridSpacing) {
    draw(x, y, gridSpacing, gridSpacing);
  }
}
And, lastly, let's draw this to the screen! This is done simply by calling the function drawTurtles with the turtle we defined at the start.
drawTurtles([ t ]);
And, you're done! If all went well, you should be seeing something like the below art:

Great job! You can still go farther with this, if you want.
- See what happens if you change the probability in our
drawfunction from0.5to something else - Try changing how detailed the artwork is, by tweaking
gridSpacing - See what other patterns emerge when you draw things other than slashes
Also - if you have a Haxidraw on hand, go through this guide for instructions on how to set it up. After that, press "run machine", and watch the Haxidraw draw the art you created!