- ideal for video streaming
- quiet
- metal case
- external WiFi antenna
- temperature controlled PWM of fan
- simple, only few additional hardware components are required
- Raspberry Pi 4 4GByte with U.FL antenna connector e.g. from geeks-r-us
- WLAN Upgrade Kit Raspberry Pi / ESP8266 5dBi e.g. from geeks-r-us
- drill an additional 6.5 mm hole for the RP-SMA socket into the metal case next to the fan opening
- Hifiberry AMP2 shield e.g. from Reichelt
- power supply LEICKE 72W Netzteil 12V 6A e.g. from Amazon
- metal case for Raspberry Pi 4 & HiFiBerry AMP2, black e.g. from Reichelt
- very quiet 25mm fan with ball bearing EBM Papst 255M axial flow fan 5 V/DC 2.3 m³/h (L x B x H) 25 x 25 x 8 mm e.g. from Conrad
- heat sink 40 mm x 30 mm for Raspberry Pi 4 e.g. from Reichelt
- spacers, screws as appropriate
- loudspeaker and speaker cables
- TV or monitor
- for the fan control
- 2N 7000 FAI MOSFET, N-CH, 60V, 0,115A, 0,4W, TO-92 e.g. from Reichelt
- resistor 10kOhm e.g. from Reichelt
- resistor 100Ohm e.g. from Reichelt
- diode 1N4148 e.g. from Reichelt
- schematics of fan control:
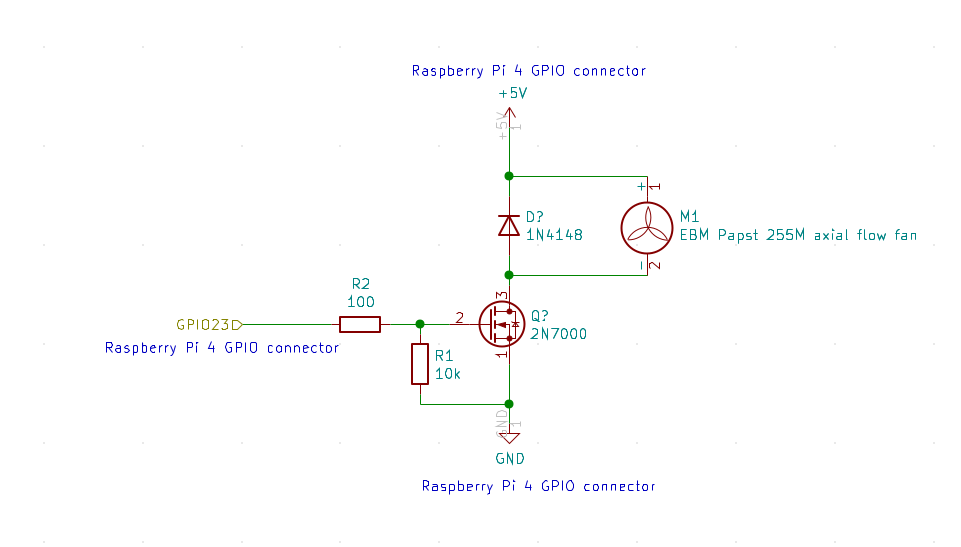
- solder as floating wiring, ensure that all components are isolated by insulation tape
- as reference, the GPIO pinout of a Raspberry Pi 4 is available e.g. here
- used Raspberry Pi 4 GPIO pins:
- +5V power (#2)
- GND ground (#6)
- BCM24 (#18)
- note: do not use GPIOs that are used by the Hifiberry AMP2, see here

- Libreelec Rpi4 nightly build e.g. this one (worked for me)
- add two lines for the Hifiberry Amp2 to the Rapberry Pi 4's config.txt:
-
connect to the Raspberry Pi 4 via ssh:
- enable ssh access in Libreelec
ssh root@<raspberry_pi4_ip_address>
- the default ssh password is: libreelec (if not changed yet)
- the /flash boot partition is read-only by default, so we need to remount it in read-write mode:
mount -o remount,rw /flash
- use the nano text editor to modify the file. Save changes with ctrl+o and exit using ctrl+x:
nano /flash/config.txt
- add the following lines for the Hifiberry Amp2 at the end:
max_usb_current=1
dtoverlay=hifiberry-dacplus- after editing set the /flash partition back to read-only mode:
mount -o remount,ro /flash
- and reboot for the changes in config.txt to be applied:
reboot
-
- the fan control software is derived from here. Many thanks to internauta37 !
-
installation procedure for the fan control (derived from here.)
-
major change is that the fan is turning at 'turn_on_speed (default: 65%)' speed for 1 second after each change of the fan speed
-
to make the fan working on LibreELEC it is necessary to perform the following steps:
-
install the Addon Raspberry Pi Tools in LibreELEC
-
connect to the Raspberry Pi 4 via ssh:
- enable ssh access in Libreelec
ssh root@<raspberry_pi4_ip_address>
- the default ssh password is: libreelec
- check that all the libraries by Raspberry Pi Tools have been installed correctly:
ls -la /storage/.kodi/addons/virtual.rpi-tools/lib
- download the python script that starts and manages the fan:
mkdir /storage/.config/fan_controller
cd /storage/.config/fan_controller
- create the autostart.sh file and let his start the python script that takes care of controlling the fan:
touch /storage/.config/autostart.sh
chmod +x /storage/.config/autostart.sh
nano /storage/.config/autostart.sh
- adding to it:
(python3 /storage/.config/fan_controller/fan_controller.py)&
- save it; now all that remains is to restart the Raspberry and enjoy the fan running:
reboot
- ensure that the fan is turning after the reboot
- experts can observe debug messages by invoking from the command line after setting 'debugFlag=True' in the python script 'fan_controller.py':
python3 /storage/.config/fan_controller/fan_controller.py
- please do not forget to set 'debugFlag=False' afterwards
-
-
- seal the SD card opening of the case with black adhesive tape in order to avoid a bypass of the air flow. Keep the fan opening free.
- use of these instructions is on your own risk! No liability by the publisher!
- ensure that the fan is turning after installation
- ensure that your raspberry pi4 is not overheating due to a wrong installation
Creative Commons BY-NC-SA
Give Credit, NonCommercial, ShareAlike
This work is licensed under a Creative Commons Attribution-NonCommercial-ShareAlike 4.0 International License.
