| title | description | author | ms.date | ms.topic | ms.service | ms.subservice | ms.custom | keywords | products | categories | ||||||||
|---|---|---|---|---|---|---|---|---|---|---|---|---|---|---|---|---|---|---|
DevOps Tooling for Well-Architected Recommendation Process |
Instructions for using theDevOps Tooling for Well-Architected Recommendation Process |
drspott |
09/14/2021 |
conceptual |
architecture-center |
well-architected |
|
|
|
|
There are four sections to this document:
- Preparation
- Reporting
- Place findings into an Azure DevOps project
- Importing to GitHub
-
A new or empty DevOps project using an agile framework. Instructions to create this project are below.
-
We encourage users of this example script to test on a non-production DevOps project to better understand how recommendations are presented in Azure DevOps.
-
After testing, users of this example script are encouraged to import recommendations into an appropriate Azure DevOps project for work planning and execution.
or
-
A new or empty GitHub repo to receive these items.
-
We encourage users of this example script to test on a non-production Github project to better understand how recommendations are presented in Github.
-
After testing, users of this example script are encouraged to import recommendations into an appropriate GitHub project for work planning and execution.
-
Windows 10 or greater.
-
PowerShell v7
-
Microsoft PowerPoint 2019
-
PowerPoint is not required for importing findings into Azure DevOps or Github.
-
Only required for creating PowerPoint slideshows outlining the issues found.
IMPORTANT: These instructions only work in a Windows environment at this time.
-
Download and install PowerShell 7
-
Open a PowerShell terminal and run the following commands from within a new or existing directory:
$installUri = "https://raw.githubusercontent.com/Azure/WellArchitected-Tools/main/WARP/devops/install-WARP-tools.ps1"
Invoke-WebRequest $installUri -OutFile "install-WARP-tools.ps1"
.\install-WARP-tools.ps1
Example output:
PS C:\Users\cae> mkdir warp
PS C:\Users\cae> cd warp
PS C:\Users\cae\warp> $installUri = "https://raw.githubusercontent.com/Azure/WellArchitected-Tools/main/WARP/devops/install-WARP-tools.ps1"
PS C:\Users\cae\warp> Invoke-WebRequest $installUri -OutFile "install-WARP-tools.ps1"
PS C:\Users\cae\warp> .\install-WARP-tools.ps1
Working Directory: C:\Users\cae\warp
Downloading from: https://raw.githubusercontent.com/Azure/WellArchitected-Tools/main/WARP/devops
We will get these files:
    Azure_Well_Architected_Review_Sample.csv
    CAF Category Descriptions.csv
    GenerateAssessmentReport.ps1
    PnP-DevOps.ps1
    PnP-Github.ps1
    PnP_PowerPointReport_Template.pptx
    PnP_PowerPointReport_Template - CloudAdoption.pptx
    WAF Category Descriptions.csv
-
Copy the exported CSV from a Microsoft Azure Well-Architected Review into the working directory created above.
NOTE: A sample export has been included with this tooling: Azure_Well_Architected_Review_Sample.csv
-
Run the following command in the PowerShell terminal and select the CSV file you wish to use:
.\GenerateAssessmentReport.ps1
NOTE: A new PowerPoint file will be created in the directory with name in the format of:
WAF-Review-yyyy-MM-dd-HHmm.pptx -
Examine this PowerPoint file for auto-generated slides after slide 8.
-
If these slides are created in this deck, then your environment is properly set up and you may move now use the above steps with a CSV generated by your WAF assessment.
-
Create or log into an Azure DevOps Organization:
- If an organization does not exist, follow these steps in this link.
IMPORTANT: In Azure DevOps, under Organization Settings - Overview, verify that your organization is using the new URL format.
-
Navigate to the Project where you want to import the recommendations:
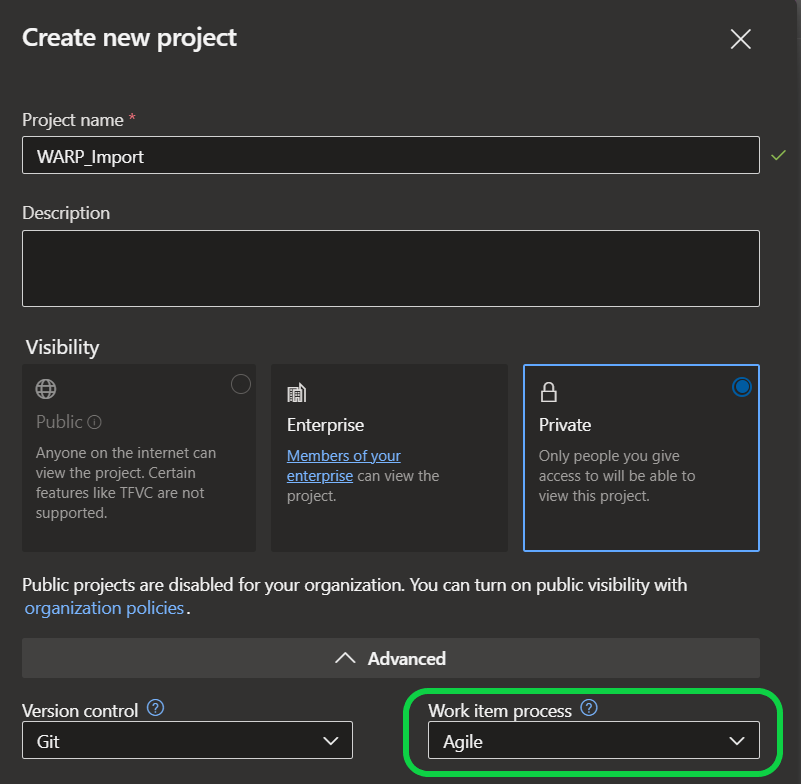
- If a project does not exist in the Azure DevOps Organization, then create a new project using the steps in this link.
IMPORTANT: If you are using an existing Project, you will need to ensure that the process is set to Agile. When you create a new project, ensure that the Work item process is set to Agile under Advanced. If the project is not Agile, you can change the DevOpsWorkItemType parameter to fit other work item proceses. Valid work items types are Feature or Issue.
-
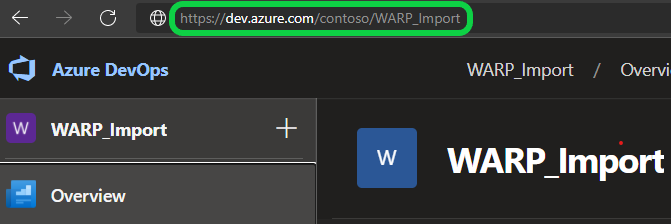
Make note of the Project URL in the address bar
-
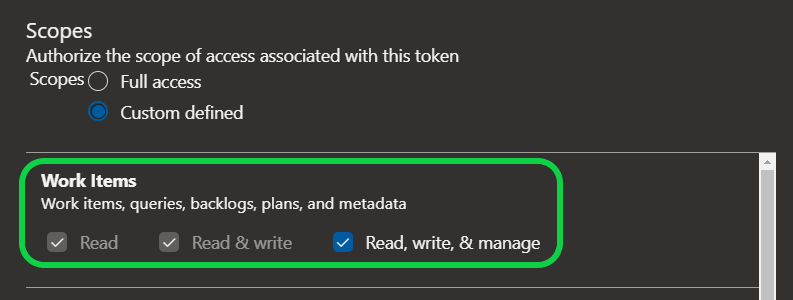
Create or acquire an Azure DevOps Personal Access Token using the steps in this link.
- IMPORTANT: The Personal Access Token that you use or create must have Read, write, & manage access to Work Items
-
Run the following command in the PowerShell terminal.
.\PnP-DevOps.ps1 -DevOpsPersonalAccessToken PAT_FROM_ADO -DevOpsProjectUri "PROJECT_URL" -DevOpsTagName -DevOpsWorkItemType { [Feature],[Issue] } "ASSESSMENT_NAME" -AssessmentCsvPath PATH_TO_CSV
The flags are:
- -DevOpsPersonalAccessToken The Personal Access Token from ADO
- -DevOpsProjectUri The URL for your Project
- -DevOpsTagName is used to tag the imported work items in ADO.
-
Organizations and teams can use these tags as milestones to organize the work items across multiple assessments.
-
For example:
A team performs a Well-Architected Review and imports the resultant CSV into their DevOps tooling. The team names this import "Milestone 1" and all work items imported are tagged with the name "Milestone 1"
After a few sprints, the team can perform another Well-Architected Review. The import the resultant CSV into their DevOps tooling. This import would be named "Milestone 2".
Note: Assessments and imports should focus only on a single workload. There is no method to differentiate between workloads with these tools.
-
- -DevOpsWorkItemType Set the work item type for the project. Valid options are Feature or Issue.
- -AssessmentCsvPath The exported CSV file from a Microsoft Azure Well-Architected Assessment.
Example command output:
PS C:\Users\cae\warp>.\PnP-DevOps.ps1 -csv .\Azure_Well_Architected_Review_Sample.csv `
>> -DevOpsPersonalAccessToken xxxxxxxxxxxxxxxxx `
>> -DevOpsProjectUri https://dev.azure.com/contoso/WARP_Import `
>> -DevOpsTagName "WAF-Assessment-202201"
Assessment Name: WAF-Assessment-202201
URI Base: https://dev.azure.com/contoso/WARP_Import/
Number of Recommendations to import : 175
Ready? [y/n]: y
Adding Epic to ADO: Operational Procedures
Adding Epic to ADO: Deployment & Testing
Adding Epic to ADO: Governance
...
Adding Work Item: Storage account should use a private link connection for 4 Storage Account(s)
Adding Work Item: Log Analytics agent should be installed on your virtual machine for 1 Virtual machine(s)
Adding Work Item: Management ports of virtual machines should be protected with just-in-time network access control for 1 Virtual machine(s)
...

Import Complete!
-
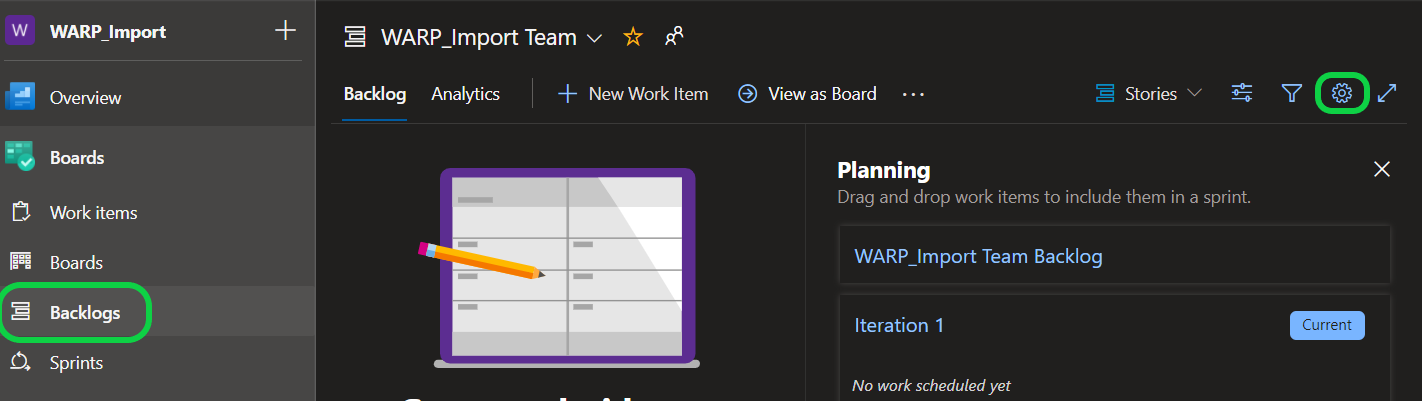
When the script finishes, navigate to the Backlogs in your Azure DevOps Projects, enable Epics in the settings, and then set the navigation level to Epics.
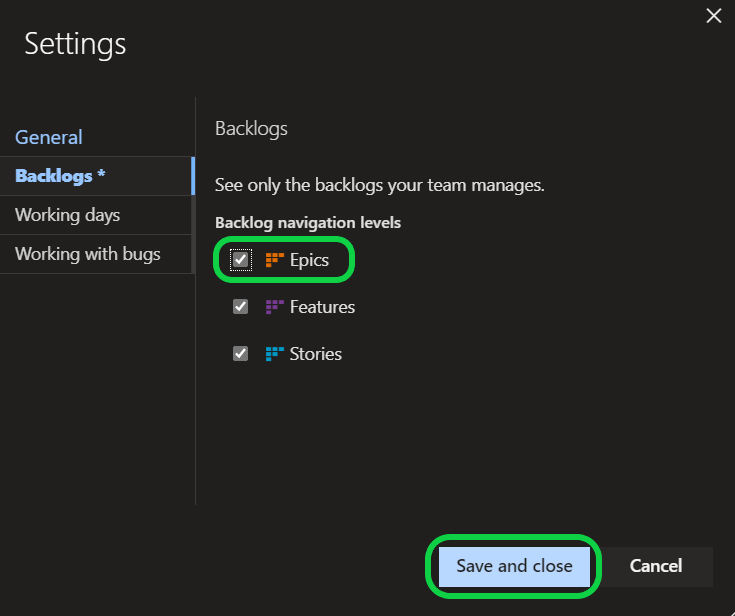
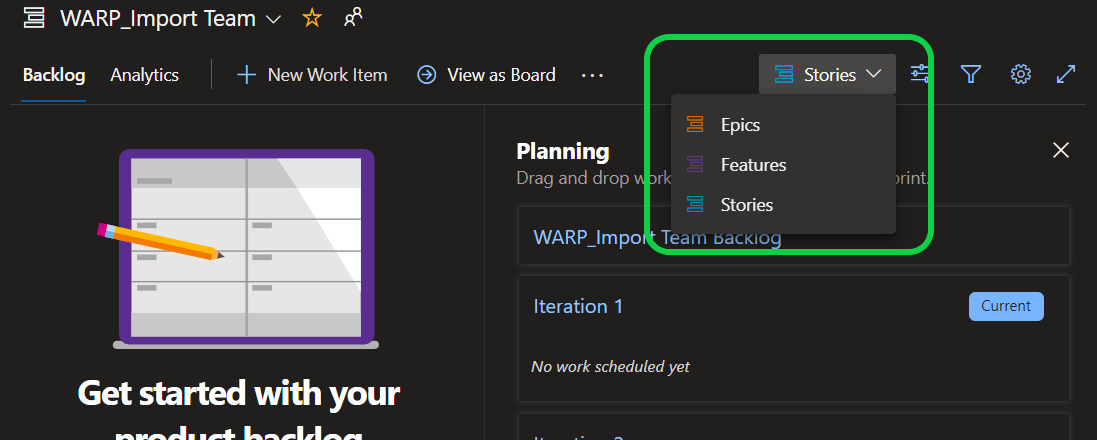 NOTE: If Epics do not appear in the drop down after changing the settings, refreshing the page should fix that.
 -
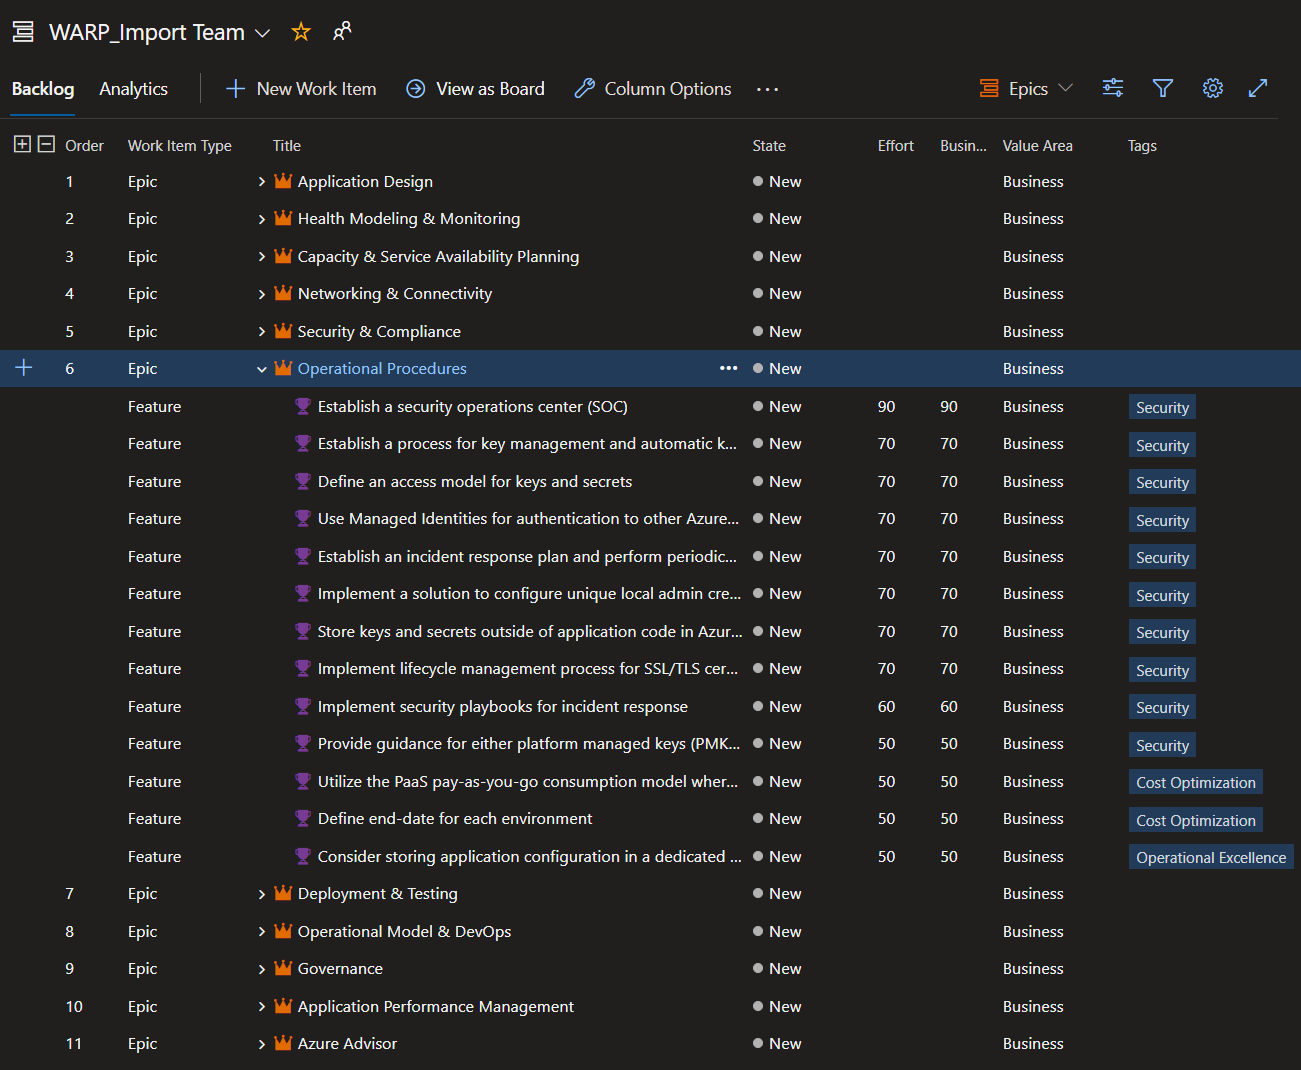
You should now see the Backlogs populated with Epics and Features or Issues:


-
Create or log into an existing Github repository.
- If an organization does not exist, follow these steps in this link.
-
Acquire a personal access token with write access to create issues:
- Permissions should be Full control of private repositories.

- Permissions should be Full control of private repositories.
-
Run the
PnP-Github.ps1script from a command prompt:./PnP-Github.ps1 -GithubPersonalAccessToken \"GITHUB-PAT-TOKEN" -AssessmentCsvPath PATH-TO-CSV -GithubrepoUri "URI-FOR-GITHUB-DEPOT" -GithubTagName "ASSESSMENT_NAME"The flags are:
- -GithubPersonalAccessToken The Personal Access Token from Github
- -GithubrepoUri The URL for your Project
- -AssessmentCsvPath The exported CSV file from a Microsoft Azure Well-Architected Assessment.
- -GithubTagName is used is used to tag the imported issues in GitHub.
-
Organizations and teams can use these tags as milestones to organize the issues (work items) across multiple assessments.
-
For example:
A team performs a Well-Architected Review and imports the resultant CSV into their GitHub repository. The team names this import "Milestone 1" and all issues (work items) imported are tagged with the name "Milestone 1"
After a few sprints, the team can perform another Well-Architected Review. They import the resultant CSV into their GitHub repository. This import would be named "Milestone 2".
Note: Assessments and imports should focus only on a single workload. There is no method to differentiate between workloads with these tools.
-
Example command output:
-
Example:
./PnP-Github.ps1 -GithubPersonalAccessToken xxxxxx -GithubrepoUri "https://github.com/contoso/WAF-Review" -GithubTagName WAF-Security -AssessmentCsvPath .\Azure_Well_Architected_Review.csv -
You should see Milestones and Issues populated with data.


