Skip to content
New issue

Have a question about this project? Sign up for a free GitHub account to open an issue and contact its maintainers and the community.

By clicking “Sign up for GitHub”, you agree to our terms of service and privacy statement. We’ll occasionally send you account related emails.

Already on GitHub? Sign in to your account

第 63 题:如何设计实现无缝轮播 #108

Open
zeroone001 opened this issue Apr 25, 2019 · 18 comments
Open

第 63 题:如何设计实现无缝轮播 #108

zeroone001 opened this issue Apr 25, 2019 · 18 comments

Comments

@zeroone001
Copy link

No description provided.

@chen86860
Copy link

最近刚好做一个轮播的公告组件,强答一波:

简单来说,无缝轮播的核心是制造一个连续的效果。最简单的方法就是复制一个轮播的元素,当复制元素将要滚到目标位置后,把原来的元素进行归位的操作,以达到无缝的轮播效果。

贴一段轮播的核心代码:

  // scroll the notice
  useEffect(() => {
    const requestAnimationFrame =
      window.requestAnimationFrame || window.webkitRequestAnimationFrame || window.mozRequestAnimationFrame
    const cancelAnimationFrame =
      window.cancelAnimationFrame || window.webkitCancelAnimationFrame || window.mozCancelAnimationFrame

    const scrollNode = noticeContentEl.current
    const distance = scrollNode.clientWidth / 2

    scrollNode.style.left = scrollNode.style.left || 0
    window.__offset = window.__offset || 0

    let requestId = null
    const scrollLeft = () => {
      const speed = 0.5
      window.__offset = window.__offset + speed
      scrollNode.style.left = -window.__offset + 'px'
      // 关键行:当距离小于偏移量时,重置偏移量
      if (distance <= window.__offset) window.__offset = 0
      requestId = requestAnimationFrame(scrollLeft)
    }
    requestId = requestAnimationFrame(scrollLeft)

    if (pause) cancelAnimationFrame(requestId)
    return () => cancelAnimationFrame(requestId)
  }, [notice, pause])

@ligoudan1
Copy link

无限轮播基本插件都可以做到,不过要使用原生代码实现无缝滚动的话我可以提点思路,
因为轮播图基本都在ul盒子里面的li元素,
首先获取第一个li元素和最后一个li元素,
克隆第一个li元素,和最后一个li元素,
分别插入到lastli的后面和firstli的前面,
然后监听滚动事件,如果滑动距离超过x或-x,让其实现跳转下一张图或者跳转上一张,(此处最好设置滑动距离),
然后在滑动最后一张实现最后一张和克隆第一张的无缝转换,当到克隆的第一张的时候停下的时候,,让其切入真的第一张,则实现无线滑动,向前滑动同理

@bikedawuwang
Copy link

前一阵使用angular写了一个无缝轮播的组件,与大家思路都差不多
https://github.com/zmh3788/AElfWebsite-Angular/blob/master/src/app/components/app.carousel.component/app.carousel.component.ts

@ragnar-document
Copy link

克隆第一张和最后一张作为过渡,在切换时就会显得流畅一些

@w3cmark
Copy link

w3cmark commented Jul 20, 2019

这里说一个不需要clone的方案:

<div class="slide">
  <ul>
    <li>图片1</li>
    <li>图片2</li>
   <li>图片3</li>
  </ul>
</div>

1、最外层div.slide定宽、相对定位relative

2、ul 足够宽,最起码li数*li宽度,这里有个技巧,直接 width: 9999em,目的是让里面的所有li一字排开

3、滚动效果通过控制ulleft或者transform来进行滚动效果

4、到了最后一个li,往后看第一个li的时:

4.1、准备继续滚动,把最后一个的li设置为相对定位relativeleft值为此时此刻相对ul的位置(设置的时候不要带缓动效果),目的是让最后一个li不动。

4.2、然后把ul的left或者transform设为0(这步没有缓动效果),

4.3、然后再正常的开始一样出现第一个li的滚动效果(这步有缓动效果)

4.4、最后等无缝的第一个li效果完成后,把最后一个lileft值复原为0

5、到第一个li,往前看最后一个li时,也是和上面同理

具体效果可以看下 汽车之家首页的轮播图效果

@montage-f
Copy link

No description provided.
占楼大哥~~

@18055975947
Copy link

<!DOCTYPE html>
<html lang="en">
<head>
    <meta charset="UTF-8">
    <meta name="viewport" content="width=device-width, initial-scale=1.0">
    <meta http-equiv="X-UA-Compatible" content="ie=edge">
    <title>轮播</title>
    <style>
        *{
            padding: 0;
            margin: 0;
            list-style: none;
        }
        #continer{
            width: 300px;
            height: 200px;
            position: relative;
            margin: 20px auto;
            border: 1px solid;
            overflow: hidden;
        }
        #lunbo{
            width: 9999em;
            height: 100%;
            position: absolute;
            top: 0;
            left: 0;
        }
        li{
            float: left;
            width: 300px;
            height: 200px;
            text-align: center;
            line-height: 200px;
            color: brown;
            font-size: 30px;
        }
    </style>
</head>
<body>
    <div id="continer">
        <ul class="ul" id="lunbo">
            <li class="list">1</li>
            <li class="list">2</li>
            <li class="list">3</li>
            <li class="list">4</li>
            <li class="list">5</li> 
        </ul>
    </div>
</body>
<script src="./js/jquery3.0.min.js"></script>
<script>
    let selectNum = 0
    function lunboFun (selectNum, time) {
        $('#lunbo').animate({
            'left': -1 * selectNum * 300
        }, time, () => {
            selectNum++
            setTimeout(() => {
                if (selectNum > 4) {
                    selectNum = 0
                    $('ul li:last').css({
                        'position': 'absolute'
                    }, 0)
                    $('ul li:last').animate({
                        'left': -300
                    }, 0)
                    $('#lunbo').animate({
                        'left': 300
                    }, 0)
                } else if (selectNum <3) {
                    $('ul li:last').css({
                        'position': 'relative',
                        'left': 0
                    }, 0)
                }
                lunboFun(selectNum, 1000)
            }, 2000)
        });
    }
    lunboFun(selectNum, 1000)

</script>
</html>

@zhishaofei3
Copy link

一上来clone一个

@lvzhiyi
Copy link

lvzhiyi commented Aug 21, 2019

代码千万种,这里主要说一下两种实现思想:

  • 每次轮播元素动画执行到末尾的时候迅速让其位置恢复原位,造成视觉上的无缝轮播
  • 将轮播元素复制一份,第一个item元素轮播执行完后将其删除后添加在整个轮播列表的最后,造成循环轮播

自己写的react-native的轮播组件,欢迎评鉴:https://github.com/lvzhiyi/react-naitve-SeamlessScroll

@yaodongyi
Copy link

改变了以往写轮播的方式,尝试了一下纯操控节点增删来实现无缝连接轮播图。https://github.com/yaodongyi/javascript

@FoooooooF
Copy link

FoooooooF commented Aug 28, 2019

演示地址
github 源码

原理

本例 固定为4张图的轮播图,主要为便于阐述原理.

  1. 首先页面布局,重点实现如上图所示的滚动内容(board)结构
    • 4fake的图片4的复制,1fake的图片1的复制,
  2. 通过设置上述滚动结构(board)的css left和transition 实现滚动效果
  3. 实现无限滚动
    • 当页面滚动到1fake 时,在滚动完成后,将left值设置到1的位置(此处没有动画,用户无法察觉);
    • 同理,当页面滚动到4fake 时,在滚动完成后,将left值设置到4的位置(此处也没有动画);

3 实现无缝轮播

当到达4fake的位置,默默切换到4,到达1fake的位置,默默切换到1

(function () {
    let prev = document.getElementsByClassName("carousel-prev")[0];
    let next = document.getElementsByClassName("carousel-next")[0];
    let board = document.getElementsByClassName("carousel-board")[0];
    let panels = Array.from(document.getElementsByClassName('carousel-board-item'));
    board.style.left = "-400px"; //设置初始的left值
    let index = 1; //设置初始的index值
    prev.addEventListener("click", function () {
        index++
        console.log(index);
        animate(-400);
        //关键点 如果当前在 1fake 的位置
        if (index === panels.length - 1) {
            setTimeout(() => {
                //去掉动画
                board.style.transition = "0s";
                let distance = 4 * 400
                //默默的左移board至 1
                board.style.left = parseInt(board.style.left) + distance + "px"
            }, 600)
            index = 1;
        }

    })
    next.addEventListener("click", () => {
        index--
        console.log(index);
        animate(400);
        //关键点 如果当前在 4fake 的位置
        if (index === 0) {
            setTimeout(() => {
                // 去掉动画
                board.style.transition = "0s";
                let distance = -4 * 400
                //默默的右移board 至 4
                board.style.left = parseInt(board.style.left) + distance + "px"
            }, 600)
            index = 4;
        }
    })

    function animate(width = 400) {
        board.style.transition = "0.5s";
        board.style.left || (board.style.left = 0)
        board.style.left = parseInt(board.style.left) + width + "px";
    }
})()

@HuberTRoy
Copy link

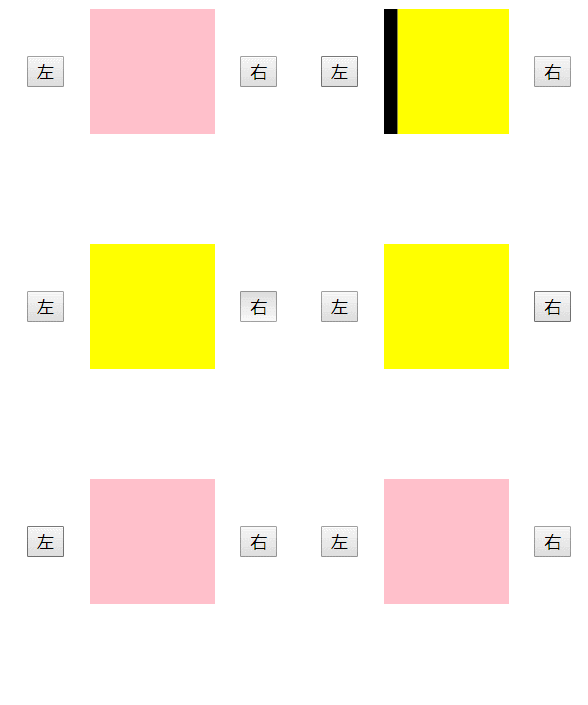
用Vue实现无缝轮播好像比较省事:
transition-group来显示图片的位置,
Vue中的过渡有4种状态:
enter -> enter-to, leave ->leave-to
如果向左移动,那么enter从 translateX(-100%) 开始,到 translateX(0) 结束,leave从translateX(0)开始,到translateX(100%)结束,向右移动则反过来。
GIF.gif

<!DOCTYPE html>
<html>
<head>
    <title></title>
    <script src="https://cdn.bootcss.com/vue/2.6.10/vue.min.js"></script>
    <style type="text/css">
        #app {
            display: flex;
            align-items: center;
            margin: auto;
            width: 200px;
        }
        ul  {
            list-style-type: none;  
            position: relative;
            width: 100px;
            height: 100px;
            box-sizing: border-box;
            padding: 0;
            margin: auto;
            overflow: hidden;
        }
        li {
            width: 100px;
            height: 100px;
            position: absolute;
        }
        #one {
            background: yellow;
        }
        #two {
            background: black;
        }
        #three {
            background: pink;
        }
        #four {
            background: orange;
        }

        .right_animation-enter, .left_animation-leave-to {
            transition: all .3s ease;
            transform: translateX(-100px);
        }

        .right_animation-leave-to, .left_animation-enter {
            transition: all .3s ease;
            transform: translateX(100px);
        }

        .right_animation-enter-to, .right_animation-leave, .left_animation-enter-to, .left_animation-leave {
            transition: all .3s ease;
            transform: translateX(0);
        }

    </style>
</head>
<body>
    <div id="app">
        <button @click="turn('left')"></button>
        <transition-group tag="ul" :name="direction=='left' ? 'left_animation' : 'right_animation'">
                <li v-for="(img,index) in imgs"
                    :id="img" 
                    :key="index"
                    v-show="current_index===index">
                </li>
        </transition-group>
        <button @click="turn('right')"></button>
    </div>
</body>
<script>
    new Vue({
        el: '#app',
        data: {
            imgs: ['one', 'two', 'three'],
            direction: 'left',
            current_index: 0
        },
        methods: {
            turn: function (side) {
                this.direction = side
                if (side == 'left') {
                    this.current_index -= 1
                    if (this.current_index < 0) {
                        this.current_index = this.imgs.length - 1 
                    }
                } else {
                    this.current_index += 1
                    if (this.current_index === this.imgs.length) {
                        this.current_index = 0
                    }
                }
            }
        }})
</script>
</html>

@yinzuowen
Copy link

演示地址 ⭐️
github 源码

原理

本例 固定为4张图的轮播图,主要为便于阐述原理.

  1. 首先页面布局,重点实现如上图所示的滚动内容(board)结构

    • 4fake的图片4的复制,1fake的图片1的复制,
  2. 通过设置上述滚动结构(board)的css left和transition 实现滚动效果

  3. 实现无限滚动

    • 当页面滚动到1fake 时,在滚动完成后,将left值设置到1的位置(此处没有动画,用户无法察觉);
    • 同理,当页面滚动到4fake 时,在滚动完成后,将left值设置到4的位置(此处也没有动画);

3 实现无缝轮播

当到达4fake的位置,默默切换到4,到达1fake的位置,默默切换到1

(function () {
    let prev = document.getElementsByClassName("carousel-prev")[0];
    let next = document.getElementsByClassName("carousel-next")[0];
    let board = document.getElementsByClassName("carousel-board")[0];
    let panels = Array.from(document.getElementsByClassName('carousel-board-item'));
    board.style.left = "-400px"; //设置初始的left值
    let index = 1; //设置初始的index值
    prev.addEventListener("click", function () {
        index++
        console.log(index);
        animate(-400);
        //关键点 如果当前在 1fake 的位置
        if (index === panels.length - 1) {
            setTimeout(() => {
                //去掉动画
                board.style.transition = "0s";
                let distance = 4 * 400
                //默默的左移board至 1
                board.style.left = parseInt(board.style.left) + distance + "px"
            }, 600)
            index = 1;
        }

    })
    next.addEventListener("click", () => {
        index--
        console.log(index);
        animate(400);
        //关键点 如果当前在 4fake 的位置
        if (index === 0) {
            setTimeout(() => {
                // 去掉动画
                board.style.transition = "0s";
                let distance = -4 * 400
                //默默的右移board 至 4
                board.style.left = parseInt(board.style.left) + distance + "px"
            }, 600)
            index = 4;
        }
    })

    function animate(width = 400) {
        board.style.transition = "0.5s";
        board.style.left || (board.style.left = 0)
        board.style.left = parseInt(board.style.left) + width + "px";
    }
})()

prev和next反了吧。

@yinzuowen
Copy link

这里说一个不需要clone的方案:

<div class="slide">
  <ul>
    <li>图片1</li>
    <li>图片2</li>
   <li>图片3</li>
  </ul>
</div>

1、最外层div.slide定宽、相对定位relative

2、ul 足够宽,最起码li数*li宽度,这里有个技巧,直接 width: 9999em,目的是让里面的所有li一字排开

3、滚动效果通过控制ulleft或者transform来进行滚动效果

4、到了最后一个li,往后看第一个li的时:

4.1、准备继续滚动,把最后一个的li设置为相对定位relativeleft值为此时此刻相对ul的位置(设置的时候不要带缓动效果),目的是让最后一个li不动。

4.2、然后把ul的left或者transform设为0(这步没有缓动效果),

4.3、然后再正常的开始一样出现第一个li的滚动效果(这步有缓动效果)

4.4、最后等无缝的第一个li效果完成后,把最后一个lileft值复原为0

5、到第一个li,往前看最后一个li时,也是和上面同理

具体效果可以看下 汽车之家首页的轮播图效果

4.1应该是把最后一个li的left设置为所有li宽度之和的负值,4.2应该是把ul的left设置为1个li的宽度。

@cutie6
Copy link

cutie6 commented Jun 7, 2020

nter从 translateX(-100%) 开始,到 translateX(0) 结束,leave从translateX(0)开始,到translateX(100%)结束

nter从 translateX(-100%) 开始,到 translateX(0) 结束,leave从translateX(0)开始,到translateX(100%)结束

这样是向右移动吧

@Larmyliu
Copy link

参考了18055975947,没有用jquery

<!DOCTYPE html>
<html lang="en">

<head>
    <meta charset="UTF-8">
    <meta name="viewport" content="width=device-width, initial-scale=1.0">
    <title>Document</title>    
    <style>
        * {
            padding: 0;
            margin: 0;

        }

        .outer {
            position: relative;
            width: 400px;
            height: 200px;
            overflow: hidden;
            margin: 100px auto;
        }

        .innerBox {
            position: absolute;
            width: 9999em;
            height: 200px;
            /* background-color: red; */
        }

        .inner {
            /* position: absolute; */
            float: left;
            width: 400px;
            height: 200px;
            font-size:25px;
            text-align: center;
            line-height: 200px;
        }
    </style>
</head>

<body>
    <div class="outer">
        <div class="innerBox">
            <div class="inner" style="background-color: aqua;">1</div>
            <div class="inner" style="background-color: aquamarine;">2</div>
            <div class="inner" style="background-color: beige;">3</div>
            <div class="inner" style="background-color: red;">4</div>
            <div class="inner" style="background-color: blanchedalmond;">5</div>
        </div>
    </div>
    <script>
        var count = 0;
        var inner = document.getElementsByClassName("inner");
        var timer = null;
        var innerBox = document.getElementsByClassName("innerBox")[0];
        function move() {
            innerBox.style.transition = '2s'
                    innerBox.style.left = -400 * count +'px'
            timer = setInterval(function (times) {
                count++;
                if (count > 4) {
                    count = 0;
                    inner[4].style.position = "absolute"
                    inner[4].style.left = '-400px'
                    inner[4].style.transition = '2s'
                    innerBox.style.left = "0px"
                    innerBox.style.transition = 'none'
                } else {
                    inner[4].style.position = "relative"
                    inner[4].style.left = "0px"
                    // inner[0].style.left = "0px"
                    
                    innerBox.style.transition = '2s'
                    innerBox.style.left = -400 * count +'px'
                }
                
            }, 2000)
        }
        move()
    </script>
</body>

</html>

@tianfanfan
Copy link

tianfanfan commented Dec 19, 2020

<!DOCTYPE html>
<html lang="en">

<head>
  <meta charset="UTF-8">
  <meta name="viewport" content="width=device-width, initial-scale=1.0">
  <title>Document</title>
</head>

<body>
  <ul class="animation">
  </ul>
</body>
<script src="https://cdn.bootcdn.net/ajax/libs/jquery/3.5.1/jquery.js"></script>
<script>

  var actionStep = 1.5

  var animationData = ['1', '2']

  var domData = [...animationData, animationData[animationData.length - 1]]

  $('.animation').append($(domData.map((val, index) => {
    if (index === domData.length - 1) return `<!-- 为了撑起 animiation 元素 --><li class="animation-item animation-item-slot">${val}</li>`
    return `<li class="animation-item animation-item-move animation-item-move-${index + 1}">${val}</li>`
  }).join('')))

  var dataLength = animationData.length

  $('head').append(`<style>
    .animation-item-move {
      position: absolute;
      left: 0;
      width: 100%;
      transform: translateY(100%);
      animation: ${dataLength * actionStep}s step-start 0s infinite running slidein;
    }
    ${animationData.map((v, index) => {
    return `.animation-item-move-${index + 1} {
          animation-delay: ${index * actionStep}s;
        }
      `
  }).join('')}

    @keyframes slidein {
      0% {
        transform: translateY(100%);
        animation-timing-function: ease-in-out;
      }

      ${100 / dataLength}% {
        transform: translateY(0%);
        animation-timing-function: ease-in-out;
      }

      ${200 / dataLength}% {
        transform: translateY(-100%);
        animation-timing-function: step-start;
      }
    }

    @keyframes slideinSlot {
      0% {
        transform: translateY(0);
        animation-timing-function: ease-in-out;
      }

      100% {
        transform: translateY(-100%);
        animation-timing-function: step-start;
      }
    }

    .animation-item-slot {
      animation: ${actionStep}s slideinSlot;
      transform: translateY(-100%);
    }

    .animation {
      position: relative;
      padding-left: 0;
      text-align: center;
      background-color: aqua;
      overflow: hidden;
    }
    .animation-item {
      list-style: none;
      line-height: 50px;
      height: 50px;
    }
  </style>`)
</script>

</html>

@Soyn
Copy link

Soyn commented Jul 30, 2021

FYI. -> Demo && Code

Sign up for free to join this conversation on GitHub. Already have an account? Sign in to comment
Projects
None yet
Development

No branches or pull requests