Before we get into the how of instrumentation tests a.k.a UI tests, we need to understand the test pyramid and when to use UI tests.
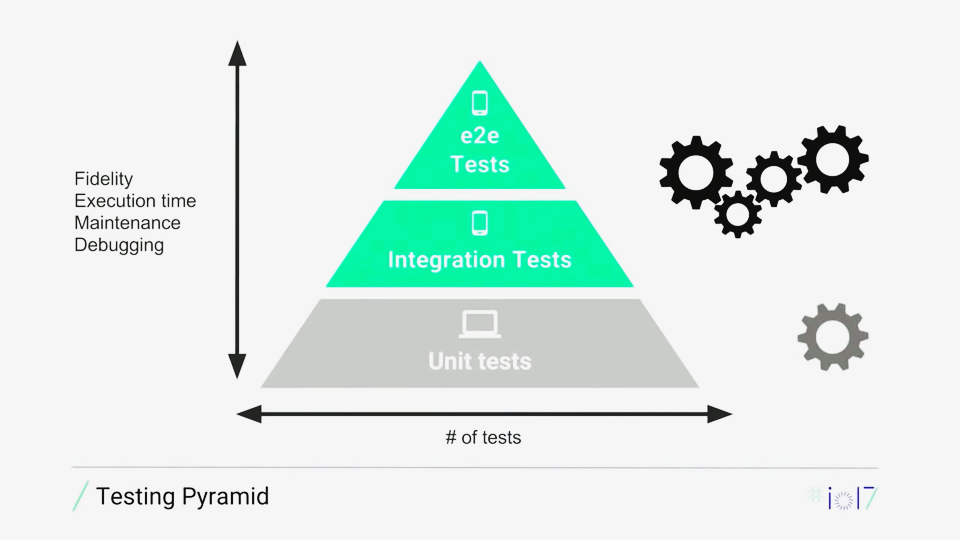
The test pyramid consists of three layers: Unit Tests, Integration Tests, and End to End Tests. At the bottom of the pyramid we have our Unit Tests. These you should already be familiar with from the lesson on architecture. Unit tests test all of your business and UI logic. Good unit tests are:
- Thorough
- Focused
- Fast
- Repeatable
- Verifies Behavior
- Concise
Unit tests are cheap and fast to run. It makes the most sense to have your test suite be composed of unit tests to enable fast feedback.
Next up we have integration tests, a type of UI test. As we can see, integration tests are higher up on the pyramid and smaller. Because they're higher up in the pyramid, it means that these tests are more expensive in terms of execution time, maintenance, and debugging. Therefore, we should have less of them. The benefit of being higher up in the pyramid is that integration and end to end tests have more fidelity, because they are closer to what a real user experiences when using the app.
An integration test might consist of UI tests around a single screen. An end to end test would walk through a particular flow in your app, traversing several screens, and making network requests to mock web servers. Notice the emphasis on mock. You don't want to be hitting real servers in your tests for a couple reasons:
- It'll slow down your tests. IO is slow and internet connections are unreliable.
- It'll make your tests flaky. A flaky test is one that can run multiple times without code changes and have different results from run to run. By hitting actual servers, your test results will be at the mercy of the backend. If it were to go down, your tests would as well, through no fault of their own. We want to aim for hermetic and deterministic tests that can run in complete isolation.
In general, it's suggested that you stick to a balance of 70% unit tests, 20% integration tests and 10% end to end tests.
Now that we've covered the when, let's talk about the how.
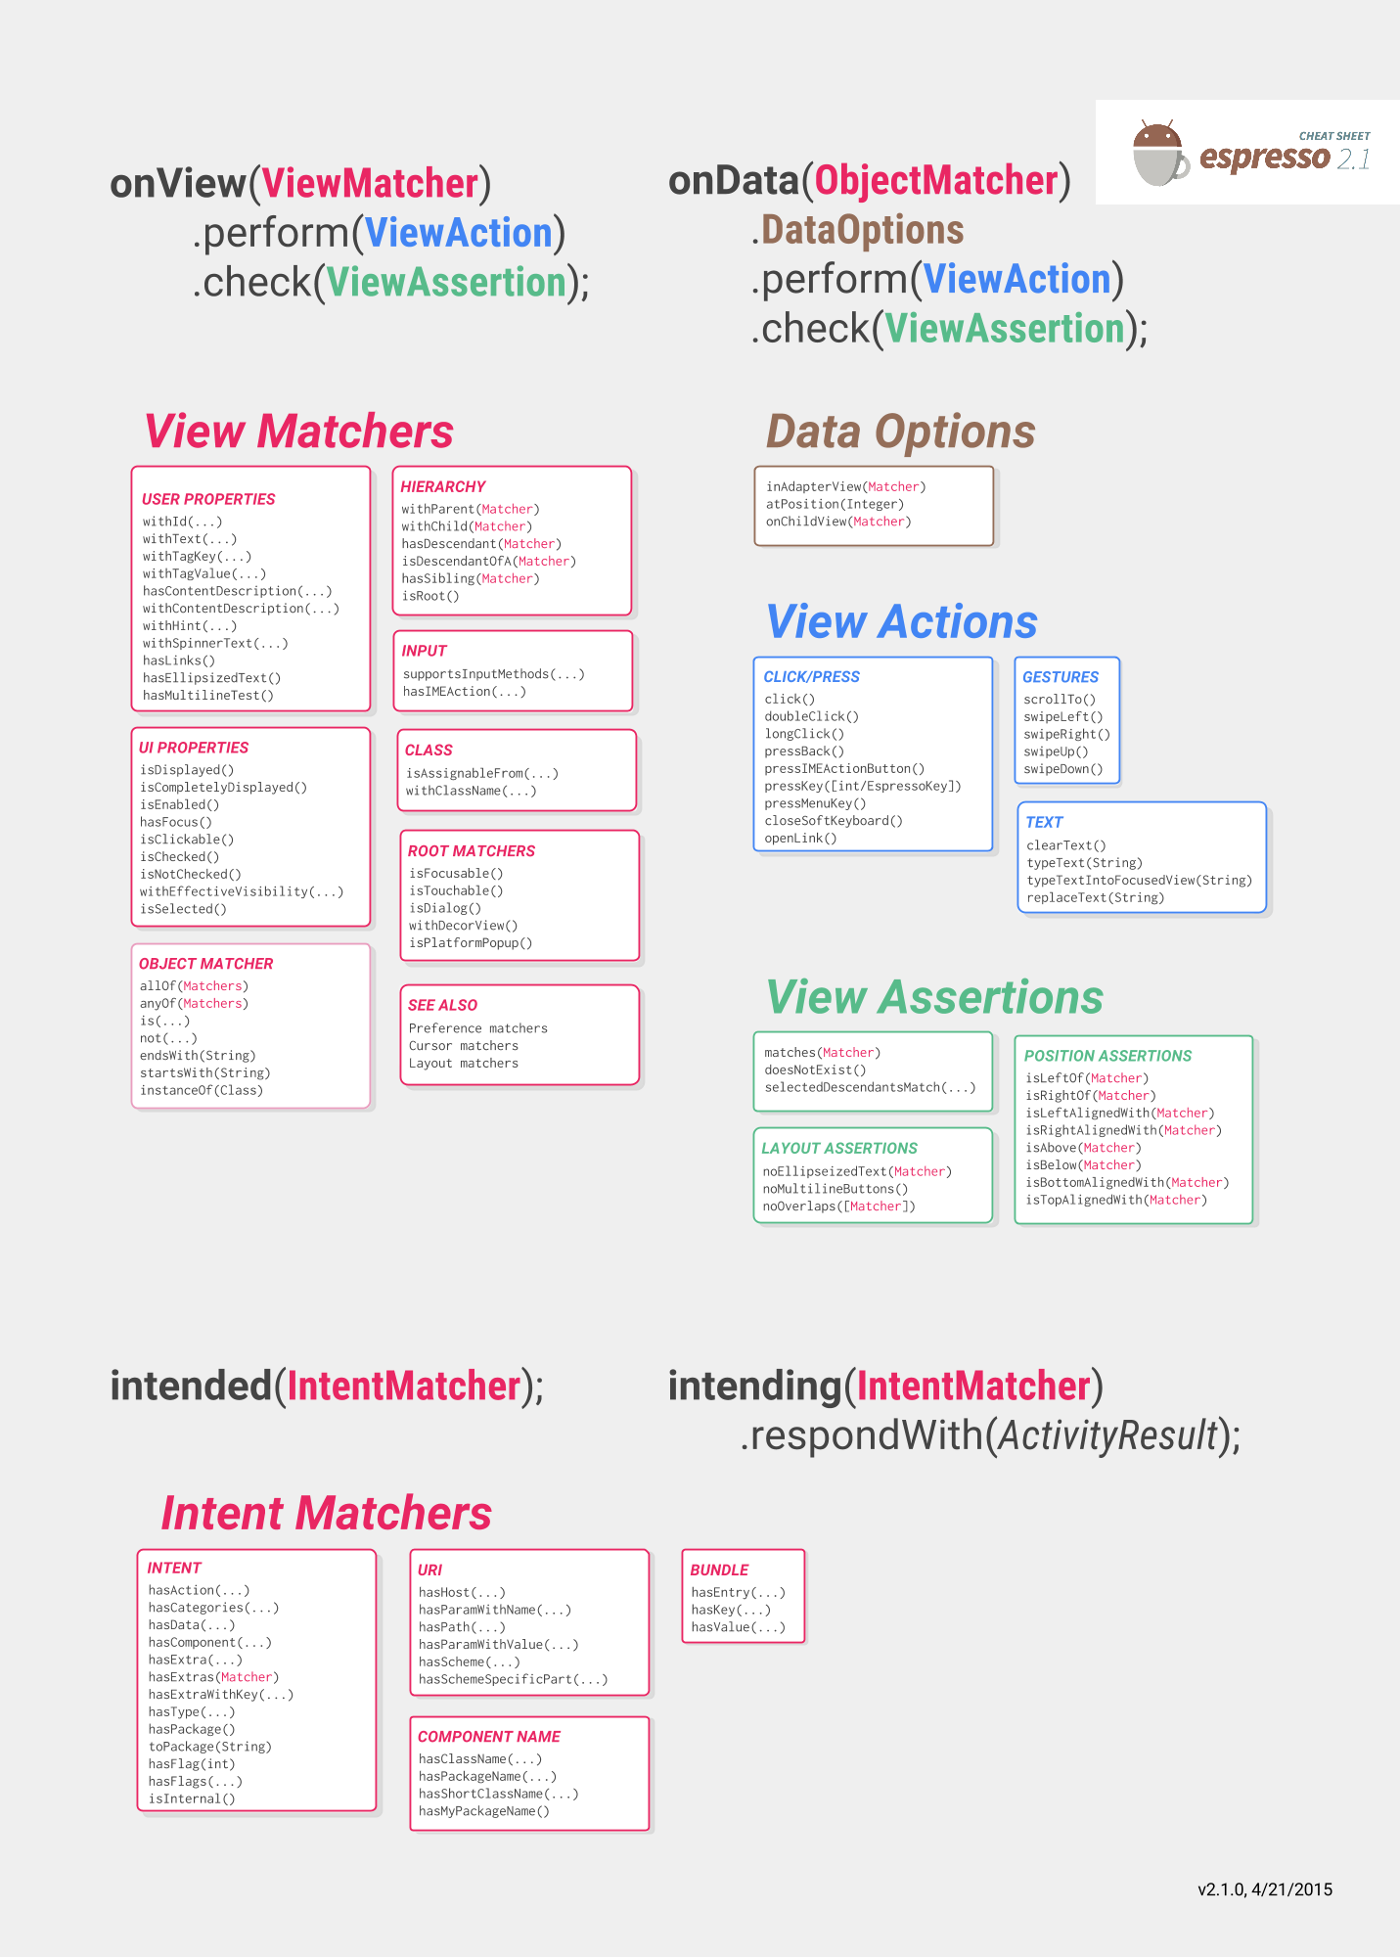
Espresso is a UI testing library built by Google. It has access to your app internals and is aware of background tasks and AsyncTasks. This means you'll never have to write Thread.sleep() in an Espresso test. When writing tests, it'll generally be of the format
onView(ViewMatcher)
  .perform(ViewAction)
  .check(ViewAssertion)
The call to onView() takes in a ViewMatcher and finds the view that matches the ViewMatcher. You can
match on attributes like withText(...) and hasSibling(Matcher). This returns a
ViewInteraction.
Once you have a ViewInteraction, you can perform ViewActions such as
click() and scrollTo().
When you have your view in your expected state, you can then make assertions on the View, such as
check(matches(isDisplayed()))
Before using Espresso, you'll need to declare the appropriate Gradle dependencies.
dependencies {
    ...
    androidTestImplementation 'androidx.test.espresso:espresso-core:3.1.0'
    androidTestImplementation 'androidx.test:runner:1.1.0'
    androidTestImplementation 'androidx.test:rules:1.1.0'
}
See TipCalcActivityTest for an example, and the cheat sheet below for more of the Espresso API.
You can run all UI Tests on the command line via
./gradlew connectedCheck
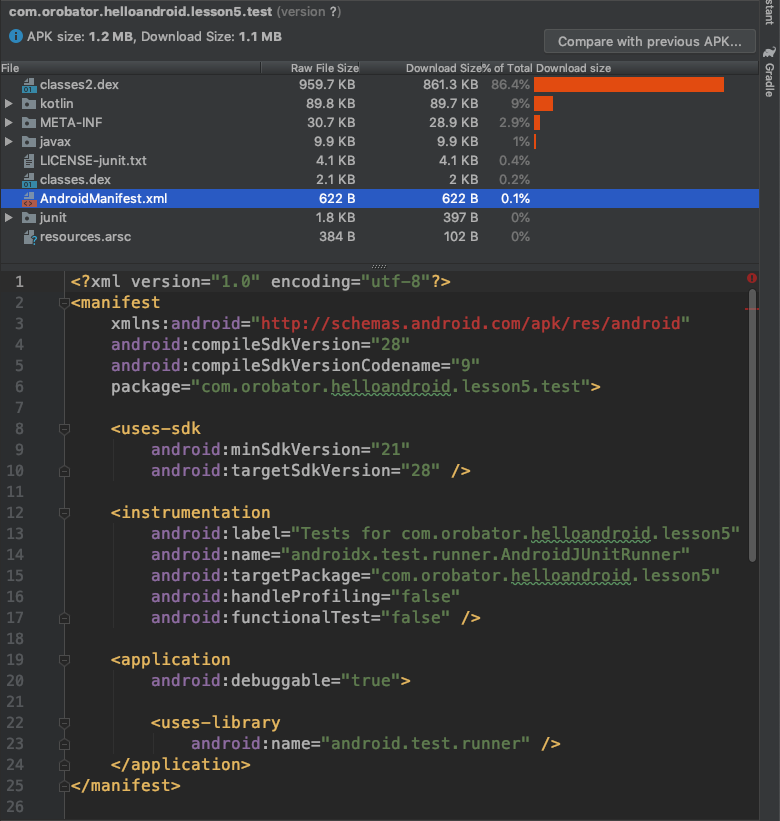
First a test APK is generated with all tests, a Manifest and the AndroidJUnitRunner. You can take a look at this generated apk using Android's APK analyzer. Using the invoke action command, type "Analyze APK" and when it prompts for a path, choose
lesson05/build/outputs/apk/androidTest/debug/lesson5-debug-androidTest.apk
After selecting this apk, you should get something that looks like this:
The Instrumentation tag declares an Instrumentation class that enables you to monitor an application's interaction with the system. The Instrumentation object is instantiated before any of the application's components.
While we're here, now is as good a time as any to talk about the structure of APKs. As you can see, we have the AndroidManifest. We also have some folders that contain metadata and compiled class info for the libraries we're using. Next, we have resources.arsc. This is a file generated by the Android tool chain that contains all of the resources for the app. Finally we have 2 dex files. These contain actual compiled code and are analogous to Java JARs. Just a side-note that each dex file can contain a max of 65,535 methods, aka the 65K Dex limit. Previously apps were only allowed to have 1 dex file per application and many efforts were made to keep app size under control. Android introduced the ability to have more than 1 dex file in API 21 and also included a support library for multi-dexing. If you're minSdk is 21 or higher, this isn't something you should be worried about directly, but you should keep in mind that large app sizes have been proven to decrease downloads. Keep library size (method count and download size) in mind while creating your app.
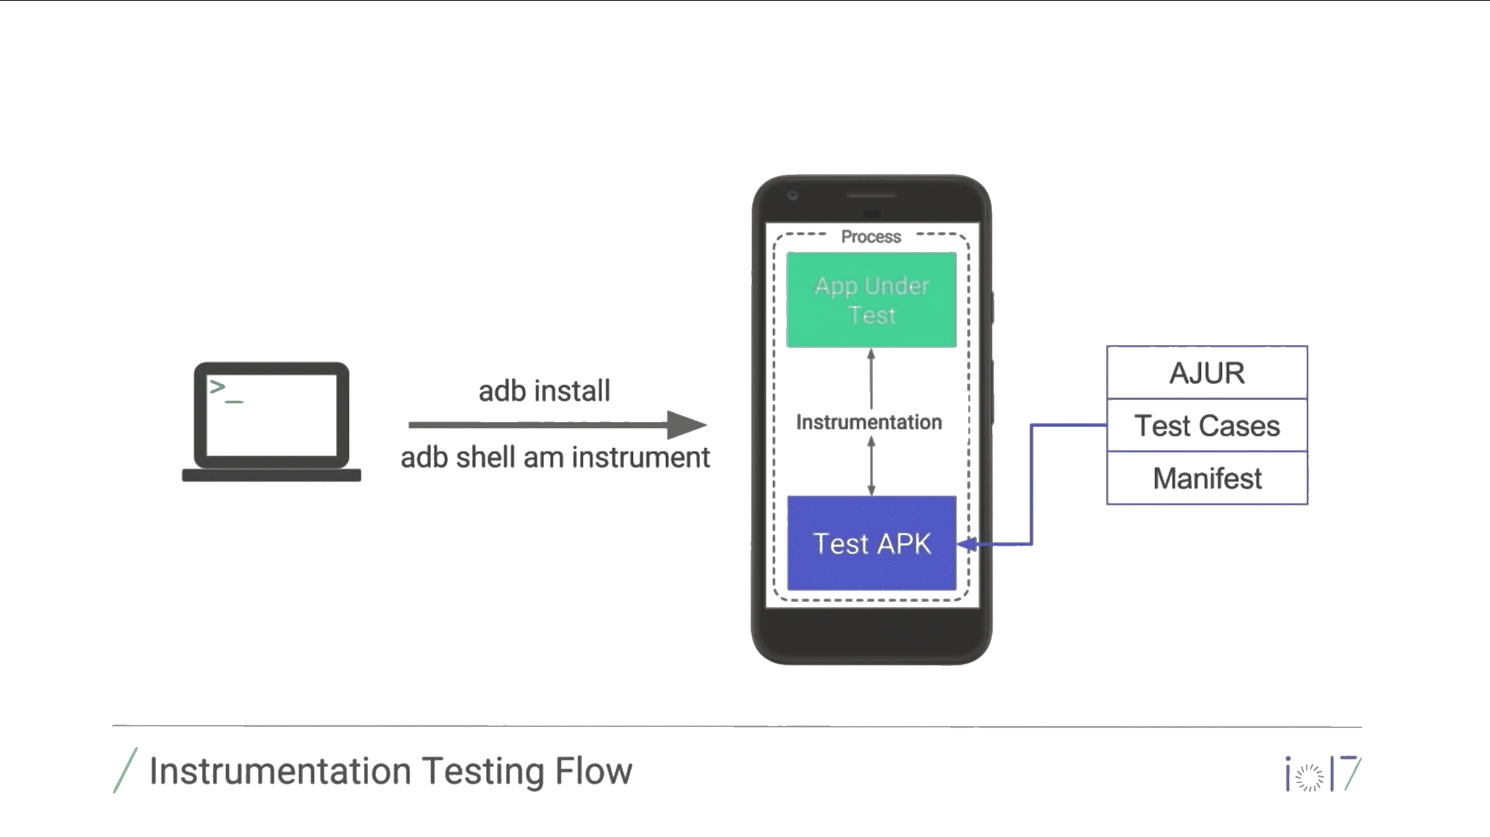
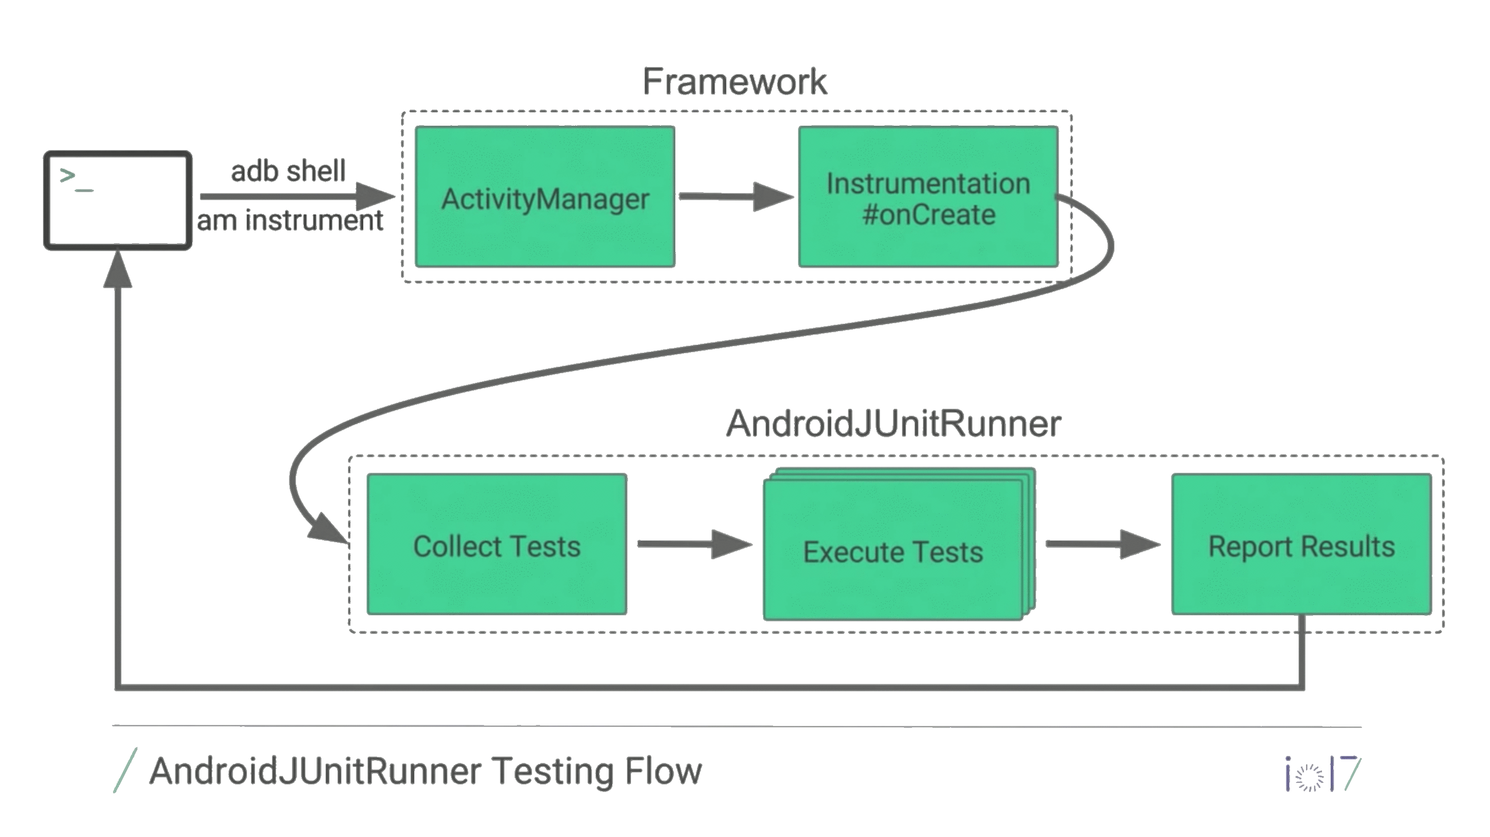
After the test APK is deployed the ActivityManager creates the Instrumentation. Then the AndroidJUnitRunner collects and executes the test and reports the results to
lesson05/build/outputs/androidTest-results/connected/
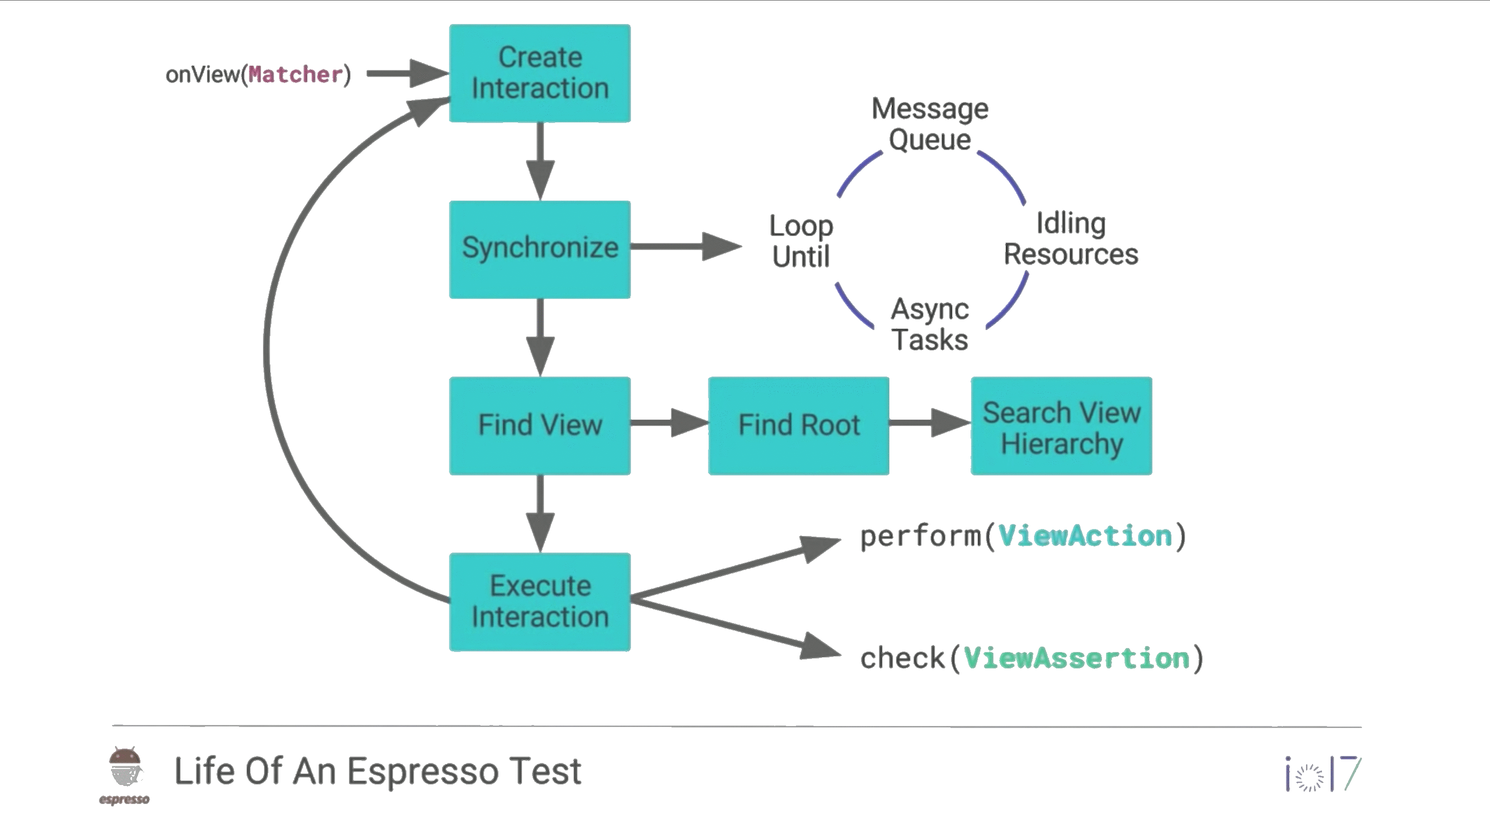
During the actual test, whenever onView(Matcher) is called, a ViewInteraction is created. It waits
until all tasks are done/main UI thread is idle, then finds the view. Afterwards, it either performs
a ViewAction or does a ViewAssertion.
Back to our own test, we can create our DSL for Espresso to improve the readability of our tests. See TipCalcActivityKotlinDslTest for example. This test still has much room for improvement.
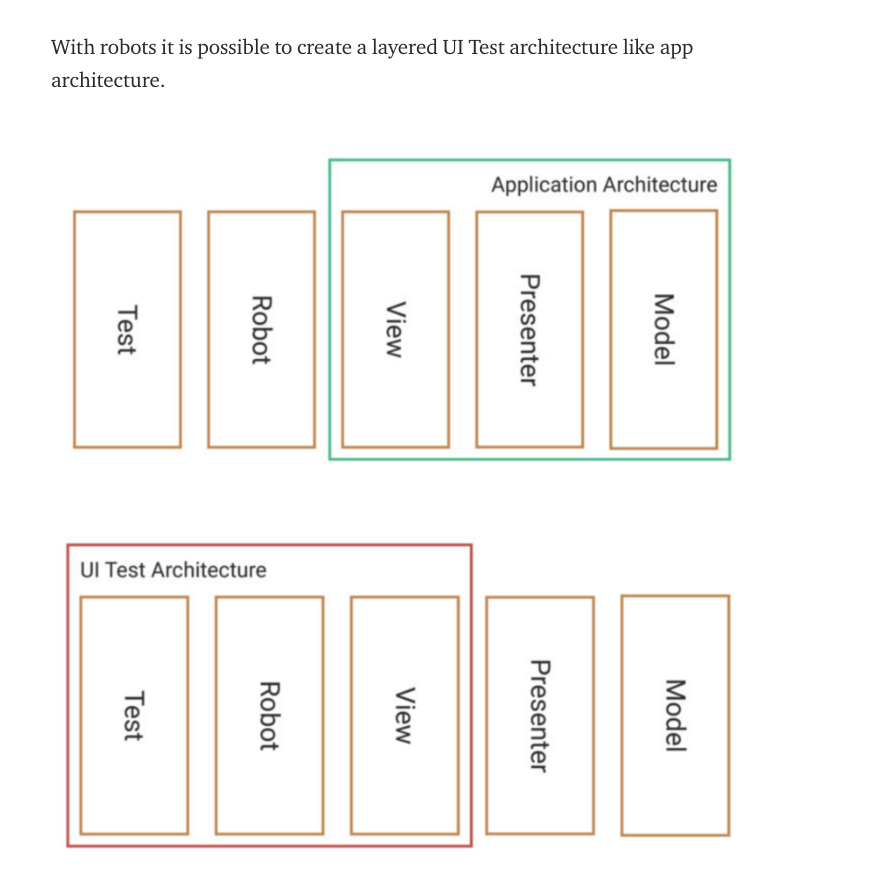
Just like our application has an architecture (whether we know or not) so do our tests. The first 2 versions of our TipCalcActivity test are currently very tightly coupled to the implementation of our UI. If the UI were to change significantly, our tests would have to drastically change. Right now, our UI unit tests describe both the What (to test) and the How (to test). Using the Robot pattern, we can create an abstraction layer that just deals with how to interact with the view. When we use this screen robot in our tests, and the UI changes, only the robot will have to be updated and the test can stay the same.
See TipCalcActivityRobotTest for an example.
Right now our tests and app are pretty simple and don't contain any shared state. However, more complex applications may store data to persistent storage. If we maintain state from test to test, we increase the likelihood of flaky and unreliable tests, due to tests not having the right state when starting. Luckily, Google provides a tool that can help with that.
When using AndroidJUnitRunner version 1.0 or higher, you have access to a tool called Android Test
Orchestrator, which allows you to run each of your app's tests within its own invocation of
Instrumentation.
Android Test Orchestrator offers the following benefits for your testing environment:
-
Minimal shared state. Each test runs in its own
Instrumentationinstance. Therefore, if your tests share app state, most of that shared state is removed from your device's CPU or memory after each test. To remove all shared state from your device's CPU and memory after each test, use theclearPackageDataflag. -
Crases are isolated. Even if one test crashes, it takes down only its own instance of
Instrumentation, so the other tests in your suite still run.
To enable Android Test Orchestrator using the Gradle command-line tool, complete these steps. After you're done, it will also be enabled in Android Studio, as it uses your Gradle configurations to build.
- Add the following statements to your project's
build.gradlefile:
android {
  defaultConfig {
    ...
    testInstrumentationRunner "androidx.test.runner.AndroidJUnitRunner"

    // The following argument makes the Android Test Orchestrator run its
    // "pm clear" command after each test invocation. This command ensures
    // that the app's state is completely cleared between tests.
    testInstrumentationRunnerArguments clearPackageDate: 'true'
  }

  testOptions {
    execution 'ANDROIDX_TEST_ORCHESTRATOR'
  }

  dependencies {
    androidTestImplementation 'androidx.test:runner:1.1.0'
    androidTestUtil 'androidx.test:orchestrator:1.1.0'
  }
}- Run Android Test Orchestrator by executing the following command:
./gradlew connectedCheck
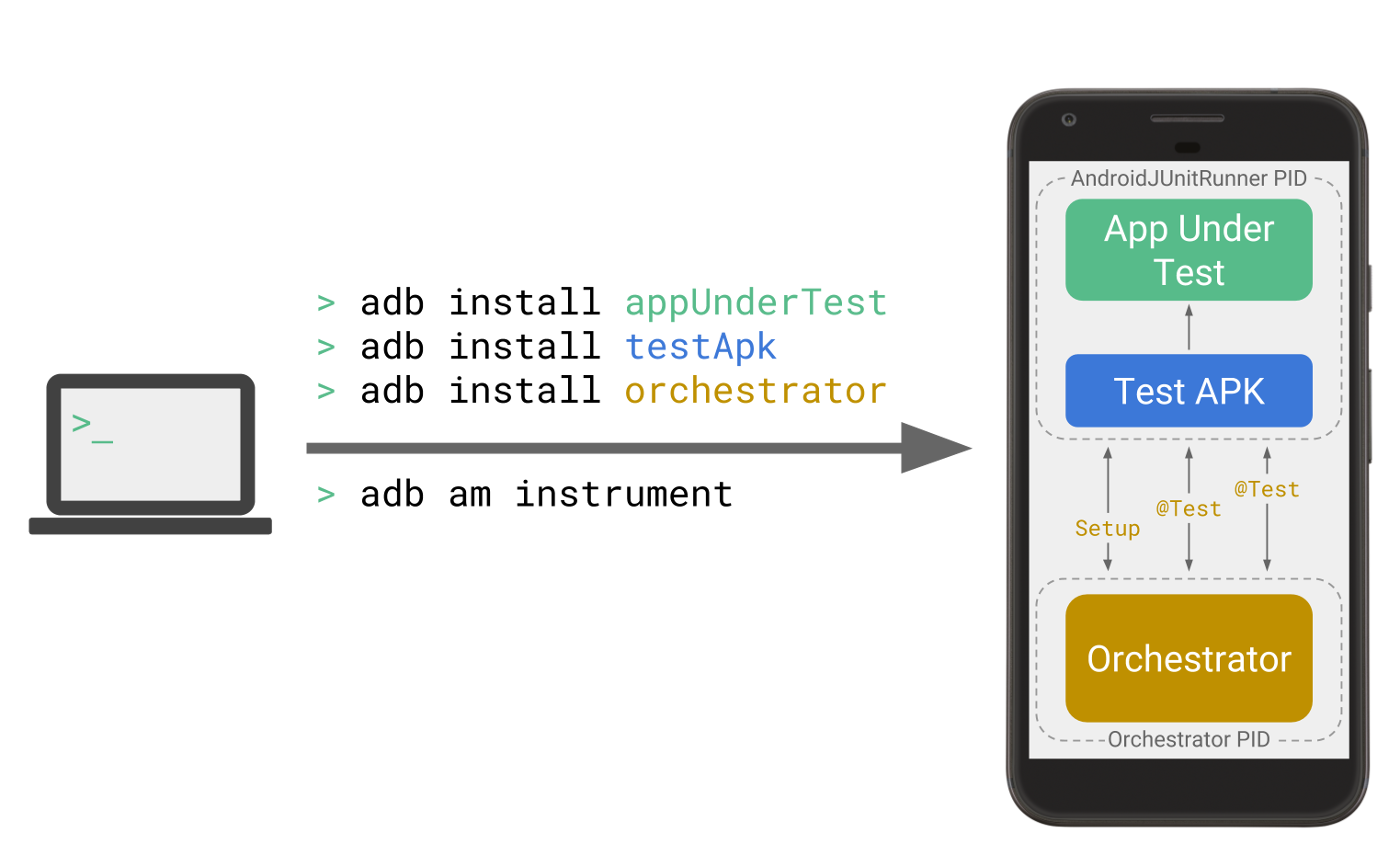
The Orchestrator service APK is stored in a process that's separate from the test APK and the APK of the app under test, as shown below:
Android Test Orchestrator collects JUnit tests at the beginning of your test suite run, but it then
executes each test separately, in its own instance of Instrumentation.
